Knitted mittens are a useful and convenient thing that is necessary in winter and in the cool off-season. To master this skill, you need a little patience and accuracy. Guided by the recommendations and description in this article, you can learn how to knit mittens in different ways using simple and clear patterns.
Selecting yarn
The choice of yarn is primarily based on color, texture and price. But this is not enough. The skein label should contain information that is not useless to read.
When choosing yarn, you should pay attention to the following parameters:
- weight of the skein;
- length in a skein;
- thickness;
- compound;
- uniformity of coloring/dye fastness;
- stretch/shrinkage coefficient;
- tensile strength.
Important! When choosing yarn, you need to be guided not only by the weight of the skein, but also by the length of the thread, since with the same weight, in yarn of different textures, there can be completely different lengths.
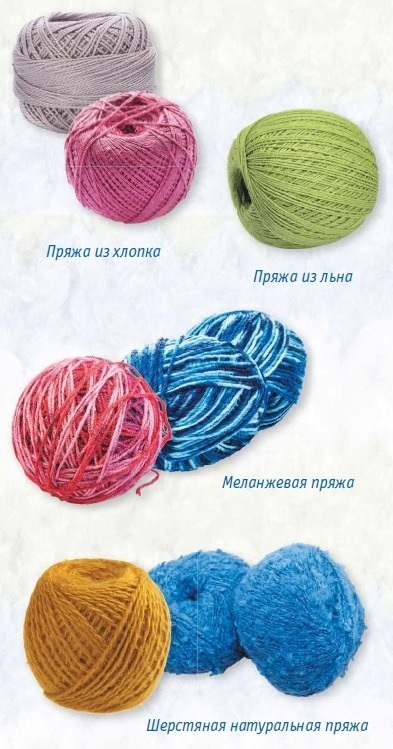
Types of yarn
Knitting yarn can vary in composition, texture, thickness, twist and color. These factors determine the purpose of the yarn for hand knitting.
Yarn comes in the following varieties:
| Origin | Types | |
| Natural raw materials | Of plant origin | Animal genesis |
| Viscose, cotton, linen | Cashmere, wool, silk, mohair | |
| Synthetics | Acrylic, polyester | |
| Mixed fibers | Various combinations | |
 In addition, the yarn can be:
- twisted with several threads;
- domestic, self-spun;
- large and small boucle;
- polished.
Yarn for knitting needles and crochet hook
You can knit any yarn on knitting needles. But when choosing, special attention should be paid to the uniformity of the thread thickness in the skein along the entire length. If there are thickenings or thinning areas of the thread, then such yarn is not recommended for openwork and stocking knitting. Uneven yarn is used for knitting relief patterns or in combination with yarn that matches the color.
For crochet needlework, the choice of yarn and special threads is much wider. Any yarn is suitable for this type of knitting, as well as "iris", "mouline", "krashe", "garus" and thick spool threads.
Yarn for mittens
Mittens should be warm, soft, and not very wind-resistant. Based on this, the spinning threads are selected mainly natural - wool, semi-wool, mohair, angora. For mittens, it is possible to use mixed yarn. For example, wool - acrylic, or mohair - cotton.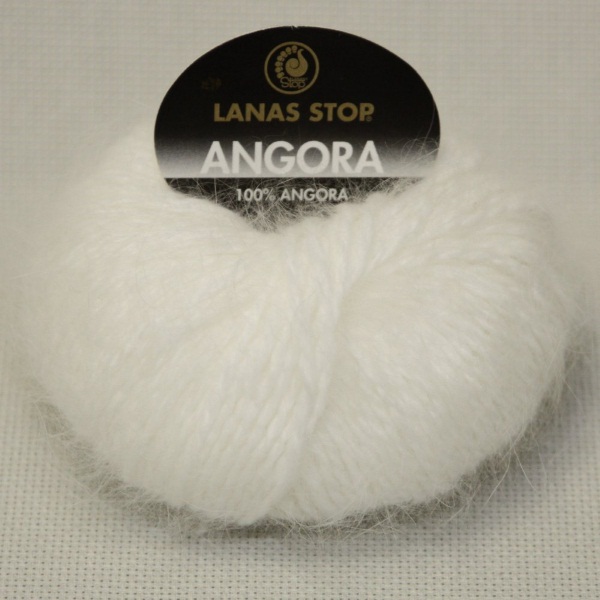
Self-spun yarn from goat down is still popular – the same yarn that grandmothers and great-grandmothers used. From self-spun fiber, needlewomen like to use goat, camel and dog wool.
Among modern yarns for knitting mittens, we can recommend the following: Kaun wool, YarnArt Jeans, Troitskaya New Zealand wool, and Laika.
Selecting spokes
The quality of the knitted fabric, its smoothness and uniformity depend on the type of knitting needles. The choice of knitting needles depends on the type and thickness of the yarn, so this issue must be approached responsibly.
The right choice of knitting needles:
- of the required design (needles with limiters, Teflon or metal on a fishing line, stocking or hooks);
- the required thickness and length (depending on the yarn, knitting density);
- from the preferred material (wood, bamboo, plastic, metal);
- of proper quality (smooth, without burrs, with a comfortable end and limiter).
Approximate correspondence between the size of knitting needles and the thickness of yarn:
| Yarn thickness (length of yarn per 100 g weight) | Recommended needle thickness |
| 50 m – 100 g | 7 – 15 mm |
| 100 m – 100 g | 6 – 9 mm |
| 150 m – 100 g | 5 – 7 mm |
| 200 m – 100 g | 4 – 6 mm |
| 300 m – 100 g | 3 – 4.5 mm |
| 400 m – 100 g | 2 – 3.5 mm |
| 800 m – 100 g | 1.5 – 3 mm |
 The label of a standard skein of yarn usually indicates the recommended needle size. However, everyone's knitting style is different - some prefer tight knitting, while others prefer loose knitting. Beginner knitters, for the most part, knit very tightly, so larger needles are recommended for them. And vice versa, for loose and loose knitting, thinner needles are needed.
For knitting mittens, gloves, and mittens, stocking needles are best suited. These are 5 shortened needles without a ring and a limiter. They are convenient for knitting even small fingers on mittens and gloves in a circle and learning to knit.
To knit mittens from yarn with hard fibers, use smooth metal knitting needles, and for polished yarn, use plastic or wooden ones.
Selection of schemes
Mittens with knitting needles (diagrams and descriptions are presented below) can be knitted in several ways, it all depends on personal preferences and what you want to get in the end.
You can knit mittens in this way:
- On 2 needles with a seam, one piece (thumb in front).
- On 2 needles with a seam (thumb on the side).
- On 2 needles with a seam (with a wedge for the thumb).
- On 4 needles without a seam (thumb in front).
- On 4 needles without a seam (with a gusset for the thumb).
- Crochet, around the palm or along it (the thumb is similar to the base).
- On circular needles, seamless or with seam (any method of knitting the thumb).
In addition, mittens can be made with a beautiful combined pattern, with “braids” and “flags”, with openwork knitting, “boucle”, with a jacquard ornament...
Knitting pattern for mittens on 2 needles with a seam and a thumb on the side
This method of knitting mittens is used quite rarely. It is simple and does not require special knitting skills.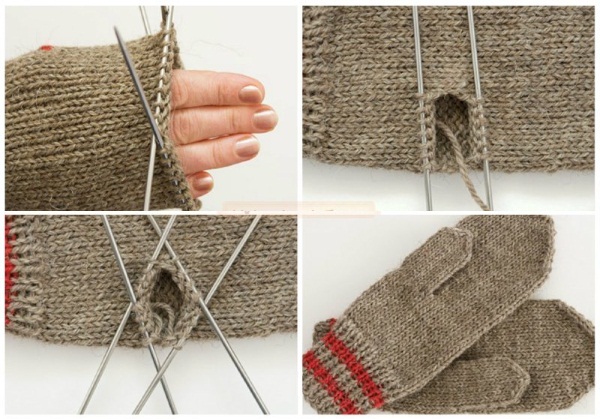 The main thing is to observe the correct order of execution according to the scheme. This method of knitting is used when the mitten pattern needs to be placed across the product.
Knitting pattern for mittens on 2 needles with a wedge for the thumb
These mittens are knitted traditionally, starting with an elastic band. The thumb is knitted with a wedge. Mittens made according to this pattern are very comfortable due to the natural, physiological position of the thumb.
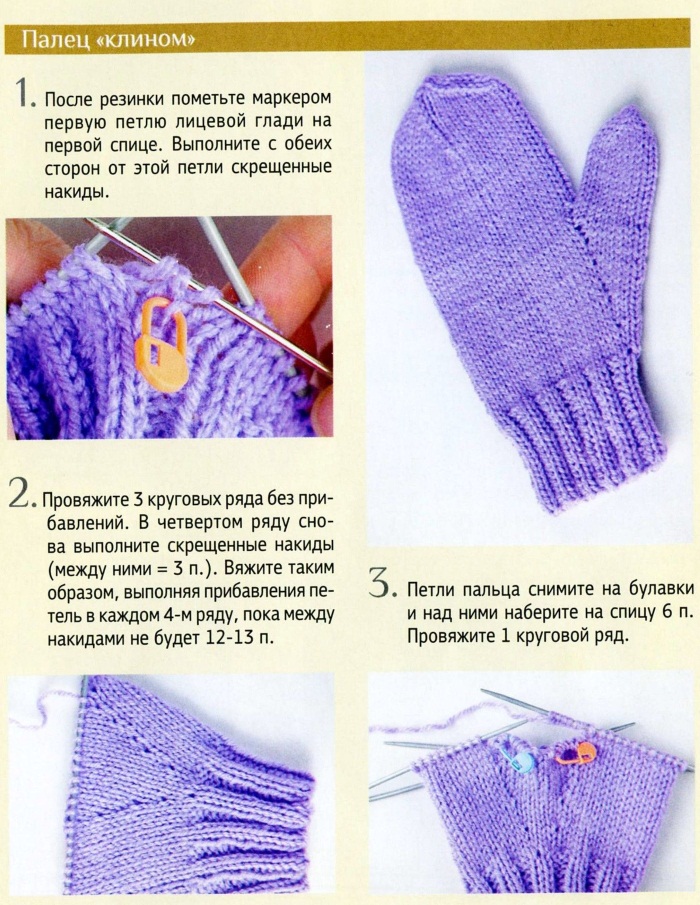
In addition, there is also an “Indian” way of knitting a wedge for the thumb, which is even more comfortable and beautiful.
Knitting mittens crochet
For crochet lovers, making such things will not be difficult. Knitting starts from the wrist to the fingertips in a circle. This is done either along each side of the mitten or around the palm. The finger is knitted similarly to the main part, its location is determined during the fitting.
Knitting pattern for a mitten with a seam, a thumb in front and a jacquard pattern
Mittens with a jacquard pattern are knitted by fairly experienced craftswomen. The peculiarity of such knitting is the combination of 2 or more threads, which form a pattern.  It is most convenient to knit such mittens on 2 knitting needles strictly according to the pattern. After creating the fabric, the mitten is sewn on the side with a knitted seam.
Necessary measurements
Before you start knitting, you need to take the necessary measurements from your hand, namely:
- The circumference of the palm at its widest part.
- Wrist circumference.
- The length of the palm from the wrist to the top of the middle finger.
- The length of the palm from the wrist to the level of the base of the thumb.
- The length of the thumb from its base to the top.
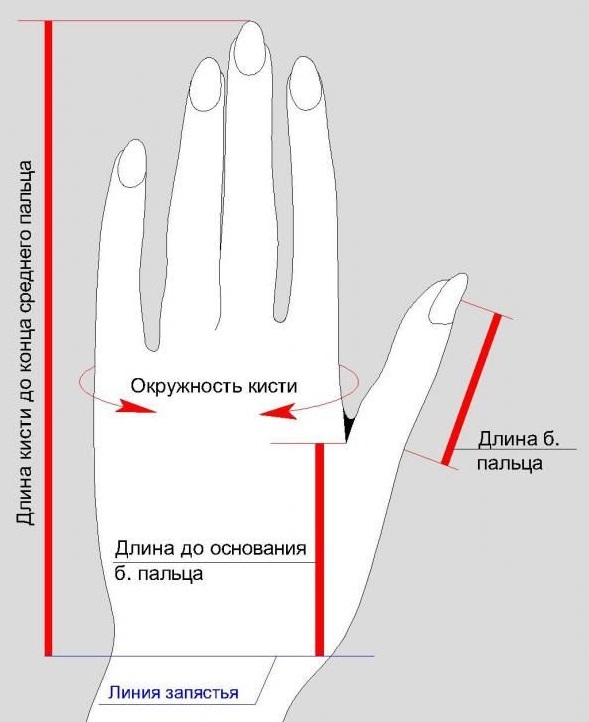
All measurements are taken with a tailor's tape measure without allowance for free fit.
Features of knitting mittens with knitting needles
There are several methods for knitting mittens with knitting needles:
- knitting on 2 needles with an open edge;
- knitting with a stocking (on stocking needles);
- knitting with knitting needles with a fishing line (stocking or with an open edge).
Each knitting method is correct and has its own characteristics. Knitting on 2 needles assumes the presence of a seam. The finished fabric of the mitten is a layout of the product that simply needs to be sewn. This method is used when the knitting pattern is complex (for example, jacquard or Scandinavian pattern) or when other methods are unacceptable.
Mittens on 4 needles are practically a classic of knitting this product. This is a very convenient method, since knitting is done in a circle and there is no need to sew the parts. Beginner needlewomen comprehend the science of knitting mittens in this way.
Mittens are knitted quite often on circular knitting needles with a fishing line, because it is convenient - you can always try on how everything turns out. On such knitting needles, mittens are knitted with a seam or without it, it's up to you. The method of knitting the base and the thumb itself remains traditional.
Mittens on 4 needles: instructions for beginners
In order to learn the technique of knitting mittens, you need to start with the simplest models and "dress" at least your entire family with them (to consolidate the result). After that, you can experiment with patterns, combinations and knitting methods, but at first only the very basics.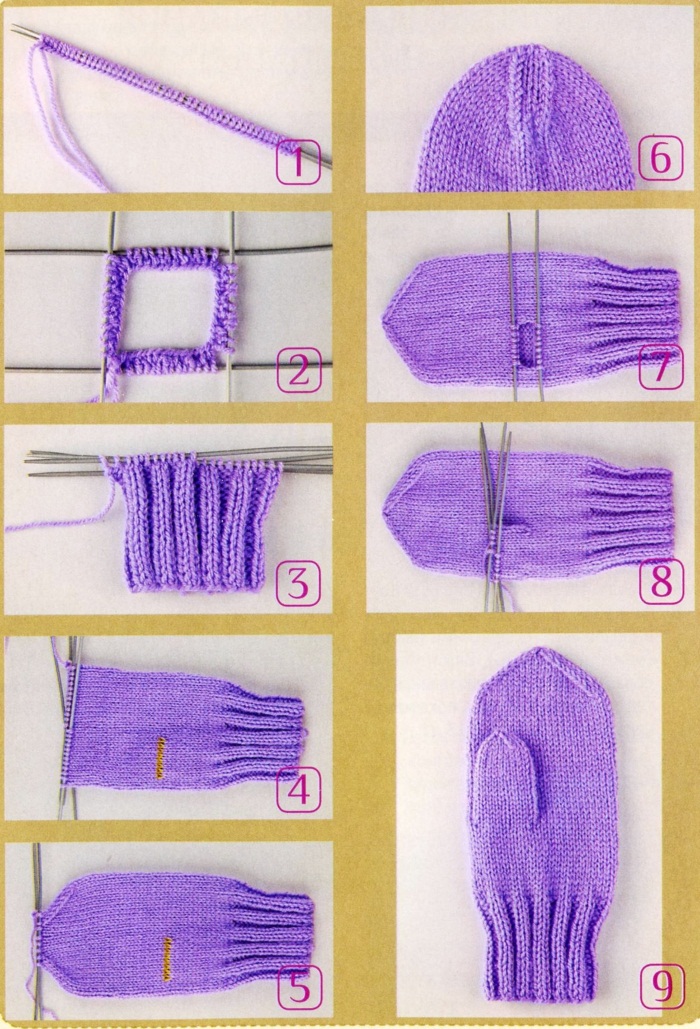
Step-by-step instructions for knitting seamless mittens on double-pointed needles:
- You need to prepare a skein of yarn and double pointed needles of the required size (see table above).
- Before casting on stitches, always make a small calculation to clarify the total number of stitches on all 4 knitting needles. Knitted mittens (diagrams and description are below) made of wool yarn have an average knitting density of 1.7 stitches per 1 cm. If we assume that the palm circumference (see the table above) is 20 cm, then the total number of stitches can be calculated as follows: 20 x 1.7 = 34. The total number of stitches is 34. Now this number of stitches must be divided by 4 (the number of knitting needles), which gives 8.5 stitches. This number must be rounded up to the nearest whole number, which gives 9 stitches.
- The set of loops is made alternately on each knitting needle, as a result there should be 9 loops on each of them.
- The first and last knitting needles should be closed, connecting the end of the yarn with the working thread. The first row is knitted in a circle tightly enough so that the knitting needles do not slip out of the cast-on loops. The elastic cuff is knitted by alternating front and back loops (1 x 1 or 2 x 2). The height of the cuff can be from 5 to 10 cm, as an average solution - 7 cm.
- Once the elastic is finished, you need to move on to the main mitten pattern. For ease of learning, you can take a regular front surface - then all the loops are knitted with front loops.
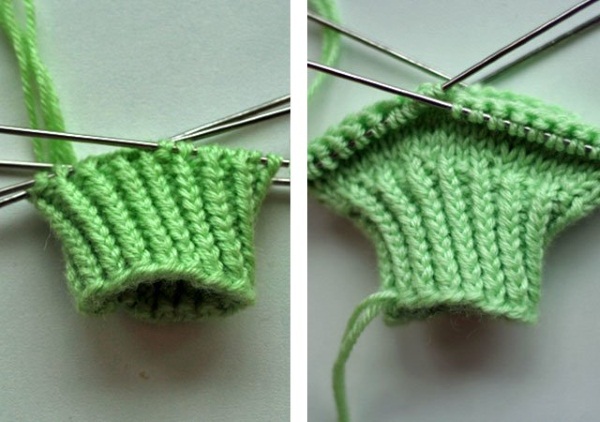
- The main part of the mitten is knitted to the level of the thumb. Then, you need to make a hole for it to enter the mitten, namely, knit several loops (in this case 7) on an additional thread or collect them on a regular pin. If you use a safety pin, then in the second row you should dial the same number of air loops on the knitting needle.
- Then knitting in a circle continues to the level of the crown of the little finger.
- Having knitted the mitten to the height of the little finger, you can begin knitting the toe and decreasing the loops. To do this, determine the place of decrease by folding the mitten flat. On each side of the resulting fold, at the end and at the beginning of the row, two loops are collected into one loop.
- This decrease should be done every other row until the mitten "grows" to the level of the ring finger. When the knitting reaches this finger, the decrease should be done in every row until there are 2 or 3 loops left on the knitting needles. The remaining loops should be collected with a hook on the working thread and cut off from the skein.
- The thumb is knitted in the same way as the main part. First, you need to pull out the auxiliary thread and collect all the loops on 2 knitting needles. As a result, there should be 7 loops on each. To prevent a hole from forming on the side, 1 loop is pulled out from the edge of the finger hole on both sides. As a result, the number of loops on the finger is 16.
- 16 loops are distributed on 4 knitting needles and the finger is knitted to the level of the middle of the nail.
- Then the toe loops are decreased in the same way as the loops in the toe of the main piece.
The second mitten is knitted similarly to the first one in mirror image. Here the position of the thumb changes, it is located on the other edge of the inner half of the product.
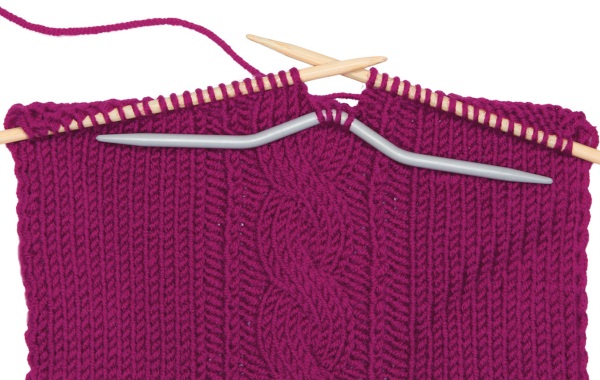
Mittens with a pattern "Flagellum", "Pigtail"
Mittens are a necessary attribute of the winter wardrobe. After mastering the basics of knitting the simplest mittens on knitting needles, it's time to try knitting mittens with a pattern. The most popular and favorite patterns are flagella, braids and their simultaneous combination (diagrams and detailed descriptions are given below in the text).
It should be noted that such relief patterns look good on smooth yarn, but on knotted, bouclé or downy yarn they are simply lost and, in fact, are not needed.
Pattern "Flagellum"
Scheme of sequential knitting of the pattern "Trangle":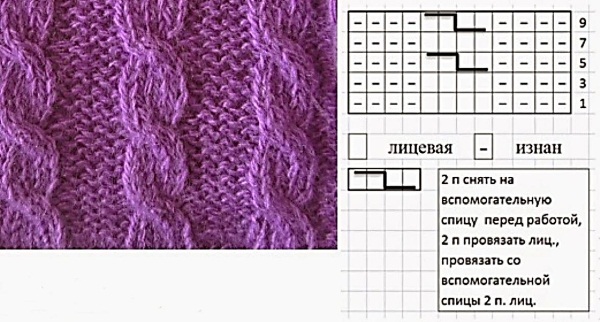
Flagella are almost always knitted on a contrasting field, on a fabric made of purl loops - this way the pattern is better drawn.
For the sample (rapport) you need to cast on 12 loops on the knitting needle and knit 9 rows according to the pattern:
- 1 row - 1 edge loop, 3 purl, 4 knit, 3 purl, 1 edge.
- Rows 2, 3 and 4 – knit according to the pattern.
- Row 5 – 1 edge loop, 3 purl, 2 front loops transferred to a pin in front of the work, then 2 front loops, 2 front loops removed to a pin and all the rest – according to the pattern.
- Rows 6, 7 and 8 – knit according to the pattern.
- Row 9 – repeat row 5.
Note: The abbreviations of designations should be understood as:
- p. – row;
- pet. – loop;
- edge – edge;
- persons - facial;
- purl – wrong side.
Braid pattern
Sequential knitting pattern for the “Pigtail” pattern: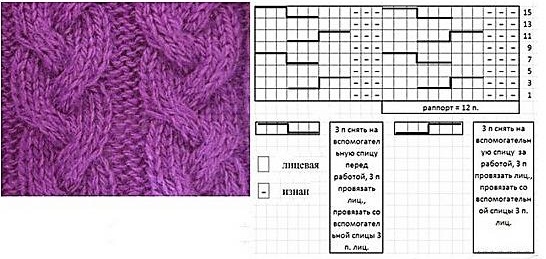
Braids are knitted similarly to plaits, by moving the loops in one row "behind" and "in front" of the work. Braids look very beautiful on mittens in combination with plaits.
For the pattern sample, you need to cast on 12 stitches and knit 15 rows according to the diagram:
- 1 row - 1 edge loop, 2 purl, 9 knit, 2 purl, 1 edge.
- Row 2 - knit according to pattern.
- Row 3 – 1 edge loop, 2 purl, 3 front loops transfer to a pin behind the work, then 3 front loops, 3 front loops removed to a pin, 3 front loops and all the rest – according to the pattern.
- Rows 4, 5 and 6 – knit according to the pattern.
- Row 7 – 1 edge loop, 2 purl, 3 front loops, 3 front loops removed on a pin before work, then 3 front loops, 3 front loops removed on a pin and all the rest – according to the pattern.
- Rows 8, 9 and 10 – knit according to pattern.
- Row 11 – repeat Row 3 and then according to the pattern.
Note.The abbreviations of designations should be understood as:
- p. – row;
- pet. – loop;
- edge – edge;
- persons - facial;
- purl – wrong side.
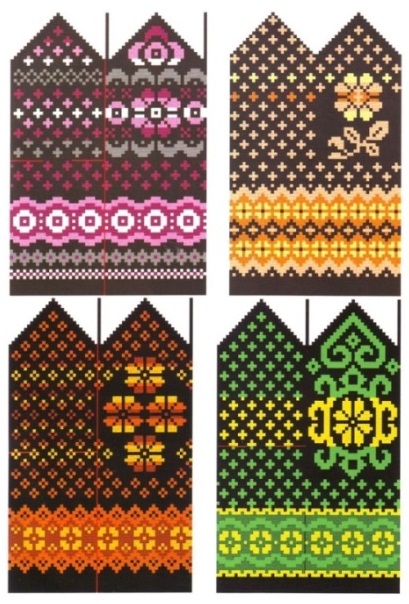
Mittens with ornament
Mittens with an ornament are knitted in the same way as ordinary ones - on 2, 4 knitting needles and circular knitting needles with a fishing line. The peculiarity is the combination of yarn by color, which gives a pattern on the front side. The combination can be with 2, 3 and four colors of yarn - it depends on the chosen pattern and style of the ornament.
Knitting pattern for mittens on 4 needles (ornament of 2 colors of thread):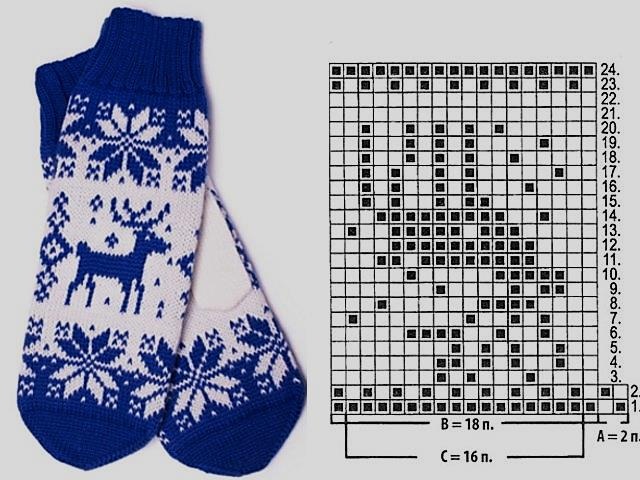
Mittens with knitting needles (diagrams and descriptions of other patterns can be found on the Internet) with such an ornament have a repeat consisting of 24 rows. The sequential alternation of threads makes up the mitten pattern.
Knitting jacquard patterns is not difficult, but there are some nuances and you need experience to get the hang of it. When knitting jacquard, you need to take into account the tension of the combined threads - they should not be too tight or, conversely, knitted too loosely.
Pattern samples (jacquard pattern):
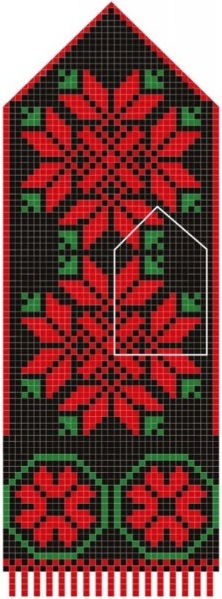
To make these mittens look beautiful and to keep the pattern from getting skewed, you need to use one simple rule – the “correct back” rule.
For example, in jacquard knitting, 2 colors are used - red and white. In the pattern, the white loop goes through 8 red loops. From the back side, there are many long white broaches. In the finished mitten, such long broaches are very inconvenient, and they cannot be left in this form.
What to do in this case? This is solved in the following way: you need to knit 2 loops with a red thread, then twist the red and white threads, then knit 2 more red loops and twist again - and so on ... In this case, the white thread will be picked up by the pattern (this will only be visible from the back side) and will not hang down and interfere.
In a 3 or 4 thread jacquard pattern, the long purl threads should be twisted in the same way.
Downy mittens
Downy mittens are knitted in the same way as mittens from regular wool yarn on 2, 4 knitting needles and Teflon circular knitting needles with a fishing line or a plastic tube. Their thickness should correspond to the thickness of the threads. For mohair mittens, knitting needles are taken larger, since loose knitting is assumed.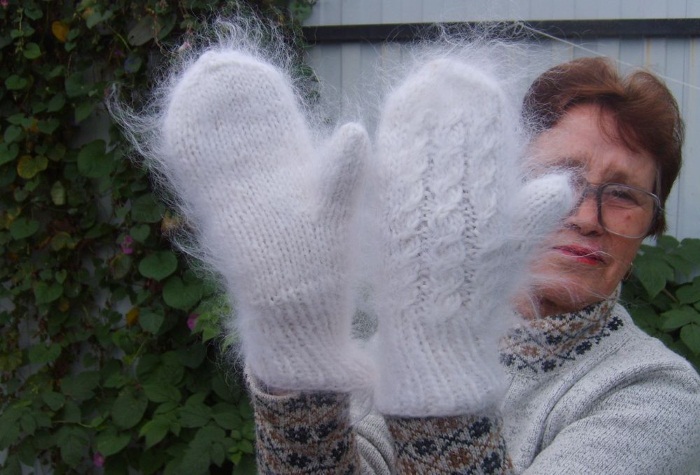
To make down mittens, yarn with goat and rabbit down, mohair, angora, and homespun twisted threads are used. Down yarn can contain 100% natural down or down with the addition of cotton thread.
Down mittens are very warm and soft. Some knitters make them double so that the down inside does not fall out. For this purpose, you need very thin natural fabric or fleece.
How to knit children's mittens with knitting needles
Children's mittens are knitted absolutely similarly to mittens for adults. Moreover, with mittens for babies you can fantasize to your heart's content. Children love their mother's crafts and willingly wear them.
Children's mittens with ornament
There are many ready-made patterns for children's mittens with such a pattern on the Internet. But you can make them yourself. The pattern for the mitten is made from the child's hand, which needs to be traced on a sheet of squared paper.
For the drawing, you can use pictures of your favorite animals, cartoon characters, or any other image that will be interesting to your baby. Next, using the cells of the sheet, a drawing or ornament is applied to the mitten pattern. As soon as the pattern is ready, you can start knitting.
Knitting pattern for children's mittens without a seam on 4 knitting needles with an ornament: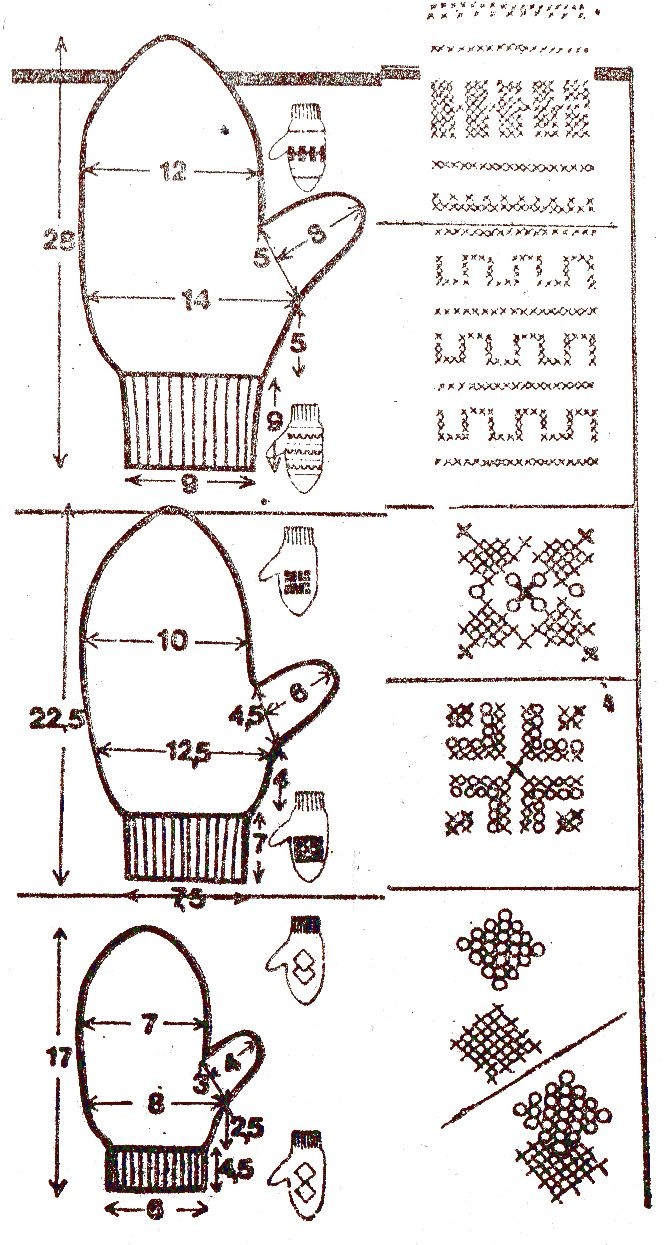
Advice! It is better to make children's mittens with an ornament double, since there are many elongated threads on the back side of the pattern.
Double mittens for a baby are warmer and will not blow through. Instead of a knitted cover, you can use warm and soft fleece.
Children's down mittens
Mittens with knitting needles (patterns and descriptions for them can be found on the Internet) for babies are knitted from goat down, mohair, angora, rabbit down, alpaca. Some needlework mothers spin yarn from dog wool or from the down of fluffy cats for this purpose.
The technique of knitting down mittens for children does not differ from the traditional one, the knitting patterns remain the same.
Important! If your baby is allergic to animal hair, you should not knit down mittens.
An alternative could be any other type of mittens or knitting from regular yarn that imitates down.
Children's mittens with openwork knitting
You can also decorate children's mittens with openwork in an unusual and original way. The same flagella, braids, knitting with elongated loops, cones or boucle are suitable for this. The mitten can be decorated with beads, bugles, seed beads, rhinestones, fur inserts or pendants.
Interesting ideas for children's mittens. Photo
Mittens knitted with your own hands are a good gift with meaning. The main thing is that there is a desire to warm someone, and the skills will definitely appear over time. Previously, this skill was passed down from grandmothers and mothers.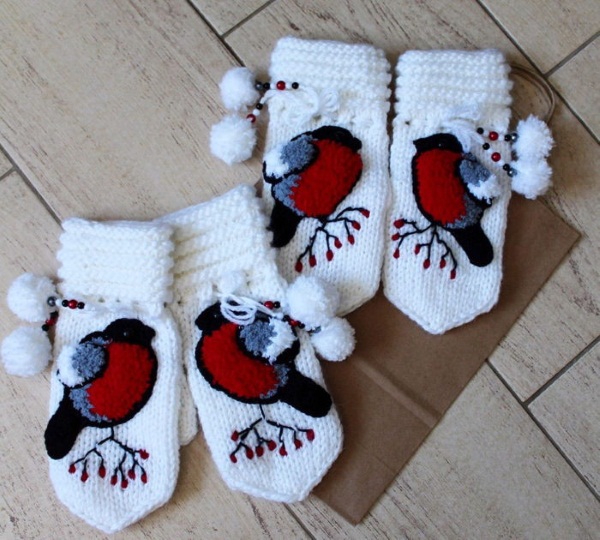
Now you can find any, even the most intricate and unusual scheme, detailed instructions for it and a description of the work on the Internet. And all this so that your dear and beloved hands do not freeze!
Author: Severyanochka
Article formatting: Vladimir the Great
Video about knitting mittens with knitting needles
Master class on knitting mittens with knitting needles for children:
Please tell me what is the footage of your yarn in 100 grams?