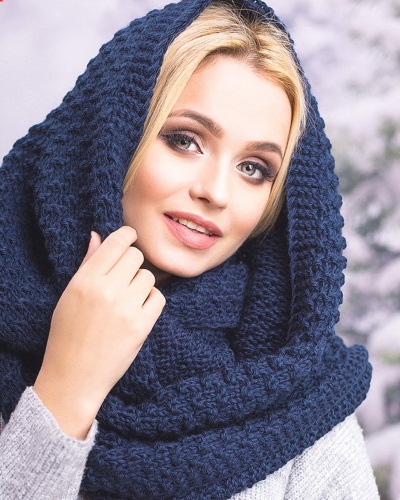
As a rule, a women's bonnet is knitted with knitting needles in one piece or sewn together, and its pattern can be openwork or very simple - according to the taste and skill level of the knitter. Designers have come up with a very convenient and functional thing that can be created with your own hands, using detailed and proven patterns.
Fashionable models of bonnets in 2019
For 2019, the bonnet hat remains relevant. All models of this year are distinguished by exquisite functionality, comfort and femininity. The choice of bonnet design has increased significantly, along with the traditional cylindrical shape of the pipe hat, interesting ideas for a collar hat, scarf, hood or snood have appeared.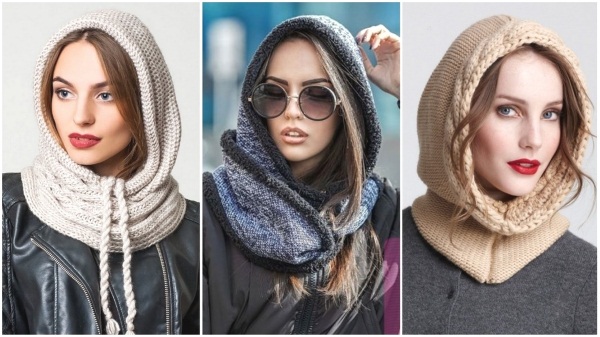
This year, this headdress is made in beautiful Aran lace, combined with a matte lipstick tone and an elegant shape of sunglasses.
For this season, the bonnet has become even more convenient - a drawstring on the front of the cap tightens the headdress around the face and reliably protects from wind and bad weather. Feminine and very practical headdresses are worn with coats of different styles, jackets, down jackets or fur coats.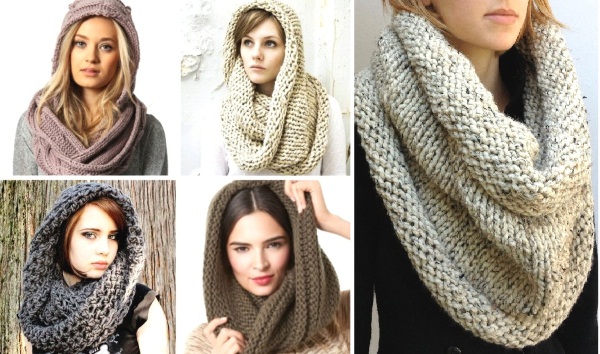
This season has made the bonnet even more democratic. Now the bonnet can be worn with voluminous large knit blazers, with quilted cropped jackets and coats, with parkas or with leather biker jackets. The modern bonnet has also become more functional.
It is used as a regular warm knitted hat, but when taken off the head, the bonnet looks great as a large chic scarf, a beautiful collar, a snood or a cape...
Tools and materials for knitting
To start knitting, you should prepare all the necessary materials and tools. The material for work is selected in accordance with the bonnet model by composition, texture, color, thickness and yarn consumption per product. Almost any yarn is suitable for a bonnet, and the color and thickness of the thread are selected according to individual taste.
Before you start knitting a bonnet for women, you should decide on the choice of knitting needles. Such hats are knitted on straight or circular knitting needles, crochet. It should be noted that the quality and appearance of the bonnet depend on the correctly selected knitting needles, so this preliminary stage should be approached with all responsibility.
To make a hood you may need the following tools:
| Knitting device | Description, application |
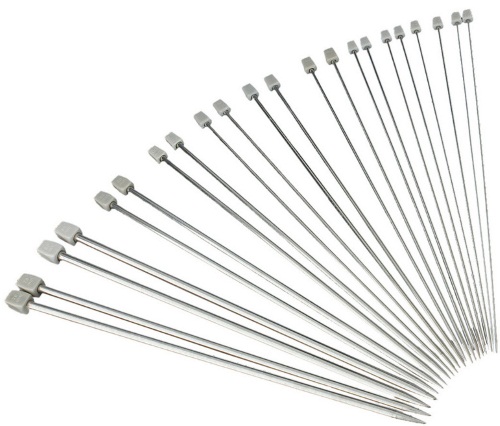 | Straight needles with stoppers. They are used for knitting flat knitting parts and can be long, short, single-ended and double-edged. They are made of metal, plastic, wood, bamboo, Teflon, aluminum. |
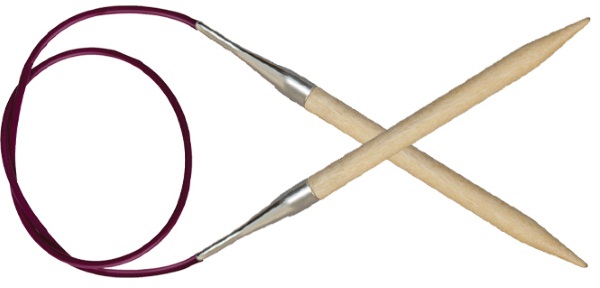 | Circular knitting needles.
These are single-ended knitting needles with a flexible connection (line, plastic cable). They are used for knitting flat parts and parts with a closed circle (in the form of a pipe). They can be metal, brass, aluminum, wooden or combined. |
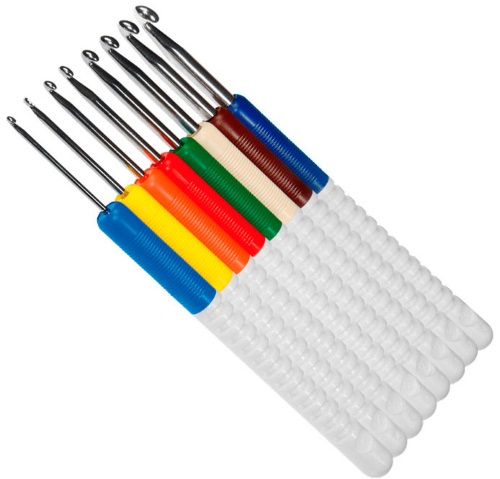 | Hooks.
Hooks of different sizes are used for knitting a wide variety of clothes, as well as for decorative tying of parts. They can be long and short, thick and very thin. They are made of metal, aluminum, copper, bone, plastic or wood. |
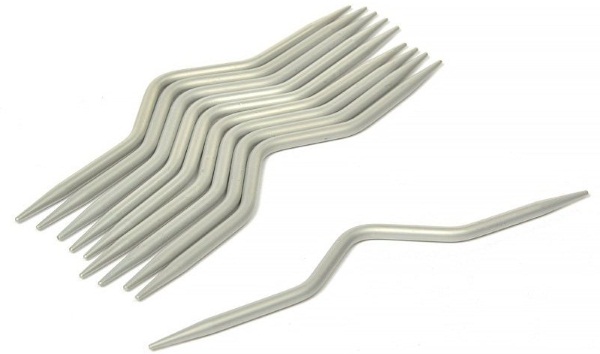 | Knitting needles for openwork.
With the help of such needles, the process of knitting braids and cords is significantly simplified when crossing several loops during the main work. Additional needles are metal, plastic and aluminum, and also differ in thickness, shape and length. |
 | Markers.
Markers are used in knitting to mark the beginning or end of a pattern, to fix the length or width of a section of a part. They are made of colored plastic. |
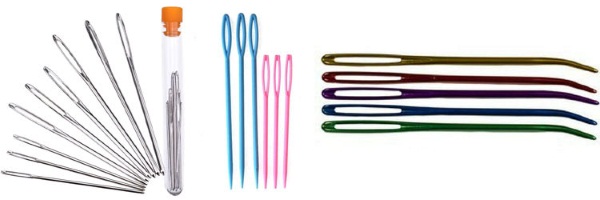 | Needles for sewing parts together.
Special needles for sewing knitted parts with a wide eye and a blunt nose. They are made of metal and plastic. |
It goes without saying that for any handicraft you will also need a flexible measuring tape, a ruler and scissors. Now, having armed yourself correctly, it is time to start creating.
Patterns of models for women
A women's bonnet with knitting needles (and sometimes a men's one) only at first glance seems difficult to knit. In fact, this process is simple even for beginner craftswomen. The diagrams below describe the step-by-step execution of the work, and the choice of pattern can be left arbitrary.
With a beautiful pattern and tassels
How to knit a bonnet with knitting needles for women - for this you can use the pattern of the model with a combination of openwork knitting. This knitting technique, as well as soft voluminous yarn, make the product very stylish and expensive. The design of the headdress is a free-form hood and a large beautiful scarf with tassels at the same time.

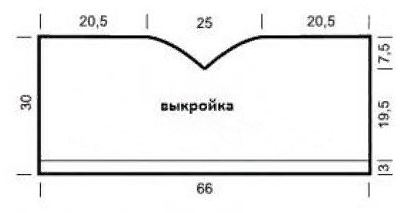
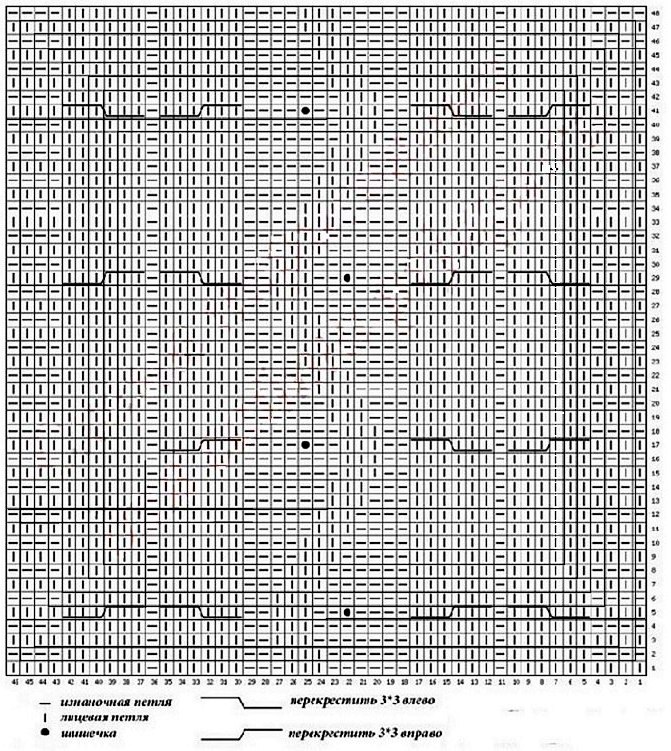
The women's bonnet is knitted with knitting needles as a rectangular knitted fabric, the finished dimensions are: 132.0 cm - length, 35.0 cm - width. The knitting pattern diagram and decoding of the symbols are presented below.
Each row of openwork knitting should be done very carefully and exactly according to the pattern, so that each knitted loop matches the main pattern from the front and back sides. The knitting density of the bonnet is average, a section of 10.0 by 10.0 cm is approximately equal to 12 loops in 18 rows.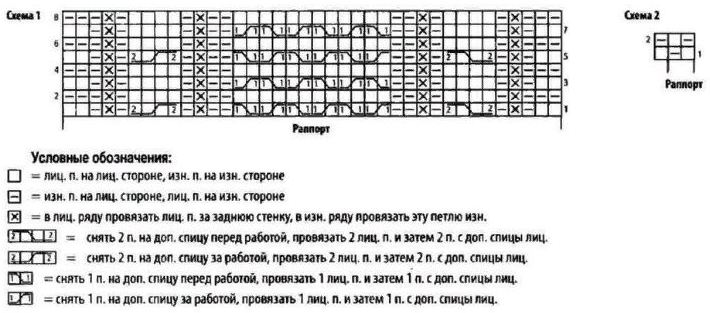
To make a hood you will need:
- mixed fiber yarn – 800 g;
- circular knitting needles with a cord of at least 60 cm;
- a knitting needle for knitting a cable (with crossed loops);
- several plastic markers;
- measuring tape, scissors.
Progress of work, step by step:
- Knit 2 identical parts of the scarf separately from each other, but at the same time. To do this, cast on 38 loops for one part of the scarf from one ball and 38 loops for the other part of the scarf from the second ball.
- Next, according to the pattern in figure No. 1, knit a piece of fabric 96.0 cm long on both parts of the scarf.
- Then, from the wrong side, knit the right half of the scarf according to the pattern, cast on 37 free loops on the knitting needle and knit the left half of the scarf with the same thread. Thus, both parts of the scarf are knitted into a single piece.
- Continue knitting the side parts (scarf parts) according to pattern No. 1, and knit the central part (37 cast-on loops) according to pattern No. 2.
- When the middle part (hood detail) is 35.0 cm high, finish knitting on all fabrics. Fold the middle part of the knitting (hood) to the corner and sew both sides with a knitted or elastic chain stitch.
The knitted bonnet can be decorated with large or small tassels along the bottom edge of the scarf. For this purpose, cut the yarn into 10 or 12 pieces 30 to 60 cm long, fold in half and place the folded edge between the loops of the edge of the scarf. Then thread the free edge of the strand into the resulting loop and tighten the threads into a knot.
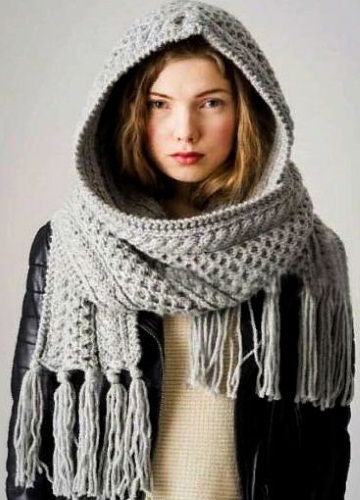
Hood with large double collar
The original model, knitted on knitting needles, reliably protects the head and neck from wind and cold. For those who do not like classic knitted hats - this is a great solution to the problem. This women's hood fits loosely on the head and will not spoil the hairstyle, and if necessary, the hood can be easily thrown off.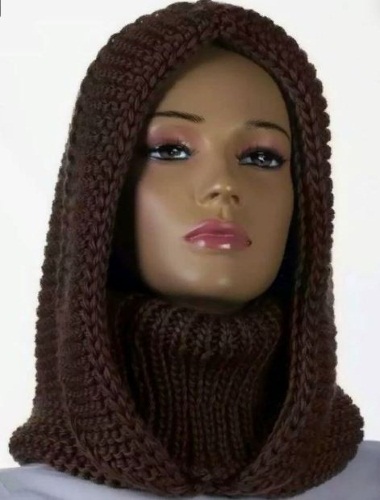
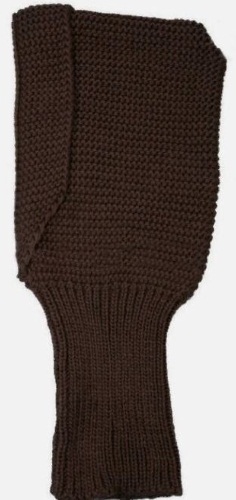
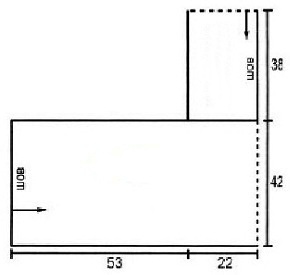
How to knit a hood with knitting needles for women (according to the layout) - across the length of the part, from the bottom up. The height of the hood is 33.0 cm. The collar model is designed for a neck circumference of 53.0 cm. The knitting density level of a section of the front surface 10.0 by 10.0 cm is 18 loops in 26 rows, elastic bands - 16 loops in 26 rows.
To make a hood you will need the following:
- acrylic yarn – 200 g;
- knitting needles (straight with stoppers or circular);
- several plastic markers;
- measuring tape, scissors.
Step-by-step knitting instructions:
- Cast on 108 stitches on circular or straight knitting needles with stoppers and knit a 2x2 rib pattern 3.0 cm (the first and last stitches are edge stitches).
- Then continue knitting 22.5 cm with the front surface.
- To design the lapel of the front part of the hood, divide the number of loops by 2 (place a marker) and knit each symmetrical part separately.
- Knit 54 stitches to marker, turn work and knit to end of row in reverse direction.
- Next, in the same way, close 34 loops in the following order: 4 rows/1 st, 3 rows/2 sts, 2 rows/3 sts, 1 row/4 sts. Then close the remaining loops in the row with purl loops.
- Knit the symmetrical part of the hood front flap in a similar way in a mirror image, closing the row with face loops.
- For the collar, cast on 96 stitches on circular or double-pointed needles and knit in a circular closed pattern using a 1x1 or 2x2 rib pattern to a height of 20.0-25.0 cm.
- In the last row of the collar, close the loops, purl with purl, and front with front.
- Connect and sew the bottom edge of the hood and the bottom edge of the collar.
For ease of fitting and sewing the parts, both parts of the hood should first be secured with pins, evenly stretching the elastic band of the collar.
Original "Bashlyk" with plaits and pompom
How to knit a bonnet with knitting needles for women "Bashlyk" is indicated in the detailed diagram-description below in the text. Structurally, this bonnet is a single product made of a long scarf with a hood. The headdress is knitted simply even for beginner knitters, and the main feature of the product is a beautiful pattern, fringe and a playful tassel on the crown.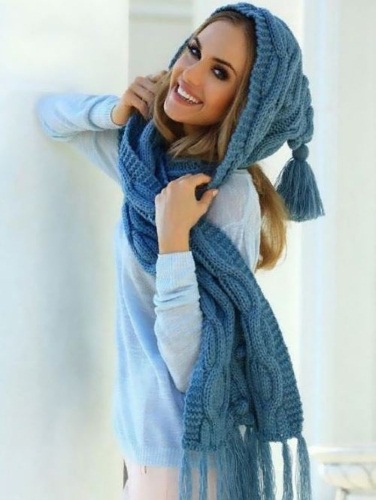
To work on the product you will need:
- wool and acrylic yarn – 500 g;
- straight needles with stoppers;
- knitting needles for braids and cords;
- plastic markers;
- measuring tape, scissors.
Progress of work, step-by-step actions:
- Cast on 46 stitches and knit the fabric strictly according to the pattern.
- When the length of the scarf reaches 95.0 cm, start adding loops for the hood on the right side of knitting (after the garter stitch). To do this, add 1 loop 12 times in every 2 rows. Decorate the added loops with a "bump" pattern.
- Using this method, knit 30.0 cm of fabric, and then, exactly the opposite, decrease 1 loop 12 times.
- After all the hood stitches have been decreased, knit the 2nd part of the scarf – 95.0 cm according to the pattern. After finishing knitting the scarf, close the stitches and cut the working thread.
- Then fold the scarf in half and sew the hood from its crown on both sides at a distance of 30.0 cm. Sew a pompom or tassel to the hood, and make fringe at the ends of the scarf.
Warm snood with scarf and drawstring
The design of this women's hood consists of 2 simple canvases, and the parts can be knitted on knitting needles both separately and together. For making a hood-snood, English elastic (patent) is recommended, which looks beautiful in bulky yarn, has good elasticity and is very easy to knit.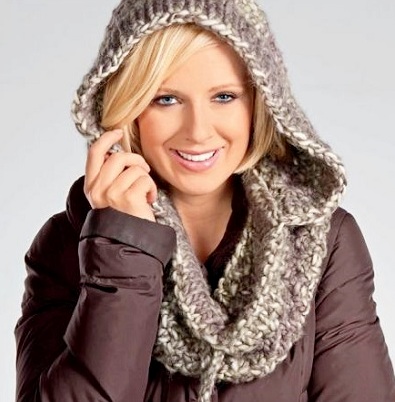
To make a hood you will need:
- melange yarn – 400-600 g;
- straight knitting needles with stoppers (or circular knitting needles with a cord);
- crochet hook;
- plastic markers;
- measuring tape, scissors.
Step-by-step description of the knitting process:
- Taking into account the density of your knitting style, cast on stitches onto the knitting needles to obtain a section of 22.0 cm.
- Knit 3.0-5.0 cm with a 1x1 (or 2x2) elastic band.
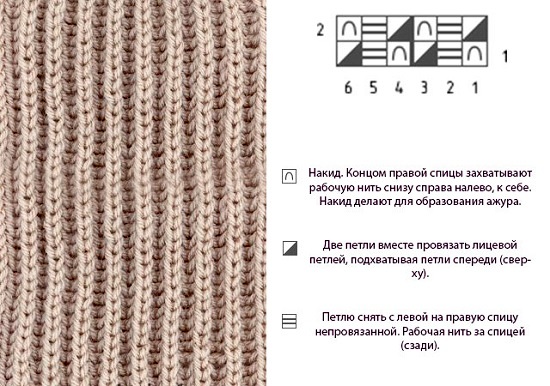
- Then knit 76.0 cm with English elastic (see the diagram above). As a result, you should get a square measuring 44.0 x 76.0 cm - this is the hood. How to knit a hood with knitting needles for women with English elastic: 1 edge st., 1 front st., 1 yarn over, 1 purl st. slip without knitting, 1 front st., 1 yarn over and 1 purl st. without knitting - and so on to the end of the row. In the next row - 1 edge st., 1 front st. and 1 yarn over, knit 1 front st, 1 yarn over, 1 purl st. without knitting, and so on.
- Fold the hood piece in half and sew one edge with a knitted stitch.
- Another rectangle (snood) is knitted with the same pattern measuring 42.0 x 150.0 cm. To simplify the work, the snood can be knitted with circular knitting needles without a seam. To form the drawstring, knit a 1x1 (or 2x2) elastic band along the upper edge of the piece with smaller knitting needles, then turn it over and hem it with a knitted or overlock stitch.
- Next, sew the 2 resulting knitted squares according to the diagram above. Use a crochet hook to make a cord and pull it through the drawstring of the snood.
Patterns of models for girls
Bonnet hats for girls are a very comfortable and functional item that perfectly protects the child's head and neck from the chilly wind and cold. Not so long ago, this headwear for babies was presented in the form of a helmet cap, but over time, fashion trends have affected this type of children's clothing.
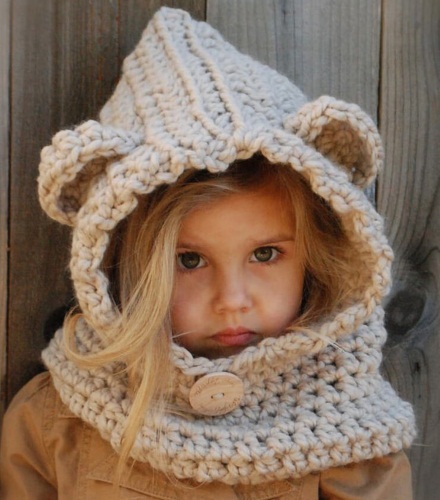
Now children's bonnets have become more diverse in design, color, knitting technique and finishing method. Of course, every mother and grandmother wants to dress their favorite girl not only to be "warm", but also at least "originally".
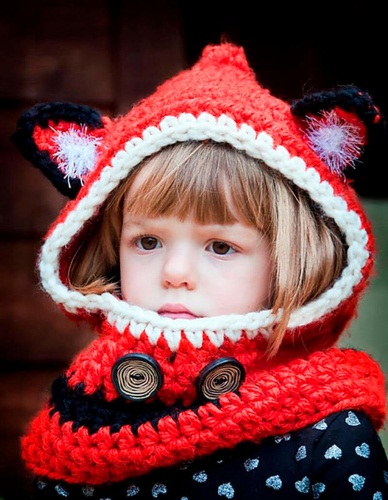
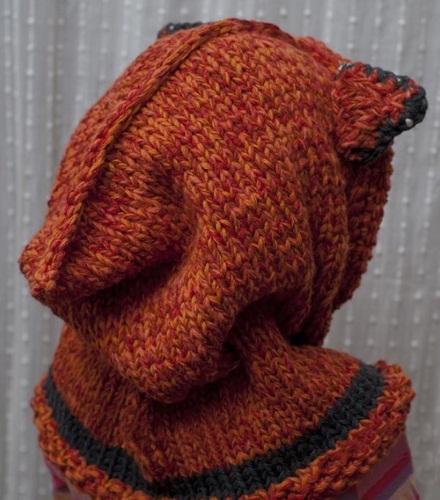
"Red Fox"
This bonnet model is a one-piece knitted fabric with binding, a catching cord and decorative ears. For knitting, we recommend voluminous, light yarn with a characteristic fox fur coat color.
To knit the "Red Fox" bonnet you will need:
- yarn (wool, semi-wool) – 250-300 g;
- knitting needles with cord, circular;
- hook;
- plastic markers;
- measuring tape, scissors.
Knitting instructions step by step:
- Cast on 70 stitches using knitting needles and fishing line.
- Row 1, 2, 3 and 4 knit in a circle without a connecting seam in garter stitch (front and back sides with front loops).
- Rows 5, 6, 7 and 8 knit in the round in a contrasting color using the front surface (front side of knitting – front loops, back side – back loops).
- From rows 9 to 20, knit the hood fabric in the main color with the front surface in the round.
- In row 21, knit 35 stitches according to the pattern and place a marker. Turn the work over and knit the fabric in stocking stitch from marker to marker until row 60, i.e. a turning row.
- Then fold the top of the hood in half and sew it into a corner.
- Crochet the edge of the front part. Knit 3-4 rows of single crochet stitches and turn the edging strip over to the front, simultaneously fixing the ears. The “Ear” detail consists of 2 paired corners: 2 parts of the main yarn color and 2 parts of white yarn. Cast on 10 stitches on a knitting needle and knit the fabric with the front surface, closing 2 stitches into 1 stitch at the end of the row. Make all 4 ears in this way. Then fold the parts in pairs and crochet with single crochet stitches.
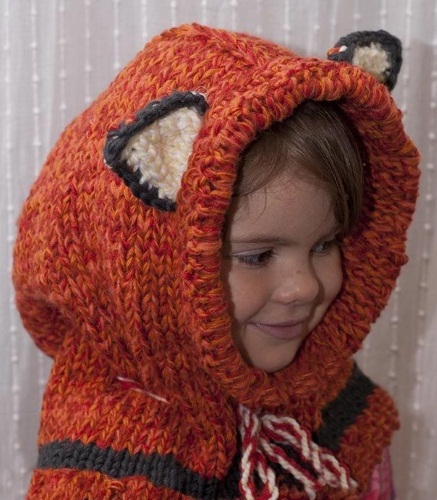
- Twist a long cord from the yarn and pull it through the loops of the hood, pulling the fabric together at neck level (see diagram below).
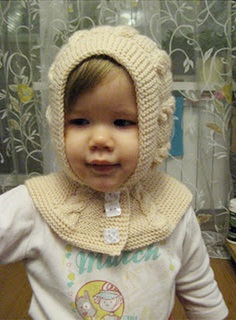
Hat with flagella
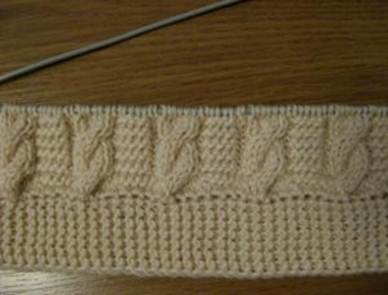
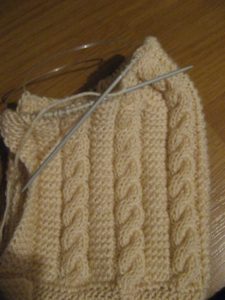
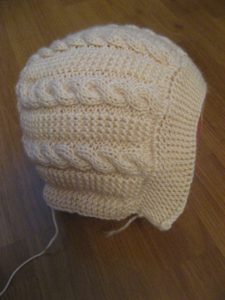
This model of the bonnet wonderfully protects the head, ears and neck of the baby from the cold, piercing wind or rain. The bonnet-hat is a comfortable soft hat, helmet and bib in one model and will undoubtedly please the little beauty.
What you need for work:
- soft yarn – 150 g;
- straight needles with stoppers;
- knitting needles with a cord (circular);
- hook;
- auxiliary knitting needles for braids;
- plastic markers;
- measuring tape, scissors.
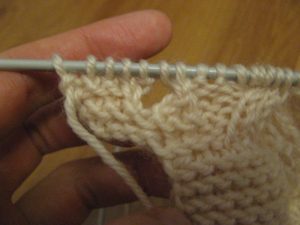
Step-by-step instructions for knitting a children's bonnet:
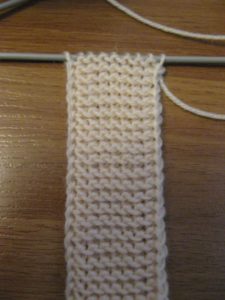
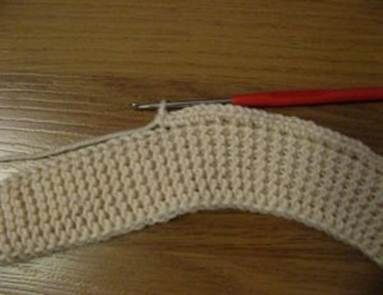
- Cast on 7 stitches on straight knitting needles and knit 125 rows of garter stitch to obtain a rib band. Then, from the edge braid of the resulting piece, crochet 1 row of sc and cast on 106 stitches from it again on straight knitting needles.
- Next, you need to continue knitting according to the following pattern: *1 edge st, 2 purl sts, 6 knit sts (cordage), 2 purl sts, 4 knit sts (garter stitch)**, 2 knit sts, 2 knit sts (garter stitch), 1 edge st.
The segment *…** is the rapport of the repeating pattern.
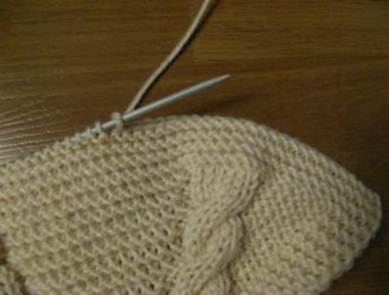
The "flag" is formed from 6 loops in rows as follows: 1 row knit st, 2 row purl st, 3 row - 3 sts transfer to an additional knitting needle before work, knit the next 3 knit sts, return the removed loops to the main knitting needle and knit them as faces. Next, on the wrong side, knit the loops of the "flag" with purl loops, and on the front side - with faces.
- Knit 43 rows according to this pattern. Next, divide the 44th row into 3 sections so that there are 36 loops in the middle, and begin knitting the top of the hood like a heel in socks. To do this, knit this row like this: knit 36 loops according to the pattern, only in the "tourniquet" of 6 loops make 4 loops (close 2 sts in each "tourniquet"), knit the middle in the usual way, and make the remaining section as a mirror image of the initial section.
- Row 45 is knitted according to the pattern, but the 36th loop in the center must be connected to the loop following it. Turn the work over and row 46 should be started by removing 1 st without knitting, and all the remaining loops should be knitted similarly to row 45. Turn the work over again.
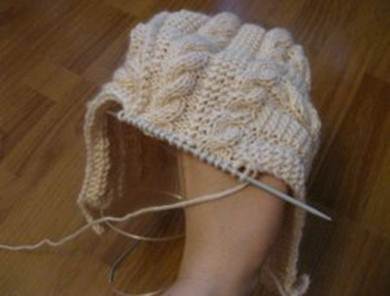
- Continue knitting according to this pattern until row 51. In rows 51 and 52, decrease at the expense of the central part of the product. To do this, in each 6th row on both sides, you need to decrease 1 st until there are 16 loops left on the knitting needle. Then continue knitting according to the pattern until all the loops on the side are gone, after which close the remaining outer loops and cut the working thread.

- To form the neck, cast on 5 ch from the bottom edge of the hood, 74 stitches from the edge of the garment, and another 5 ch. Then continue knitting according to the following pattern: 1 edge st, 6 knit sts (garter stitch), *2 knit sts, 6 knit sts (“cordage”), 2 knit sts, 5 knit sts (garter stitch)**.
Pattern section *…** must be repeated 4 times.
- Next add 2 knit stitches, 6 knit stitches (“cordage”), 2 knit stitches, 6 knit stitches (garter stitch) and 1 edge stitch. Do not forget to form a strip on both sides of the knitting – 5 knit stitches (garter stitch).
The buttonhole is knitted as follows: cast on 3 knit stitches (garter stitch), 2 yarn overs, then close 2 loops. In the next row, working in the opposite direction, make 2 loops from 2 yarn overs according to the pattern.
- Continue knitting according to this pattern and knit 16 rows according to the pattern without adding. After this, the number of loops should be increased by adding additional loops from the "cord" on both sides (increase - 10 loops in 1 row).
- Next, turn the work over and finish knitting 8-10 rows with face loops (garter stitch, hood edge at the bottom). Then close all the loops and cut the working thread.
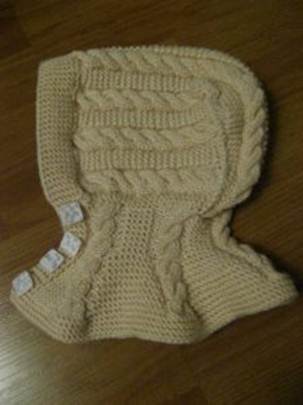
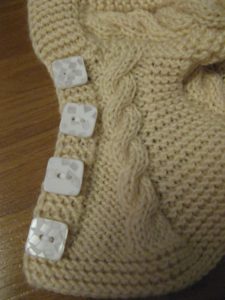
- After the knitting of the hood is finished, you need to mark the location of the buttons along the loops of the upper fastener bar and sew them to the finished product.
Knitting a women's bonnet on knitting needles will help to significantly increase the level of professionalism in the manufacture of knitwear and update the wardrobe of headwear for the whole family. In addition, a bonnet hat, knitted with your own hands, will undoubtedly be a subject of special pride for a novice craftswoman.
Author: Severyanochka
Article formatting: Vladimir the Great
Video about knitting a bonnet with knitting needles
Knitted bonnet: