Ideas and master classes on creating toys from socks with your own hands will be understood not only by an adult, but also by a child of 7-9 years old. Making a craft is so simple that you will not have to sit for several days and you will be able to complete the task in 2-3 hours.
General principles of making toys from a sock
Of course, not everyone is a super-fashion designer or seamstress and creating a trial toy will require a lot of effort, so The following principles should be followed:
- Choosing a sock. It is better to take a sock made of natural fabrics, it will not stretch much and lose its shape. You can try to make the first toy from socks that have already been used 1-2 times, having washed them beforehand. If suddenly the toy does not work out, it will not be a pity to throw it away;
- Thickness of sock fabric. Choose a thin fabric so that it is easy to pierce with a needle and stitch it;
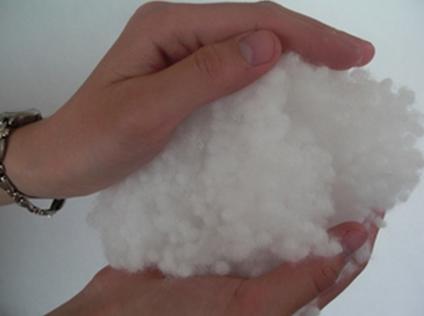
- Filler should be convenient to use, it is better to choose cotton wool, synthetic padding or leftover pieces of fabric (knitting thread) for the first time;
- Color selectionTo start working with socks, choose plain ones, this will make it easier to model the shape of the craft;
- Tools You should choose comfortable ones.
Just 5 principles that will help a child or parent create the best toy – with their own hands.
Necessary materials and tools
Toys from socks are created with your own hands using different materials. The master classes presented below will help in the implementation of any idea.
The main tools that may be needed include:
-
- Scissors - small and large. Small ones with thin edges are easy to cut corners and small patterns, large ones are easier to make even cuts from the sock;
- Threads - choose a color that matches the toy, No. 40 will be enough. You can make additional decoration from a thick, contrasting thread by stitching the seams with it;
- Needle - small thin and large. Small, convenient for sewing folds and corners;
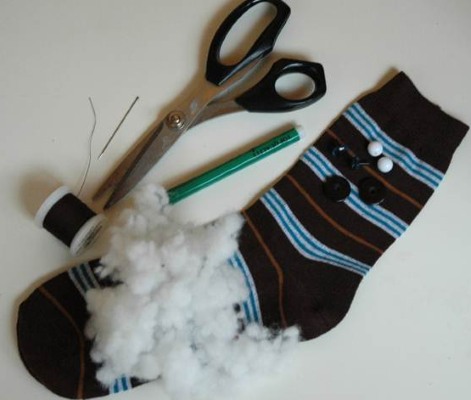
- Material for stuffing toys: cotton wool, synthetic padding, fluff, foam rubber, fabric scraps (knitting threads), sand, cereals, beads, sawdust. The choice of material depends on the artist's wishes.
- Decor – choose a nose, eyes, bows, twigs, flowers for the toy;
- Glue gun.
Having prepared all the materials and stocked up on ideas, choose a convenient place and start making the craft.
How can you decorate a toy?
Creating a toy and adding a twist to it using various decorative means is not an easy task, because it is difficult to choose one thing from a large variety of ideas. For example, you can add hair, flowers, a hat, a cap, a ball, a bow, earrings to the toy. Or make a backpack out of it by sewing on 2 ribbons. A suit sewn for the toy will be an addition to it.
The craft can be trimmed with beads or ribbons, or contrasting threads.
 Materials needed for decoration:
- Multi-colored threads, ribbons;
- Paints;
- Fur;
- Beads, sequins, beads, rhinestones, stones;
- Fabrics;
- Buttons;
- Figures of eyes, ears, lips, nose;
- Pom-poms;
- Floristic nets;
- Foam tubes, multi-colored.
You can choose the material for a handmade toy in any fabric store.
Master class on making a snowman from a sock
Toys from a sock with your own hands (master class) are often made in the form of snowmen. For the first work, it is better to use the simplest idea. The toy - Snowman, can be trusted to sew a child of 5-6 years old, under the supervision and with the help of parents.
Master class - "Snowman"
The snowman is white – so take a white sock, white threads, buttons, eyes. You will also need a piece of fabric or a red, orange sock (nose), scissors, glue, a smaller sock – colored (hat), filler (sand). If you need a large snowman, then choose a sock of size 52 or more.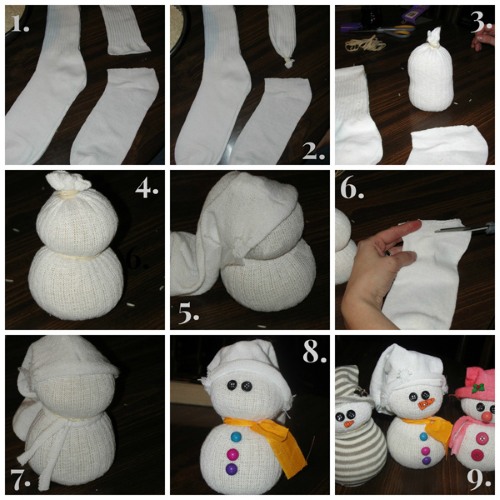
Youcompletion:
- Divide the sock into two parts, cutting off the part with the heel at a right angle to the elastic of the sock;
- Iron the second part a little with a warm iron;
- By eye, mark out 2-3 parts of the snowman, as desired. Better in 2 parts, so it will look more voluminous;
- Fill the sock with sand to about the middle and tie it tightly with white thread, having first given it the shape of a ball;
- Fill the top part with sand so that it is smaller than the bottom (this is the head);
- Sew the top part with threads, twist and tie the tip, as after the body. It turned out that the tail sticks out;
- Fold the red fabric in half, draw a triangle with a pencil on the fold. Cut out without cutting the fold of the fabric. Sew the 2 edges with red thread, stuff with light filling (cotton wool);
- Sew the nose to the snowman, folding the edges inwards so that the cuts are not visible. Or you can sew the nose right away and then sew it to the snowman;
- Glue on the eyes, sew 2 buttons onto the body, stitch the mouth with red thread;
- For the hat, you need a smaller colored sock, cut off the top part with an elastic band. The side with the elastic band will be put on the head. So, sew the lower part of the cut with a suitable thread and make a pompom. Put it on the snowman's head. Instead of a hat, you can buy a small bucket in a souvenir shop and glue it with a glue gun;
- Make a scarf from a red ribbon or knit a braid from red knitting threads and tie it around the snowman’s neck.
The snowman is ready! Joy for the child and the development of fine motor skills, plus additional time spent next to mom. In general, only advantages and pleasure. Such a master class on creating a snowman toy will allow the child to realize all his original and incredible ideas with his own hands from socks of any color, not only white.
I sew an owl from a sock
For the owl you will need:
- a sock of the corresponding color;
- threads;
- eyes;
- scissors;
- glue;
- sawdust;
- decorative elements – optional.
A schoolchild can be offered to make a toy from a sock in the form of an owl with his own hands, playing up the idea - as a talisman helping to learn and gain wisdom. And offer to watch or read a master class on its manufacture. After all, since ancient times, an owl has been considered a symbol of intelligence, wisdom, knowledge.
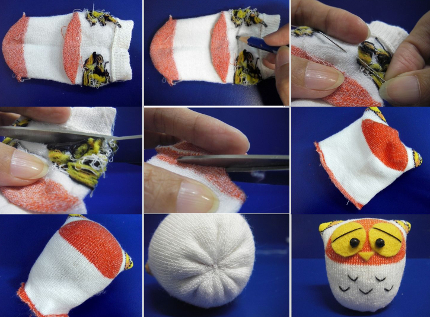
Execution:
- Cut off the toe, do not throw away the second part from the heel, it will be needed to make the wings;
- Divide the sock in half, you can mark it with chalk or thread;
- Stuff the bottom part with sawdust, sew up the sides a little so that the body is separated from the head;
- Stuff the toy tightly with sawdust;
- The cut of the sock is slightly deepened, made into a semicircle, cut with scissors. If after cutting off part of the sock, 2 parts of the cut are folded, then 2 protrusions (angles) are formed on the sides - these are the ears;
- Sew from one ear and from the other to the middle of the cut, so that there is room for stuffing with sawdust. Stuff more sawdust from the side of the ears than in the middle. Sew the rest;
- Draw a half-circle in the shape of a moon with chalk near the fold, on one side and on the other. Cut out, sew, leaving space for stuffing with sawdust;
- Sew the wings to the owl's body. Glue on the eyes;
- Cut the beak into a triangle shape, stuff it with sawdust and sew or glue it between the eyes;
- Cut the paws out of the sock fabric. Make 2 thick strips, sew them together and stuff them with sawdust. Make 2 seams on one edge over the fabric – these will be the owl’s toes. Sew the other side to the body;
You can decorate the owl by adding a scarf and hat or by sewing sequins on the wings.
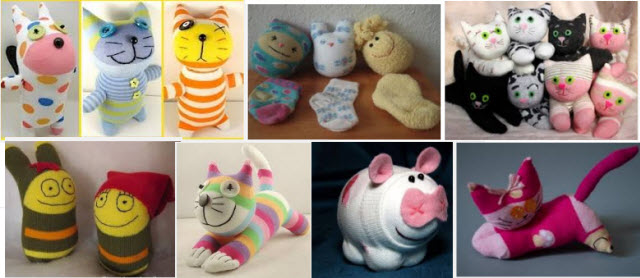
Kitten from a sock
To make a kitten you will need 2 socks with colored heels, scissors, threads, eyes, and synthetic padding:
- For the body you need 1 sock, cut off the elastic band (cuff) on it;
- From the side where the elastic was and from the opposite side, make a small longitudinal cut (these will be the cat’s 4 paws);
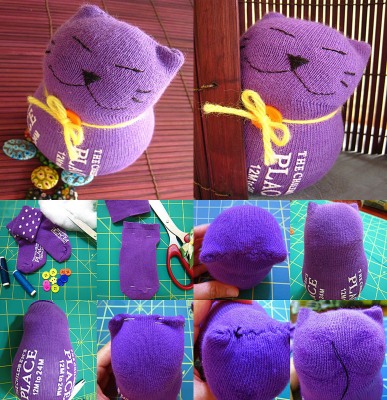
- Sew the cut with threads. There should be 2 holes left on the side of the elastic in the paws, stuff the toy with padding polyester through them and sew them together;
- Make a pattern from the second sock. Cut off the elastic, the place from the elastic to the heel is the kitten's neck. The heel is the muzzle (nose). Cut out 2 triangles above the heel - these are the cat's ears;
- Sew the ears and the top of the head, stuff the bottom with padding polyester and sew;
- Make a tail from the remains of a sock, cut out a wide rectangle, sew it and stuff it with padding polyester. To make the tail curved or twisted, sew its edges, slightly gathering the fabric;
- Sew the head and tail to the body. The kitten is ready!
To decorate the kitten, you will need a bow, beads or a flower from an elastic band. You can also add a scarf. If you make a kitten from a single-color sock, you can additionally sew a costume like Matroskin the cat.
Sewing a hare from a sock
Hares come in different varieties, you can sew them using the technology of making an owl or a kitten, adding a round tail made of fur and longer ears. Take white or gray socks and 1 colored one, scissors, threads, paints, eyes, cotton wool, buttons.
Execution:
- Cut off a part of a sock (white, grey) to the heel – this is the body and head of the hare, sew and stuff with cotton wool. Find the middle of the resulting figure and tie it with a thread of the corresponding colour – this will be the neck of the hare;
- Cut 4 circles from the heel and sew 2 of each, stuff them with cotton wool and sew them to the body - these are the bunny's hind legs;
- Cut out 4 rectangular parts with sharp ends, sew on the sides and stuff with cotton wool, sew the ears to the head;
- Cut off a part of the sock with an elastic band from a colored sock, make 2 holes on the sides - this is a jacket for the hare;
- Make the upper paws in the same way as the lower ones, but from a colored sock. Sew them to the hare and put on the sweater;
- Glue the eyes to the hare, sew the mouth and nose with thread. Sew buttons to the sweater;
In addition to the hare, you can sew pants, a hat, a scarf. Add bows or elastic bands to the ears.
Puppy from a sock
A master class on creating a toy puppy from socks with your own hands should start with buying 2 socks, a piece of fur (ears, tail), scissors, thread with a needle, eyes or buttons, black fishing line.
Execution:
- Cut off 2 socks from the elastic side, leaving 1-1.5 cm near the heel - this is the body and head;
- Fill both parts with padding polyester. At the first sock, using a needle and thread, make stitches, tighten the side of the toes of the sock (this is the dog's nose);
- Where the heel of the first sock is, sew on buttons or use glue and fishing line to make eyes; near the nose, pierce the sock through and through – these are the dog’s whiskers;
- Sew 2 unsewn parts, body heel down, head heel up;
- Make paws. Cut the remaining parts in half, stuff with padding polyester, twist the edges, sew with thread. You get a ball and uneven edges of the cut - 4 parts. Sew the balls to the body, the uneven fabric is the dog's nails;
- Cut the ears and tail out of fur and sew them onto the puppy.
Make a separate collar with a leash for the dog, and you can tie bows on the ears.
Teddy bear from a sock
A small teddy bear can be made from one sock and several white or brown scraps:
- Cut the sock into three parts: 1 - from the toes 2-3 cm, 2 - elastic (cuff) - 1.5-2 cm, 3 - part is the heel (body);
- From the first part, cut out a circle with two ears, sew and stuff with available material;
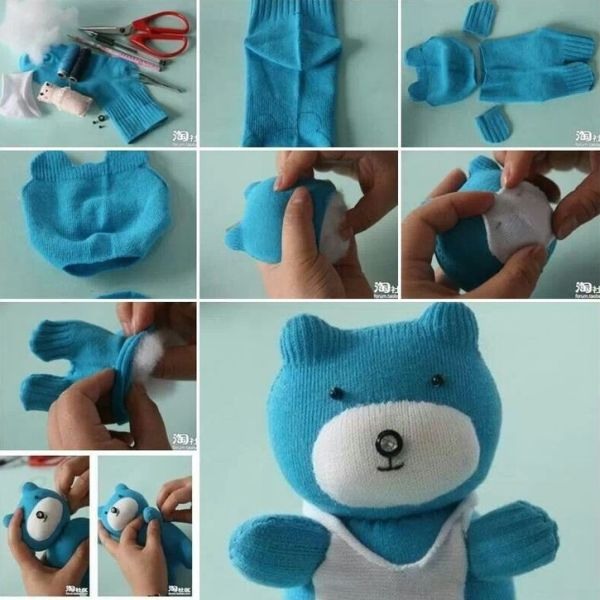
- Cut the 2nd part of the cuffs in the middle, but not completely - these are the bear's buttocks and legs, sew the cuts, stuff with material;
- Sew the legs to the body and stuff with material, then sew on the head;
- Make the front paws from white scraps, stuff them with material and sew them to the body;
- Cut out 3 white circles, one smaller. Sew the larger one to the bear's belly, and the second one to the muzzle;
- Sew eyes, nose and mouth onto the face;
- Sew the third white circle with the edges to the middle, fill it with material and sew it to the bear’s buttocks.
You can sew a barrel of honey and a hat for this bear.
Master class on making a doll from a sock
To make a doll, it is better to use a golf, then it will be big. To create it, you will need 2 socks (a golf and a sock of a different color), scissors, threads with a needle No. 40, thick acrylic threads - beige or yellow, glue, eyes, a nose, lips.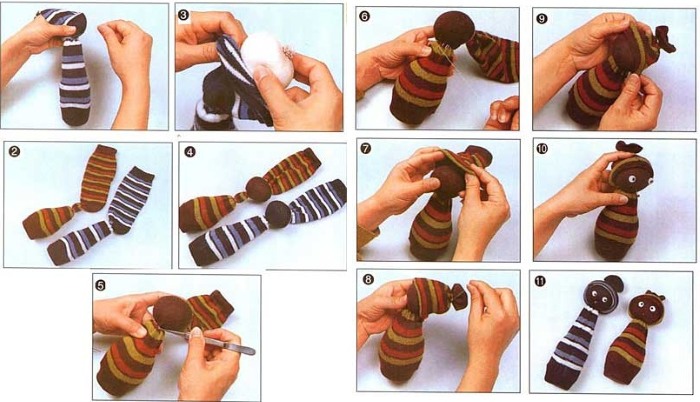
Execution:
- Cut off the convex part for the fingers from the golf;
- Make a cut from the side of the cut 3-4 cm up, so that the heel is at the back (these will be the doll’s buttocks) – these are the doll’s legs;
- Measure 2-3 cm from the cuff side and mark. After marking, measure another 2-2.5 cm and mark with chalk;
- Fill with padding polyester from the feet to the top mark, tie a thin elastic band for hair;
- On the second mark from the bottom, sew with threads, making the neck and separating the head from the total mass;
- Just below the neck, sew through the padding polyester 2 opposite sides on both sides - these will be the doll's hands, it looks as if they are lowered into the pockets. You can make hands sticking out separately from the body, for this it is enough to make patterns of hands, fill with padding polyester and sew;
- Make a pattern from a sock of a different color, 2 halves of a sundress and sew on top of the doll, make pockets in place of the arms;
- Sew on mouth, eyes, nose;
- Mode the same length of acrylic thread and sew on top of the elastic band for the hair around the tail - this is the doll's hair.
The doll will turn out original and beautiful, especially if you make it together with your child.
Sewing a monkey from a sock
Take 2 large socks, threads, scissors, accessories for the eyes.
Execution:
- Cut the first sock in half from the elastic side to the heel, sew the cut edges together - these are the legs, fill the toy with synthetic padding;
- Cut the second sock into several parts. First, cut off the part from the elastic to the heel, and cut it lengthwise into three equal parts, these are the arms and tail of the monkey, sew and fill with padding polyester;
- From the second one, cut off the part where the fingers should be, fill it with synthetic padding and do not sew it up;
- Cut the part with the body lengthwise from the toe side and sew the part from the second sock to it - this is the monkey's head;
- On the second sock, cut out the heel and sew it to the animal’s face, stuffing it with synthetic padding;
- Glue on the eyes and use thread to sew a seam along the heel – this is the monkey’s mouth;
- Now sew the arms and tail to the monkey;
- From the remaining piece of socks, cut out 2 rectangles, sew and stuff. Then roll each into a ball and sew to the head - these are the monkey's ears.
You can sew a costume for the monkey and put a banana in his hand.
Hedgehog from a sock
You can make spines for your hedgehog from pom-poms, fur, or buy socks with toes.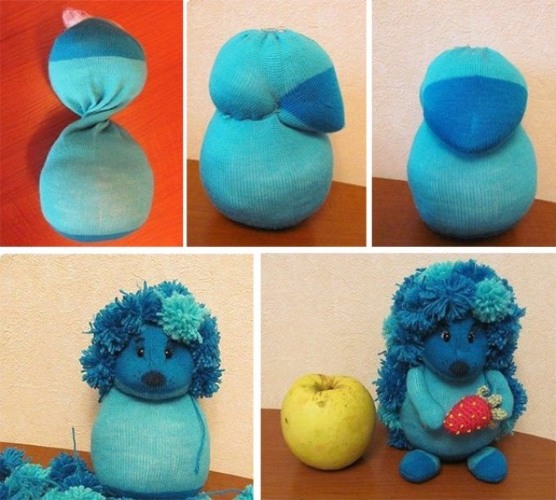
Execution:
- If the sock is long, then cut off part of the elastic, leaving 1-2 cm after the heel;
- Twist the toe just above the middle of the toe - this is the neck;
- From the heel side, this is the hedgehog's nose; sew the toe from below to make it angular;
- Sew the head with the twisted neck to the body;
- From another sock, cut out 4 rectangles, sew the cuts and stuff with synthetic padding, sew to the body - these are the paws;
- Make pompoms from threads and sew them to the hedgehog's back - these are needles. Or sew a piece of fur to the back, shaped like a matryoshka doll. If the socks have toes, then cut off the part of the sock with toes from two socks, stuff it with padding polyester, and sew it to the back.
For beauty, they sew a mushroom and apples from socks and sew them onto the hedgehog's back.
What other toys can be sewn from a sock?
A huge number of toys are created with your own hands from socks, the main thing is imagination and the presence of an unlimited number of socks. Further you can read master classes on making a turkey, a boa constrictor, a horse.
One of the simple options for making a toy from socks is making a boa constrictor
For this, take 5-10 pairs of socks, cut off the part up to the heel, after the heel and the toe to get rectangles. All parts are sewn together, alternating different socks. The first sock does not need to have the edge for the toes cut off - this is the head, sew the eyes and a large forked tongue there.
Original idea for a toy from a sock - making a turkey
For this you will need 2 socks and 2 knee-highs with toes.
Execution:
- Cut off the part from the heel to the toe of the first sock, fill it with padding polyester and sew it together on both sides – this is the body;
- From the second part of the sock, cut out two identical figures of a turkey head - a narrow one at the bottom, a semicircle at the top, sew them together and fill them with padding polyester. Sew them to the body;
- Make wings from the second sock;
- Make a beak out of fabric in the shape of a cone, sew a piece of red ribbon on top of it, these are the turkey's earrings;
- Cut off a 3-4 cm part from the golf socks, with the toes. Sew the top so that it is narrow - these are the turkey's legs and sew to the body;
- From the remains of the knee socks, cut rectangles the entire length, sew all the edges into one strip, and then sew to make a tube, which is stuffed with padding polyester. Fold several times in a zigzag and sew to the buttocks - this is the tail.
You can decorate such a toy with sequins, sew a hat or a worm.
Easy to sew sock toy in the shape of a horse
Take 2 socks. Cut one from the toe to the heel in the center - these are the hooves and the body, sew and stuff with cotton wool. Cut off the part from the heel to the toe of the second sock, sew from the heel side and stuff with cotton wool. Sew the head to the body with the elastic side. Cut 3 rectangles from the remaining sock, sew three tubes from them, stuff with cotton wool and sew to the horse, 2 legs and a tail. Sew the tail with acrylic threads.
Sew bunches of thick, multi-colored threads from the top of the head to the middle of the back. Glue on the eyes, make a mouth, and 2 nostrils. For additional decor, a bridle for the horse is made from belts. Master classes on creating toy animals from socks with your own hands are simple and accessible to everyone: from small children to the elderly.
Video: Sock Toys
How to make a bunny from a sock, watch the video:
Find out how to make a doll from a sock in the video:
🙂 🙂