During drawing a human face Beginning artists have problems with the features of the nose, which is considered an important element that helps to capture the image completely or paint a portrait.
Together with the eyes, the nose helps convey character and give special features, so it will always be in the foreground. Based on this, the main task is to demonstrate the face in the most realistic way.
What you need for drawing
Drawing portraits or individual elements of the face in the form of eyes, nose requires the preparation of a small set of materials and tools in the form of:
- papers;
- eraser;
- simple pencils with different levels of hardness.
The paper sheet must be smooth so that the shading with a simple pencil is more detailed and clear. When depicting a small drawing, this type of sheet helps to demonstrate a sharper drawing with detailed drawing of small details.
Additionally, the paper should be thick, because periodically it is necessary to remove errors with an eraser. By density per 1 m2 There should be 90-110 g. This type of sheet will easily cope with an eraser that leaves marks.
Drawing paper is ideal for pencil drawing because it is thick and has a smooth, non-rough surface.
There are other types of paper that are suitable for drawing:
| Type | Peculiarities |
| For graphics | This type of paper is produced using cellulose and cotton. The product has a grainy texture and a white tint. By density per 1 m2 is about 250 g. This type of paper easily withstands work with an eraser, so it is suitable for beginners and experienced artists. |
| Office | It is smooth and white, so it allows you to draw a more expressive and clear image. This type of paper is great for sketching without corrections. However, it has a low density, so this paper is only suitable for drawing without a lot of corrections. Otherwise, the sheet will be deformed and there will be holes from the eraser. |
| Writing | Suitable for beginners, because it has a light, slightly yellow color and medium density. The paper sheet can withstand the friction of an eraser, so there will be no damage or defects on the surface. |
Master classes in pencil
Both experienced and novice artists can draw a nose. To obtain a beautiful, correctly constructed and original-like image, you first need to get acquainted with the basic principles of academic drawing. This subject is taught in higher education institutions and art schools for children to prepare masters of fine art.
In this discipline, you can learn the anatomical structure of some parts of the face, study the geometric design of a complex facial element in the form of a nose, as well as the principles of placing shadows on an image to give volume. This is more relevant to those who want to draw at a professional level.
To become familiar with the simple technique of drawing a human face, you need to consider several recommendations:
- Closer to the tip of the nose, the shading should be lighter. Smooth shadows should be given to the protruding, upper roundness.
- This part of the face must be given color transitions. At the same time, the area of the image that will be placed close to the viewer must be the most contrasting.
- The lightest areas should be white. In painting, these areas should have highlights of light, bright pigments.
- You can start shading the more shaded areas located behind the wings of the nostrils. This area requires deep and dark shadows, which can be contrasted to make the drawing more expressive.
- The nostrils on the sides should be light, and the horizontal planes should be white.
- The nose is a characteristic, prominent element of the face, so it is necessary to think in advance about the way to depict its convex fragments. This is possible with the help of shading of shadow areas.
- The process of shading the sides will depend on the side on which the light falls, as well as the angle of the face.
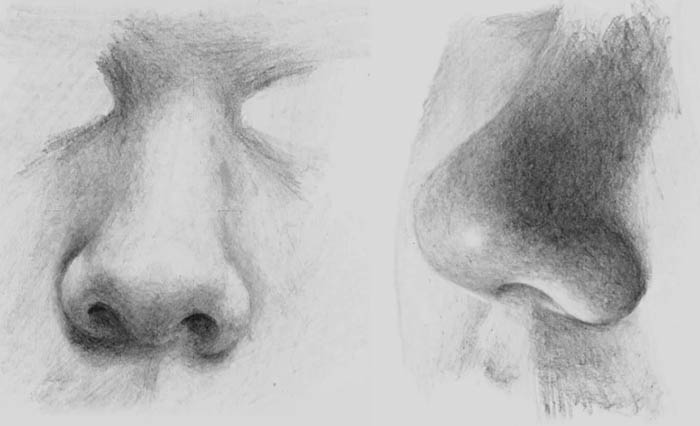
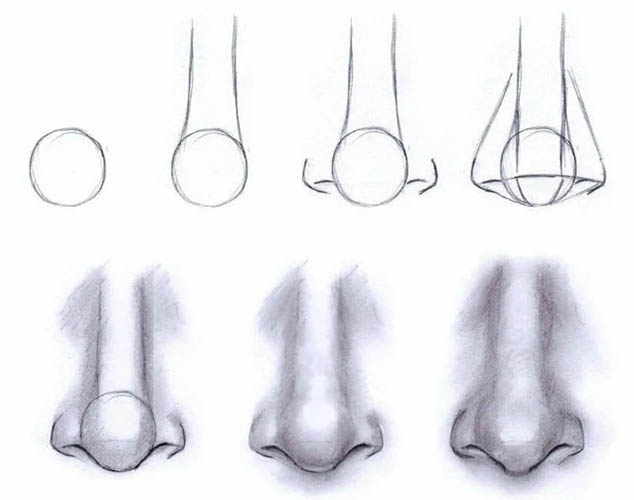
Full face
When drawing a nose from the front, you first need to create a sketch. This stage is considered more difficult than drawing details. If you carefully think through the sketch, the drawing will be truthful and beautiful.
At the same time, you may be unfamiliar with the ideal proportions of the human body and face. In this case, you need to rely on knowledge related to the depiction of geometric figures.
Step by step sketch creation:
- To show the length of the nose, draw a straight line vertically, which is closed at each end by 2 short lines horizontally. These lines must be of the same length.
- To make an additional segment along the main axis, make an indent of 6 mm down from the top line. This segment should be shorter than the top line.
- From each edge of the lower segment, step back 2 mm horizontally and draw points to which straight lines are drawn from the short upper line (drawn in step 2). The result should be a figure in the form of an elongated trapezoid with an expansion towards the bottom. Using short straight lines, connect the ends of the upper segment horizontally with the short line. In this case, a small trapezoid should be drawn, with the short edge directed downwards.
- To mark the nostrils, find the lower horizontal segment, from which step back 5 mm to different sides and put dots.
- From the segment obtained in step 2, draw 2 short straight lines horizontally on each side to the upper line. Draw a dot in the center of each line. From these dots, without touching the surface of the paper, step back with a pencil by 2 mm to the sides and draw dots again.
- From the extreme points on the upper segment, draw 2 straight lines horizontally to the last 2 depicted points. Then connect these points with the points indicating the nostrils.
To complete the sketch, you need to step down 5 mm, continuing the main line vertically. In this case, you need to draw straight lines from the nostrils to this point.
Step-by-step drawing of details:
- Give the wings and tip of the nose a rounded shape. The bridge of the nose should have a more streamlined shape.
- Draw 2 depressions that will act as nostrils.
- Use an eraser to get rid of all the extra lines and refine the drawing.
- Afterwards, completely shade the image using a hard pencil. Do not press hard. The shading should look in the appropriate directions. Give the upper part of the bridge of the nose and the edges of the wings darker strokes using a soft pencil. In this case, go over these areas again.
- To give the image volume, the top of the nose should be lighter.
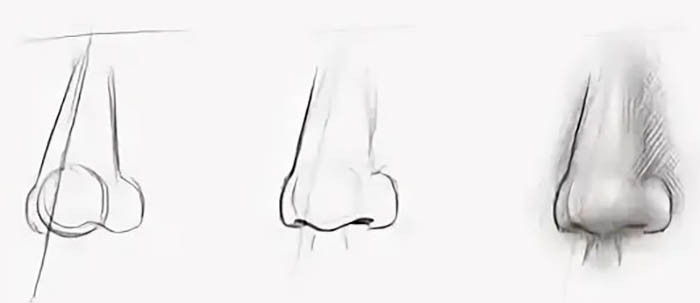
In profile
You can draw a nose in profile. This type of drawing is easier to do than drawing this element of the face from the front.
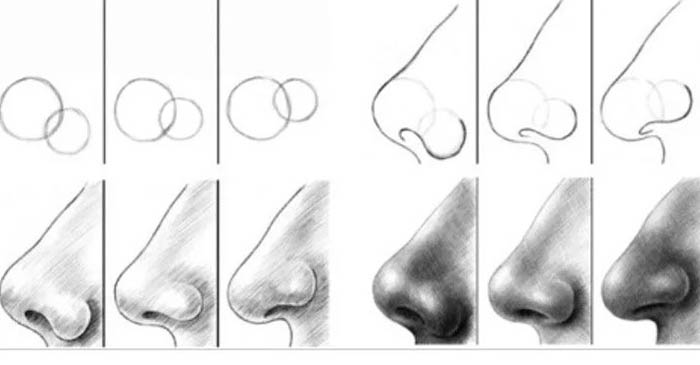
Step-by-step description of the work:
- To create a sketch, first use a simple pencil to mark the forehead and the area for the eye. The 2 straight lines that connect should resemble an obtuse triangular angle. Then draw a long straight line at an angle for the bridge of the nose, which should be longer than the forehead area.
- Additionally, set the position of the eye so that you can easily understand the dimensions of the portrait.
- Afterwards, outline the wing of the nose, which may initially have an irregular, angular shape. This part of the nose can be improved later.
- To indicate the depression that serves as the opening of the nostril, draw a small figure that resembles a flattened oval.
- Give the shape a more streamlined appearance by rounding the tip of the nose and making the wing more realistic. When drawing a woman's nose, the nostrils often need to be much more graceful and miniature than a man's.
- To mark the end of the tip of the nose, draw a small curved line, located at a close distance from the hollow in the nose. If necessary, you can highlight the hump in this area.
- Shade this area of the face, drawing strokes from top to bottom with a simple pencil. At the beginning, the pressure should be stronger, and towards the end of the stroke, the pressure should be reduced.
- The tip of the nose with the bridge area and the top of the wing should be practically not shaded so that the image is much more voluminous.
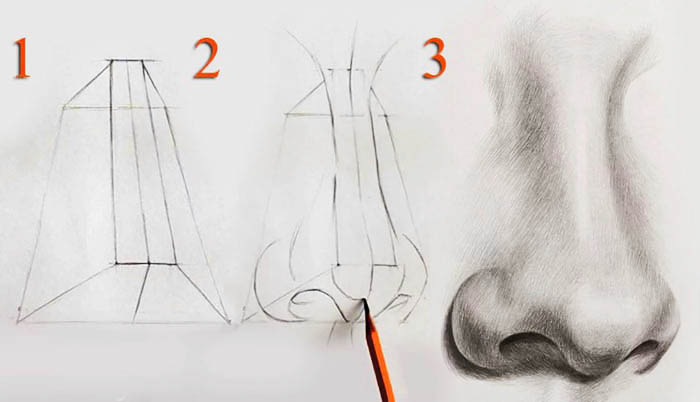
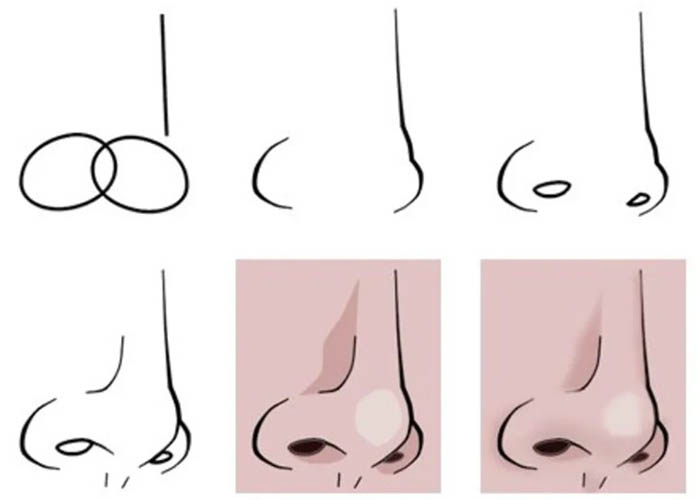
Half-turned
You can draw a nose half-turned, and you don't need to have any special skills. For these purposes, you should use a soft pencil to get thin and thick lines, relative to the pressure force.
Additional sections should be soft, so you need to touch the surface of the paper lightly. The main drawn lines should be more solid and confident. In this regard, you need to make sweeping movements with your hand. At the same time, extra lines can be easily removed with an eraser.
Step-by-step description of the work:
- On a sheet of paper, draw 2 vertical lines that are parallel to each other and beveled at an angle of 30°. Connect these lines with a short segment at the top. These lines will act as guides for the bridge of the nose.
- Add a long vertical line to the resulting figure, which will deviate by 10°. This line will serve as a guide for the correct placement of the nose, relative to other parts of the face.
- At the bottom, connect all 3 vertical lines with 2 segments, one of which should be long, the other short.
- Additionally, draw 2 small lines under the existing ones to obtain a trapezoid. This figure will act as a sketch for the lower area of the nose.
- Connect the lower corner of the trapezoid on the left with the upper corner on the same side. This line is not mandatory, but it helps to better understand how the nose will be located on the side of the face that is hidden from the viewer.
- Then draw 3 circles. Place the large circle between the 2 vertical lines below that were drawn in step 1. Place the other 2 circles in the 2 distant corners of the trapezoid figure. The most distant circle should be small in size because it will protrude as the wings of the nose.
- Using a soft pencil, outline half of a large circle with an outer line to obtain the first part of the nose. It is not necessary to make the line very even, because in nature there are no perfectly even noses. When drawing this detail of the face from a reference or model, it is advisable to draw the shape of the bridge of the nose approximately.
- To highlight the wing of the nose, draw a small circle on the left side again. To mark the nostril on the right, draw a small oval.
- Afterwards, better outline with a pencil 1/2 of the circle on the right side.
- In the center of the left circle, draw 1 small oval, which will be the far nostril.
- Draw a slightly curved line to create the right side of the bridge of the nose. In this case, use the inclined vertical line that was created in step 1 as a guide.
- Use an eraser to remove the circles and lines that were used in the process of constructing the nose.
- Shade the nostrils with a dark shade. The strokes near the wing on the right side and the tip of the nose should not be too dense.
- Place a solid shadow along the entire length of the bridge of the nose, which should be denser at the bottom than at the top. This will give the drawing volume.
- Between the wing and the bridge of the nose, draw a darker shadow that should not touch the wing. Around the nostril, which is at a large distance from the viewer, draw a slight shadow.
- Give the two nostrils a darker shadow.
Bottom part
When depicting a human nose, instead of the entire fragment, it is acceptable to draw only the lower part to highlight the wings and nostrils. In this case, the larger half of the nose will be hidden from the viewer.
Step-by-step description of the work:
- Draw a figure with round corners that resembles a triangle.
- Draw a large circle in the upper corner of the figure.
- Additionally, draw 2 curved shortened lines that extend to the right and left sides from the upper area of the circle.
- Draw 2 identical ovals under the circle, slightly deviated to the left and right sides.
- To highlight the nostrils, re-outline the rounded lines from each side of the ovals with a pencil. To create the interlabial fold under the nose, add a slight shadow.
- Draw the nostrils with a black pencil. Place darker shadows near the large circle, in the area of the bridge of the nose and near the wing of the nose.
- The other part of the nose should not be shaded because it should be illuminated.
- Remove the circle with the eraser that was used as a sketch.
- To make the design more natural, it is permissible to shade or rub the shadows with a cotton swab.
Minimalistic
Drawing a nose is acceptable in a simple technique, without using a large number of details with shadows. This method is used when detailed facial fragments are not required. This drawing is suitable for depicting an anime character, a cartoon, or when creating quick sketches.
Step-by-step description of the work:
- On a sheet of paper, draw a flat small triangle, the acute angle of which should be directed downwards. Shade the geometric figure.
- Using a shading tool or a cotton swab, go over the hatching inside the geometric figure. Then, using the cotton swab, draw a semicircle above the triangle. You don't have to do the shading. However, in this case, the upper area will have to be painted over with a lighter shade.
- Using a thin pencil, draw 2 dark brackets inside the triangle that will act as nostrils. After drawing these elements, the nose can be given more recognizable outlines.
- On each side of the nostrils, draw 2 additional small lines that will act as the wings of the nose.
- The contours of the tip of the nose should be clearer. However, you can't overdo it, otherwise the shadow will lose its naturalness. In this case, to emphasize the shape of the nose, it is recommended to add one line on the right side below, the second on the left side above.
Basically, when drawing a head, the nose is the modular size, so more attention should be paid to this process. If you more accurately establish the proportions and build the general shape, the image will be more believable. By adhering to the sequence in this process, you can avoid the difficulties associated with the depiction of different shapes of noses.
Video about drawing
How to draw a nose: basic mistakes: