If an artist strives not just to draw, but to develop and improve his abilities, he must do so that the portraits he draws become better and better. The process of depicting a human face – is not the most difficult work. The main thing is to clearly imagine what the face looks like (that is why artists need a model) and to observe the proportions.
A step-by-step guide and preparation for work will help a novice artist in this matter.
Drawing tools
It will be easier to maintain the proportions of a person's face for drawing if the main tool is a simple pencil and the main material is paper. You will also need an eraser, which will help remove unnecessary lines or other unnecessary elements of the face.
Anyone who is just beginning to master the basics of fine art will want to use what is already familiar to them. That is why many beginning artists create portrait works with simple pencils. They allow you to make the smoothest and most precise strokes.
When choosing simple pencils, it is worth remembering the scheme by which they are marked. The letters "H" indicate hardness, and the letters "B" - softness. Also, the larger the number next to the letter, the harder or softer the lead is.
Once an artist gains confidence in himself and his abilities, he will realize that it is time to expand his reach.
For example, you can start working with the following tools:
| Tools | Description |
| Solid graphite pencils | They differ from regular pencils in that they are devoid of a wooden shell. In fact, they are bare rods. Their advantage is that they simplify the process of coloring large areas. They can also be used to create various effects that are impossible when using more familiar pencils in a wooden shell. It is also worth drawing the artist's attention to the fact that solid graphite pencils can be colored. |
| Charcoal pencils | With their help, you can get a deeper black color, as well as a smoother stroke. The name of such tools suggests that charcoal is used to make them. With the help of such tools, you can produce many effects: from thin lines to bold strokes. However, working with such pencils can be difficult for a beginner. |
| Ink or mascara | This solution will also lead to excellent results. The classic pen and ink consists of black ink and white paper; however, there are also options with other colors |
| Pastel | This paint will be a great choice when you need to add brightness and more colors to your drawing. The main types of this paint are soft, hard, oil, water-soluble. You can also use pastel pencils. They are very convenient to work with |
| Watercolor pencils | Designed for working with watercolor techniques. They can also be used as independent writing instruments when it is necessary to draw sharp and bold lines. |
 In addition to the basic tools that directly leave marks on paper, additional tools are also used to create certain effects. The simplest of these tools are fingers. It is enough to simply run your finger over the surface of the paper to perform shading.
The following also help to shade:
- brushes;
- combs;
- sponges;
- napkins;
- cotton wool;
- textile.
The proportions of a person's face for drawing are easy to maintain if you choose the right materials and tools. It is also important to remember that mistakes cannot be avoided during the creative process, no matter how hard the artist tries and how professional he is. You will constantly have to remove something, add something, especially in such precise work as creating a portrait. Therefore, you cannot do without an eraser.
It is recommended to use not a standard eraser, familiar to everyone from school, but a kneaded eraser. It differs from a traditional eraser in that it is softer. A kneaded eraser is great for creating sketches and carefully working out details. Its only problem is that the kneaded eraser can dry out. To avoid this trouble, you need to store it in a box. Kneaded erasers will help when forming dots to highlight highlights in the eyes and hair.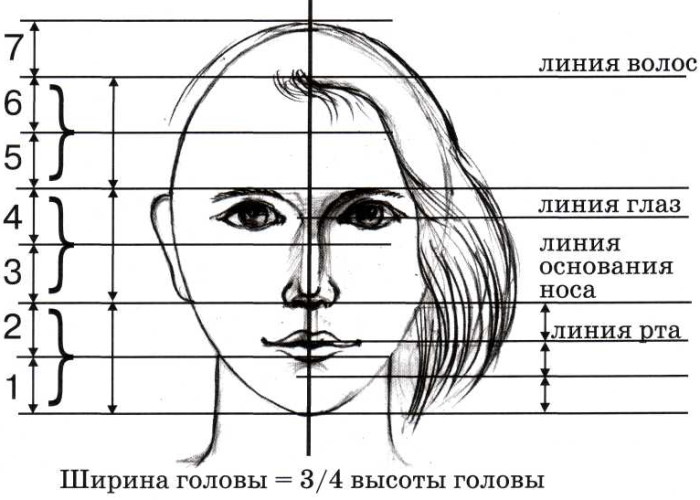
Dry brush technique can be used in oil portraits.
Artists work with gouache and watercolors, and can also use:
- ink;
- acrylic paints;
- tempera;
- pastel.
The main requirement of the "dry brush" method is that the bristles of the brush should not be wet. If water-soluble pigments are used, they must be completely wrung out before use. The bristles are dipped into a fairly viscous paint and then applied to a dry surface.
Master classes
It is not necessary to try to create a portrait that will be indistinguishable from a photograph at the first attempt to draw a human face. The very first drawings can be simplified as much as possible. However, they will help the artist to learn and consolidate knowledge about the physiology of the face.
Drawing a human face must be done in accordance with proportions. After all, if they are not observed, the resulting head will look little like a human one. The master classes that are given below are arranged in order of increasing complexity. And it is recommended to start with the first - the simplest option.
Full face
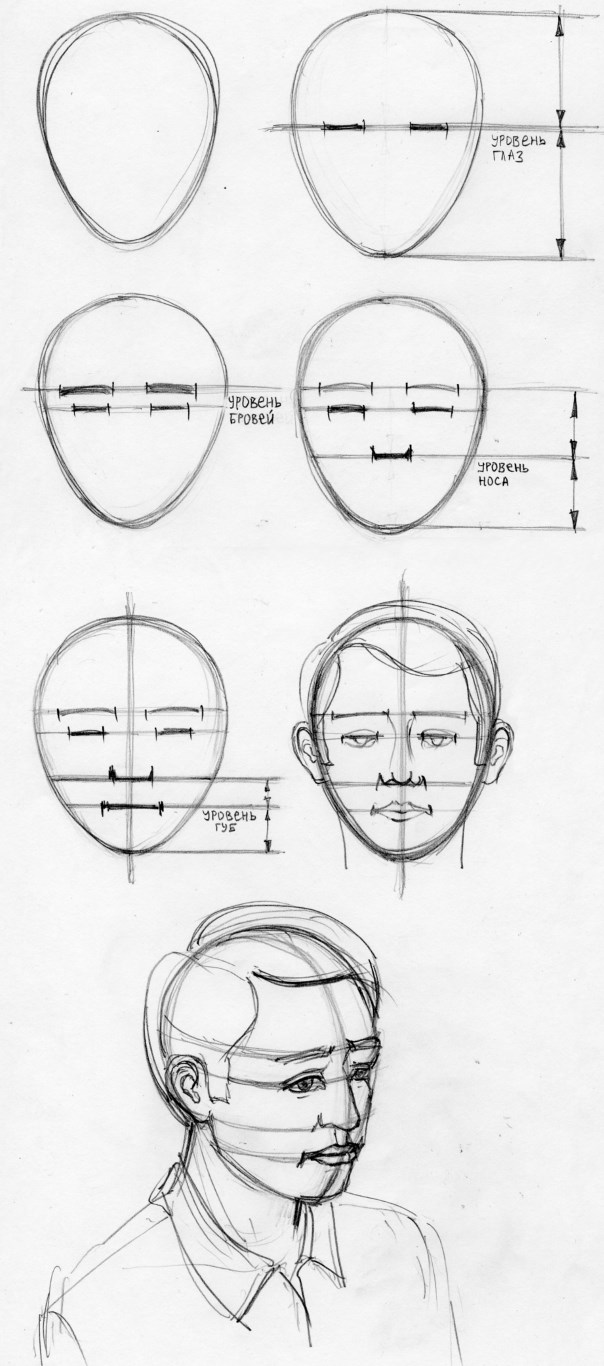
The skull and jaw are a slightly flattened sphere, so the face in full face is something like an egg, turned upside down with the wide half up. This is the "egg" that needs to be drawn at the first stage of the work on the image of the human face.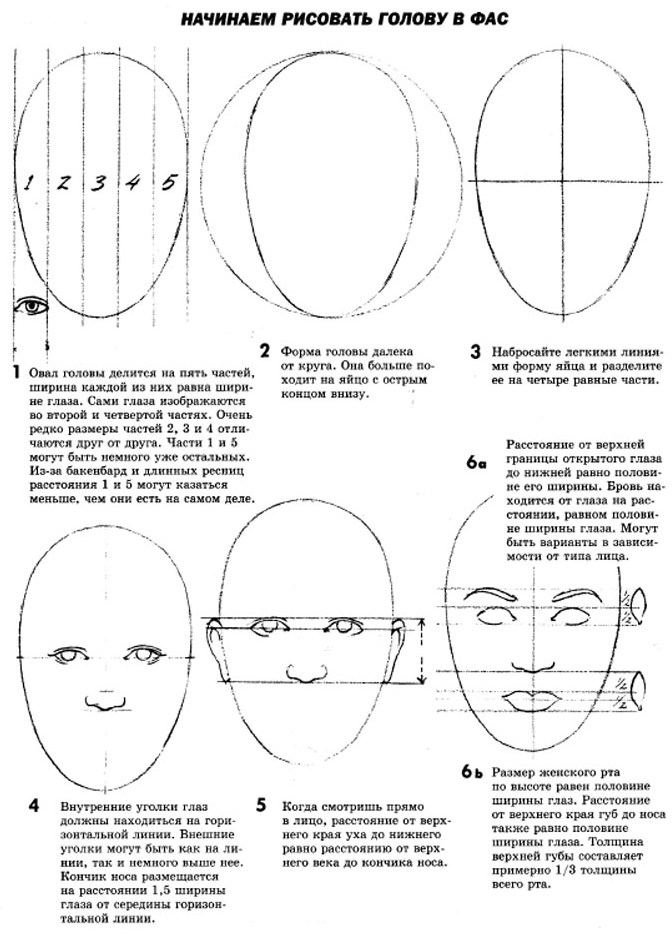
The steps to create it will be as follows:
- Draw a figure resembling an egg on white paper. It is positioned vertically. Its narrow half is at the bottom, and the wide half is at the top.
- Once the "egg" is drawn, you can begin drawing 2 perpendicular lines. Each of them should divide the "egg" (aka the face) into 2 equal halves. The horizontal line divides the figure into upper and lower parts, and the vertical line into left and right. Accordingly, the intersection point of these lines is in the very center of the "egg". As a result, the "egg" will be divided into 4 equal parts. After this, you can move on to the next stage.
- Pay attention to the horizontal line. It is on this line that the eyes will be located. The main task is to find their locations. The right eye should be located strictly in the middle between the right edge of the "egg" and the intersection point of the perpendicular lines. Accordingly, the left eye, on the contrary, should be placed in the middle between the left edge of the "egg" and the intersection point of the perpendicular lines. It is not difficult to draw the eyes, considering that this is an example of a person's face without detailed detailing. Here it is only important to observe the proportions. Each eye is a small circle located strictly above the point found in the previous step; and an arc passes above this circle.
- Start working with the horizontal line. For now, you will only need the lower half, which must be divided into 5 equal parts. This division will help to correctly determine the location of the nose and mouth. In particular, the lower part of the nose should be on the 2nd point from the top (under the 2nd segment of 5). The line of the closed lips is one point lower. The line of the nose is a small arc, and the line of the closed lips is an almost horizontal straight line. It should be slightly longer than the line of the nose.
- The upper half of the vertical line is divided not into 5, but into 4 equal segments. The hairline may pass between the 1st and 2nd points. However, this feature may be different for different people, and the hairline itself may have a different shape. You can imagine it as just 2 adjoining arcs.
- Work on the placement of the ears. Here you need to focus not on the points on the auxiliary vertical line, but on those elements of the face that have already been depicted in the previous stages. The ear should be represented by a figure of almost semi-oval shape, which extends from the height of the tip of the nose to the height of the upper eyelid. It is important that this rule does not always apply, but only in those cases when the head is located straight - not tilted up or down. It is also important not to forget to draw the 1st arc line above each eye. These will be the eyebrows.
- Erase all auxiliary lines with an eraser, as well as those lines that were drawn accidentally. Add a short arc under the line where the lips meet. It should be approximately the same as the lower part of the nose.
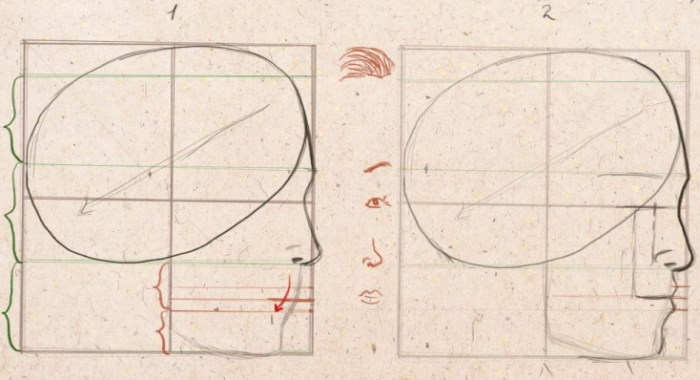
Profile
The proportions of a person's face are just as important for drawing in profile as they are for a full-face drawing. The face in profile is also shaped like an egg, but it differs from the full-face position in that its sharp side is directed toward the corner. The auxiliary perpendicular lines this time will divide the head into the cranial and facial parts.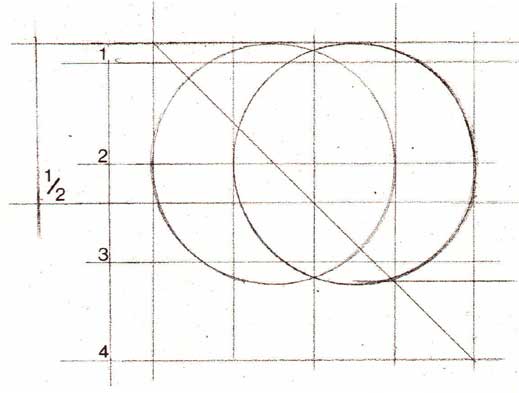
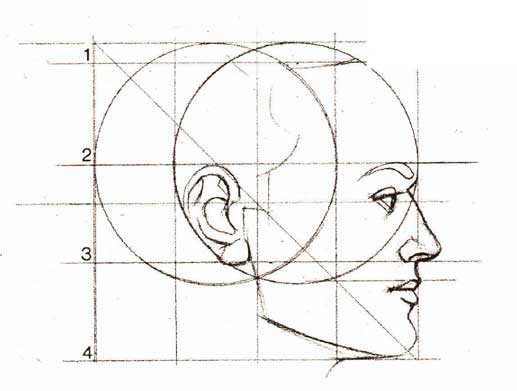
The steps to create a face in profile will be as follows:
- Draw a figure that has the shape of an egg. It will now be located neither vertically nor horizontally, but diagonally. Moreover, the narrow part of this "egg" will become the chin, and its wide part is the upper part of the skull.
- Once the "egg" is drawn, you can begin dividing it into 4 parts. To do this, as in the previous example with the face in full face, draw 2 lines intersecting at a right angle in the center of this "egg".
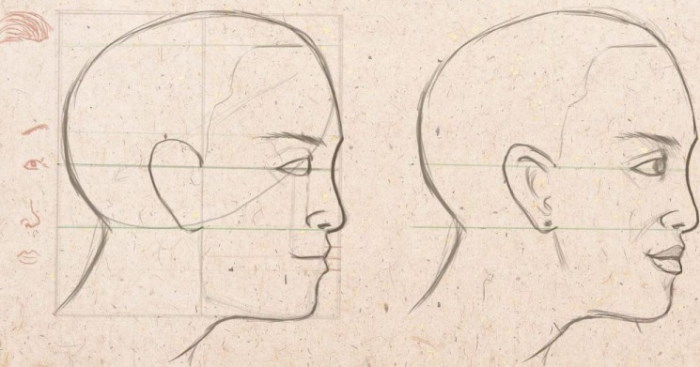
- In this position, the ear is clearly visible, so it should be drawn first. It is located immediately behind the vertical line, or more precisely, on the left side of it, if the face is looking to the right. As before, the ear should be between the lower tip of the nose and the upper eyelid in height.
- The ear can be used as a guide when drawing the nose and eye. The nose can be imagined as a bulge on the right side of the "egg". The root of the nose is on the horizontal line. It can be placed a little higher. The mouth, which is a little lower, is, on the contrary, a hollow. The eye has a shape similar to a triangle, but the side that is closer to the nose should not be straight, but arched. An arch passes above the eye. This will be the eyebrow. The eyebrow line is marked by the 1st point above the horizontal line, which is the most convex part of the skull. The 2nd eye does not have to be drawn, because it is simply not visible in this position of the face.
Drawing based on a square
It is not necessary to use an oval as a base. You can start drawing a face with a square.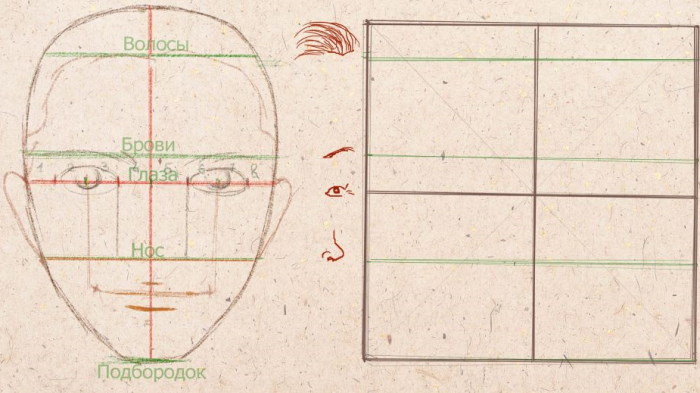
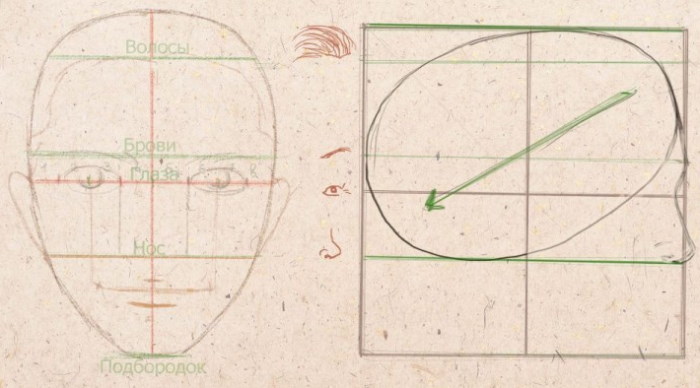
This creative process would proceed as follows:
- Draw a vertical line. It should be drawn so that the sheet of paper is eventually divided in half into equal right and left sides. It is important to remember that these are auxiliary lines. They are only required for construction. Therefore, you do not need to press hard on the pencil, because these lines should be removed at the final stages of the work.
- Draw a large square in the middle. The face itself will be inscribed into this quadrangular shape in subsequent stages. There is no need to use the compositional rule of leaving more space at the bottom.
- Divide the figure into 3 equal parts vertically.
- Take the value of half a third of the square and add it above the square.
- Draw a horizontal line. It will mark the top border of the head.
- Determine the location of the eyes. They should be in the center between the top and bottom lines. You should find the middle on the axis and draw a horizontal line through it. This is where the eyes will be.
- Remember the round skull. This should be done before you start drawing the circle on top. Its radius should be 3 times smaller than the distance between the top and bottom points of the head.
- Draw another circle. It should be slightly smaller: its radius is 4 times smaller than the distance between the top and bottom points of the head.
- Connect 2 circles using tangent lines. After that, you will get an oval face. However, the work is not finished yet. Next, the portrait artist will need to add detail.
- Draw round eyes. To do this, divide the segment between the intersections of the eye line and the face contour into 5 parts. Each even segment (2nd and 4th both above and below) are the places where the circles will be inscribed.
- Start working with the nose. It should be on the 3rd part of the square – approximately in the middle. Its width is equal to the width of the 3rd eye.
- The ears are always the same length as the nose and are located in the same area, but at the edges of the main oval of the face.
- Move on to the lips. To determine where exactly they will be in this drawing, the lower 3rd part of the square should be divided into 3 vertical areas. The line of lip closure will pass under the upper area. Accordingly, the other 2 areas will be under this line. The length of the lips should be projected from the center of the eyeballs.
- Remove all unnecessary lines. To do this, use the eraser.
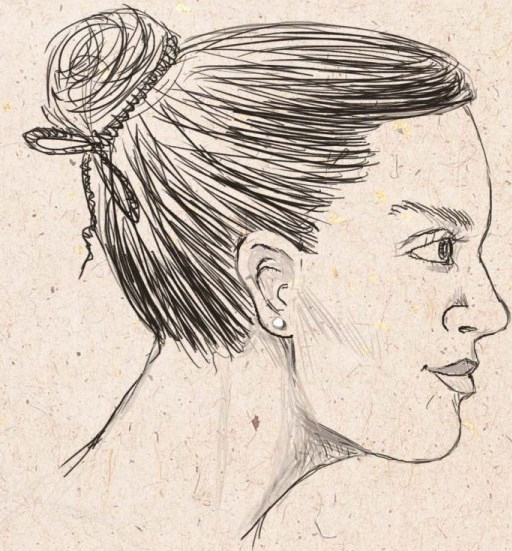
A professional artist will want to make his painting look more realistic. However, for a beginner, this is not necessary.
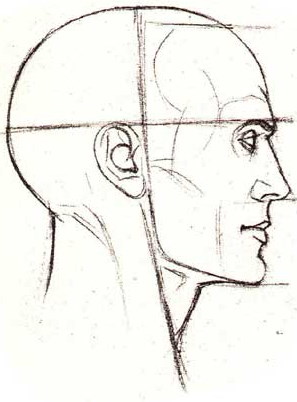
Detailed drawing with shadows
Proportions of a person's face for drawing help to avoid distortions and unnaturalness. If you add shadows to the face in the right place, the portrait will become more beautiful and more alive. However, adding shadows is one of the last stages of the entire work. You also need to start with the designation of the shape of the head and drawing auxiliary lines.
Namely:
- Outline the shape of the face. This is the easiest part of the work. All that is required of the artist is to depict a figure that is close to an oval in shape, but more like an egg. The wide part of this "egg" should be at the top, and the narrow part, respectively, at the bottom.
- As in the previous examples, draw a couple of lines. They should be straight and intersect at a right angle in the center of the figure drawn in stage 1. It is important to remember that all these lines will only help in constructing the face. After finishing the work, they should be removed with an eraser, so when drawing them, do not press hard on the pencil. The line running vertically will help create symmetry, and the axis that runs horizontally will help determine the location of the eyeballs.
- Start working on outlining the main elements of the face: eyes, nose, mouth, eyebrows, ears. The artist can start with any detail. However, it is important not to get stuck on any one of them for too long. At the very beginning, it is best to outline all the details at once, without going into details of their structure. The main thing is not to make a mistake with their location, otherwise this will lead to a violation of proportions, which will negatively affect the finished drawing. At the same time, it is important not to press hard on the pencil so that at the next stages it will be possible to easily eliminate all unnecessary things. For example, if some elements turn out to be not very even and not very accurate, then this mistake can always be corrected.
- Specify shapes and sizes. Here you need to make adjustments to all the details of the face that were drawn at the previous stage. All necessary corrections of errors are also made at this stage.
- Add shadows. They should be near the nose, near the eyes, under the upper lip. Also at this stage, you need to highlight the cheekbones, draw the hair and show the neck. Then apply a shadow to the neck, which is cast by the chin.
Many people are convinced that only a select few talented individuals can draw. However, this is a big mistake. Drawing, like any other creative process, can be mastered by anyone, regardless of age, gender, or life beliefs. All it takes is desire, persistence, and a little patience. The first portrait of a person will probably not be the best; however, the second will be better, and the third – better than the second.
The main thing an artist needs when drawing a portrait of a person is knowledge of facial proportions and construction rules. It is not difficult to learn. In addition, the task will be significantly simplified if you follow the instructions.
Video about human facial proportions
Proportions of the human face: