Vegetables and fruits, which can be seen growing in large quantities in gardens and vegetable patches in the summer, are not only desirable food and ingredients for delicious dishes, but also topic for drawing.
Drawing tools
To create a still life, you will need paper and several writing instruments. When choosing paper, remember: it should be thick enough so that the drawing does not show through on the back side.
In addition, thin sheets have other disadvantages:
- they can be quickly ruined by going over them with an eraser;
- They get wet from the watercolors.
Felt-tip pens and pens
Educators, teachers and many parents agree that it is better for preschoolers and first-graders not to use felt-tip pens and pens when drawing. These tools write easily, so the hand does not develop.
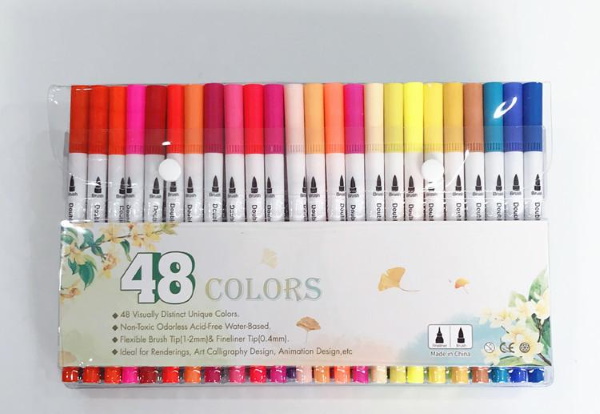
It is better to choose colored pencils and paints.
Colored pencils
Young artists under 3 years old can buy wax crayons, the main advantage of which is that they do not need to be sharpened. For older children, it is better to use wooden and plastic crayons. The latter are easy to sharpen, which will be easy to do even for a 5-year-old child.
The most beautiful still lifes can be created using watercolor pencils. When the painting is ready with their help, you need to run a damp brush over it, as a result the drawing seems to come to life.
Paints
If a child wants to draw, but is not yet able to hold a brush, you can give him finger paints. When choosing such paints, you should pay attention to the numbers on the packaging. They indicate what age children these tools are intended for.
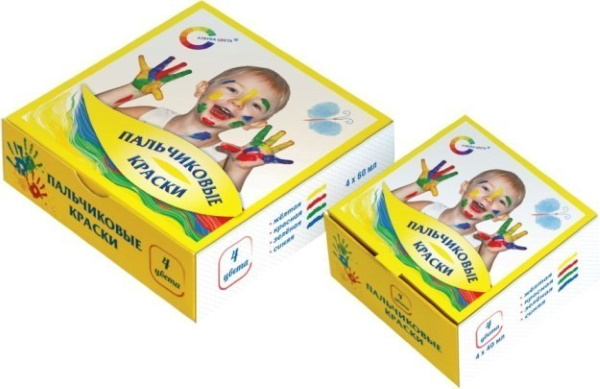
If these are numbers “1”, “2” or “3”, it means that the paints contain fewer harmful substances.
Master classes
Drawings of fruits and vegetables are recommended to be created after preparing materials and tools. If you correctly follow the stages during drawing, the result will surprise even a novice artist.
Tomato
One of the most common objects in still life is a tomato. It is not difficult to depict this vegetable. Thanks to its spherical shape and uniform color, it is easy to draw.
The process of drawing a tomato on paper consists of the following steps:
- Draw a circle. At the top, add a small branch, which can be represented by a pair of short, slightly rounded lines connected at the top.
- Add a few green leaves near the branch. Note that the leaves look like a star.
- Color the vegetable. The tomato should be red, and its branch and leaves should be green. There should also be highlights on the surface of the vegetable. They can be represented by small white circles. The easiest way is to leave the areas where the highlights should be located unpainted.
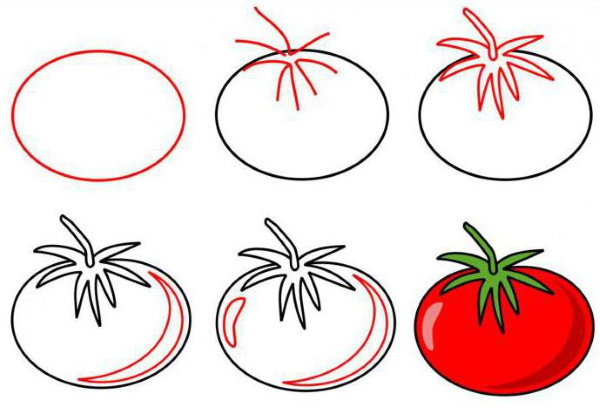
Ready.
Apple
The fruit design is topped by an apple, one of the most common vegetables, similar to the tomato.
This fruit must be drawn as follows:
- Draw a circle or a light oval. Draw 3 lines under it: 1 of them should go horizontally a few cm from the bottom edge of the circle; the other 2 lines should connect the left and right edges of the circle with a horizontal line. At the same time, they should be located at a slight angle. The right line, going down, should deviate slightly to the left, and the left one also goes down, but deviates in the opposite direction.
- Using the shapes from the previous step, draw the outline of the lower part of the fruit in the shape of the letter “M”.
- At the top, draw a tail, which can be represented by a pair of short lines located at a slight angle.
- Draw the basics of the leaf. The main components are an oval, a triangle, and a curved line.
- Having finished drawing the leaf, using the main shapes, outline the contour of the fruit, making the lines more distinct and do not forget to add a highlight, which can have the shape of the letter “D”.
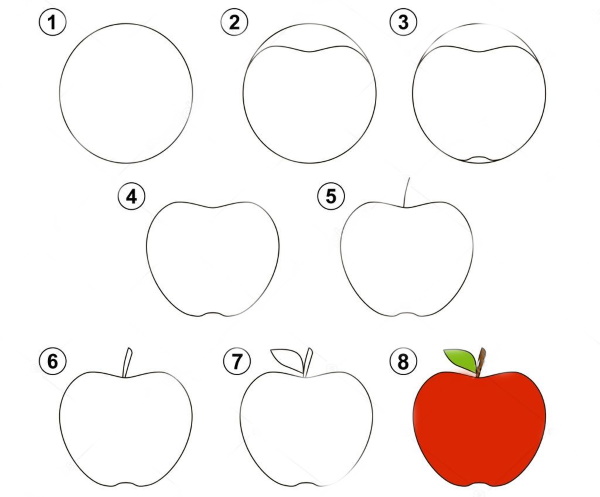
Ready.
Cucumber
The cucumber differs from other common vegetables in that it is ellipsoidal.
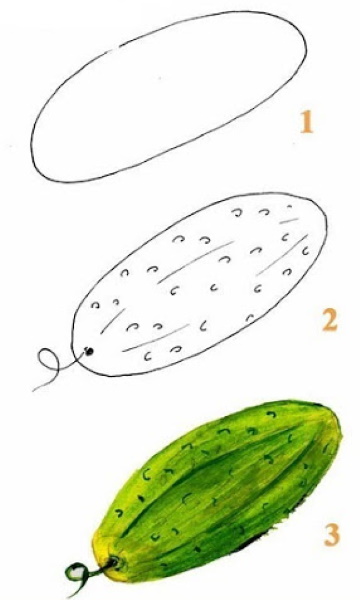
In a flat drawing, the cucumber will be represented simply by an oval.
However, it should be painted in such a way that the oval resembles a real cucumber.
The steps for drawing a vegetable are as follows:
- Draw an oval.
- Place dots or small circles all over the oval surface. These will be the pimples.
- At one end of the vegetable, draw a tail, which can be represented by a twisted thin line.
- To make the surface look more realistic, add a few lines running along the cucumber.
- Color the cucumber. For this, use different shades of green.
Pear
Along with apple, pear is one of the popular fruits.
It has an oblong shape, and the color of the fruit can be any:
- green;
- red;
- yellow.
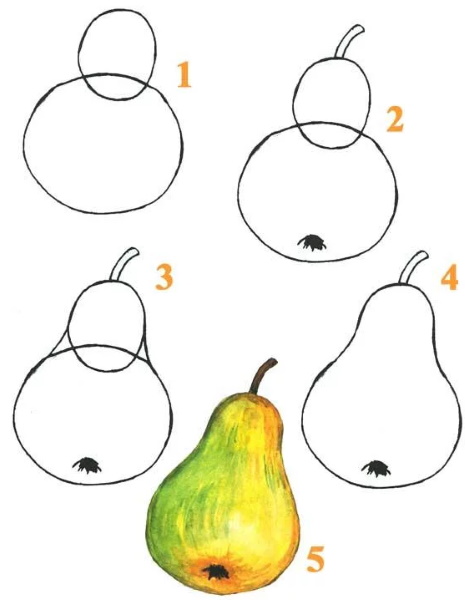
Drawing a pear is easy if you follow the 5-step instructions:
| No. | Stage | Description |
| 1 | Sketch of a fruit | Draw 2 circles of different sizes. 1 of them - the one that is bigger - should be located at the bottom. The circle that is smaller is at the top. The circles should intersect each other at 2 points. |
| 2 | Working with the top and bottom | Above the small circle, draw a short tail, which can be represented by a pair of arced lines connecting at the top. At the bottom of the large circle, draw the bottom. To do this, it is enough to color in a section a few mm wide with a pencil. |
| 3 | Merging lines | Connect both circles with 2 smooth lines of the outer contour, passing from the left and right. |
| 4 | Removing excess | Use the eraser to remove all extra lines inside the circle. |
| 5 | Coloring | Pear comes in different colors. You can use a single color or their various combinations. |
Still life with colored pencils
Drawings of fruits and vegetables can be depicted lying on the table. Having prepared a sheet of paper, a simple pencil and several colored pencils, you can begin to depict a still life.
1:
2:
3:
4:
5:
The process consists of 7 stages:
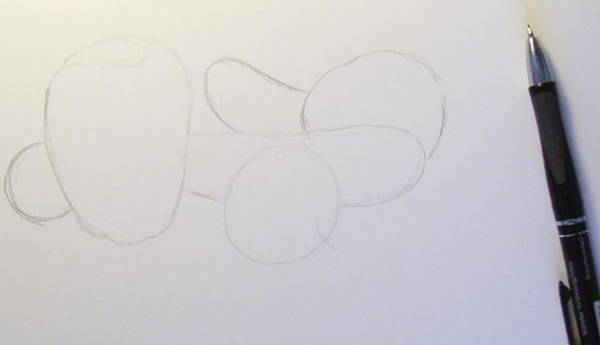
| No. | Stage | Description |
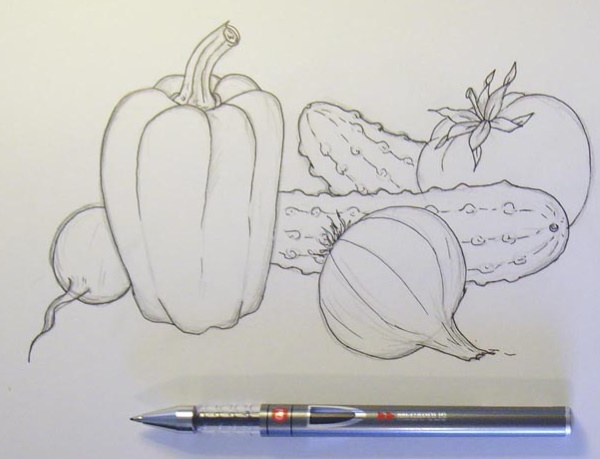
| 1 | Create the outline of each fruit | Fruits and vegetables can be different, depending on the artist's wishes. The number of fruits can also be different. For example, you can depict: · 1 pepper; · 1 radish; · 1 onion; · 2 cucumbers; · 1 tomato. Cucumbers and peppers should be represented as elongated ovals, and everything else as circles. To make the composition complete and harmonious, you need to try to make sure that the fruits are not just lying in a row, but are located one after another. |
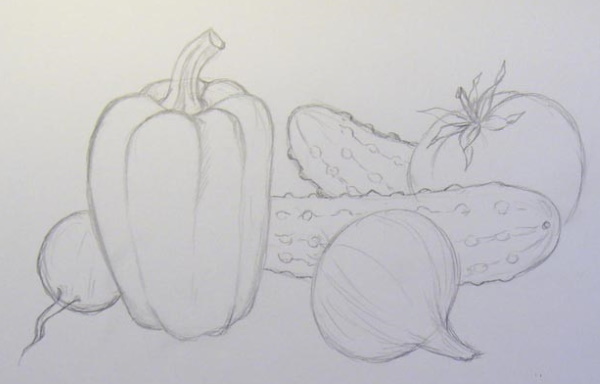
| 2 | Detail the fruits | Each vegetable should have its own characteristic shape:
· A small branch should appear on one side of the pepper; · the tomato should also be decorated with a small “tail” and several leaves; · pimples should appear on the surface of the cucumbers; · The radishes and onions need to be given short “tails”. |
| 3 | Trace the contours of the fruits | This can be done using a gel pen. After tracing, it is necessary to remove all the lines that were previously drawn with a pencil. An eraser is used to remove pencil marks. |
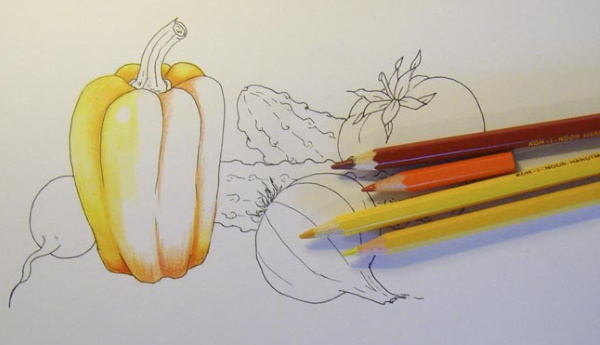
| 4 | Color the pepper | This vegetable needs to be colored with a yellow pencil so that the highlight area on the left side remains untouched. The highlight is a small white spot. The places where there are depressions and unevenness should be colored with orange and brown pencils.
To add saturation to the color, you need to use other shades of orange. The work on adding color to the pepper will be completed immediately after coloring its stalk. A green pencil is used for this. |
| 5 | Color the radish | To do this, you need to use pink. It is important not to forget to leave the highlight area unpainted, which should be located on the left side. Burgundy and red pencils will help make the color of the root vegetable deeper. The "tail" of the radish should have the same color as its main part, that is, rich pink. |
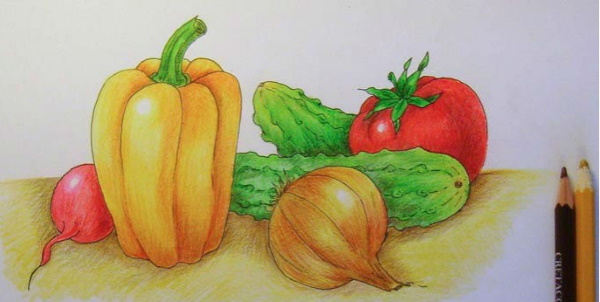
| 6 | Color cucumbers, tomatoes and onions | Not only green, but also yellow and brown colors are used to color cucumbers.
The bow can be colored with yellow, orange and brown pencils. It is important to remember about the glare on the left side. The tomato should have a rich red color. To enrich it, use burgundy and brown pencils. |
| 7 | Paint the surface of the table | To do this, simply choose any color, for example, brown, and shade the lower area of the paper. The only thing that makes the work a little more difficult is the need to create shadows around the fruits. The shaded areas on the brown table should be colored with a dark brown pencil. |
Still life "Plate with vegetables" in gouache
Drawings of fruits and vegetables on a plate can be created using gouache paint. The drawing can be done in a regular sketchbook.
The stages of its creation are as follows:
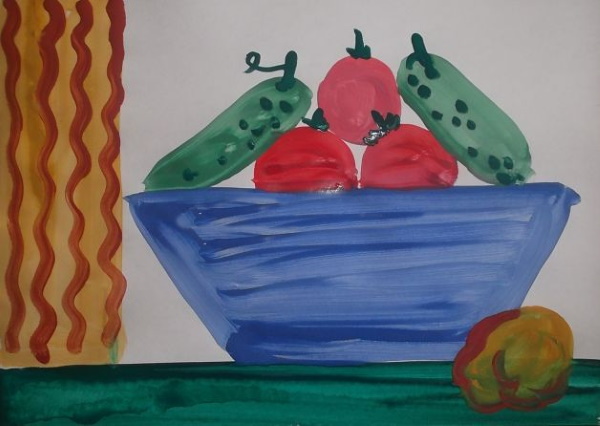
- Draw the surface of the table on which the plate filled with vegetables will stand. For this, use dark green or emerald gouache. Use a brush to draw a stripe along the bottom of the sheet.
- Proceed to drawing the plate. It will be blue. The silhouette of the plate has the shape of a trapezoid and resembles a boat. First, you need to make the contours, and then color the plate.
- Place vegetables on a blue plate on a green table. You can start with tomatoes. They should lie in a small pile. It is best to place them in the center of the plate. There can be 3 or more of them. Red paint is used to draw these vegetables. Tomatoes are round, so their silhouettes in the drawing should also be represented by circles.
- Draw cucumbers. They are oval-shaped. To draw them, use light green gouache. It will be enough to draw 2 cucumbers. One can be on the left, the other on the right. Both of them lie on the tomatoes drawn earlier.
- Draw a potato. It will not lie on the plate, but next to it, on the table. It can be 1 tuber. Its color is yellow. You can "put" the tuber, for example, on the right side of the plate, and on the left you can draw a curtain with the same paint. This is done simply: it is enough to draw a vertical stripe a few cm wide. This stripe starts at the top of the sheet, goes down and ends near the table.
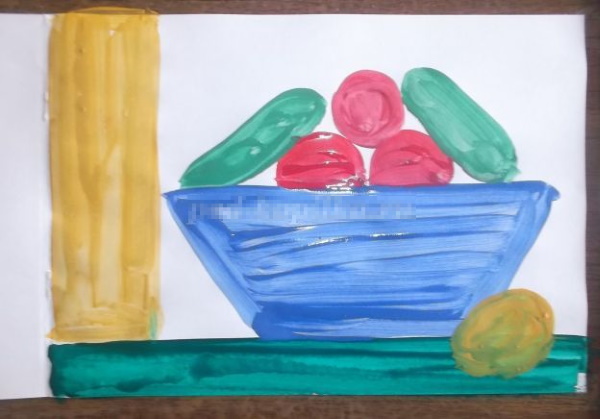
- Return to the vegetables lying on the plate. The cucumbers should have dark spots and twigs, and the tomatoes should have leaves. All this can be drawn in one color. Dark green gouache is used for this. Each cucumber should have 5 to 10 spots. The twigs can be located in their upper parts. The tomatoes also lie on the plate with their leaves facing up.
- Create patterns. You can draw several vertical wavy lines on the curtain using brown paint. At this stage, you need to decorate the potato tuber lying next to the plate with a shadow. This can be done without changing the paint. The shadow should be located on the left edge of the potato and at its bottom.
- Decorate the vegetables with highlights. The total number of highlights in this picture should be equal to the number of vegetables. Each vegetable should have 1 highlight. To draw them, you need to use white. The light falls from the right, so the highlights should be located on the vegetables on the same side.
- Apply a pattern to the plate. Use purple gouache for this.
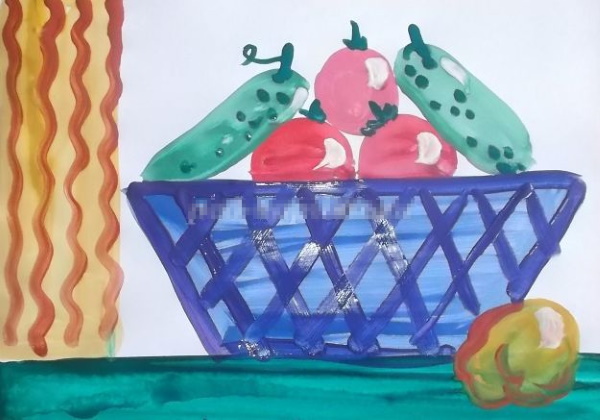
- First, you need to outline the edges of the plate with purple paint, then draw parallel lines from the bottom up, each of which should be slightly inclined. First, a pattern of parallel lines is drawn in one direction, and then in the other.
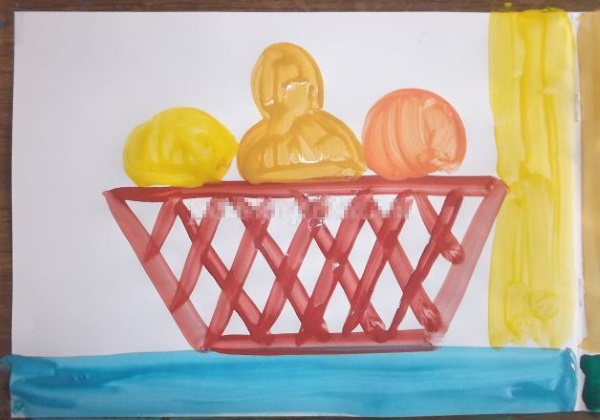
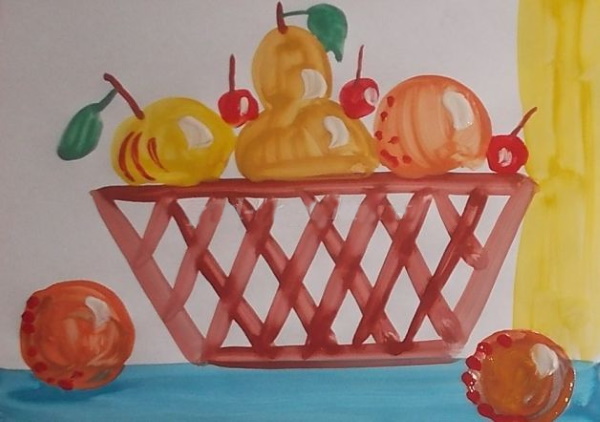
Plate with fruits in gouache
Drawings of fruits and vegetables can be presented with fruits together or separately. For example, you can depict a fruit plate.
To do this you need:
- Draw a stripe at the bottom of the album sheet. You can use blue paint.
- Draw the outline of the plate. It can be brown.
- Make a pattern on a plate. For example, it can be decorated with parallel lines. To do this, first draw several inclined parallel diagonal straight lines in one direction, and then the same number in the opposite direction. They are done in brown.
- Draw a yellow curtain. It can be depicted on the right. It will be represented by a vertical stripe several cm wide.
- Start drawing the fruit. Draw a pear in the center. Use ocher for this. The shape of the pear is oval.
- Place an orange to the right of the pear. Its color is orange and its shape is round.
- To the left of the pear, draw a yellow apple, which can initially be imagined as a circle.
- If necessary, add more apples, pears or citrus fruits to the plate. Also, several fruits can be placed on the table, near the plate. They are all drawn according to the same principle.
- Draw several red cherries on a plate and near it. You can put several berries on top of the fruit or "scatter" them on the table.
- Draw additional elements of fruits and small berries. These elements will be green branches and leaves. Green gouache is used for drawing them. It is most convenient to draw branches with a thin brush. This is especially true for cherries. The pear and apple, in addition to the branches, should also have several leaves. They have the same color as the branches.
- To make the fruits more than just circles and ovals, add distinctive features to them. In particular, the apple should have red stripes, indicating that the fruit is ripe and ready to eat. They can be placed on the left side.
- The orange should have a few spots on its peel. In the picture, they can appear thanks to red paint and a small brush. As on the apple, the spots on the orange should be located on the left side.
- Apply highlights to the fruits. Their location depends on which side the light is falling from. For example, if the rays are coming from the right, then the highlights should be on the right. There should be one highlight on each fruit and on each berry. White is used to depict highlights.
Ready.
Pencil drawing of an orange
To draw a whole orange with slices next to it, you need to do the following:
- Draw 1 large square and 2 small rectangles. You will need to fit the objects of the drawing into them.
- In the large square, draw a circle so that it touches all the edges.
- Draw orange slices in 2 small rectangles.
- Using light shading, apply shadows to the edges of the orange.
- Shade the slices, but not completely. Do not press hard on the pencil.
- Delete the lines of the square and rectangles. Correct the shading.

- You can leave the drawing in pencil, or color it in orange.
Such famous personalities as Pablo Picasso, Paul Cezanne, and Willem Claesz Hed were fond of still life painting. Art critics called the latter the "master of breakfasts." He skillfully conveyed the mood of his paintings, which mainly featured fruits, vegetables, and silverware.
Video about drawings of fruits and vegetables
How to draw vegetables easily, instructions: