Japanese patchwork is an unusual type of creativity that allows you to add interesting details to your home or wardrobe without much expense. This is a technique for making unusual designer items from scraps of fabric. The article further describes the features of this type of creativity and how to independently study it using step-by-step schemes for beginners.
Features of the national Japanese art of patchwork
It is not known for certain in which country the patchwork technique originated. The most ancient items made from scraps were found in Egypt and date back to 980 BC. In each country, patchwork developed according to a special scheme. This also applies to Japan. In general, the Japanese patchwork technique is not fundamentally different from the work of masters from other countries.
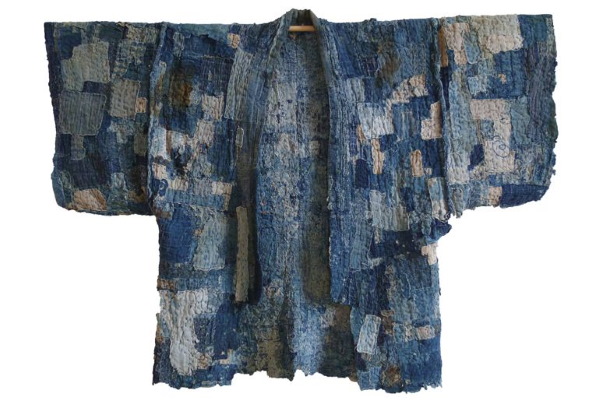
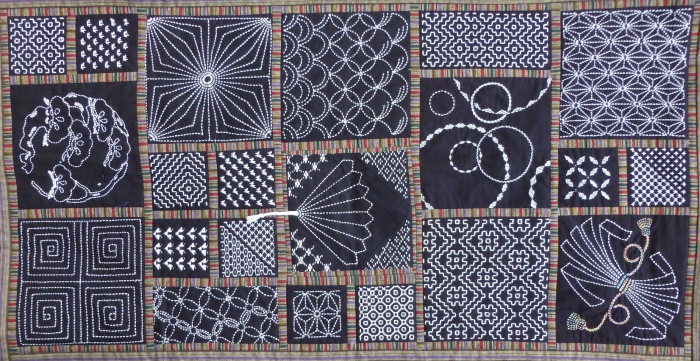
But there is a main feature: the presence of a unique finishing seam in the work. It was called "sashiko". Thanks to this stitch, the products visually appear more voluminous. The embroidery is done using the "forward needle" method.
This method of creating stitches has ancient origins. Today, it has become an important part of revered Japanese traditions. For example, some traditional clothing has been made using this technique for several centuries.
Anyone can master this embroidery method if they want to. The most important thing is to make sure that the stitches are the same length and that they are as neat as possible.
It is in Japan that patchwork products are made exclusively by hand. Local craftsmen are sure that only in this way the finished products get a “soul” and can bring grace and happiness to the home.
All works of Japanese needlewomen in patchwork technique are distinguished by their sophistication and originality. At the same time, the drawings and patterns are slightly mysterious. These qualities in hand-made products are especially appreciated by collectors from all over the world.
There is a version that Japanese patchwork began with monks' robes. Religious communities did not have the means to buy new clothes and had to look for other ways to extend the life of existing suits. When holes appeared on the robes, they were covered with scraps and quilted. Later, the military began to use this trick.
The Japanese, who live in cities and have easy access to clothing stores, did not accept this art for a long time. Some even ridiculed it. But the situation changed when the crisis hit. Then the city factories could no longer cope with their task. They could no longer provide everyone with enough clothes.
First of all, this happened because of the ban on importing fabrics from China. Therefore, it was necessary to organize sewing from the remains of the material. So gradually, day after day, patchwork became a tradition of the nation. Today, the Japanese also prefer not only to repair their clothes, but also to decorate them in the process.
Distinctive features of Japanese patchwork
Japanese patchwork for beginners (step-by-step diagrams of this technique are presented further in the article) in addition to a special seam has a number of distinctive features.
This:
- Most often, silk fabrics are chosen for this type of creativity;
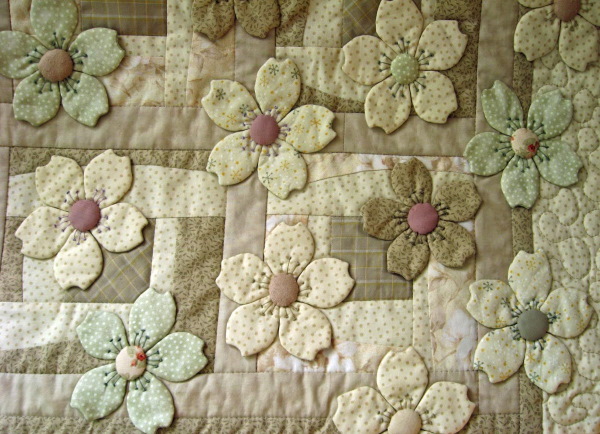
- when decorating the base, natural themes are chosen as the main motif of the ornament (most often flowers and leaves, less often animals, houses, people);
- traditional patchwork is alternated with small stitches (this is necessary to securely fasten the layers of fabric together and make the item better quality, as well as for decoration);
- if flowers and plants are depicted, this is done using geometric figures of different sizes;
- for additional decoration of products, various details are used - beads, seed beads, fringe, tassels;
- appliques can be created on the fabric;
- The work is dominated by natural (calm) colours and shades.

They say about Japanese craftsmen that they do not just sew "rags", but create real volumetric chic pictures on each item. If it is not a silk base, then cotton. Craftswomen prefer to choose textured, printed fabrics. This allows adding volume to the stitches.
The Japanese note that patchwork is not just an opportunity to decorate different fabric items in an unusual way, but also a great way to relax. In the process of patchwork handicrafts, a person relaxes, lets go of his thoughts, and can even meditate.
Techniques and Features
If you prepare correctly: choose the technique, materials, templates, then such patchwork needlework will not be too difficult even for a beginner. The main thing is not to rush in the process. The Japanese version of patchwork involves a measured and calm approach to work. You also need to try to immerse yourself in the process as much as possible.
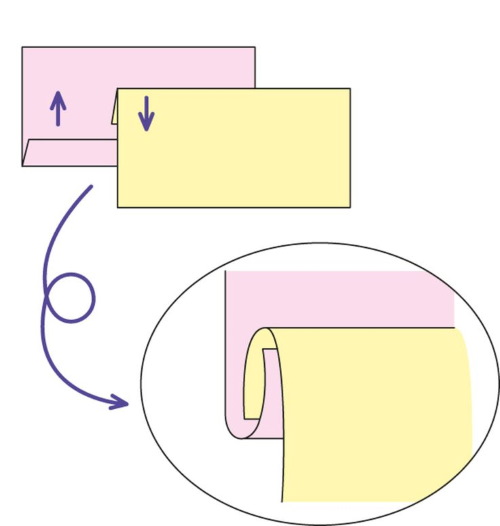
In general, needlework involves creating patterns in a seamless way. For this, craftsmen use thin, smooth wooden blanks. The necessary contours are applied to them, and the pattern is cut out with grooves. The edges of colored fabrics are tucked into the resulting recesses. As a result, a pre-conceived pattern is created.
Modern needlewomen often use foam blanks instead of wooden ones.
Poyagi
This unusual technique involves stitching layers of fabric together using special stitches. The pieces of material are placed on top of each other in 2 pieces and then processed with threads. This can be either a classic straight seam or a fancy pattern. It is allowed to use 2 types of fabric at once. But the top layer should be chosen specifically from silk.
Yossegi
Japanese patchwork for beginners (the diagrams describe step-by-step the stages of creating crafts) includes different techniques. One of the most interesting among them is yosegiri. This is the process of creating patterns and designs using miniature pieces of expensive fabrics.
The technique appeared during the period when silk became unavailable to most Japanese due to its high cost. Then the craftsmen began to obtain tiny pieces of rare material and sew them on top of the products. A little later, original thematic patterns and drawings began to be created from these patches. As a result, this technique was singled out as a separate independent one in patchwork.
At one time, the trend was used by women to get around the ban on wearing expensive fabrics. Then the base of the outfit was made of ordinary cotton, and it was simply decorated with pieces of silk.
Applications
This technique involves creating designs and patterns on a fabric base using patches. To do this, take a blank, which is placed on the main canvas of the future product. When a suitable place is chosen for it, the patch is already attached with even miniature stitches.
It is important to choose the right fabrics for applique. They should be contrasting, but not too bright. For example, a combination of white and light brown, gray and green.
Sashiko
This is a forward needle embroidery method. The result is very unusual designer items. The stitches in the technique are precisely decorative. They decorate the fabric in an interesting way. It is not necessary to make the stitches in the process perfectly even. It is enough to achieve their equal size. The professionalism of the master is assessed by this parameter.
The fabrics are processed by hand. Sewing machines are not used in the process.
Futon decoration
The design of Japanese mattresses can be singled out as a separate group. The Japanese do not like to throw away already worn-out things. It is important for them to give the item a second life.
Therefore, when the futon cover wears out, it is covered with small pieces of fabric. As a result, some mattresses are decorated like real paintings.
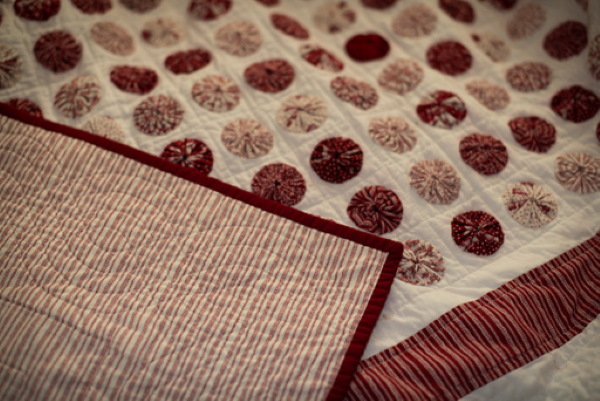
Yo-yo
This technique uses tiny scraps of different fabrics. The pieces must be square or round. The details can be used in different ways. For example, sewn onto the main fabric as decoration. Or connected with threads.
This technique is often used to make toys. It is very convenient to create floral decorations for pillows, clothes, bedspreads from square or round pieces of fabric. They are also suitable for decorating items using the mosaic principle.
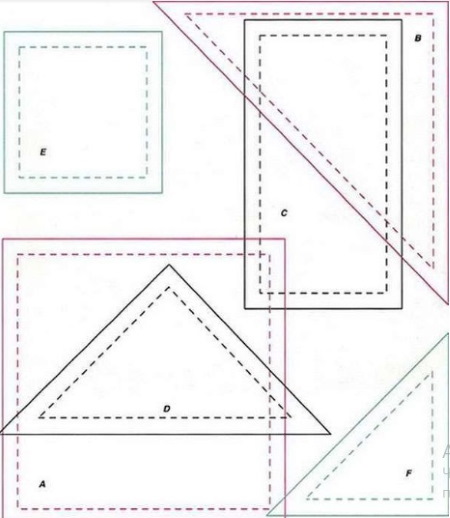
Japanese Patchwork Patterns for Beginners
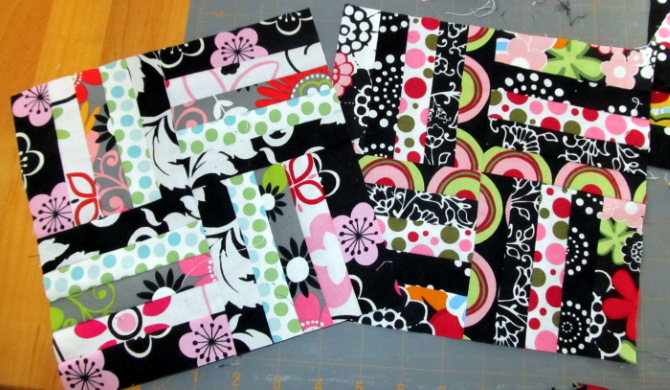
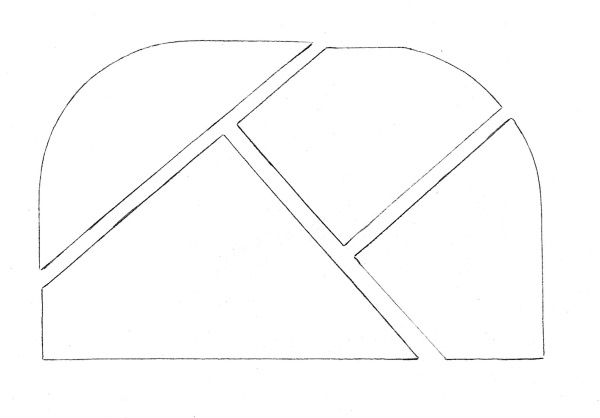
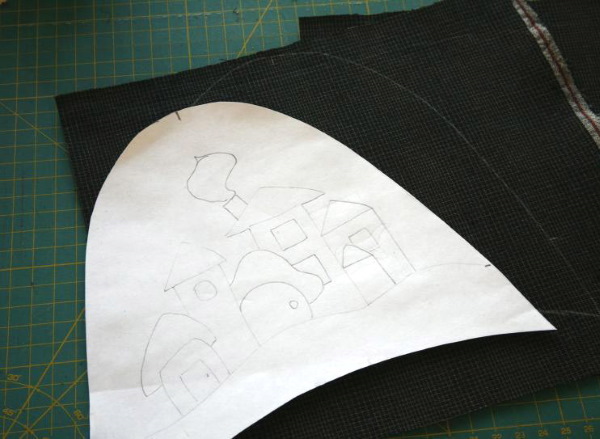
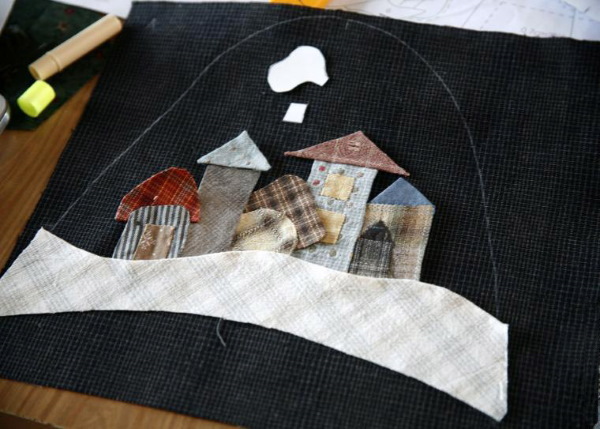
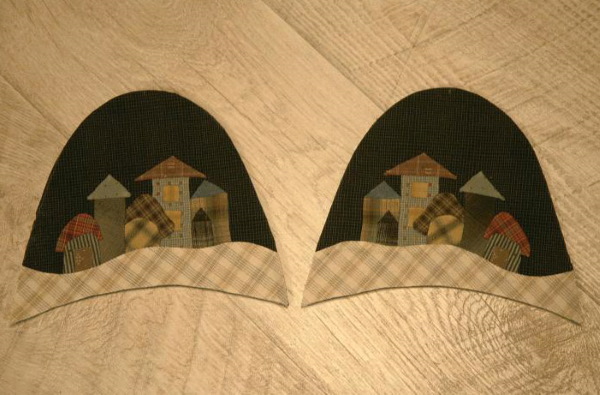
Step-by-step patterns of Japanese patchwork (for beginners or experienced craftsmen) are easier to find in thematic magazines, books. But you can even make them yourself. In the process, it is necessary to take into account that the main direction of needlework is applique. With this calculation, the patterns are created independently.
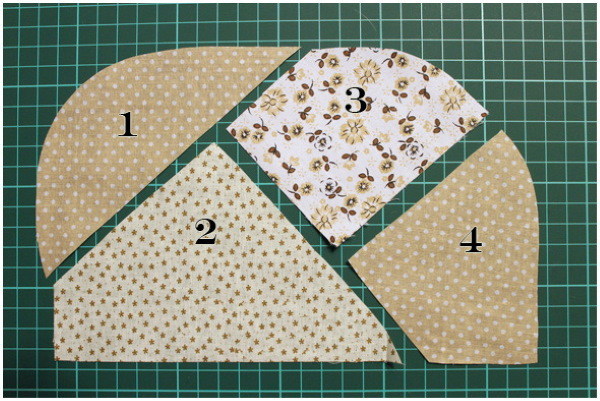
To start working, you will need to create a blank from the fabric that will become the base. And also prepare contrasting patches for sewing on top. To cut out the planned product, you will need to use templates with plant motifs or in the form of geometric figures. Squares, circles, trapezoids, arcs are usually used.
To create a pattern, it is necessary to arrange all the details on a fabric base in advance. These are parts of the applique, all the stripes. The details are easy to fix and connect with each other with small needles. Later they are sewn together by hand.
It is important to harmoniously select shades of materials. The stitches should be even and neat. Then the feeling of soft borders of the design details, its main contour, will be created.
How to Cut Fabric for Patchwork
To be successful in patchwork, you need to cut the fabric correctly for the process. A special quilting knife should be used. This is a tool with a rotating blade. You will also need to take a ruler and a mat. It is convenient to cut not too large pieces of fabric.
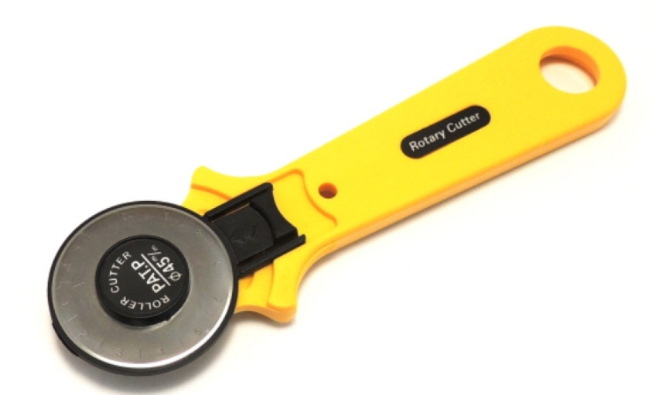
It is important to check the blade in the knife and make sure it is as sharp as possible. A dull knife will make jagged cuts or even ruin the fabric. After each use, the blade should be covered with a special guard. It is not scary if the fabric initially has uneven edges or is shifted to the center.
The prepared base needs to be:
- Place the fabric on the mat.
- Using a ruler, fold the material exactly in half. This will connect the edges.
- If folds form, iron the fabric again.
- If you need to reduce the number of cuts in the future, fold the base in half again. Then you will get 4 layers of fabric at once.
- Make sure the folded edge of the piece lines up exactly with the horizontal line of the mat.
- Place the ruler along the vertical line of the cutting mat.
- Trim off any uneven edges of the base.
- Measure the required width of the patches.
- Make cuts away from you, placing your left hand on the ruler.
- Make sure the stripes are straight. If not, you will have to straighten the base again.
Once the strips have been cut, you can distribute them along the mat lines (horizontal) and form the desired length of each.
What is needed for work
The main thing for patchwork is scraps of fabric. They can differ from each other in color, shape, structure, size and other features. But also various additional accessories, materials, details are taken for work. The exact set will depend on what product the master decided to make.
The table will tell you what additional accessories might be useful:
| Additions | Peculiarities |
| Pins | They will help to record the preliminary result in the creative process. |
| Threads | For the final fastening of parts. Most often, floss is used. |
| Fabric for the back of the product | It is needed, for example, to create bedspreads, blankets, curtains. |
| Rolled sealant (for example, thin synthetic padding) | Typically used to make blankets and throws. |
| Scheme | It will significantly facilitate and simplify the master's task. |
| Soap or chalk | For drawing on fabric. |
| Accessories and jewelry | If you need them, you can take beads, lightning, fringe, tassels. |
Where does the work begin?
Typically, the main fabric is cut into pieces to begin with. Afterwards, they can be cut into pieces according to the pattern. Sometimes it is necessary to initially transfer the pattern to a previously prepared base. In this case, it is best to use soap or chalk so that no noticeable marks remain on the material.
Preparing the parts
When preparing the parts, it is very important to cut them all out as carefully as possible. This applies to the components of both the front and back of the future product. At the same time, experts recommend taking into account the future seams. Approximately 6-7 cm are added to them.
Warp
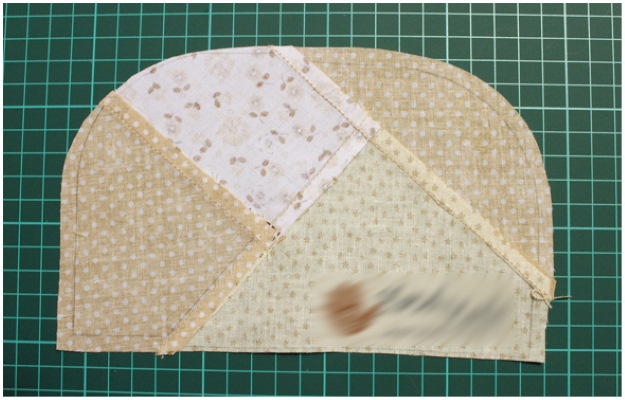
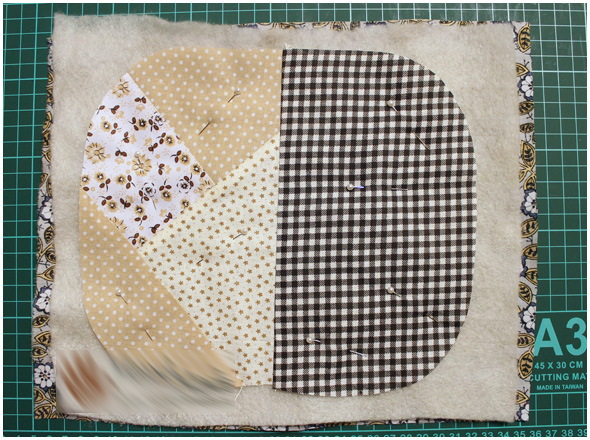
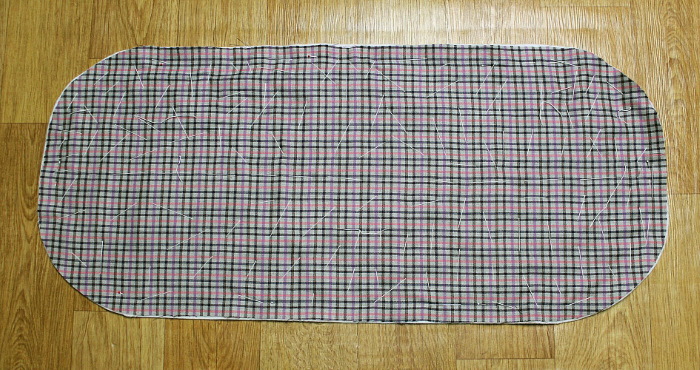
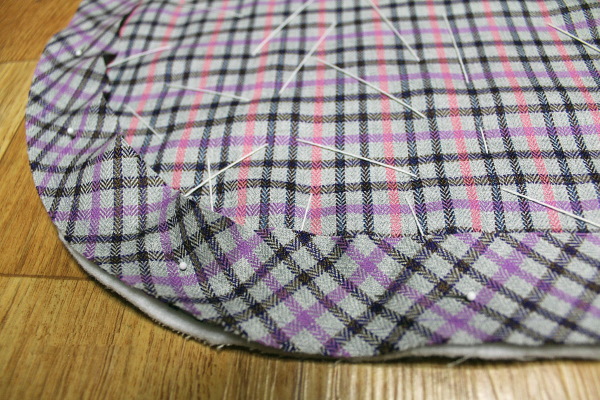
The basis of the work depends on what product is being created. But usually the master needs to carefully and thoroughly connect all the prepared parts together. It is advisable to do this with pins first and visually evaluate the result, and only then use threads.
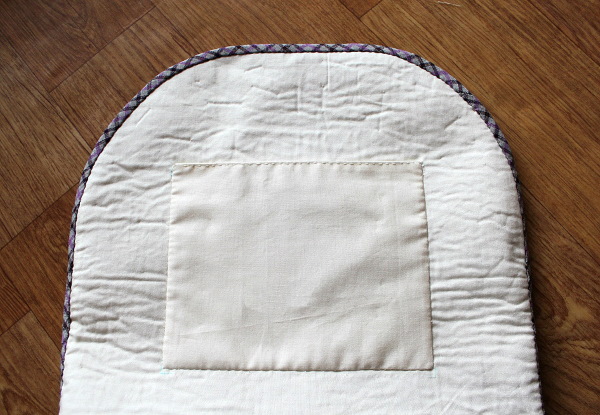
On the resulting workpiece, the seams are carefully ironed so that they do not look too voluminous. After, for example, a rectangle is cut out of padding polyester, larger in size than the main piece made of scraps. The parts are connected.
If a purse, bag, or cosmetic bag is being made, then a zipper or other fastener options are sewn into the product. Toys may require stuffing, more complex shapes of blanks, details in the form of eyes, noses, wings, paws.
Decoration
There are different ways to decorate items created using the patchwork technique. Japanese craftsmen especially like to use various beads and rhinestones for this purpose. Fringe and kisli are used. Such details are quite easy to sew in the chosen place on top of the already completely finished product.

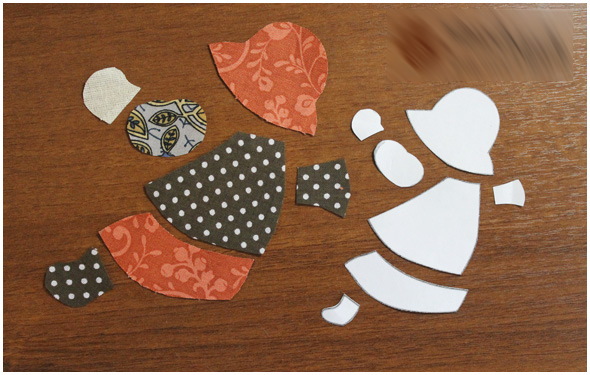
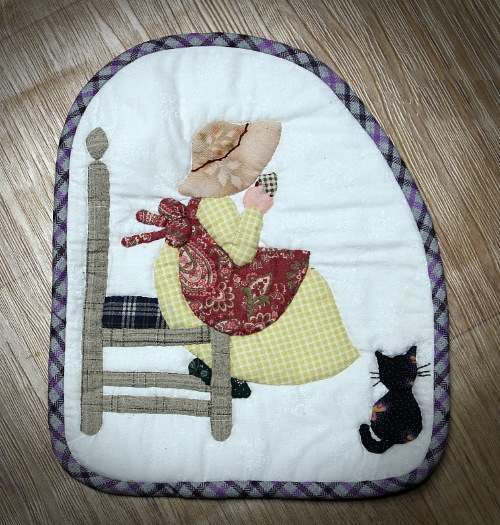
Another popular design option is applique. First, a base is also made from scraps. For example, a blanket, a pillowcase, a handbag. An applique will be sewn on top again from scraps, but more varied in shape and size. It is very easy to create an image of flowers this way.
First, a small circle is sewn onto the base in the process. This will be the central part of the applique. Oval petals are located around it. All that remains is to sew the stem (for example, classic green) with a thick thread and make leaves.
If you plan to create an applique on the main product, you need to choose the colors for it wisely. A voluminous patch will not be noticeable on a very colorful bright background.
Finishing process of the product
Usually the final process is decorating the finished product. When everything is completely ready, experienced craftsmen advise additionally sewing all the existing stitches and strengthening the details. Then the finished thing will definitely last a long time and will be comfortable to use.
Sometimes the final stage requires washing the product. It should be done with the utmost care. The best way is by hand. The finished item is soaked in warm water with a mild detergent for a quarter of an hour and thoroughly washed. But it is better to wash the materials used in advance.
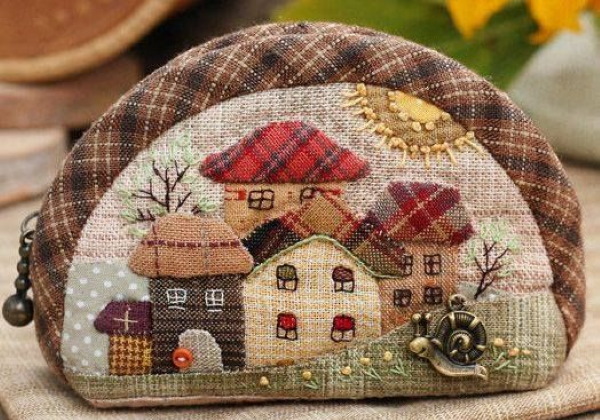
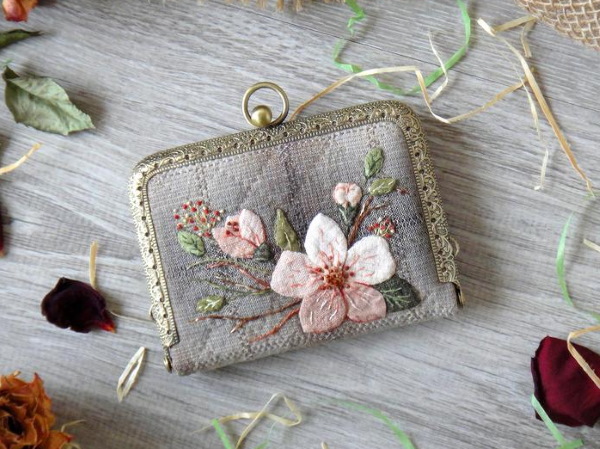
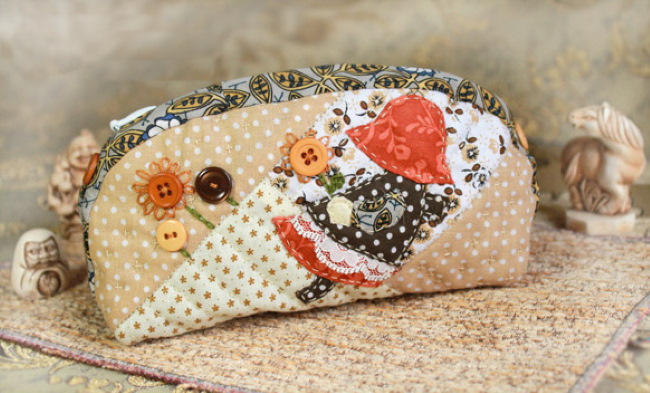
Master class on making a cosmetic bag
Japanese patchwork for beginners (step-by-step diagrams will help you create a beautiful craft) offers easy and simple creation of designer products that will be useful in everyday life. For example, a cosmetic bag.
To do this you will need to prepare:
- materials for the base and applications;
- floss threads;
- padding polyester and non-woven fabric;
- pins;
- chalk;
- a zipper of the appropriate size;
- decorations (buttons, ribbons);
- scheme.

To create a neat and beautiful cosmetic bag yourself, you need:
- Wash and steam the main fabric so that it is perfectly flat.
- Use chalk to transfer the design of the cosmetic bag onto the base.
- Cut out all the pieces, leaving 5 mm for seams.
- Sew the pieces together.
- Iron or steam the seams.
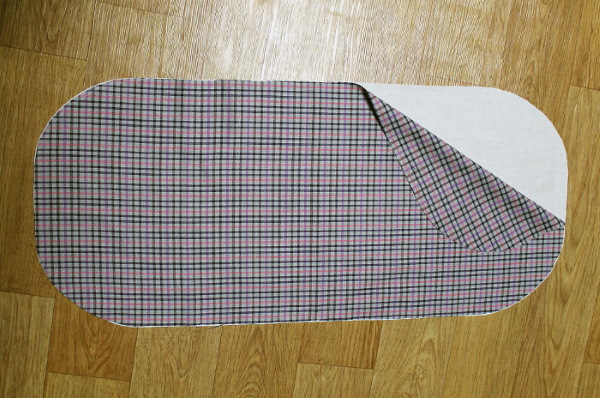
- Cut out rectangular blanks from interlining and synthetic padding slightly larger in size than the resulting base.
- Sew all the pieces together by hand, working forward with the needle.
- If desired, add an applique to the surface of the cosmetic bag.
- Sew on the zipper.
The last thing left to do is to decorate the product with additional details. For example, you can decorate it with ribbons and/or buttons.
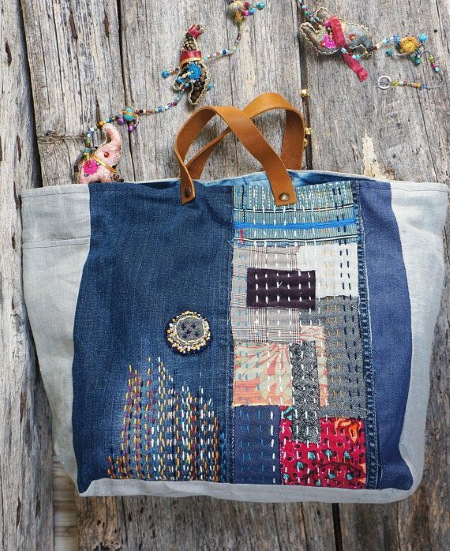
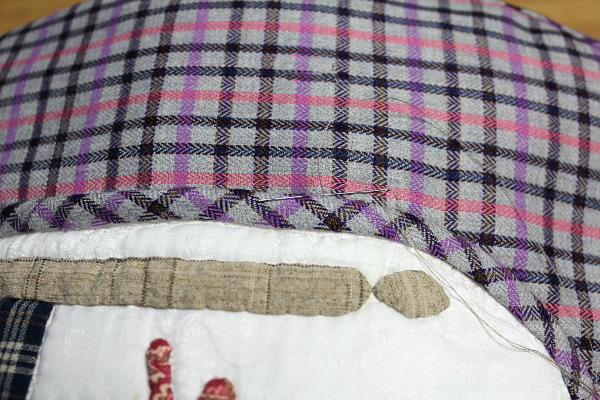
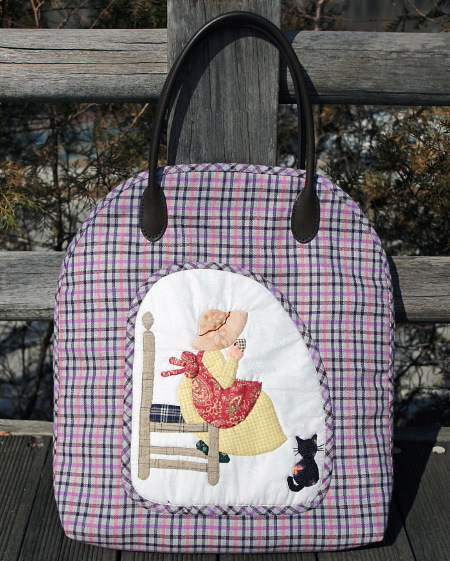
Japanese Patchwork Bags and Clutch Making Pattern
Japanese patchwork for beginners (step-by-step diagrams should be followed when working with this technique for the first time) will allow you not only to sew a bag yourself, but also to decorate a finished product. If the master has a favorite thing in stock that has worn out, but does not want to throw it away, patchwork will come to the rescue.
Even if the bag is very worn, thanks to the handicraft technique it can be quickly and easily transformed. To do this, you will only need a large number of scraps of fabric and thread. It is advisable to first draw a line around the surface of the bag and clearly imagine where the details will be located on it. You can decorate the product not only with square scraps.
They can be of different shapes and sizes. In the process, the flaps are simply sewn onto the surface of the bag. Later, the resulting seams are carefully ironed. Then you can immediately use the product for its intended purpose.
If you want to create a handbag from scratch yourself, you should start with a simple clutch. To create it, select pieces of different fabric. These blanks must first be thoroughly washed with a mild cleanser and ironed. Only then can you move on to cutting.

In addition to the main fabric, thin padding polyester, a zipper or button, interlining and threads are also taken. Different details are suitable for decorating the fabric. This can be lace, beads, thick threads, any stripes.
If the master is a beginner, then it is recommended that he first draw a pattern of the product on paper. The clutch can be rectangular or oval. It is best to make it from different pieces of fabric. Let it be 5-6 separate elements at once.
The work process requires:
- Cut out the necessary parts from the prepared scraps, matching them with the pattern. It is important not to forget to leave a distance on the fabric for the seams. This is approximately 3-4 cm (it all depends on the size of the planned clutch, 6-7 cm may be required).
- Sew the resulting pieces together and iron.
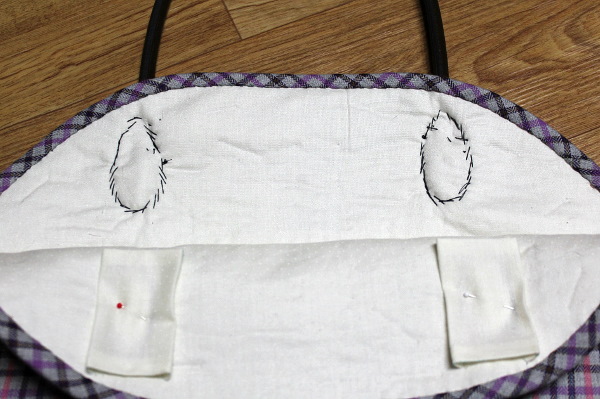
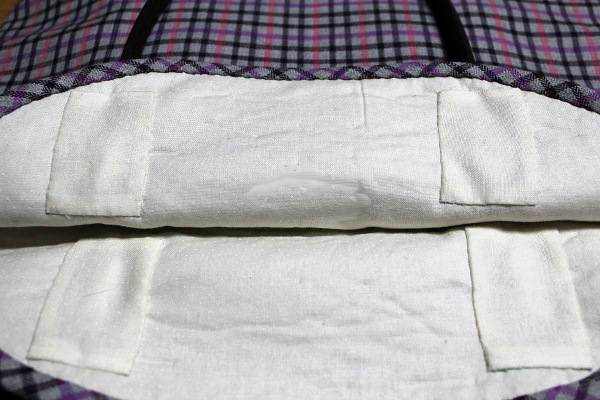
- Sew the cut out back part to the rest according to the pattern.
- Using the existing parts, cut out parts from synthetic padding and non-woven fabric.
- Place all the pieces together and first secure with pins, and then sew all the stitches.
- Sew on a zipper. Another option is to make a clutch in the form of a pocket with a triangle of fabric on the side. Then it will close with a button/snap.
Last but not least, you can start decorating the item. For example, trim it with lace. The more small details there are on the clutch, the more interesting the design will be and the more voluminous it will be visually.
What else can you do in Japanese patchwork style?
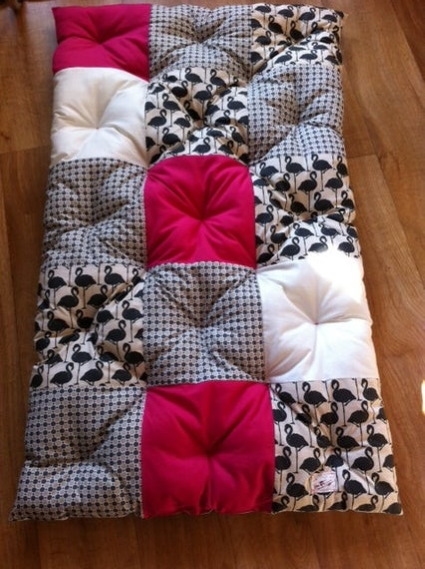
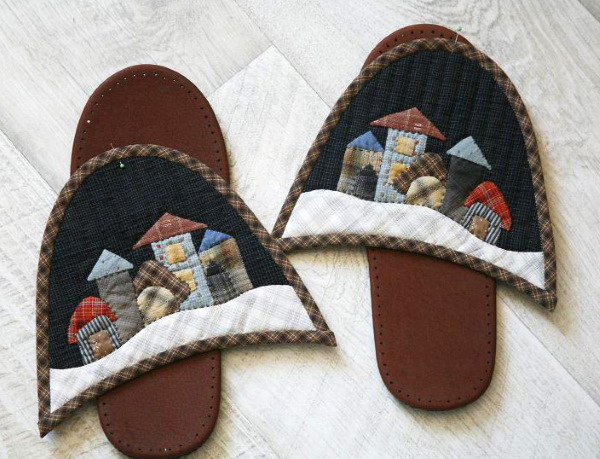
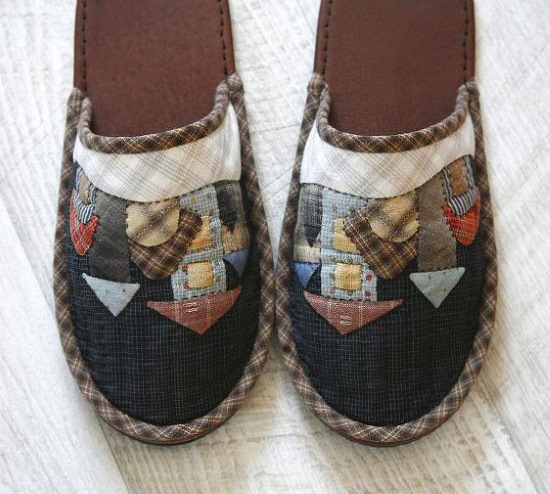
You can create many interesting things in the Japanese patchwork style. For example, wardrobe details, bags, scarves, cosmetic bags, outerwear and shoes are decorated this way. You can decorate house slippers and ballet flats with colored patches.
It is relevant to decorate any home textiles in this way. These can be blankets, quilts, rugs, wall tapestries, curtains, pillowcases. Sometimes even decorative pillows themselves are sewn using the patchwork technique.
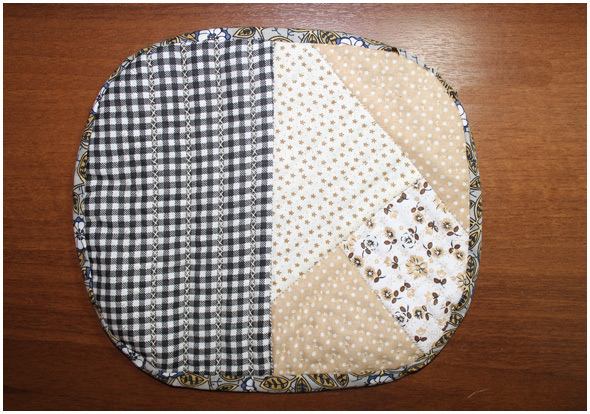
In this style, you can sew toys, backpacks, potholders. Sometimes, even notebooks and photo albums are decorated with scraps of fabric. Japanese patchwork is a very exciting type of needlework. Detailed step-by-step diagrams will help beginners master it on their own.
Video about handicrafts
Japanese patchwork for beginners: