A sketch is a drawing created in a hurry. As a rule, pencils are used for drawing. In this case, the tool only slightly touches the canvas. Professionals make sketches in order to create a prototype of a future painting.
For those who are just beginning to learn the basics of fine art, this type of creativity can become a hobby and a starting point for an exciting journey into the world of illustration. The main thing is to adhere to a clear sequence of actions in the first lessons.
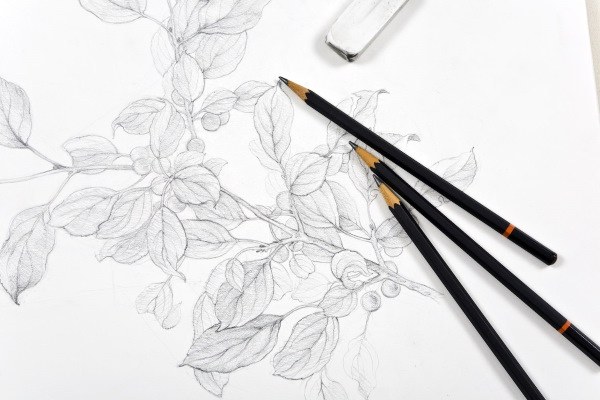
Drawing tools
Sketching (lessons for beginners with a pencil are usually easy to perform) will be useful for professional artists; those who have just started creating illustrations; those who are tired of computer graphics and who miss live drawings on plain paper.
Quickly created drawings:
- promote the development of imagination and spatial thinking;
- help find explanations for complex things;
- give pleasure.
Many people create sketches to relax and unwind. Some, on the contrary, concentrate on creating such drawings. Having sketching skills, it will be easier to design personal and work projects. On the eve of the holidays, you will not have to spend a long time and painfully searching for postcards, because you can make them yourself.
A gift made with your own hands will be valued by the recipient much more than one bought in a store, even if this purchase cost the giver a decent amount of money.
When sketching, there is no need to bring everything to perfection. The main thing is to hone your skills and if something turns out not very well or badly, it does not matter. After all, this illustration is created quickly, and many artists use it as a sketch for a future large painting.
This type of activity can be compared to working out in a gym. It is better to work on such drawings not for long, but often, than to try to break a drawing record right away. For example, professionals advise starting with 20-minute sessions.
If you devote this amount of time to sketching per day, it will be enough for your skills to quickly improve, and the drawings themselves, accordingly, will become better and more interesting.
The theme of the sketches can be anything. It all depends on the preferences of the person drawing or the person who asked him to draw something. The main task is to feel like a creator and stop being afraid, seeing a clean sheet of paper with pencils in front of you.
Sketching (lessons for beginners in pencil can start with the image of familiar objects) can be both simple and clear, and abstract. It can be a vessel, a piece of furniture, a culinary dish or an unusual landscape.
Before you start working, you need to prepare the materials and tools that will be needed for this.
The minimum set should include the following:
- sketchbook or regular drawing album;
- several pencils;
- eraser.
The choice of pencils requires special attention.
In any artistic work, a lot depends on how hard the writing instruments are:
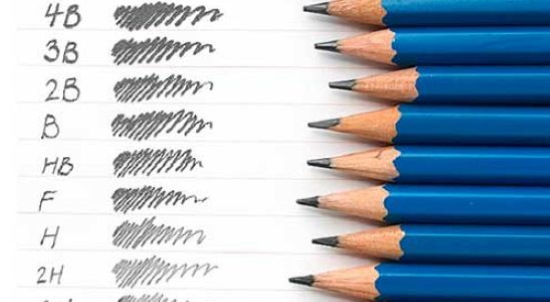
- after drawing on the paper with the hardest pencil, the artist will see a thin, light line on the surface of his canvas;
- Soft pencils leave dark and dense marks.
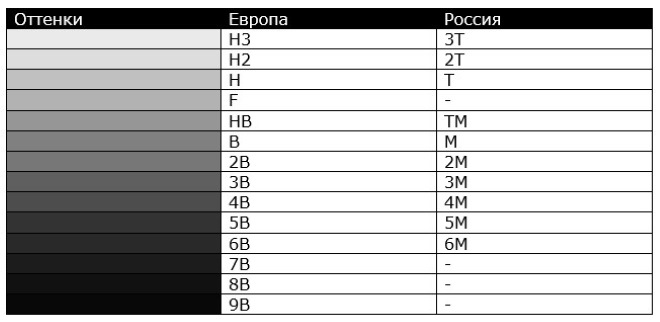
The level of hardness and softness of pencils is indicated by the manufacturers themselves. Special markings are used for this. They usually contain one letter and one number. As for the letters, it can be "B" or "H". The first one indicates the softness of the pencil, and the second one, respectively, the hardness.
Occasionally, an additional letter "F" may be used, indicating that the pencil is both hard and soft - medium. Similarly, the letter combination "HB" is used to indicate a pencil of medium hardness.
There are also usually numbers next to the letters that indicate the degree of softness or hardness. As the number next to the letter "H" increases, the pencil's hardness increases. For example, a "4H" pencil is harder than a "2H" pencil.
Accordingly, as the number next to the letter "B" increases, the softness of the pencil increases. For example, a "5B" pencil is softer than a "3B" pencil.
You can buy the tools of the required softness at any point of sale where office supplies are sold. As a rule, they can be purchased in whole sets, which contain from 5 to 10 pieces.
A beginner artist will need 3 pencils:
- solid;
- soft;
- average.
It is recommended to choose pencils:
- 2B;
- 2H;
- HB.
The marking indicating the softness or hardness of the pencil is the first thing to pay attention to when choosing these writing instruments. After that, you can look at the manufacturer. Professional artists, as a rule, prefer instruments made in the Czech Republic or Germany.
The following brands can be cited as examples:
- Faber Castell;
- Koh-i-Noor;
- Lyra.
Master classes
Sketching (lessons for beginners with a pencil are based on simple exercises) after preparing the necessary tools requires constant practice and a positive attitude.
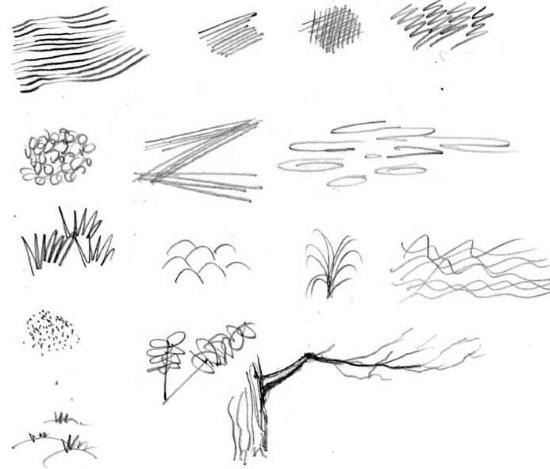
Simple lines
The most important thing in sketching is light lines. To learn how to make simple drawings with them, you need to hold the pencil correctly.
To do this:
- there is no need to squeeze it too hard;
- the fingertips should not be too close to the pencil;
- The best position is when the instrument lies freely in the hand and allows it to move easily;
- If you have problems holding the pencil, you can lower your fingers a little closer to the tip of the lead.
Since the lines themselves are not complicated, the process of drawing them is also simple. All that is required is to draw a pencil across a sheet of paper. As a result, a long trace will remain on the latter. The task will be more difficult if you try to draw 2 parallel lines.
You can start with short lines and then gradually increase their length. Eventually, you can draw the entire sheet with such lines. It is important to remember that you do not need to worry if they turn out uneven and not quite parallel. In sketching, there is no need to immediately bring your work to perfection. The main thing is not to press too hard on the pencil and draw calmly.
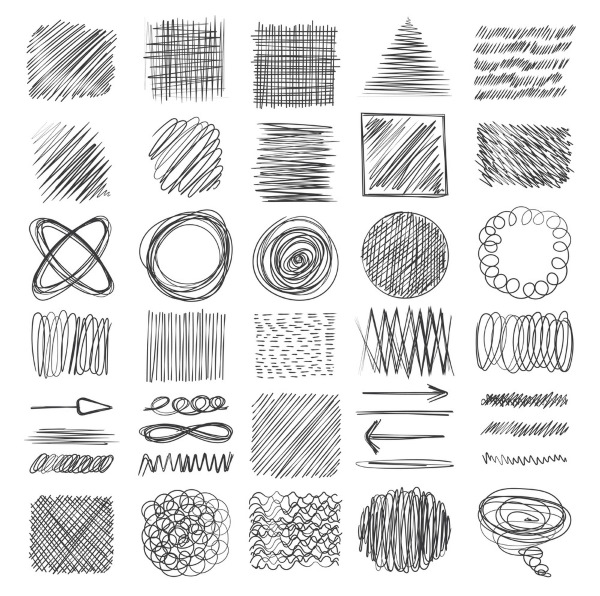
Once the entire sheet is shaded with parallel lines, you can begin to draw perpendiculars. If the first lines were all horizontal, now you need to draw vertical ones. The result should be a lot of cells, like in a school notebook intended for math classes.
Such movements will not only help improve your drawing skills, but will also have a calming effect. If you wish, you can try to create any other composition from a multitude of lines. It depends on the imagination of the person drawing.
For example, you can divide the sheet into several rectangles with lines, and draw several parallel lines in each rectangle:
- horizontal;
- vertical;
- diagonal.
You can tilt them at different angles. The result will be a drawing that will not yet be considered a sketch as such, but will be very close to it.
Rounded lines
Drawing rounded lines is a more complex process compared to the above. However, it is more fun and is good for beginner artists. The main task is to fill a sheet of paper or some of its areas with rounded lines drawn randomly at the same distance from each other.
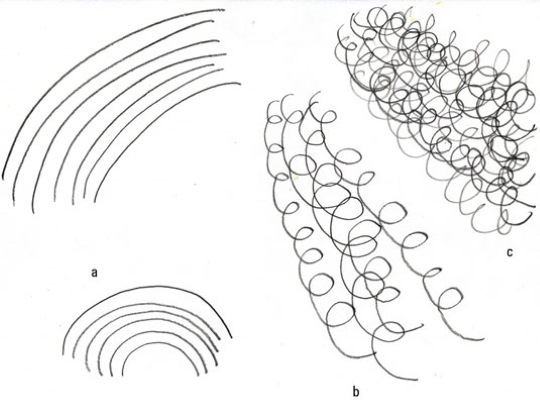
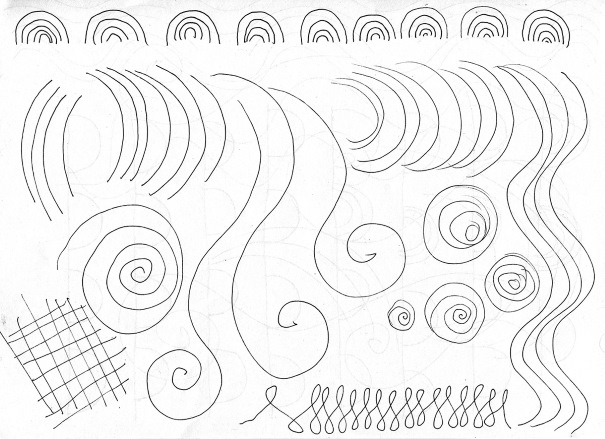
You can do this for hours, this way of spending time is great for long trips on public transport. The main thing in this business is not to be afraid of making mistakes: it is important to pull yourself together and throw away all unnecessary worries. It is enough to practice a few times, and the lines will only improve.
Squares
Drawing squares is easy and fun. The work comes down to filling a sheet of paper with these simple geometric shapes. You need to try to make the squares the same size., and they should intersect randomly. The result will be a beautiful ornament. You can start with a small section of the sheet, and then gradually increase the area.
Circles
Drawing circles is based on the same principle that is used in the above-described filling of space on paper with squares. Only in this case, circles and ovals act as figures from which a beautiful ornament will be composed. It will not be possible to depict them evenly the first time.
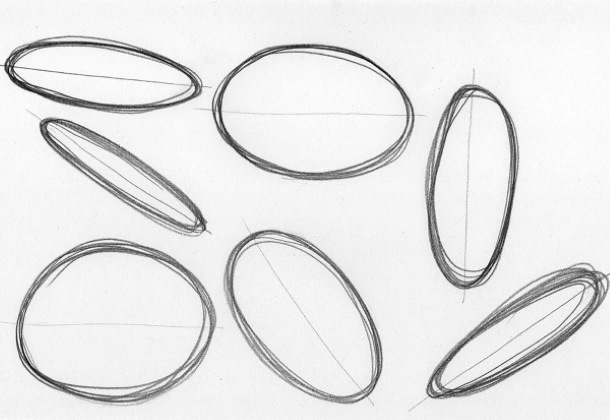
However, the process itself is addictive and has a calming effect. It can be classified as meditative.
Equal and unequal segments
This exercise helps develop not the hand, but the eye. It is important that it teaches how to accurately determine proportions. The essence of the lesson is to divide straight segments or sides of figures into equal components.
It works like this:
- A line is drawn.
- The line is divided in half.
- Each of the two resulting segments is divided in half.
- The same should be done with each of the 4 resulting segments.
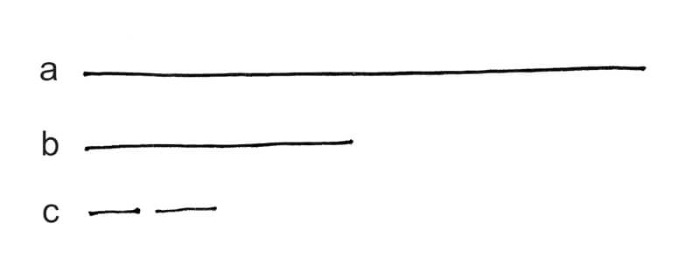
This work will continue until, finally, a short segment is obtained, which can only be marked with a pencil. Lines of different lengths can be used to divide into segments.
If the task is completed many times and it starts to seem too easy, you can make it a little more difficult. To do this, just start dividing the segments into an odd number of components: for example, 3, 5, 7.
Forms
When the hand is sufficiently trained, you can begin to create forms. They are very simple, but no sketch can do without them, even one that was skillfully created by a master.
These forms include:
- square;
- circle;
- triangle;
- cylinder.
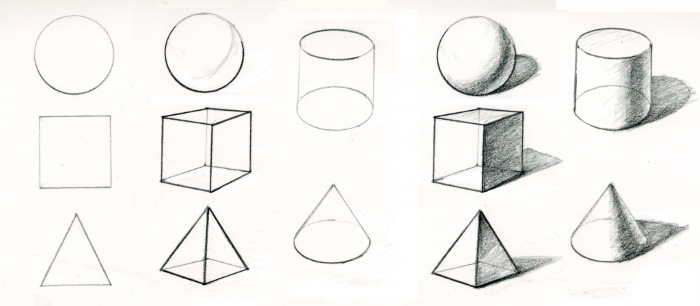
These figures are very often used in drawing, because all the surrounding objects consist of them. Professional artists know this very well. You can try to draw a circle with short, abrupt strokes. In this case, you do not need to press hard on the pencil and the sheet of paper.
Using a similar principle, you can depict all the steel figures that relate to simple forms that underlie sketching and our entire world. Once this exercise is completed, you can move on to creating sketches - drawings based on simple lines and figures.
Light and shadow
Sketching lessons for beginners with a pencil necessarily include knowledge and mastery of the art of conveying light and shadow on paper. Shading and highlighting are the main ways to make a drawing three-dimensional. They help add volume to a flat sheet of paper. As a result, the drawing becomes three-dimensional and visually very similar to a real object.
As with all the works described above, you should start with simple exercises and then gradually move on to more complex tasks. For example, you can add shadows to the circle that was drawn according to the example above.

To do this you need:
- Determine the location of the light source. However, if in real life the direction of light rays is chosen by nature itself and its strict laws, which cannot be violated by any attempt, then in a drawing the artist himself can decide where the light will be directed. After all, he is the creator here.
- Depending on which side the rays fall on the object, the shadow areas will be distributed differently. You can try changing the position of the light source in the picture several times to clearly imagine how the shadow cast by the object will move with it.
It is important to remember that the shadow falls not only on the figure, but also on the surface on which this figure is located.
- You can make the exercise more difficult by placing not 1, but 2 or more light sources in the drawing. They can be located, for example, on different sides.
There are several ways to apply shadow.
The most common of these are:
| Way | Description |
| Hatching | This method is the easiest to use. All you need to do is simply shade the shaded side. You can do this with lines, crosses, or other convenient methods. |
| Shading | This method should be chosen when creating sketches with a large shadow. You can shade with a special pencil or with a soft sheet of paper. The main rule is that the movements should be directed along the strokes. In this case, the applied shadow will look more realistic. |
| Placement of multiple points | This is the most difficult method of applying shadow. Usually only experienced artists allow themselves to use it. The essence of this method of painting over shaded areas is as follows: in the darkest areas, the dots are located close to each other. But the lighter the area, the less dense the dots become |
Regardless of the method chosen, the application of shadows should be gradual. Several approaches should be made, and everything that becomes unnecessary should be removed with an eraser or a napkin. Once the exercise with the circle is completed, you can move on to more complex figures.
You don't have to hold a pencil in your hand to practice seeing shadows. You just need to pay more attention to how the light falls on the surrounding objects in the house, room or outside.
Cupcake
Sketching (lessons for beginners with a pencil can be related to the image of food) of desserts is one of the most popular types of illustrations. It can be used not only for beauty, but also for creating culinary recipes.
For example, you can draw a cupcake by following these steps:
- Prepare a pencil and find a good photo of a cupcake. If you want, you can take a cupcake if you have one and it hasn't been eaten yet.
- Looking at an example (live or in a photograph), you should make a linear drawing, indicating the main shapes and elements.
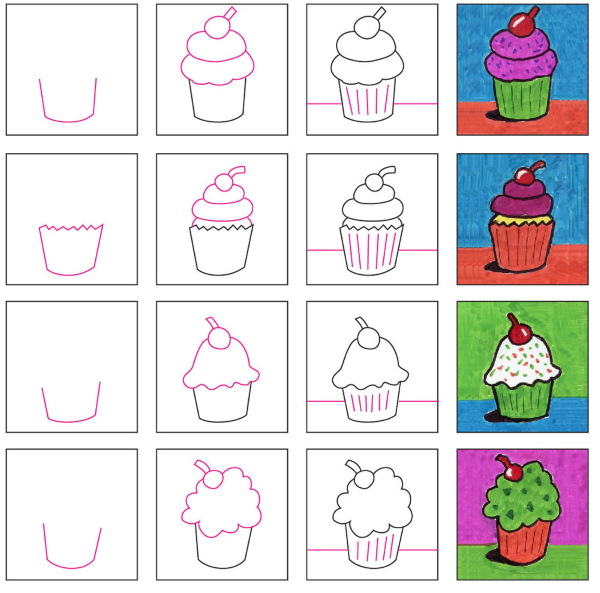
- Work on the details using pencils of varying softness and hardness. Paint the darkest areas and leave the lightest areas white.
- To show the shiny consistency of the syrup and make the drawing more appetizing, leave the white highlights unpainted.
- Refine the details of the outline and correct what seems unfinished.
Flower arrangement
Drawing flowers with simple lines and uncomplicated geometric shapes is called floral sketching. Such drawings can be used to decorate interiors before various events that are planned to be held there.
Floral sketching has much in common with botanical illustration. Those who like the idea of drawing beautiful flowers can try to start with a very simple example - a common sunflower.
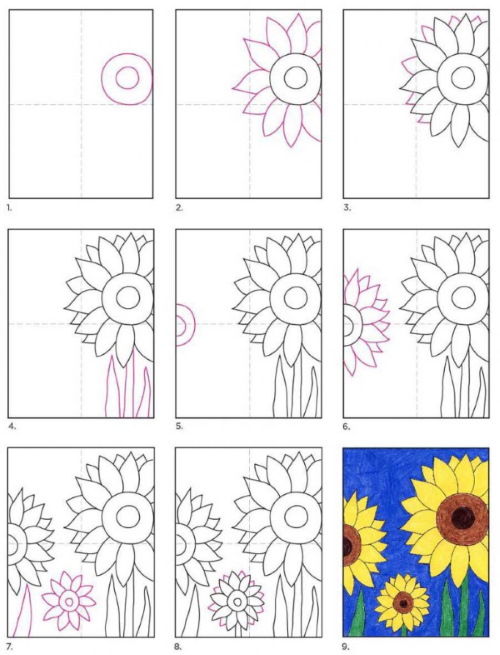
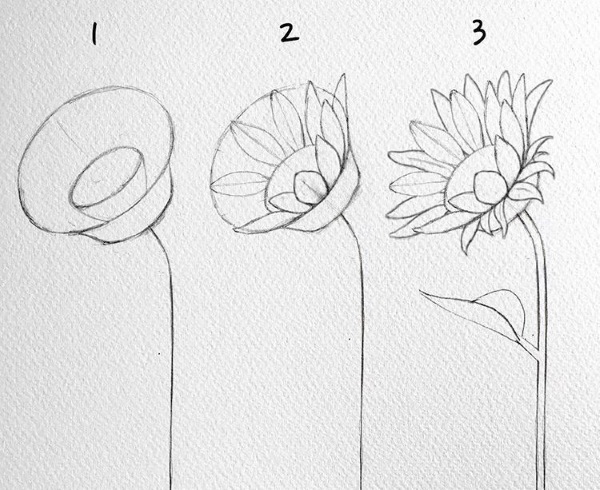
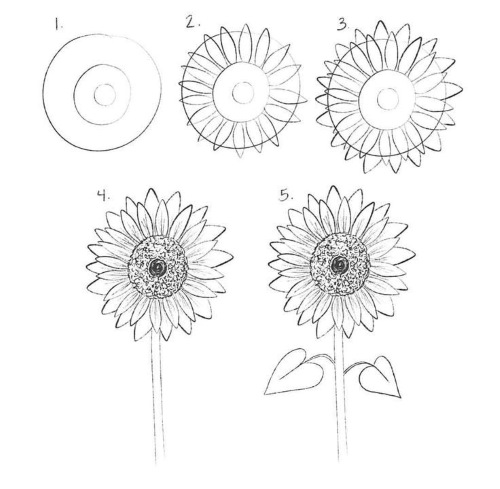
To display it, you need to do the following:
- At the bottom of the sheet, draw 2 smooth lines that will ultimately form the stem.
- Above the stem, draw a few more smooth lines that should form many teardrop-shaped petals. They should be arranged in a circle so that a large round area is formed in the center.
- Depict sunflower seeds as small squares.
- Add a couple of leaves - one on each side of the stem. Give each of them a teardrop shape. Draw 1 line along the center of the leaves.
Sketch portrait
Sketch portrait is a type of sketching that is well developed and very interesting. Some artists stylize their works as pop art or draw faces with deliberately exaggerated large eyes.
Sketching is an easy and relaxed genre that any beginning artist can master. The main thing is to hold the pencil well and correctly during the lessons, be prepared for mistakes, and enjoy the process.
Video about drawing
Sketching. Pencil lessons for beginners: