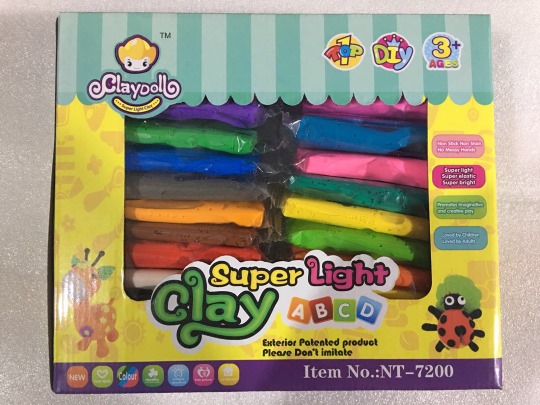
It is no secret to many parents that it is quite difficult to occupy a child for a long time. However, to solve this problem, you can use the production of crafts from air plasticine. This modern material can captivate both the youngest and older children.
What is air plasticine?
Air plasticine is often found on store shelves under several names, the most common being:
- Marshmallow plasticine.
- Light plasticine.
- Hardening mass for modeling.
- Velvet plasticine.
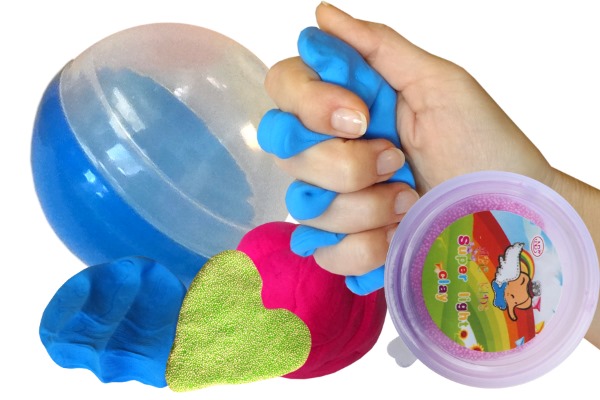
The material in question cannot be classified as ordinary plasticine, since when interacting with air it begins to harden, and the crafts become similar to products made of foam plastic. This feature allows you not only to sculpt animals, cars and other objects, but also to play with them for a long time.
Crafts made from air plasticine can be colored with a felt-tip pen or paint. And if the integrity of the toy is damaged, it will be enough to wet the damaged edges of the parts and press them tightly together.
Advantages and disadvantages of the material
| Advantages | Flaws |
When working, you can combine several colors of material without worrying about possible overlaps. |
|
However, regarding the last point of disadvantages, there is an option with minor manipulations that allow you to continue sculpting from dried airy plasticine.
How to soften air plasticine
Crafts made from air plasticine that were not completed due to the material drying out can be finished after the following steps:
- Plasticine is poured with boiling water;
- Infuse for 2 minutes;
- It is taken out of the water and stretched.
The steps must be repeated until there are no lumps left in the material. It is important to note that after the 2nd pouring, not all of the plasticine is immersed in hot water, but only the part containing the lumps.

This feature is due to the fact that the material without lumps can simply dissolve in water.
Features of working with the material
The main feature of working with the material is its ability to quickly harden when interacting with air. For this reason, it is worth taking care in advance of a sealed container in which the remains of the material will be stored.
Among other tips, it is important to pay attention to the following:
- Crafts are made only with dry and clean hands. This is especially true for making products from light-colored airy plasticine.
- New plasticine is very soft and sticks to your fingers. When working with small parts, it is worth kneading it first or leaving it in the air for 5 minutes. It is important not to forget about the material and not to allow it to harden.
- Work should be done very quickly. Avoid preparing a large number of blanks to prevent damage to the plasticine.
- When making a large craft, you can use toothpicks to secure it and ensure the product is secure.
- When making food decorations, you can use a small bag. When the plasticine is new and just unpacked, squeezing it out like a real pastry chef will not be a problem.
- To create shaped or relief parts, you can use molds and templates.
- While drying the finished craft, especially a large one, it is worth turning it periodically.
What to make from air plasticine
Crafts made from air plasticine can be of absolutely any shape and size. This material allows you to show your talents in any direction.
Very often, lightweight plasticine is used to make refrigerator magnets. Its light weight allows the craft to be attached to the simplest magnets, and does not allow the load on the door of household appliances.
Figurines
Crafts from air plasticine for boys are often aimed at soldiers and cars. However, all children are crazy about small toys. Therefore, it is worth paying attention to a simple and funny turtle.
The production of such a toy follows the following algorithm of actions:
- Prepare circles of different sizes. As a base, use plasticine of green and brown colors.
- The brown circle forms the shell.
- Several small brown circles are flattened and attached to the shell to form the animal's characteristic coloring.
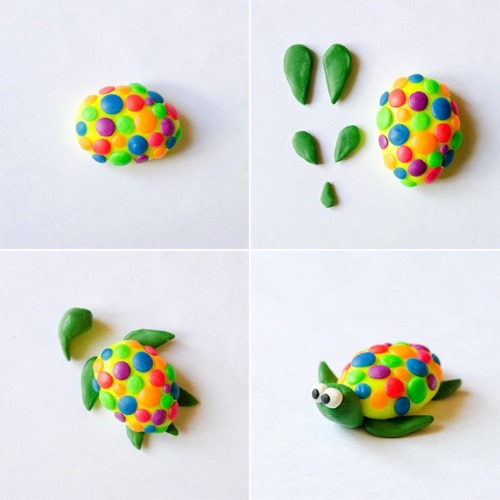
- Green plasticine is used to form the paws and head. Both parts are carefully attached to the body.
- On the muzzle, 2 small indentations for the eyes are formed. When the craft dries, you can draw a mouth and nose using paint or a felt-tip pen.
Girls will not remain indifferent to the blue kitten made of airy plasticine. For work you will need material of 3 shades and a little imagination.
The process looks like this:
- Blue plasticine is used as a base for the body and tail. The ears are molded from the same shade.
- The finished parts are connected together, and white stripes are attached to the body to give it a cat-like coloring.
- Next, the muzzle is made. You can use a stack to detail this element.
- All that remains is to secure the paws and send the craft to dry.
Food
The most popular food option made from airy plasticine is considered to be doll donuts. Such a product will not leave any child indifferent.
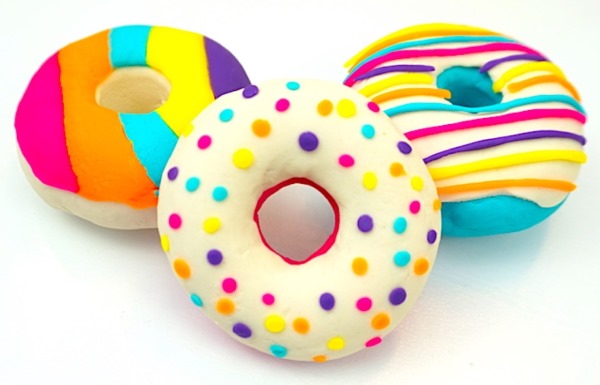
To make donuts, you will need to stock up on the brightest colors of the material, because they will add appetizing and juiciness to the product. In addition, the work also requires a plastic tool, which is sold together with the plasticine in the set.
The manufacturing process itself looks like this:
- A simple bagel is used as the basis for the future donut. For modeling, you need to take a material of a golden or sandy shade and roll it out well. Then an oblong sausage is made, which is bent into a ring.
- To imitate the glaze, use plasticine of the brightest tones. For example, pink or yellow. The glaze layer is prepared identically to the main donut. The difference is that the glaze requires less material and this part should be flat. There is no need to strive to make the glaze layer perfectly smooth, since in reality it always flows unevenly from the donut.
- Once the donut is covered with glaze, all that remains is to decorate the food with caramel sprinkles or candied plasticine.
Using the given method of food preparation allows you to make a large number of different culinary masterpieces.
Clothes for dolls
To create a beautiful doll outfit yourself, you will need at least 4 bags of airy plasticine. Naturally, the most popular shade is considered to be pink. However, you can use other tones.
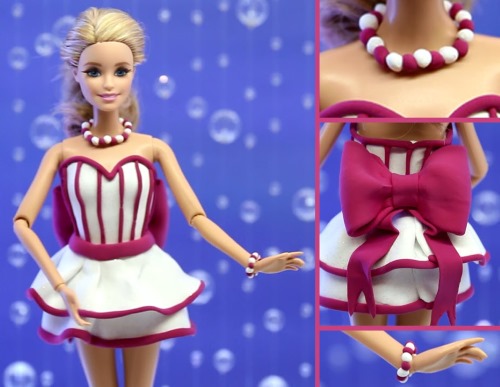
The process of making the outfit itself follows this algorithm:
- The doll is mounted on a stand for ease of use. You can buy a stand in a store or make it yourself.
- For the front and back of the outfit, roll out 2 rectangles.
- Both parts are applied to the doll, and excess plasticine is cut off with scissors.
- At the bottom of the attached rectangles, use a stack to mark 4 triangles.
- Large teeth are cut out with sharp scissors and triangles are removed. The remaining unevenness can be smoothed out with tools.
- Three cutouts resembling leaves are made with a stack in the upper part of the bodice.
- The armholes are being formed.
- A pointed tip is left in the shoulder area.
- An oval is cut out on the back with a stack.
- To ensure the top of the outfit is completely ready, it is worth processing the edges of the cut out parts.
- Next, using a thin brush and silver glitter glue, you can process the edges of the cutouts on the bodice. Ideally, apply no more than 5 layers.
- To frame the bottom of the outfit, you need to cut out 4 trapezoids and fold the pieces like an accordion.
- The finished accordions are secured between the teeth.
- On the back of the dress you can attach 2 small polka dots to imitate buttons.
- The finished outfit is covered with one layer of glitter and left to dry for 24 hours.
Flowers
To make a flower from light plasticine, you don't need to be patient or have any special tools. A standard set and a great mood are enough.
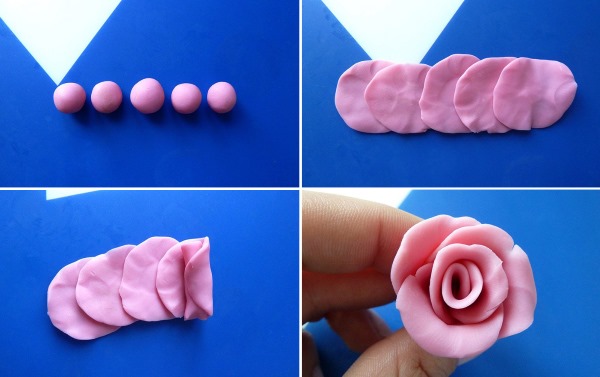
At the stage of preparing materials, it is worth checking the availability of the following components for work:
- Plasticine 3 tones.
- A stack included in the standard set.
- A button or a bead.
- PVA.
- A small piece of felt fabric.
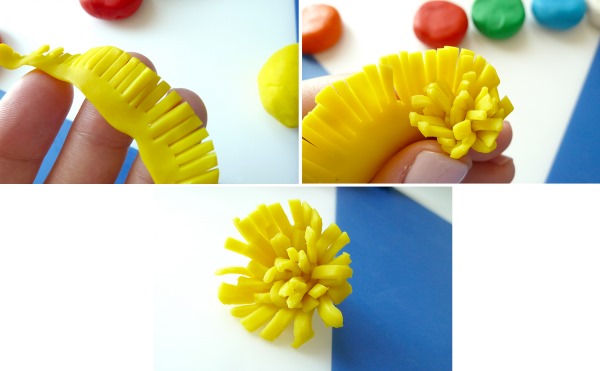
To make a three-dimensional flower, you need to follow the following sequence of work:
- The darkest shade of plasticine is used to mold the round base cake. Also, balls are prepared from this color, which serve as the first layer of petals. The work must be done quickly to prevent the material from hardening and to ensure good gluing of the parts.
- Each prepared ball is given an oval and flat petal shape. All the parts are glued around the circumference and pressed tightly together. It is worth leaving some space inside the petals for bead decoration.
- Then identical petals are made from pink plasticine, but in smaller quantities. These parts will be used to create the second layer of the flower.
- Next, you need to prepare the lightest shade of plasticine and make a small number of petals for a small inner layer. Here you should try to cover the inner part, and at the same time ideally place the new petals around the circumference of the flower.
- Before the material hardens, you need to insert the middle. It is best to use a button.
- After 2 hours, you can carefully remove the button with a needle. Glue is added to the resulting space to securely fix all the details of the flower.
Keychains
A keychain made of lightweight plasticine in the shape of a small house in a marine style can be a great gift for any occasion.
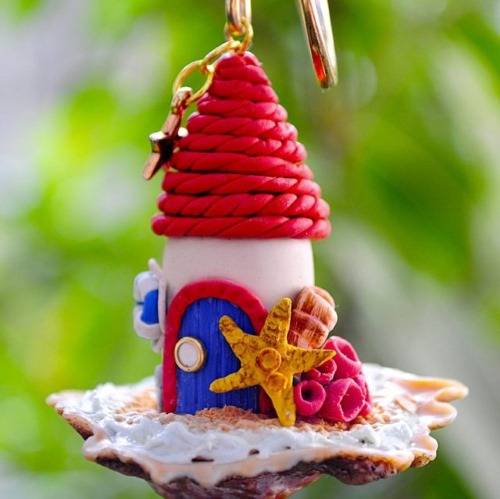
To work you will need:
- A seashell that serves as a base. When choosing its size, it is important to consider the parameters of the fittings used in the work.
- Air plasticine 8 shades.
- Fittings.
- Star shaped pendant.
- 1 gold-colored ring with a diameter of 3 mm.
- The pin with the eye is of the same shade.
- Small plastic shell for decoration.
The process of making such a keychain is very painstaking.
For this reason, it is worth strictly following the specified sequence of work:
- Mix beige and yellow clay to obtain a material with a sandy shade (you can take this tone right away).
- Fill the shell with the resulting plasticine. Use a skewer to create a texture that imitates sand. Make a small depression in the central part.
- A cylinder is rolled out of white plasticine and used as the base of the house. This part is installed in the prepared recess.
- For the base of the roof, another white cylinder is rolled. Both parts are glued together.
- Next, a little brown plasticine is added to the red mass. Using an extruder, thin sausages are made, 2 of which are intertwined and rolled a little. The resulting rope is used to wrap the roof. To ensure reliable fastening of the parts, you can coat them with a little glue.
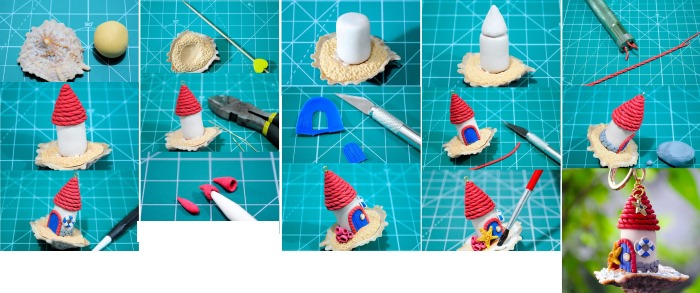
- The pin with the eye is inserted into the top of the roof. If the pin is too big, it can be shortened with nippers.
- Then blue plasticine is rolled out. Doors are cut out on a piece, and stripes are applied with a stack to imitate boards.
- The door is glued. From the sausage that was left during the preparation of the rope, you can form the outline of the door and make small notches with a stack.
- Gray plasticine is used to create a stone foundation for a house. It is enough to simply pinch off small pieces of the material, roll them into balls and flatten them.
- To make a life preserver, a blue sausage is wrapped around a stack or a small stick. Strips of white plasticine are placed on the 4 sides of the circle, and a rope is made from the thinnest sausage for the circle. The part can be secured to the house using glue.
- To complete the marine theme, you can make corals. To do this, you need coral-colored plasticine, from which 6 small droplets are rolled. Using a stack, the corals are given their natural outline. The parts are fixed on the back of the house with glue.
- The door handle uses a ring with a diameter of 3 mm.
- To make a starfish, take a piece of yellow material. It is flattened and a five-pointed star is cut out with a knife. You can use your fingers to give the part a rounded shape. But to create texture, you will need a toothpick or a stack.
- To complete the composition, you can make sea foam. To do this, dilute a piece of white plasticine in water until it becomes paste-like. Apply this mixture with a brush along the entire perimeter of the shore.
Postcard with airy volumetric flowers
A bright postcard made of airy plasticine will be an ideal gift for any occasion.
Not only adults, but also the smallest children can make such a craft. The product can be decorated with absolutely any inscription, which makes this gift option simply irreplaceable.
Before starting work, it is worth checking the availability of the following tools and materials:
- 4 bags of airy plasticine of different shades.
- Yellow cardboard.
- Decorative tape with a floral pattern applied.
- Bright decorative stamens.
- A sticker or stamp with a congratulatory inscription.
- Sharp scissors.
- PVA.
The work is performed in the following sequence:
- The base is prepared from yellow cardboard. To do this, cut out a rectangle of the appropriate size and fold it in half. To decorate the base, you can use decorative tape or a figured hole punch.
- Air plasticine is prepared. It is important to remember that small pieces of material are taken out of the bag. Before closing the package, the air trapped inside should be released.
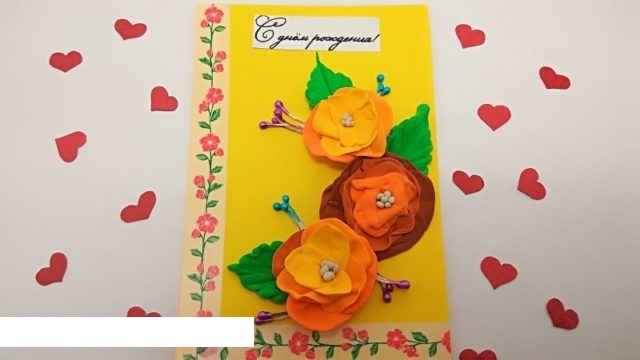
- The prepared pieces are used to make the most common types of petals in any shape.
- Future flowers are assembled into a single composition by gluing petals in a circle. The largest and darkest parts are placed first. Light-colored parts are glued to the center of the flower. In addition, decorative stamens are added to the middle. For ideal balance, 3 flowers should be made. To make the composition look interesting, all the flowers should be of different colors and not look like each other.
- Leaves are prepared from small green balls. Using a stack, you can make the edges of such parts carved in shape and show the veins. The upper part is sharpened with your fingers.
- The finished leaves and flowers are glued to a cardboard base. The card is put aside until the plasticine has completely hardened. If there are any empty spaces on the composition that catch the eye, you can fill the voids with bunches of stamens.
- All that remains is to attach the greeting sticker or stamp to any suitable place on the card.
Slime
To make slime you will need:
- Air plasticine.
- PVA.
- Corn or potato starch - 2 tbsp.
- 2 containers and a stirring tool.
- Rich hand cream.
- 1 teaspoon cold boiled water.
- 10 ml shampoo.
- Spray "Teimurova".
Preparation is carried out according to the following algorithm:
- A jar of glue is poured into the container.
- Add starch and mix thoroughly until a homogeneous mass is formed.
- Add hand cream and mix again. The finished solution should resemble pancake batter in consistency.
- Pour the shampoo into the second container and add 1 teaspoon of cold water. Beat with a whisk or mixer until foam forms.
- Both resulting masses are mixed in one container.
- Teymurova foot spray is added. This component acts as an activator. The composition is thoroughly mixed again.
- Add air plasticine and mix.
How to make plasticine yourself?
If you urgently need air plasticine of a certain color, then you can make the mass yourself.
For this you will need the following ingredients and tools:
- Cornstarch.
- PVA.
- Lemon juice.
- Dye of the desired shade.
- Vaseline or baby mineral oil.
- Mixing container and spatula.

The preparation of airy plasticine takes place in the following sequence:
- Mix equal amounts of starch and glue. Place the resulting mass on low heat.
- Lemon juice and oil are added to the container. To prepare 1 glass of plasticine, you need to take 2 tbsp. oil and 1 tbsp. juice. The resulting mixture should become a homogeneous consistency.
- Next, dye is added to the material to obtain the required shade. If a lot of colors are needed, the mixture is divided into several parts and the dye of the required tone is poured into each of them.
- Until the mixture is completely cooked, leave it on the stove for another 10 minutes. It is important to stir it constantly.
- Once the material has cooled down a bit, it needs to be kneaded by hand. This will allow all the air bubbles to be released from the plasticine.
The shelf life of homemade lightweight plasticine is 4 weeks. However, the material should be kept in an airtight container or wrapped in cling film and stored in the refrigerator.
Making crafts from airy plasticine will not cause difficulties for either parents or their children. But the pleasure from such work and impressions from finished products will last for a very long time.
Article formatting:Natalie Podolskaya
Video about crafts from air plasticine
Crafts from air plasticine:
🙂 Useful information, thank you!))) 🙂