Use of stoppers or caps from plastic bottles are considered a fashionable trend in decorative and applied art. Crafts made from scrap materials in the form of coasters, paintings, toys and figurines decorate summer cottages. They are elements of interior and apartment decor.
Crafts from plastic lids for the garden and vegetable garden
Lids of all sizes and colors are not sent to the trash today. They are given a second life. This does not require special skills and abilities. You need a supply of lids, wire, cardboard, old newspapers, and the simplest construction tools.
Fences
Fencing for small flower beds or low shrubs requires a huge number of covers of the same size.
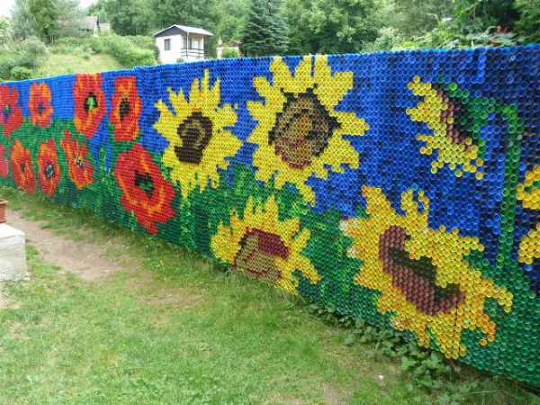
The color of the fence depends on the presence of plugs and can be monochromatic or variegated. Craftsmen choose options: they cover the fence with one color, build it in the form of colored pencils. Less often, they lay out a multi-colored pattern on the frame or arrange the caps like a painting or photograph.
When a sufficient number of caps have accumulated, the stages of building a fence begin:
- Sort the caps by color, drill a hole in each for the wire or fishing line. Holes of the same size are then made in the base of the fence.
- Choose an ornament, a pattern. Weave a fence frame from wire. For frames, take old pipes and narrow steel sheets.
- Place the lids on cardboard or a sheet of fiberboard according to the selected pattern. Transfer the lids to the fence base. Secure them with wire. Nails are considered the worst option, as they do not allow the lids to be placed tightly – one next to the other.
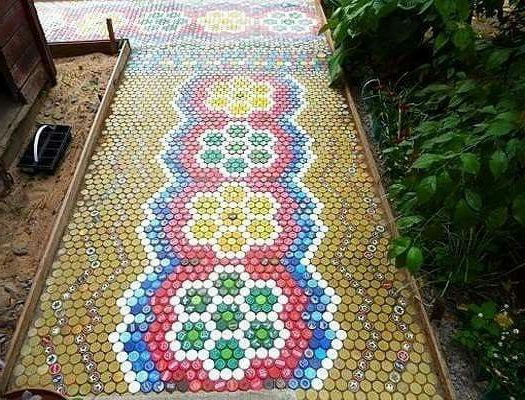
Garden paths
Crafts made from plastic bottle caps are varied and popular. Gardeners and vegetable growers pave bright, cheerful paths from them.
Since the front side of the raw material is smooth and slippery, it is recommended to safely place the paths between trees and bushes. To decorate suburban areas, you need: corks of different colors, sand, narrow boards for fencing the area, cement, industrial glue.
Construction stages:
- Select a location for a path or trail. Determine and mark the boundaries.
- Cut the soil together with the grass to a depth of 7-10 cm.
- Install formwork along the contour of the future path: secure the boards with sharp stakes.
- Fill a shallow trench with sand, gravel, wood chips, and dry leaves.
- Mix a homogeneous solution of 4 parts cement, 1 part sand and 1 part glue. Pour the mixture onto the future path. Distribute and smooth it out evenly with a pick-up shovel.
- Proceed with the installation of the road surface by pressing the plugs into the building mass. To ensure an even height of the base, it is necessary to press the plugs on the surface with equal force.
- Remove any remaining mortar from the surface using a stiff-bristled brush. Remove the formwork.
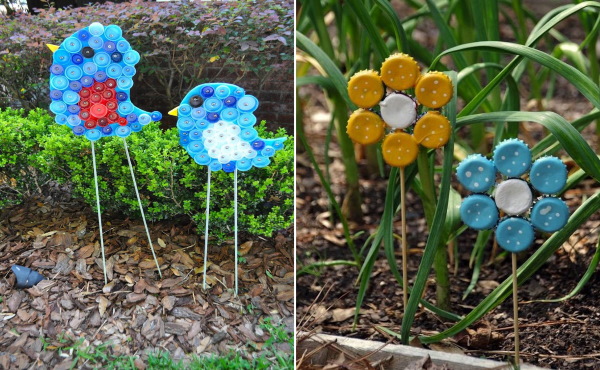
Figurines
Cork figures are common and popular crafts. Usually these are animals, fairy-tale characters, robots, fantastic flowers. Craftsmen of any age love to make bright things. For a little man figure you will need: scissors, a gypsy needle, an awl, ready-made plastic eyes, a glue gun. You will also need 34 different colored lids, a rubber band, 5 plastic eggs from a Kinder Surprise.
Assembly stages:
- make a hole in the center of the lids with an awl;
- insert a 15 cm long elastic band into the needle;
- string the egg onto the bottom edge of the elastic band and tie a knot;
- make a leg out of 8 caps on a separate piece of elastic;
- make a second one;
- pierce 2 holes in the lid of a larger diameter and secure the legs;
- put on 2 caps - the body, then the egg;
- then the lid (neck), the egg (head) and 2 lids on top;
- secure everything with a knot;
- tie a piece of elastic to the neck, leaving 2 pieces on the sides for the arms;
- string 6 caps and an egg, secure with a knot;
- do the same with the 2nd hand;
- glue the eyes.
The figurine is ready.
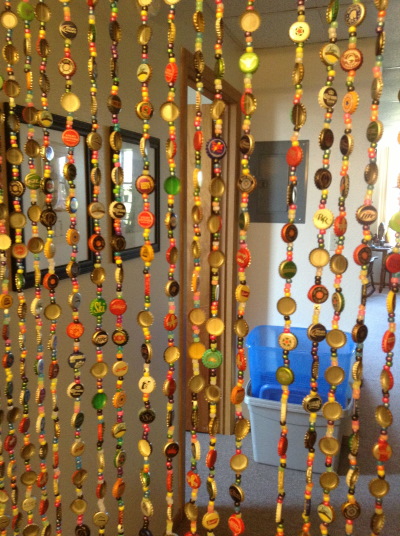
Curtains
Openwork, bright curtains will decorate summer cottage windows or doors. The product does not require much effort, time and money. But the final result pleases with an intricate pattern and rainbow colors.
For the window curtain you need to take:
- lids;
- thick fishing line or wire;
- hammer, nails;
- shoe awl;
- a flat stick or rail for attaching the curtain.
Sequence of work:
- measure the length of the curtain;
- cut the line into pieces, leaving a 7-8 cm reserve for knots;
- make a hole in the center of all the lids;
- string the lids onto the pieces, securing them with strong knots at both ends;
- tie the pieces with the lids to the base and secure it in the window opening.
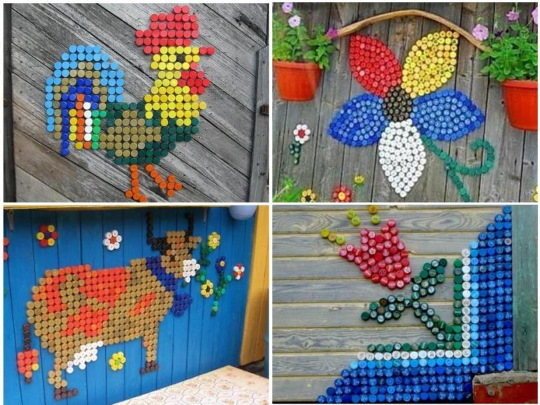
Panel
Crafts made from plastic bottle caps also include colorful panels that can be found on the walls of summer cottages and fences.
They lay out a simple picture or a complex panel in a geometric style. In each case, it is advisable to take a base - plywood or cardboard. Without experience, it is difficult to place the panel immediately in the chosen place.
Stages of the creative master class:
- draw a picture on a piece of plywood;
- sort the caps by color shades;
- degrease them with alcohol;
- place the lids upside down according to the picture on the sheet;
- glue each one with a gun;
- cut out the resulting image along the contour;
- secure the sheet with the panel in the designated place with screws and nails;
- paint the gaps between the lids with cement paint of a suitable color.
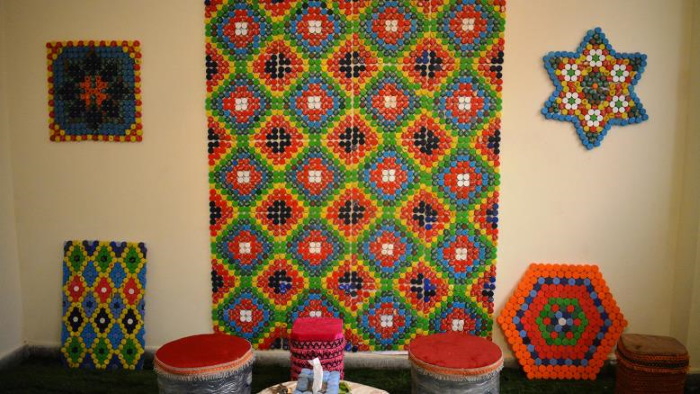
The panel looks interesting when lids of different diameters are placed one inside another, like a "matryoshka". The picture turns out to be three-dimensional, has a visual 3D effect. In this technique, a panel of a cockerel or the sun is chosen. The work is complex, for craftsmen who know how to create stained glass and mosaics. First, the plywood sheet is primed. Then the outline of the drawing is applied. It is filled with lids.
Home ideas
Free time, desire, love for handicrafts are favorable conditions for the embodiment of various things and souvenirs from ordinary bottle caps. They will decorate the interior of the rooms. They will give the home uniqueness and coziness.
Decor options
Crafts made from plastic bottle caps are used as decoration options for various places and spaces.
Thanks to the variety of colors, shapes, and sizes, lids are used literally everywhere:
- decorate barrels and boxes;
- create canopies;
- decorate garden and country furniture;
- decorate containers for flowers and plants;
- build frame fences;
- flower beds are decorated with figures made from lids;
- They make colorful screens and partitions.
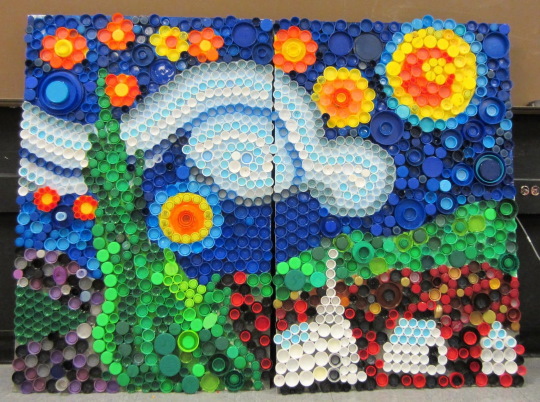
Painting
A painting is a large-scale project made from plastic caps. It is usually used to decorate a house wall or a solid fence. The main thing in this kind of creativity is to choose the right color scheme of the raw material and the pattern.
Progress of work:
- clean, wash and dry the lids;
- distribute them by size and color palette;
- print out the drawing we plan to make;
- choose a place for the future painting;
- paint the area any color;
- apply the markings of the selected design to the finished area;
- attach the lids with glue, liquid glass or screws;
- the method of fastening depends on the type of base;
- The lids are attached to the brick wall using a special solution.
Experienced craftsmen advise against using stencils. It is better to take a clear plan of the painting, divided into separate segments. Also, experienced craftsmen recommend choosing a simple, unpretentious drawing for the first painting.
Watch
Crafts from plastic caps in the form of a clock will require some expenses: a working clock mechanism will come in handy. You will also need colored bottle caps, thick cardboard, a glue gun, a compass, and a simple pencil.
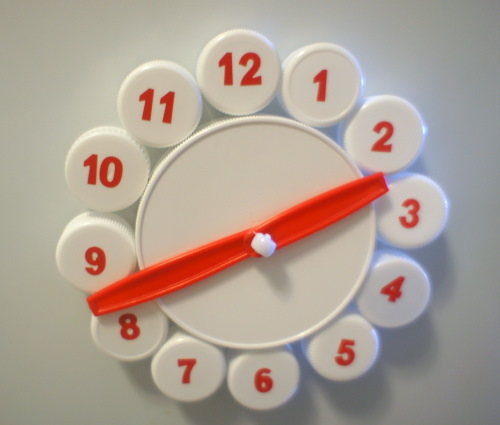
Stages of work:
- cut out a cardboard circle;
- stick 12 lids on it;
- draw a number on each one, pierce a hole in the center of the circle;
- install the clock mechanism.
The design of the dial depends on the tastes and preferences of the master.
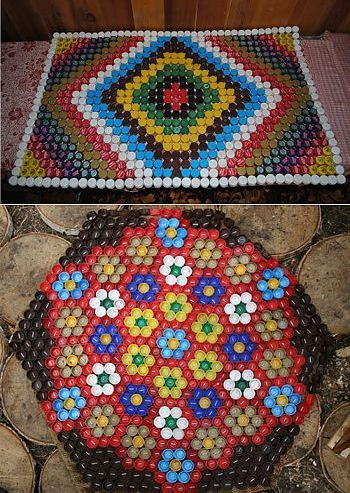
Massage mat
Lids are used not only to decorate country houses and territories. They are used to create practical things to maintain tone and health - therapeutic mats for feet or back. Using such a covering relaxes and heals the human body. It is a prevention of flat feet, osteochondrosis. You will need materials: corks, thick fishing line, awl.
Assembly progress:
- determine the size of the rug;
- take the required number of lids;
- pierce 6 holes in all the corks;
- thread a fishing line through them and connect them to form a rug;
- secure (melt) the ends.
A rug with an ornament requires preliminary placement of the pattern on a flat surface. And fastening of plastic parts according to the pattern.
Hanging decorations
Crafts made from plastic bottle caps are used in New Year and holiday interiors. Children are inspired to assemble Christmas trees from green corks and hang them on a large tree. Bright balls made from caps, connected with strong glue, look unusual.
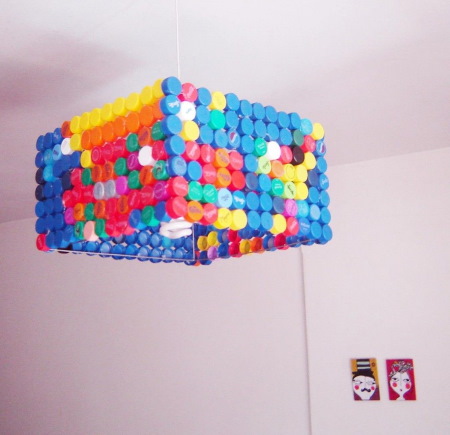
Old pendant lights will acquire a modern look if they are decorated with transparent or colored covers. Craftsmen embody bold design ideas from waste material in the form of an original lampshade. You need to make a strong frame and decorate it with covers. In addition, colored covers are pasted over monochromatic, boring flowerpots for climbing flowers.
Hanging flowers look original in the interior of garden houses or country houses. To make a plastic flower you will need: large lids from 5-liter plastic bottles, double-sided tape, scissors.
Progress of work:
- cut off the sides of the lids;
- make 6 cuts in half of the lids;
- shape (bend) the petals;
- cut a spiral out of the remaining caps;
- connect the finished buds to the spiral with tape;
- glue the stamen into the middle of the flower;
- hang a flower on a bush.
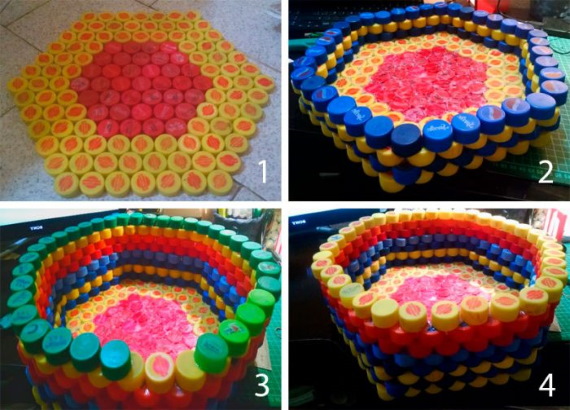
Coasters
Coasters for glasses, bowls, pots are made identically to the assembly of the healing mat. They differ only in the size of the diameter.
The special feature of this product is the reliable and durable fastening of rows of lids between each other.
To make the stand you will need:
- lids – 7 pcs.;
- 3 pieces of fabric of different colors;
- any container, 7 cm in diameter (glass, jar);
- simple pencil;
- scissors;
- thread, needle.
Making a coaster for a coffee cup:
- draw 7 circles on multi-colored patches, tracing the existing container;
- cut out circles;
- sew fabric over all the lids, placing each one in the center and making wide stitches around the flap, tighten the thread;
- fix a kind of “cover” with several stitches;
- connect the lids into a chain (sew);
- roll the chain into a circle;
- secure from the wrong side with stitches.
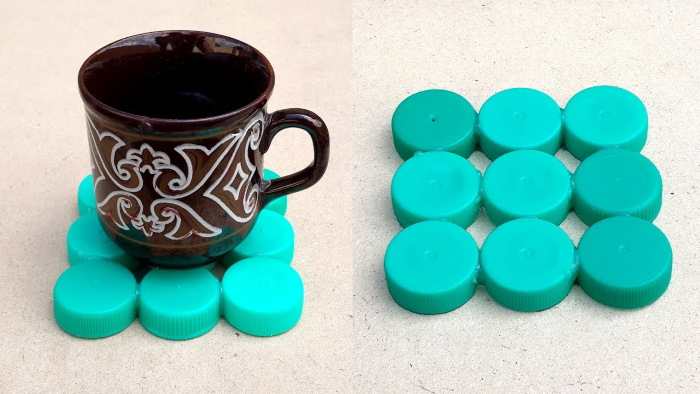
They also make stands for larger kitchen utensils: teapots, saucepans, frying pans, by combining 4-6 small stands into 1 large one.
Original ideas
Original, useful things for the home are always in demand. Without spending money, you can create various household items from lids of various containers.
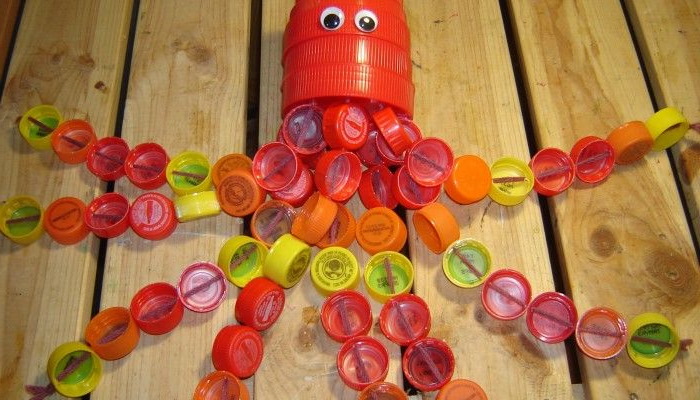
Original children's toys are a common use for bottle caps. Children play with most crafts while swimming in a pool or river. Plastic things float well on water. Bright colors and bizarre shapes attract and amuse children.
To make a sea octopus you will need: yellow and red caps, fishing line, part of a plastic bottle. Attach 10-12 pieces of fishing line to the cylindrical part of the bottle. Thread corks onto each piece to make legs. The sea animal is ready to swim in the pond.
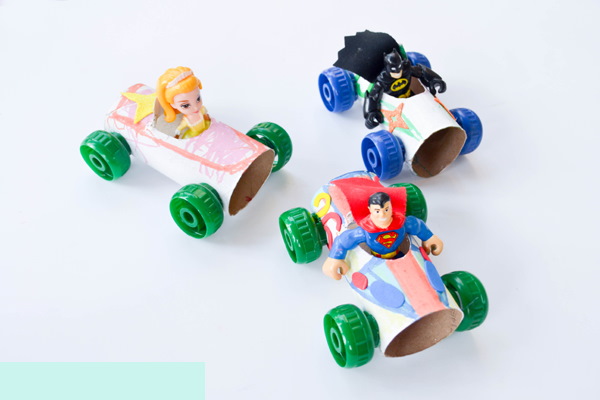
Boys and girls love to play with racing cars. And a new race car, designed together with parents, will take pride of place in the toy garage.
You need to take:
- cardboard tube;
- elastic band;
- a sheet of thick cardboard;
- lids – 4 pcs.;
- knife;
- long skewers;
- drill;
- glue gun.
Recommendation for assembling parts:
- cut the tube, leaving a length of 20-22 cm;
- drill holes slightly larger than the diameter of the kebab skewers in the middle of all the lids;
- paint the tube a bright color or cover it with red paper;
- drill holes in the tube for the front and rear wheel axle;
- install the wheels (plugs) and glue them to the axle;
- Cut out a racing driver figure from cardboard and glue it to the tube.

Children love to make new toys.
Together with them you can make the following items:
| №p/p | Type of craft | Brief description of the work |
| 1 | Applications (cat, fish, bee, bear, dog). |
|
| 2 | Three-dimensional figures (people, animals, insects). |
|
| 3 | Flat dolls (fairy tale heroes and characters). |
|
| 4 | Robots are warriors |
|
| 5 | Automobile road |
|
Adults also enjoy making things from lids. A little fantasy, diligence, imagination - and a useful thing in the household is ready. Sometimes it is difficult to find a container for storing household items. Therefore, you can make a container for small items with your own hands.
You will need:
- clean plastic bottle;
- lids – 2 pcs.;
- knife;
- acrylic based paints.
Cut off the bottle neck 3-4 cm below the lid. Insert it into the 2nd lid, glue. Unscrew the lid, place small objects (buttons, nails) in the container and screw it on. The product can be painted, decorated with colored beads or painted with acrylic paints.
A sturdy basket will also come in handy in everyday life. You need to take:
- colored or plain corks;
- nippers;
- wire;
- awl.
Work process:
- Draw a diagram of the future basket, mark the pattern.
- Pierce the lids in 2 opposite places and insert the wire.
- Following the diagram, make the bottom and sides of the product.
- Then fasten the parts together, form handles. Braid them with decorative ribbon or twine.
A smart stand for stationery (pencils, pens, brushes) can be made from scrap material, take:
- lids;
- nippers;
- punch or awl;
- wire.
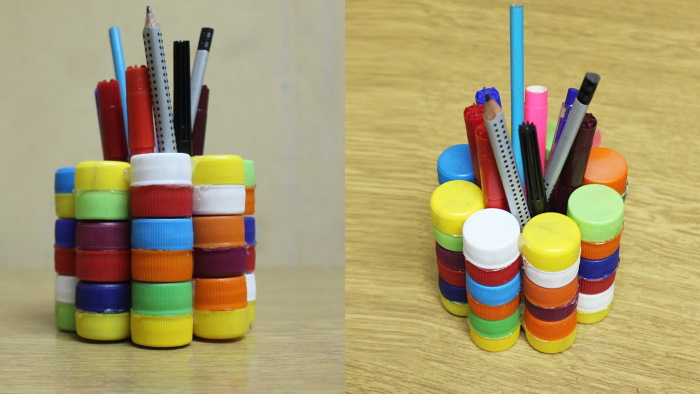
Work process:
- Draw a diagram.
- Punch 4 holes in each cap. Fasten with wire according to the diagram.
- When the canvas reaches the desired size, bend it in certain places.
- Draw mathematical symbols or letters of the alphabet on the corks.
Household items made by needlewomen often compete with store-bought items. A night light made from bottle caps will take a worthy place in the bedroom.
Materials required:
- lids;
- bulb;
- glue gun.
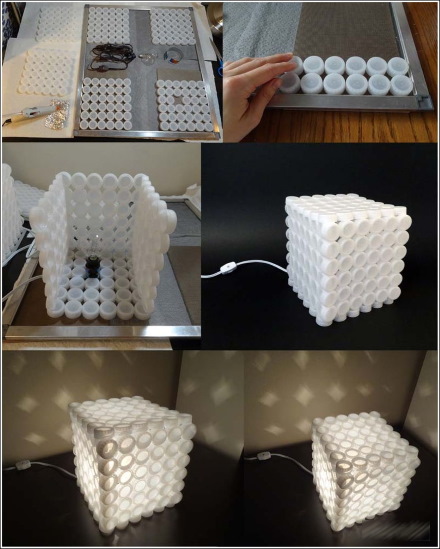
For a square lamp you will need 6 identical parts:
- Glue the lids together to form square panels.
- In one wall, leave space for a socket for a light bulb. The part with the hole will be the base of the night light. Glue the other finished parts to it.
- Before fixing the top wall of the lamp, it is necessary to screw in the light bulb. Connect the product.
- Light coming through lids and cracks will be diffused and subdued.
Unneeded, second-hand things are usually taken to country houses. Chairs with a strong frame but broken seats are given a second "birth" with the help of bottle caps. The updated chairs are used in open gazebos and indoor spaces. You will need: corks, fishing line, an awl, ties to secure the line.
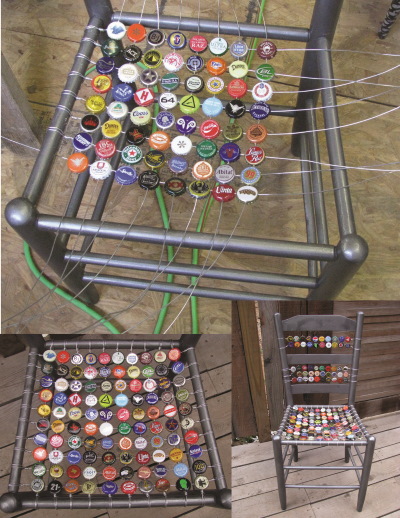
To repair a chair, you need:
- make 2 holes in the sides of the lids;
- measure the seat and back of the frame;
- calculate the number of covers required for the seat and back;
- string the corks onto a fishing line;
- attach the finished pieces to the chair frame;
- burn the fishing line, secure all rows with a tie.
Nowadays, plastic jar, canister, and bottle caps are considered a universal material that is reused. Crafts made from them are useful and durable. Things for the garden, vegetable garden, and home, household appliances and furniture, children's construction sets, and kitchen utensils have organically fit into life.
Video about plastic crafts
Crafts from plastic bottle caps: