Plastic bottles are a means of unlimited scope for the embodiment of creative ideas of adults and children. Crafts made with your own hands allow you to add originality, creativity and a positive mood to the interior of your home and garden.
Features of plastic as a material for making crafts
The characteristics of the material are:
- Availability of material.
- Low cost (or free to use).
- The pliability of the material (it bends, melts, can be painted, and is waterproof).
- Retains shape (if not heated).
- Durability (plastic retains its properties for up to 100 years).
- Great variety of shapes and colours.
- Non-toxic.
- Not eaten by insects, animals or birds.
- High strength and wear resistance (does not deteriorate in water).
Advantages
The main advantage of a handmade plastic craft is a long service life without losing its original properties.
Also, a wide choice of colors, sizes, and shapes of polyethylene dishes against the background of minimal cost create ideal conditions for creative individuals.
Flaws
The main disadvantage of plastic is its small range of temperature stability. At sub-zero temperatures in the cold season, plastic products become brittle, crack, and break when pressed. Therefore, it is recommended to store especially valuable products in heated rooms.
Materials and tools for working with plastic
To make neat and unusual crafts you may need:
- Various plastic bottles, canisters and jars found in the house (from drinks, shampoos, yogurts, household chemicals, food, car accessories).
- Several types of scissors (large, manicure) for easy cutting of details.
- A stationery knife will come in handy if you have to cut canisters or cut off bottle necks.
- Hammer, nails (for fixing some elements to wooden sticks).
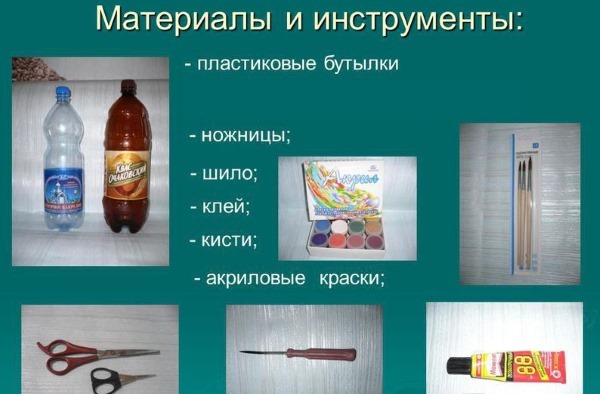
- Candles, matches for melting the edges of plastic parts or giving them the desired shape, as well as for creating holes with a hot awl.
- The remains of wire, rope, and fishing line are needed to fasten parts or attach whiskers to animal-shaped figures.
- Washcloths are a great wig for voluminous figures (horse or donkey mane).
- Eyes for handicrafts are needed for small figures when they are difficult to draw.
- Quick-drying paint is the basic element for creating color.
- The glue is selected individually based on the author’s idea.
- Nail polish (clear or otherwise) is a great substitute for paint in small crafts, such as butterflies.
- Felt-tip pens or markers are needed for drawing cut-out lines on plastic or finishing drawing body parts.
- Stapler and staples for fixing elements.
- Electrical tape (if necessary) and an awl.
- Fabric gloves for hand safety.
- A sewing kit may be required.
What can be made from bottles for kindergarten or in kindergarten? Step-by-step instructions
Crafts made from plastic bottles are a great way to decorate a playground for children in a kindergarten.
Multi-colored bottles can be used to create life-size flowers or cartoon characters from popular films. Children will be eager to study plastic characters and play with them, especially if they are the same height. Installing elements and characters from one cartoon on one site will allow children to immerse themselves in a fairy tale and feel like the main participant in the events, like Alice in the "land of wonders".
Also, from jars of drinking yoghurts and other fermented milk products, children and their parents create animal figures, New Year's toys, nesting dolls and other masterpieces for competitions in kindergarten.
Chamomile
A simple craft that does not require painting, but nevertheless looks very impressive in a full-length bouquet.
To make it you need to have:
- Several white plastic bottles from kefir, milk, drinking yogurt, with a capacity of 1-2 liters (for petals).
- 3-5 yellow plastic or metal lids from a 3-liter jar.
- 2-3 bottles of green color (for foliage).
- 3-5 pieces of stiff wire (to make stems for the flowers).
- Glue and scissors.
- Green electrical tape.
The process of creating daisies:
- Cut out identical ovals (petals) from the side walls of white bottles, along with part of the neck.
- Glue the petals with their necks to the inside of the yellow caps. Straighten the bud so that all the petals are in one plane. If desired, make a terry chamomile (if you make 2-3 rows of petals).
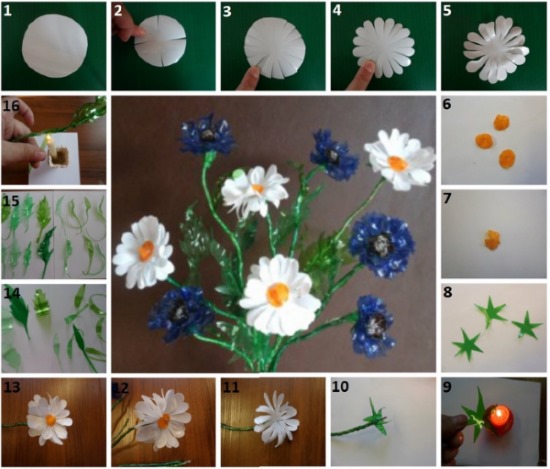
- Cut off the necks of green bottles (3-5 pcs.) with a 5 cm plastic cap and glue them to the yellow cap from the inside (creating a tapering green part of the bud, and the stem will then be inserted into the neck).
- Cut out leaves for flowers from green bottles and attach them to the wire (stem). Do this using sticky tape.
- Wrap the wire (stem) with green electrical tape.
- Insert the stem into the neck of the bud (for a strong hold, it is worth winding more electrical tape on the end of the stem so that it fits tightly into the neck of the bottle) and secure with electrical tape.
- Place the finished flowers in an outdoor vase or place them in a flower bed.
Penguin
Amazing bird figures can be made from several bottles without cutting them, all you need is paint (black, white and red) and several miniature hats (which can be quickly created from children's socks or sleeves of unnecessary clothes).
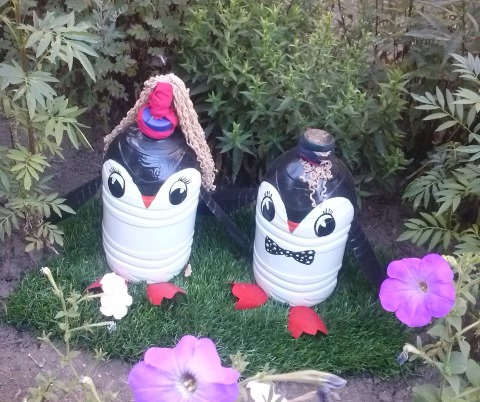
Algorithm of actions for making a family of penguins for the street:
- Take 2-3 plastic bottles (any color or colorless) with a neck.
- Use a marker to draw wings and a face on the penguins.
- Paint most of the bottles black (the back and sides of the birds), and the front white.
- Let the paint dry and paint the eyes and beak.
- Place children's socks or doll hats on the necks of the bottles.
- If desired, the girl penguin can wear red beads on an elastic band and a handbag (which can be easily made from a chocolate egg container, a piece of wire and red paint). The boy penguin will look beautiful if he is given a small tie or a bow.
- It is recommended to fill the finished figures with sand and place them on a platform in a flower bed, under a tree or near a garden pond.
Another option for making penguins from plastic bottles is suitable as a craft for a kindergarten competition. These crafts can be made by a child, if an adult helps a little.
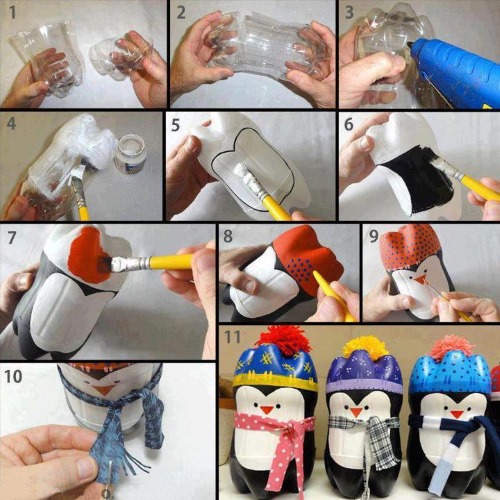
How to make them yourself - step-by-step description:
- To create one penguin, you will need 2 identical drink bottles with ribbed bottoms, colored sticky tape (available at craft stores), markers, a fabric pompom, and a piece of fabric for a scarf.
- Cut off the bottom of one bottle (this will be the penguin's hat) and cut the other in half.
- Connect the two parts of the bottles with the bottoms facing in different directions and secure with adhesive tape along the seam, as shown in the photo:
- Color the penguin with paints.
- After the paint has dried, tie a scarf from a piece of fabric and glue on a pompom.
- If desired, glue beads or rhinestones onto the cap. The penguin is ready.
Crocodile
Crafts from plastic bottles, due to the availability and cheapness of the material, are found in a wide variety of sizes and complexities. From simple children's figures from one or two containers to huge compositions from dozens of bottles. The figure "Crocodile" refers to just such crafts. Here are examples of two works, one can be made by a child of 3-5 years old, and the second is not for every adult.
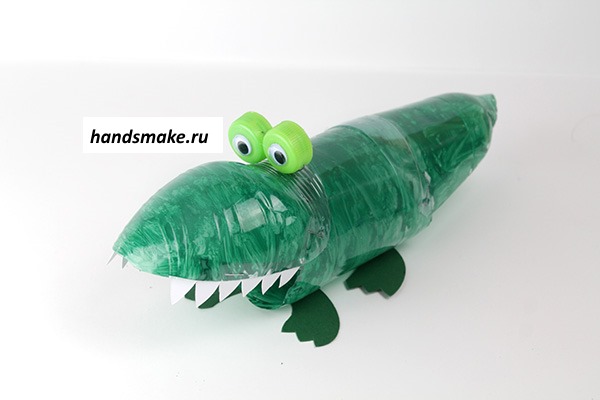 For a kindergarten, a small crocodile figurine would be more optimal; to make it, you will need:
- 2 plastic bottles with a long narrow neck.
- 8 lids (preferably green).
- Eyes.
- A sheet of green cardboard (or stiff felt).
- Green paint (acrylic, odorless or spray paint), masking tape.
Making a crocodile:
- Cut off the bottoms of both bottles and connect them with adhesive tape so that the necks are facing in opposite directions.
- Glue 4 lids onto the belly (after making cuts in the bottle so that the figure becomes stable and the paws are in the same plane).
- Glue 2 lids in the eye area (these will be the eyelids).
- Paint the figure green. Let dry.
- Make short longitudinal cuts along the crocodile’s back (the comb will be inserted into them).
- Cut triangles out of cardboard or felt and insert them into the cuts on the back (this will create a characteristic comb).
- Glue eyes and eyelashes to the eyelids (optional).
- Glue cardboard or felt fingers to the paws (3 fingers for each lid).
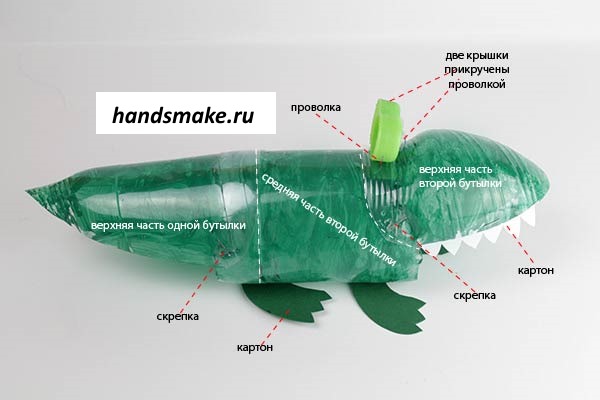
To make the figure more intimidating, at the stage of collecting two bottles, you can cut one of them lengthwise and cut out the reptile's teeth with nail scissors. And when painting, make the teeth white. Such a craft will definitely not go unnoticed among others in the kindergarten.
Bees
The fascinating process of making small bees will certainly captivate all family members and inspire further creative fantasies from plastic. A small swarm of bees hanging on a tree looks great for decorating a children's corner on the playground.
Necessary materials: small transparent plastic containers, up to 1 liter in volume, black electrical tape, yellow paint, thread, scissors and a felt-tip pen.
Manufacturing:
- Pour a little yellow paint into the bottles, close the lid and shake until all the walls are painted from the inside. Pour off the rest of the paint.
- Open the lid and let the paint dry.
- Wrap the bottles with black electrical tape to imitate the stripes on the bee's body.
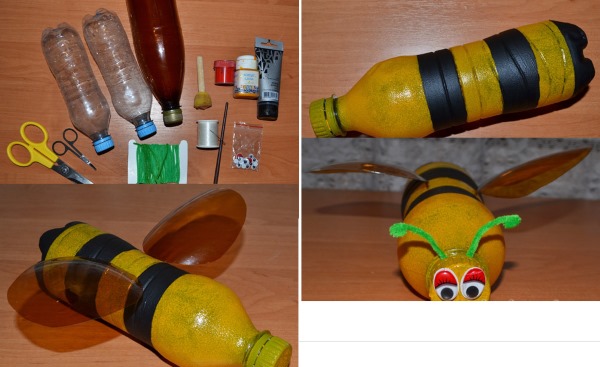
- Draw eyes on the lid.
- Make 2 cuts on the backs of the bees and insert transparent wings (ovals made of transparent plastic).
- Hang insects from a tree.
These bees will last a long time, decorating the site, and will not bite.
Butterflies
Crafts made from plastic bottles can become real masterpieces of art, indistinguishable from living insects. An example of this are the most beautiful butterflies made with your own hands from transparent bottles, candles and nail polish.
Manufacturing instructions:
- Cut out the middle part from a transparent smooth bottle.
- Draw a template of the desired butterfly on paper or print it from the Internet.
- Transfer the template onto the plastic.
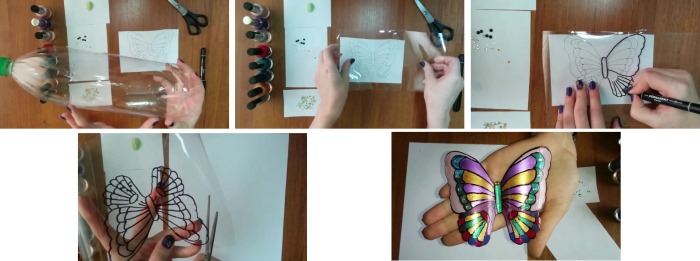
- Then cut out the outline of the butterfly and paint it with nail polish.
- At the author's discretion, decorate the body of the insect with beads glued on.
- Melt the edges of the craft over a candle flame to make them smoother.
Hedgehogs
All children love these funny animals. The craft made from brown plastic bottles turns out no less charming and very similar to a real hedgehog.
For the hedgehog you need:
- Collect several identical brown bottles with a corrugated bottom. Leave one bottle whole (this will be the basis of the craft), and cut off the bottoms of the others and cut them out in the shape of needles.
- Attach the bottoms to the body of the hedgehog using glue or nails. If you choose to attach with nails, then the base of the hedgehog must be cut from the side of the abdomen and when screwing in the nail, use small wooden blocks.
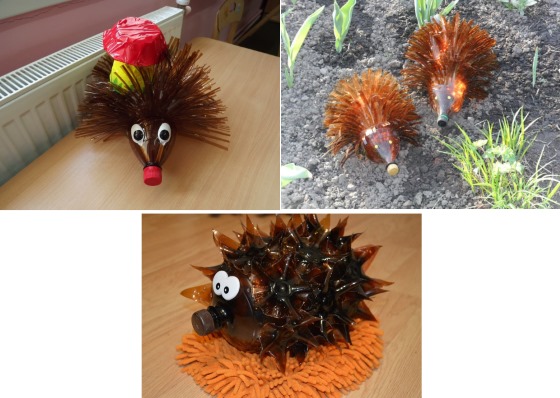
- Glue on the eyes and screw on the black cap (this will be the nose).
- To make the figure stable, glue 4 black caps to the abdomen, which will act as paws.
Helicopter
A miniature helicopter is very easy to make from a baby yogurt bottle, 3 straws and a tennis ball.
Assembly sequence:
- Cut off the top part and the strip from the bottle.
- Make a round hole in the lid and insert a tube with a curved end into it.
- Attach a strip to the bottle part using a stapler, and then attach it to the halves of the tubes.
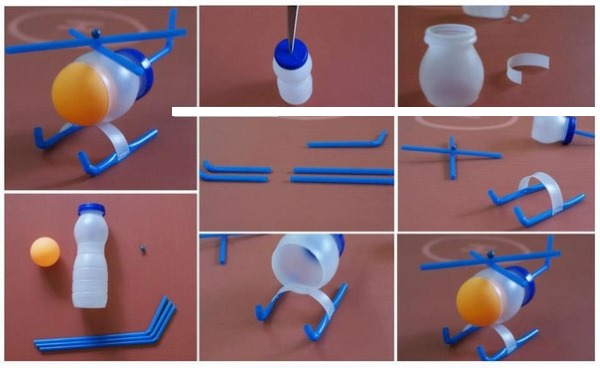
- Insert a ball into the bottle. Finish drawing the cabin with a marker.
- Form the rotor blades from two straight tubes and attach them to the helicopter cockpit using a pin.
Matryoshka
A wide variety of nesting dolls and matryoshkas can be drawn on bottles, all you need to do is cut off the bottom, take some paint and use your imagination.
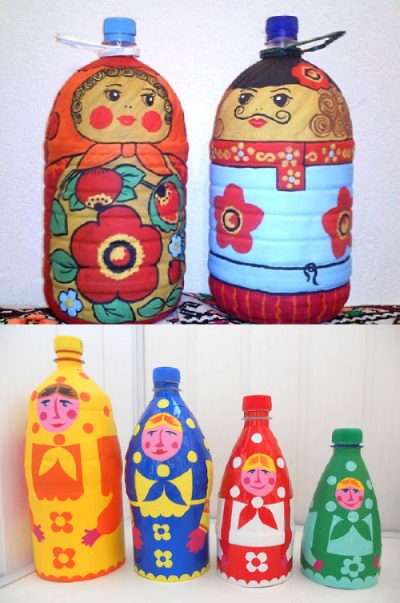
First, you need to apply a drawing with contours to the bottle to make it easier to color. In a similar way, you can create a large chess set and teach your child to play.
Fly agarics
Bright mushrooms are regular guests of any garden plot. They look great in groups under trees in the grass. It is very easy to make them.
Materials for 1 mushroom:
- Bottle with a ribbed bottom.
- Red, white and beige paints.
- Brush and glue.
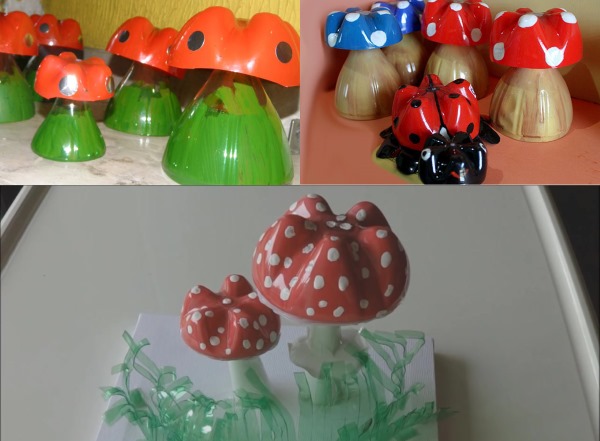
Manufacturing:
- Cut off the top part with the lid and the bottom from the bottle.
- Turn the bottom part over and put it on the lid, securing it with glue.
- Color the mushroom (make the stem beige, the cap red with white polka dots).
- At the base of the fly agaric stem, draw grass with a green marker (optional). The mushroom is ready.
Plastic bottles in garden decor
Crafts from plastic bottles have become an integral part of the arrangement of a personal plot. Shovels, flowerpots, lamps, brooms, animals for a children's corner, furniture and even greenhouses and boats are made from plastic containers. A pleasant bonus of such a hobby is the durability of the invention and, of course, its low cost.
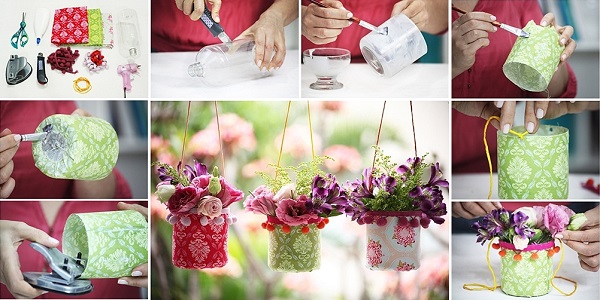
Beautiful flower beds
With the help of plastic containers, you can create stunning flower beds. They can be both traditional and hanging (or wall-mounted). The latter allow you to liven up and decorate with benefit the empty walls of a fence or structure.

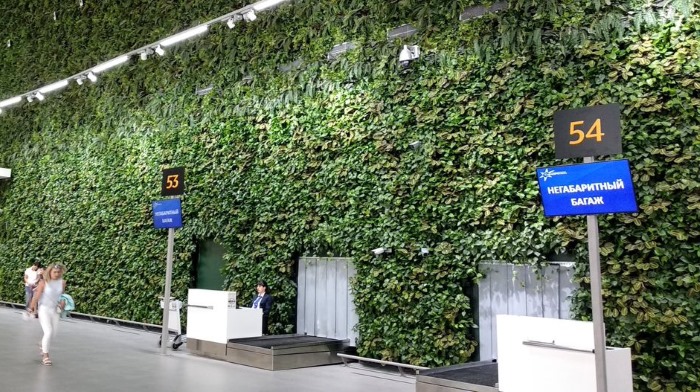
By hanging several bottles with a cut-out window and filling them with soil, you can grow greenery or hanging flowers all year round. Such a green wall will decorate any interior and create a feeling of airiness. The new airport in Crimea (Simferopol) is decorated in this technique, striking all guests of the city with its beauty.
Traditional flower beds are decorated with plastic bottles in an equally original way. They are usually framed with painted and filled with sand or water bottles, half buried in the ground. When implementing this idea, it is worth carefully choosing the material (it is desirable to have all bottles of the same size and type.
Flowers, palm trees
Flowers of amazing beauty are obtained from empty containers of shampoos, shower gels, household chemicals, since the plastic already has a bright and saturated color and does not need to be painted. And packages of thick yogurts serve as excellent bases for white daisies.
An example of flower buds from shampoo packaging (work of the author of the article):

To repeat the flower crafts, you need to collect:
- 2-3 tubes of personal hygiene products or household chemicals that have a bright color.
- Scissors.
- Needle, nylon threads.
- Candle and pliers.
Action Guide:
- Cut out flower petals from empty containers.
- At the base of each petal, make 2 holes (using a needle and a candle).
- As a base for attaching the petals, you can use the lid of any tube, along the perimeter of which you can also make several holes.
- Attach the petals to the base with threads, sewing with a needle.
- Make the core of the flower from a plastic lid and buttons, sewing it on in a similar way.
- The finished flower can be attached to a tree or placed in a garden pond (this will create water lilies that will always bloom, and it will be very difficult to distinguish them from real ones).
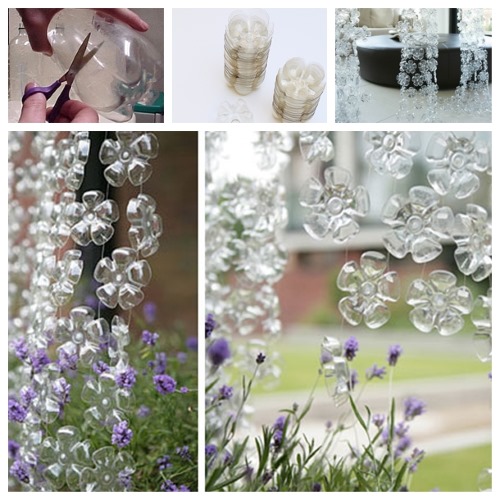
If you have plastic containers with ribbed bottoms lying around at your dacha, you can use the bottoms of the bottles for flower arrangements, as shown in the picture:
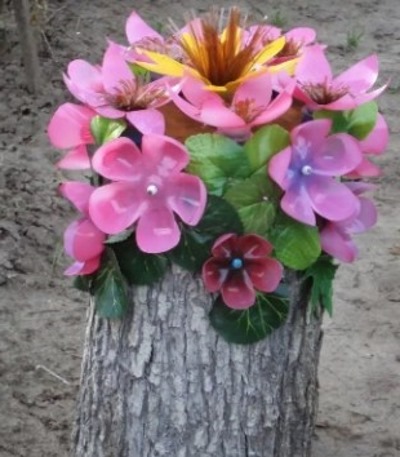
Making a flower arrangement:
- Cut off the bottoms of 10-13 bottles and form flower buds by trimming the plastic material. Make a hole in the center of each with a heated awl.
- Paint the buds with weather-resistant paint and dry.
- If desired, add stamens to each flower by cutting them out of a dark plastic bottle and gluing them on.
- Nail the flowers to the stump and add some artificial greenery. A delicate and original flowerbed is ready.
The palm tree is a southern tree that reminds you of a seaside vacation.
To make it on your own plot you will need:
- Lots of brown and green plastic bottles (at least 2 liters in volume), the number depends on the desired height of the palm tree.
- A rigid base for the trunk (a stick or metal rod).
- Scissors and a stationery knife.

Algorithm for making a palm tree with your own hands:
- Cut off the bottoms of the brown bottles and place them on the rod with the necks down, inserting one bottle into the other, as shown in the diagram:
- Cut off the bottoms of the green bottles and cut them lengthwise, cutting out the edges of the leaves. Use the diagram as a guide:
- Take another whole brown bottle, cut it across. Take the part of the container with the bottom for work. Cut out several round holes in it with a knife, corresponding to the diameter of the neck of the green bottles. Insert green leaves from the bottles into the holes and secure (screw the lid or glue), as shown in the picture:
- Assemble two parts of the palm tree by joining them. If desired, the foliage can be extended.
- Stick the finished tree into the ground and secure it.
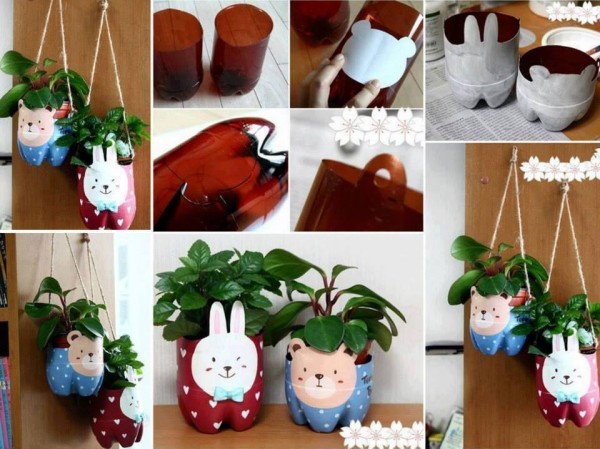
Animals for the garden
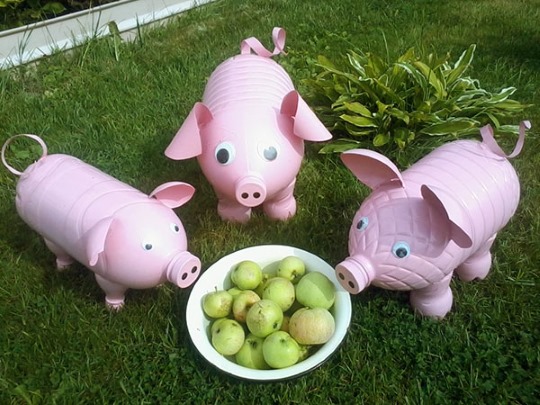
Large plastic water bottles can be turned into cute little animals that will decorate a children's corner and liven up the garden space. They can be made empty or in the form of small flower beds. Miniature pig flower beds with succulents or blooming petunias look funny, creating a creative hairstyle for the animal.
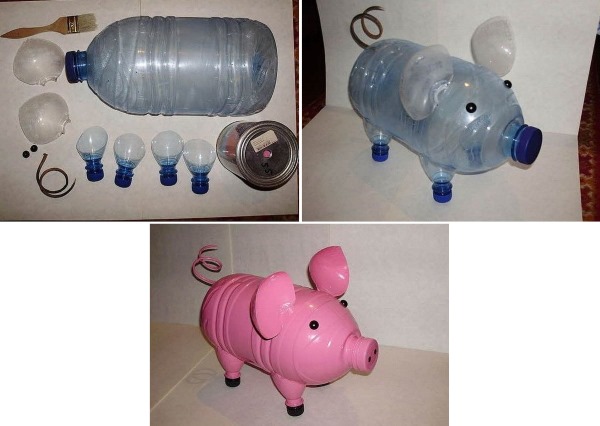
The piglets are made very quickly, for this you need several large bottles and paint. If the pig is planned as a flower bed, then it is better to make it without legs, and if as a decoration, then with hooves.
The work process step by step:
- Cut a window in the bottle on the back of the future pig (flowers will grow there), and make several holes on the belly (so that moisture does not stagnate and the roots of the plants do not rot).
- Paint the bottle pink, draw eyes and a snout on the lid.
- Cut out ears from another bottle, paint them and insert them into the cuts on the head.
- Cut a thin strip of plastic and curl it with scissors (this will be the tail), insert it into the hole of the bottle.
- All that remains is to fill the soil and plant the flowers.
Another interesting character is made from 1.5-2 liter bottles - a large crow, which can be placed in a nest on a fruit tree. It is made from several long bottles and paint (black and gray).
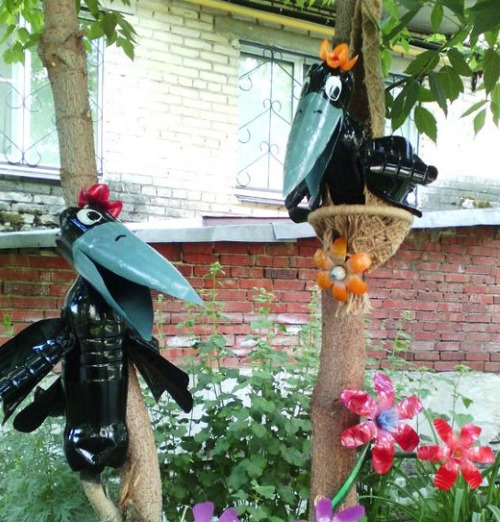
Stages of making a crow:
- Cut out a crow's head from one bottle by cutting off the neck and forming a beak.
- Make a hole in the neck area, the diameter of the neck of the second bottle.
- Use the second bottle entirely. You only need to make 2 cuts on the sides for the wings and one for the tail.
- Connect the crow's body to the head.
- Cut out the tail and wings from the third bottle.
- Paint all parts of the bird and connect them.
- For decoration, attach a bow to the head.
Air curtains for the garden
One of the most unusual and chic interior decor ideas is air curtains made from bottle bottoms. With patience and collecting many identical bottoms, you can create a real masterpiece that will please the eye for many years. If you hang them as curtains in an open gazebo, your guests will be delighted.

How to create a similar curtain, algorithm of actions:
- Collect many bottoms of the same size and color, cutting them out of identical bottles and melt the edges with a candle (to avoid getting hurt during further work).
- Cut flowers out of the bottoms.
- In each flower, use a heated awl to make 3-4 holes (in the petals); this is necessary to fasten the parts of the curtain together.
- Connect the bottoms with fishing line at the same distance from each other in a checkerboard pattern.
- Hang the resulting fabric on hooks.
Garden Lighting Fixtures and Chandeliers
Using a similar method (like air curtains from bottoms), you can make very beautiful lamps for your summer house, especially if you use colored plastic containers.
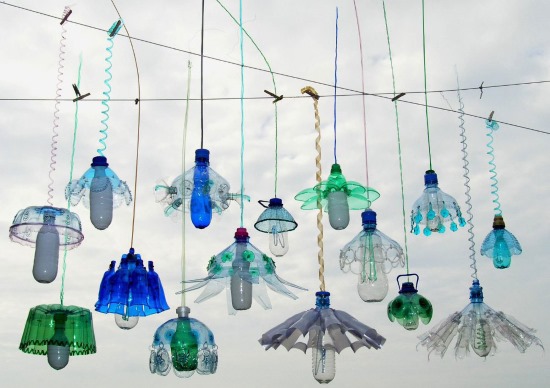
To implement the idea, you need to find a chandelier frame (a circle with a socket), to which you can hang part of the air curtain (described above) and place it in the right place. Another way to create an unusual garden lamp is to use a 10-liter bottle as a base.
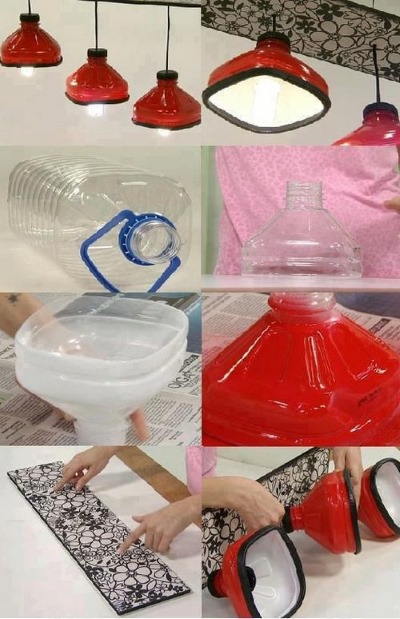
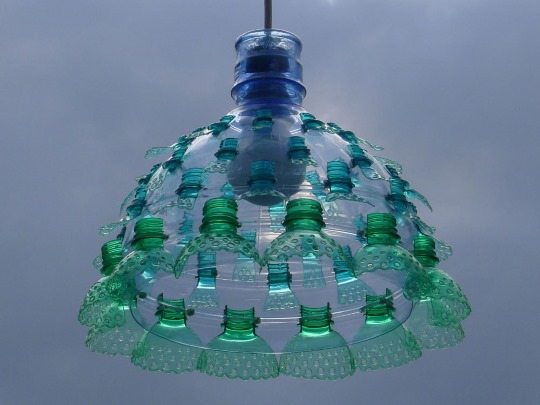
The sequence of steps for making a chandelier from a large container and plastic flowers (as in the second photo):
- Cut off the top part with the neck from a 10-liter bottle.
- Cut out flower buds from 2-liter transparent bottles, melt the edges and create curves (heating over a candle flame). Collect 5-7 buds.
- Glue or otherwise attach flower buds to the edges of the bottle.
- Insert the cartridge into the neck.
- Make a round hole in the lid and pass the wire through it. Screw the lid on.
- All that remains is to check the lighting dynamics and hang the resulting chandelier.
It is not recommended to use powerful bulbs in plastic lamps., as this may lead to excessive heating and deformation of the structure.
Garden path made of bottles
Creative gardeners can make a garden path from any available material, and as a result, they receive admiring glances from all neighbors. An example of this is the methods for making paths from plastic containers.
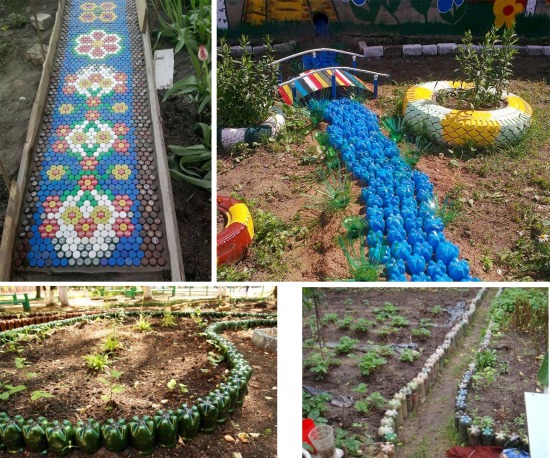
Types of tracks and their manufacturing features:
| Material used | Method of laying | Peculiarities |
| Whole bottles with dry sand. | The bottles are placed perpendicular to the ground and buried with their necks in the ground, thereby creating a fence around the beds. | It is necessary to have many identical containers, and also a reliable fixation of the bottles (concrete pouring) is required so that they do not fall apart |
| Corrugated bottle bottoms | The cut bottoms are placed with the convex side up at the same distance from each other on dry concrete. | Due to the airiness of the structure and partial filling of the convex bottom parts, the track may become deformed |
| Lids | The lids are laid out on a concrete base in the form of a mosaic pattern. | The most colorful and labor-intensive method, requiring a large number of lids. |
| Combination of all materials | A combination of all the above methods and materials. | An excellent option if you have a lot of source material, time and desire. |
Any type of path requires formwork and preparation of the lower layers of soil to maintain its shape.
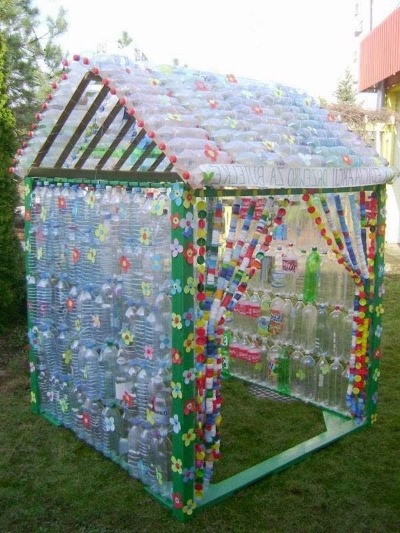
Greenhouses from plastic bottles
It would seem that making a greenhouse or hotbed from plastic bottles is a ridiculous idea, however The owners of unusual structures appreciated their advantages, namely:
- The bottles transmit and diffuse light perfectly.
- The material is quite durable, unlike film covers.
- Low cost and minimal labor input.
- Light weight and excellent mobility (can be quickly disassembled and moved by one person if necessary).
- There are no restrictions on the size of the structure.
Examples of finished greenhouses and hotbeds:
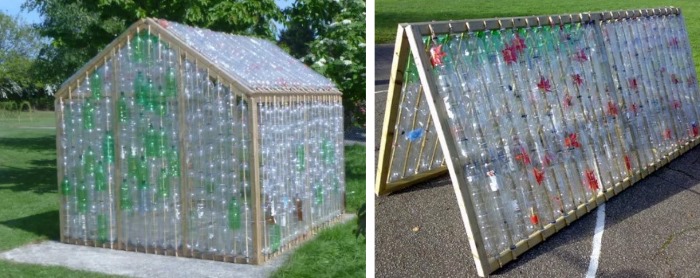
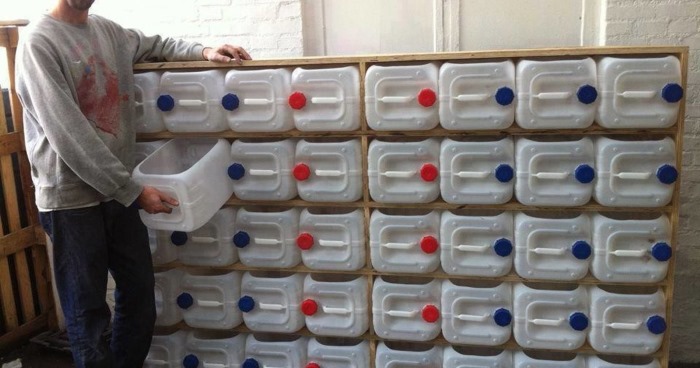
To create a compact greenhouse you need:
- Plastic bottles with a capacity of 1.5-2 liters in the amount of approximately 200 pieces.
- Wooden frame (as in the second photo). Manufactured according to your own parameters.
- Rope or thick string.
- Tools (nails, hooks, loops, hammer, screwdriver).
Making a book-shaped greenhouse:
- Screw in hinges around the perimeter of the book-shaped frame (the distance between them should be equal to the thickness of the bottle used).
- Cut the cord into equal pieces (each piece should hold approximately 5 bottles in length and have a small reserve for ties).
- Make holes in the bottoms of all bottles for the cord.
- String 5 bottles onto each cord (like assembling beads) and secure them so that they do not move.
- Tie the threads with bottles to the frame and pull them tight.
- The finished greenhouse is open on both sides. If necessary, make side triangular doors in the same way.
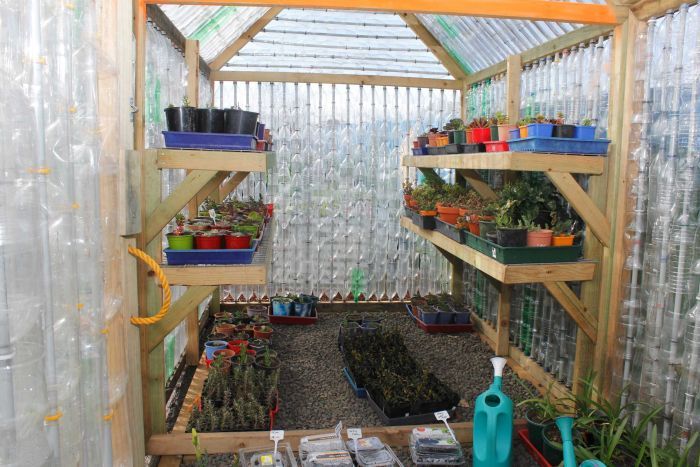
To assemble a larger greenhouse, the same technology is used on a wooden frame with the addition of hinged doors and a roof. The greenhouse can be made entirely of bottles or partially covered with film. A greenhouse measuring 2*2*2 m will require from 500 to 1000 bottles.
The foundation is necessary in this case, but it must be built separately according to standard rules and connected to the plastic structure for the period of active use. The finished greenhouse or hothouse will last for several years with careful use.
Gazebos made of bottles
An economical and original way to create a gazebo with your own hands is to use plastic containers. The structure is erected according to the principle of a greenhouse or hothouse (described above), but more airiness is provided.
To diversify the idea, it is recommended to decorate the entrance to the gazebo with a curtain made of lids or an airy curtain. The result will be a cozy place to relax, as in the picture above.
Household items made from plastic bottles
Plastic bottles in the form of various crafts help to make life easier for gardeners and gardeners, as well as save money. Very useful in the garden washstands, scoops, devices for watering plants and other necessary accessories are quickly created from ordinary plastic bottles, and can serve for several years.
Wash basins and boxes
If you have a used 5-liter bottle in your household, you can turn it into a washstand by purchasing a special valve for water supply. The bottle needs to be turned upside down, fixed to a tree or rigid structure, cut a hole in the bottom (for refilling with water) and insert the valve into the lid.
If there is a need to make boxes for storing inventory, then the work requires large bottles or canisters, from which a lid is cut out and a clasp is sewn on.
Scoops and shovels
The most necessary and durable thing in everyday life is made from a thick canister with a handle, from which part of the wall is cut out and the lid is screwed on.
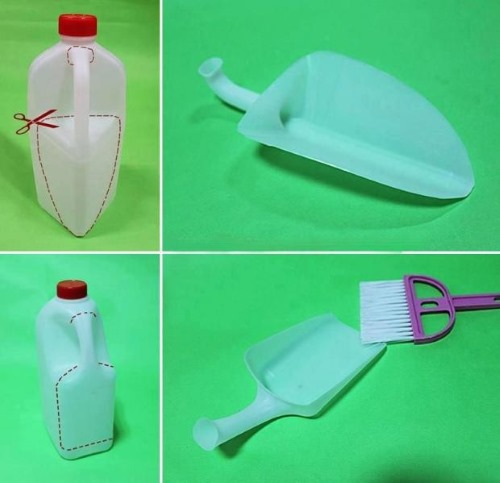
It will be very convenient to use such a device for adding soil to pots, scattering fertilizers or other work with loose items. And if you add a wooden blade to the scoop, you will get a full-fledged shovel.
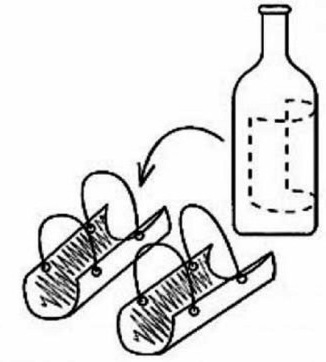
Slippers
These shoes are made from one bottle, often as a decorative ornament for a garden house.
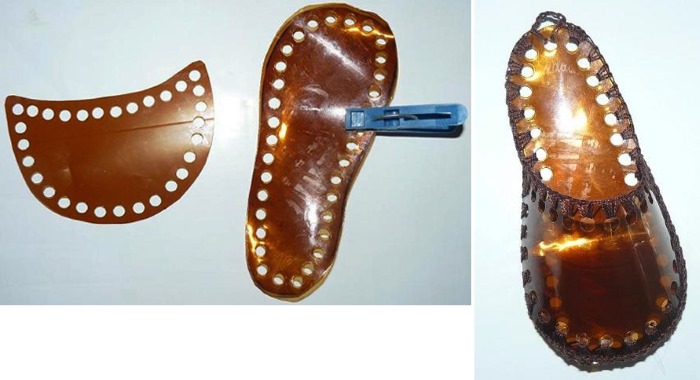
To make a slipper you will need:
- cut out 3 pieces from the bottle, as shown in the photo;
- glue 2 parts of the sole;
- sew the toe with thread;
- Decorate with plastic flowers if desired.
Devices for repelling rodents and insects
A convenient and effective thing is made from several plastic bottles to repel moles and annoying insects. Square windows are cut out of each bottle (with three cuts) and bent outward. Then the bottle is put on a metal pin and stuck into the ground.
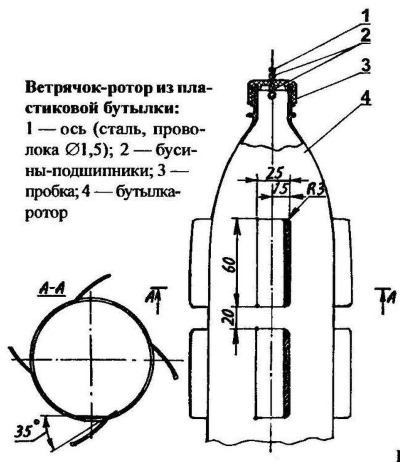

It turns out to be something like a pinwheel, when moving from the wind the bottle creates noise that scares away moles and insects within a radius of 1-2 meters. Several such pinwheels need to be installed throughout the area.
Tool boxes
Storage space in a garage, shed or basement is always relevant and needed. In order not to buy ready-made furniture, save money, and at the same time bring the desired order, plastic canisters will help (they are often thrown away after construction work). By cutting off one wall of the canister and placing it on a shelf or in a specially built box, you will get a real roomy closet.
Also suitable for the convenience of storing and using small items (for example, nails) is a design made of transparent plastic bottles, screwed with lids to the shelf. The bottle is easy to unscrew, the items do not spill and do not take up extra space.
A device for deep watering of plants and their night heating
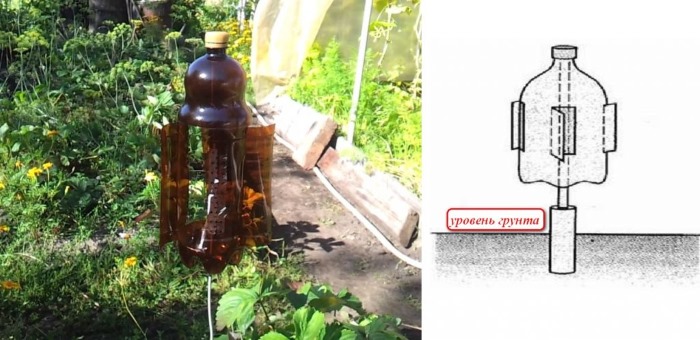
People who have a summer cottage far from their place of residence are often puzzled by the question of automatic watering of plants. There is a simple and proven way to moisten the soil near a seedling - bury a plastic bottle with many holes next to it. Moreover, the neck of the container should remain on the surface of the ground.
Then, using a funnel, fill the container with water and do not worry about watering for 2-3 days. In extreme heat, it is additionally recommended to lay hay or straw on the ground around the seedling (this will prevent the surface of the ground from drying out quickly and hardening).
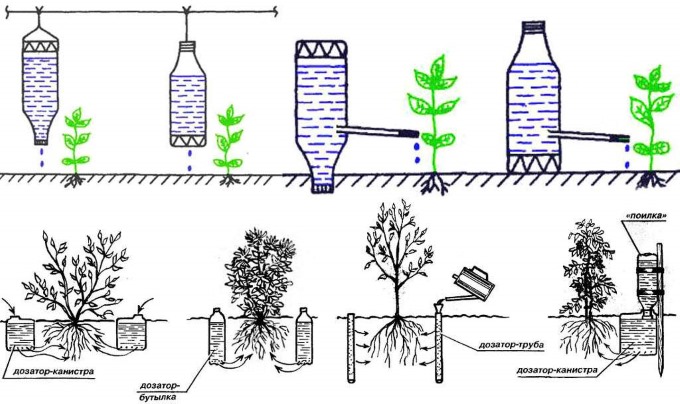
The second option for automatic watering of plants is to dig an inverted plastic bottle (lid down, with holes made in it) next to the plant, cut off the bottom and pour water. Gradually, the water will penetrate to the roots of the plant and moisten the soil.
The third option is to hang a plastic bottle of water over each plant. Make several holes in the lid of the container. This will provide drip irrigation.
But if it is necessary to provide heating of plants at night, then large plastic bottles (2-5 liters) will come to the rescue. Having cut off the bottom of the bottle, the seedling is closed and dug in with earth, in case of windy weather. An individual greenhouse is ready. The temperature inside is adjusted by unscrewing and screwing the lid.
Knee pads for gardening
A useful thing for elderly people, allowing them to sit safely and comfortably on the ground while kneeling.
To make knee pads, you will need to cut two rectangles from a smooth bottle and attach ties (2 for each knee pad).
Flower pots
They are created in an elementary way, for this a flowerpot is cut out of a bottle and painted with paints at the discretion of the author. The flight of fantasy in this case is limitless.
If necessary, you can hang the pots by making two holes on the sides.
Candlestick
For small candles, a stand made from the ribbed bottom of a bottle would be ideal.
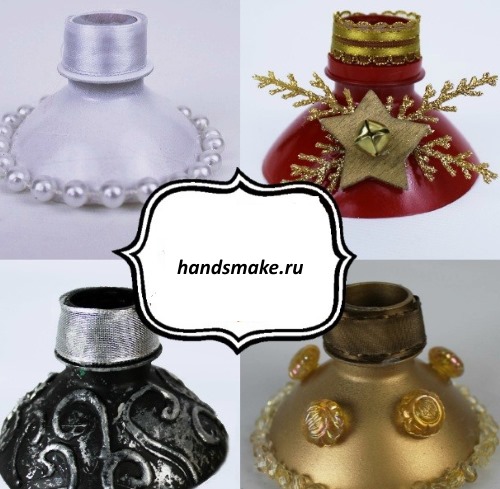
The cut off part is colored with markers and melted with a candle flame. The romantic craft is ready.
Broom
This is the main device for tidying up the territory of the garden plot, especially in the autumn, when a lot of leaves fall and need to be removed. A broom made of twigs is less attractive in this case, since it requires being in a tilted position, and the twigs can break off.
A plastic broom made from bottles is a real find, it is durable, does not break, does not bend and looks very presentable. To make such a broom, you will need several 1.5 or 2-liter bottles (4-5 pcs.), as well as a wooden stick and nails.
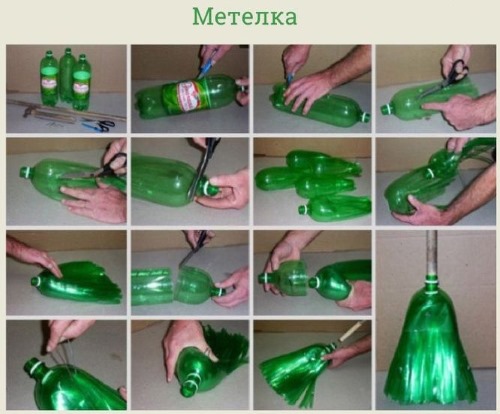
Algorithm of actions:
- Remove all labels from containers.
- Cut off the bottoms of the bottles.
- Cut the bottles into longitudinal strips (not reaching the neck).
- Cut off the necks of all the bottles (except one).
- Flatten all the bottles into one plane.
- Place all the other cut bottles on the bottle with the neck.
- You will get a broom blank; to prevent it from falling apart, you must constantly hold it with one hand or press it down with a stone.
- Take another bottle and cut off half of it, use the top part for work.
- Place the cut off half onto the assembled piece.
- In the entire structure, make two holes with an awl through all the bottles (this is necessary to secure the craft).
- Sew the broom with nylon thread.
- Secure the thread inside.
- Insert a wooden stick into the necks.
- Hammer 1-2 nails through the plastic and wooden stick to secure the handle.
- Trim the pile and the broom is ready.
Funnels
A household funnel is a necessary thing in any home. However, it is not used often, which is why many housewives forget about it until the moment when they need to pour liquids or pour something from one container with a narrow neck to another.
In such cases, a plastic bottle of any size will always come to the rescue. It is enough to carefully cut off the top of the bottle with the neck and use it as needed. The main thing to consider is that the bottle must be cut at an angle, which will make it easier to use.
These funnels are very convenient for motorists for pouring gasoline or engine oil, as well as for pouring in antifreeze in the winter.
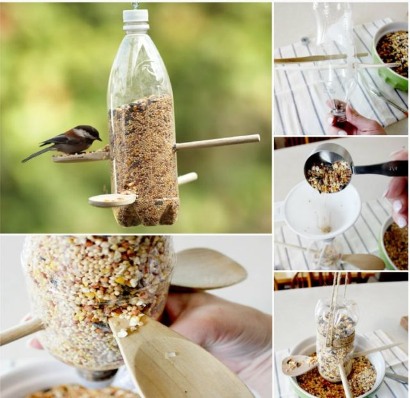
Bird feeders
This is probably the easiest craft that can be quickly made from 2 bottles (5 l and 2 l).
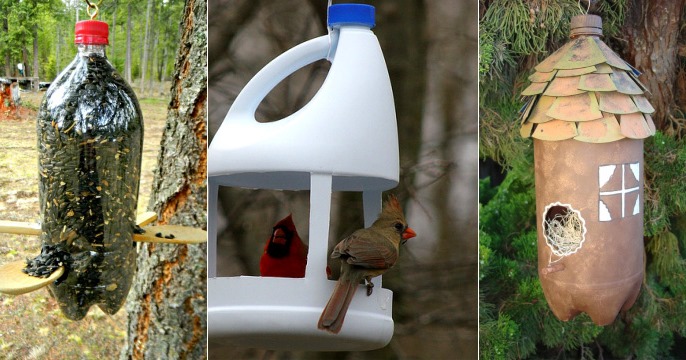
Sequence of actions:
- Cut 3 windows out of a large bottle, leaving 5-7 cm from the bottom and bend the resulting “roof” upwards (this will protect the birds from the rain).
- Cut off the bottom of a 2-liter bottle and remove the lid. Then insert it through the window into a large container with the neck down (this will be a grain reservoir that will protect the feed from wind and snow).
- Hang the feeder and pour grain through the neck into a small bottle.
- Tighten the cap on a large bottle.
- The feeder is ready. As the birds eat the food from the bottom of the large bottle, the grain will be automatically added from the small container.
Crafts made from plastic bottles with your own hands can not only serve for many years and be very useful in everyday life, but also become real masterpieces of art, decorating any home with a garden plot.
Article formatting: Natalie Podolskaya
Video about crafts from plastic bottles
Crafts from plastic bottles - ideas: