One of the main advantages of crocheting is the ability to work in circles. This means not only round fabrics, but also square motifs. There are many different patterns for knitting such elements: from the simplest (like a granny square) to more complex ones (with flowers or a net inside).
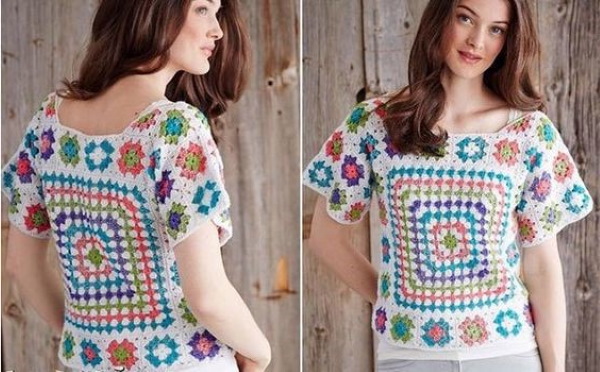
Products knitted from square motifs
Modern designers increasingly use classic square motifs when creating new clothing collections. Such dresses, skirts, cardigans, vests and tops easily fit into both everyday wardrobe and evening fashion. When knitting each specific product, certain types of materials are used, the cut and fit are adjusted.
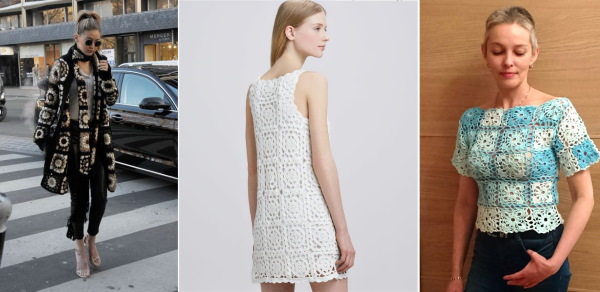
Most knitters often choose square motifs to create children's and women's clothing, as well as to make blankets and pillowcases. This is justified by the simplicity of combining colors and the elementary geometric shape of the motifs.
Simple square motif for beginners
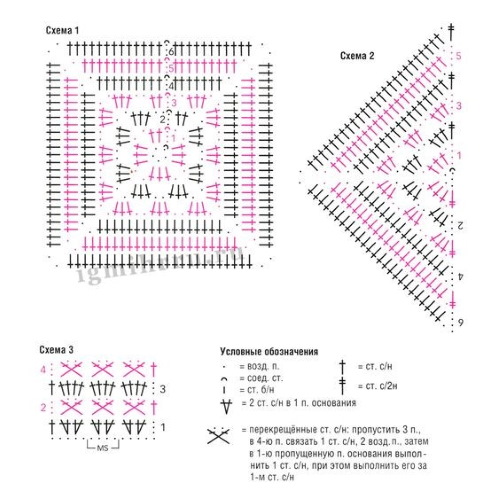
To learn how to knit the simplest square motif, you need to understand how to perform basic techniques: air loop (AL), single crochet (SC), double crochet (DC), joining crochet (SC).
Sometimes you also need to know how to knit a half-column (SCH) and a picot of 3 VPt. Despite the fact that the finished motif has a square shape, it is made in circular rows (R). When mastering knitting in a circle, you cannot do without understanding how such Rs begin and end.

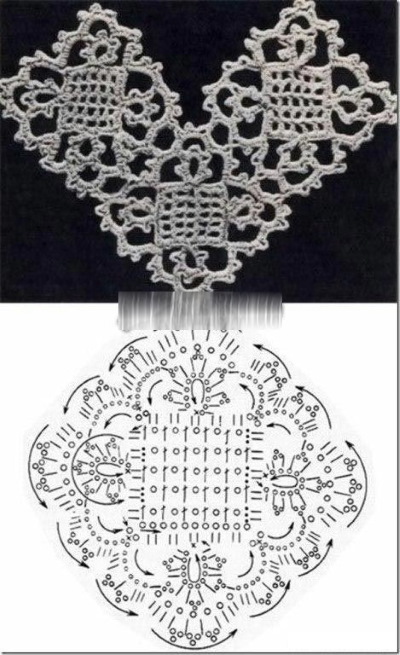
It is best to understand the principles of knitting square motifs using an example:
- Cast on 10 VPt and close them into a circle PSt.
- Work 3 ch to lift to the level of the second row, knit 24 dc into the ring of ch. Finish the row with a sl st, which will connect the last dc and the 3rd ch to lift.
- Make 1 ch, tie 1 sc into the base of this loop, then tie 2 sc into each st of the first row, in the next st make 1 sc, 7 ch, 1 sc. Then repeat 3 times * 5 sc, 1 sc, 7 ch, 1 sc *. Finish R with 2 sc and a st.
- To rise to the level of the 3rd row, make 1 ch. Repeat 4 times * 1 sc, 7 ch, 1 sc, in the loop of 7 ch knit 7 dc, make a picot of 3 ch, knit another 7 dc, skip 3 base sts *. Finish with R pst.
At this point, the first motif is finished. However, the second element will need to be knitted in such a way as to attach it to the first. This is usually done when knitting the last row. All subsequent motifs will also need to be connected to the finished fabric. Often, knitters prefer to connect the motifs not immediately, but at the very last stage of work.
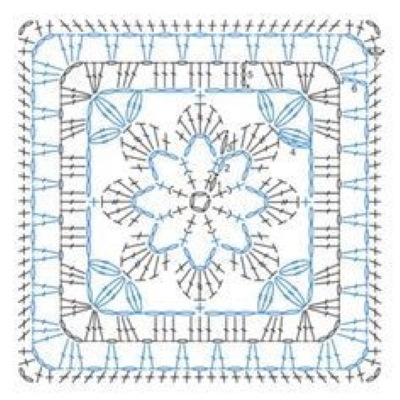
With a floral motif in the center
Square crochet patterns (patterns can have a very different number of rows) can be relatively simple or quite complex.
Complex patterns include squares with a flower inside. In turn, they can also be differentiated by the degree of complexity and the number of rows. Relatively simple motifs are built around a round floral element. The corners are formed when knitting subsequent rows.
Usually, to give the motif a square shape, designers place peculiar "bushes" of stsn or lush columns (PShSt) in the 4 corners. The principle is that 2-6 columns have a common base, and their tops expand the row and form an angle.
Flower petals come in a variety of designs: pointed and rounded, rectangular, flat and embossed, single-layer and multi-layer.
Flowers placed inside the square can be crocheted in the same color as the rest of the motif, or they can be made with a different color of yarn. This is a common practice, but you should be prepared for the fact that the number of cut yarns will double and there will be more work at the stage of tucking in the tails.
One of the simplest patterns is a flower with semicircular petals, four bush-corners and openwork trim. To make the petals smooth, start knitting them with sc, then move on to plsc and sc. If the yarn is thin and you need a large flower, the central part of the petal can be formed with double or triple yarn overs.
To complete the knitting of the petal, you need to repeat all the elements in reverse order: the second half of the central part (columns with 1, 2 or 3 yarns), PLSt and StBn.
Square crochet motifs with a floral element, the petals of which consist of lush columns, can be found very often. Patterns for such motifs can include traditional SS from unfinished DS.
They are formed when a yarn over is thrown onto the hook, then inserted into the base, the loop is pulled out and knitted with a yarn over. However, the column is not finished and a yarn over is picked up for the next element. PShSt can consist of 3 or more columns. When knitting the last one, the working thread is pulled through all the unfinished columns.
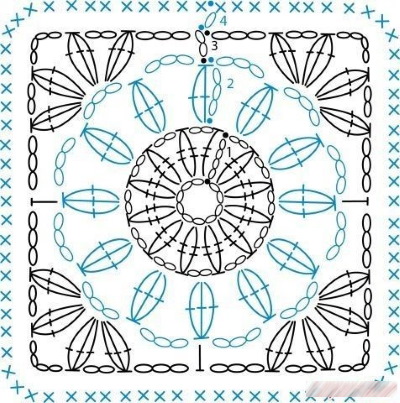
In addition, the PSS can be created using another method: a yarn over is thrown onto the hook, and a loop is pulled out of the base. However, without knitting anything, proceed to the next element. That is, only yarn overs and loops pulled out of the base remain on the hook. When the column is lush enough (3-9 elements), the working thread is pulled through all the loops and yarn overs.
This PShSt turns out to be similar to a barrel, it is really lush and relief. It is worth considering that the second method is not suitable for working with slippery and multi-layered yarn, since there is a chance that the loops will slip off, and the column will look sloppy.
When working with PShSt, it is necessary to ensure that all elements are of the same size. This usually comes with practice, so before starting work, it is worth practicing making lush columns.
Squares with a voluminous floral element inside have a special charm. Such motifs are often used for knitting children's products and blankets. They allow you to get a very decorative fabric, especially if the central part of the motif is highlighted with color.
Square crochet motifs (patterns are not always clear without explanations) with a relief flower are knitted according to a single principle.
First, the flower itself is made, it can have any number of petals, but their shape is usually semicircular or rectangular. Next comes the preparatory row, it lays the foundation for the subsequent rows that form the pattern.
Usually the preparatory P is a chain of VPt that goes behind the petals. Their number corresponds to the number of petals, and these chains can be attached in 2 ways: between the petals or in the center of each of them.
To secure the chain of VPt in the center of the petal, you need to bend the petal towards yourself, insert the hook between the central columns and pick up the chain on which the petal columns are based. This is where the fixing SC is made. Thus, all the chains of the preparatory row are at the same level as the petals of the flower motif.
It is important to remember that if the preparatory row is attached to the center of the petals, then it should be knitted with the same yarn as the petals. Otherwise, colored stitches will be visible from the front side of the motif. If the chains of the preparatory row are fixed between the petals, they can be knitted from yarn of any color.
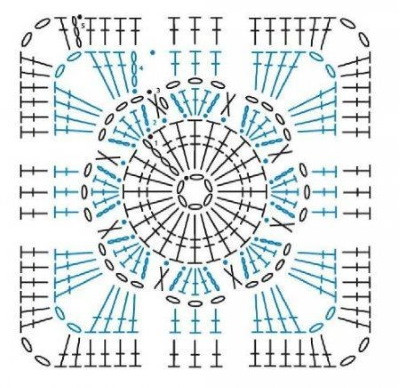
When the preparatory R is completed, the second row of petals (usually larger than the first) or the main fabric of the square motif can be crocheted into its chains.
The disadvantage of fabric with voluminous flowers is their relatively low practicality. During use, flowers can crumple, gather into a knot or even felt. It is undesirable to place such motifs on the back of products for the smallest, since voluminous flowers can press and rub them.
Granny square
The classic square motif with even sections of dc is called a "granny square". This is a universal pattern for a wide variety of products, it looks great in monochrome or colored fabric and is widely used in knitting clothes and interior items.
Today, the granny square has received a new life, although just a few years ago it was considered banal and irrelevant. This motif is great for beginners, as it vividly illustrates the principle of expanding a square canvas.
Unlike round motifs (where increases are distributed evenly throughout the row), square ones are increased by adding new columns at the corners. As a result, the edges remain flat, and the motif takes the shape of a square.
Crochet square motifs, the patterns of which are based on the granny square, can have different configurations and sizes. For example, the center of the motif is knitted according to the classic principle, and then solid rows of dc are added or the motif is complemented with various openwork patterns.
The following technique is often used to knit blankets: squares are knitted in different colors, but the last row in each motif is done in one (background) color.
In this case, the squares are sewn together with a thread of the same color as the background or connected during the last row. Thus, multi-colored elements are placed on a plain background (usually darker than the squares). This gives the products a more stylish look.
When knitting clothes, squares can be placed evenly (horizontally or vertically), or at an angle (diagonally). In the latter case, the motifs will be in the form of diamonds, and to obtain even contours of the product, you will have to fill the space between the squares with triangles.
Triangular motifs are knitted according to the square pattern, but not in circles, but in straight and turning rows. Experienced craftswomen can independently create a triangle pattern similar to the square pattern, and beginners will have to look for a corresponding ornament. Alternatively, you can knit triangles with a simple mesh or a denser pattern (single crochet or double crochet).
The granny square looks great in any size. The canvas can be composed of many small elements or represent one large motif.
Combinations of squares of different sizes look very good. In order to correctly compare them by size, it is worthwhile to draw the future product in advance on a sheet of paper in a grid or use computer programs (for example, Microsoft Excel). When working, it is necessary to carefully monitor the observance of the scale.
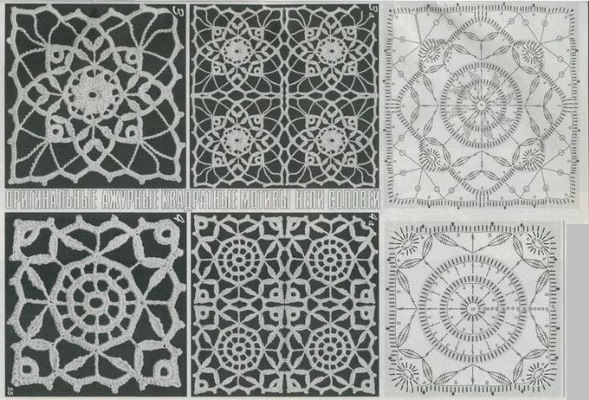
Openwork square crochet motifs
The ability to knit technically complex but very beautiful motifs becomes a powerful motivation for many to develop their skills. Indeed, openwork squares, consisting of several dozen rows and representing an independent work of art, are not at all easy to knit.
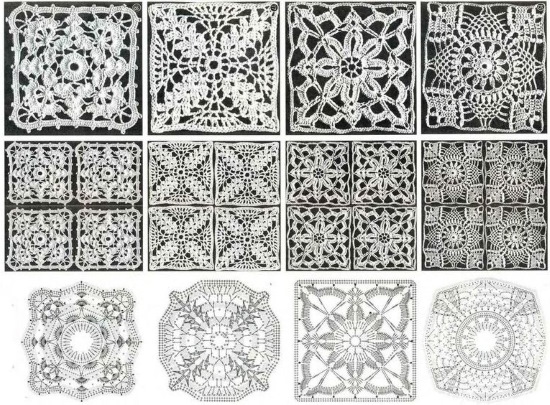
To make them of acceptable size (10-20 cm), they have to be knitted from very thin yarn (with a yardage of 800-1000 m/100 g). Only the smallest hook sizes are suitable for this type of work, for example #0.75; 0.9; 1.2. Each square can take quite a long time, from several hours to several days.
Complex and large squares should be handled carefully also in terms of modeling products. If such a motif is used to create a tablecloth, curtain or pillow, then a completely openwork fabric made only of squares is quite acceptable.
However, clothes overloaded with lace patterns are not in trend now. Items with an emphasis on lace trim along the bottom or sleeves look more stylish. Summer items decorated with just one or several squares (for example, on the back or along the neckline) also look good.
Other crochet patterns for square motifs
 One of the most interesting and unusual patterns is a square motif with a grid as a base.
These elements are perfectly connected during the last row and form a very attractive, fully openwork fabric.
Square crochet motifs, the patterns of which are built around a grid, have the following structure:
- Rectangular mesh is knitted in straight and turning rows. The mesh can be filet, French or other type.
- The 1st circular row is a rectangular mesh binding.
But at the same time, an independent fragment of the pattern is made on each edge in turning rows. As a rule, these fragments have a triangular shape.
- The final binding of the entire square, which collects all the elements and fixes the final shape of the motif.
Like other complex patterns, this lace square should be used with caution.
How to connect related motifs
The correct and beautiful connection of motifs is of the same importance as the careful execution of the squares themselves.
There are several ways to combine separate elements into a single piece of fabric, they can be divided into 2 large groups: joining during knitting or subsequent stitching.
The first method allows you to avoid unnecessary thread tails, since the seam actually becomes part of the motif. However, it is necessary to carefully monitor that the squares are collected in the right order. The downside is also the constant growth of the fabric. This is inconvenient if the craftswoman knits not only at home, but also in transport or on the street.
The 2nd method (sewing together finished squares) is more practical for mobile knitters. They can knit the motifs anywhere and lay them out and connect them at home. However, they will have to tuck in many more yarn tails and spend extra time on it.
In addition to this classification, there are 3 more ways to connect motifs based on the appearance of the seam:
- simple;
- decorative;
- dense or solid.
Each of them can be done either during knitting of squares or at the final stage of assembly.
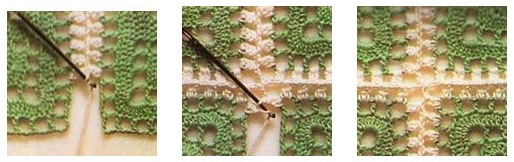
Simple connection
This is the most common method, which is convenient to use when knitting the last row of the motif. The method is suitable for squares that do not touch with whole edges, but only at several points (for example, at the corners and in 2-3 places along each edge).
Sequence of execution:
- If the motifs touch at the points where the picots of 3 VP are knitted, then the first square is knitted entirely exactly according to the pattern. The 2nd is knitted almost to the end, but when performing the last row, each picot is performed by a third (1 VP). Grab the corresponding place of the first square (insert the hook inside the picot of 3 VP). Perform a PSt and finish performing the picot of the second square (1 VP).
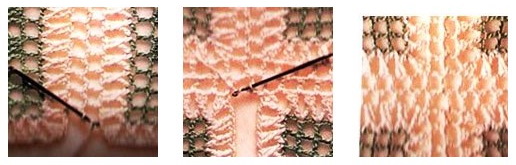
- In the case where you need to connect the petals of square flower motifs without air loops, perform a shortened version of the connection. After crocheting half of the petal, insert the hook under both loops of the central column of the corresponding petal of the first square and knit a PSt. Then finish the petal of the second square.
- When the last row of the motif consists of arches from VPt, then connect the centers of the corresponding arches. The arch of the second square is knitted to half, the corresponding loop of the arch of the first motif is captured, PSt is performed and the arch of the second square is finished.
When making such a connection, it is necessary to ensure that the last row does not turn out to be tight or, on the contrary, loose.
Decorative connection
Sometimes the places where square motifs are juxtaposed are turned into additional decor. This is only possible when connecting ready-made squares. It is easiest to work with prepared motifs: they should be washed and steamed (if this was planned), and the tails of the threads should be tucked in.
For decorative joining, you can use yarn of the same color and texture as for the main fabric. In this case, the joints will completely merge with the last rows of squares and become the background of the fabric. You can also use yarn of a different color and texture (for example, grass, material with lurex or mohair).
Most often, the decorative connection is a grid of sts and VPt. When knitting such a grid, the columns alternately connect the 1st and 2nd squares. To speed up the process, you can connect the motifs with long stripes first along, then across.
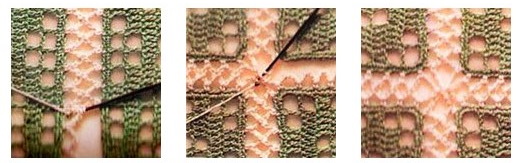
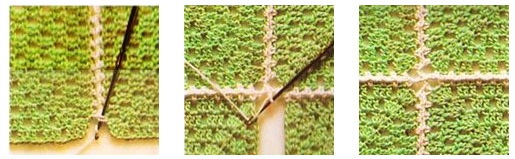
Tight connection
If the product is not supposed to be openwork, and the craftswoman wants to assemble the squares at the very last stage of work, she can use several methods for tightly connecting the motifs. The described methods are suitable for sewing squares, the last row of which consists of sc or dc.
The first and most obvious method is to simply stitch all the squares together with a needle. This is done with the same yarn that was used to knit the last rows of motifs, so that the stitches are not visible.
The squares should be sewn together from the wrong side using an over-edge stitch. The method is suitable for making blankets, pillowcases, and clothes whose back side will not be visible (jumpers, pullovers, vests).
When working on cardigans, you should carefully ensure that the back of the fabric is as neat as the front. This is necessary so that the craftswoman will not be embarrassed if the cardigan's hem opens or if she has to hang it on a hanger when visiting someone. Of course, items that are knitted for sale should also be sewn very beautifully.
To create a dense seam, you will need a hook of the same size as all the motifs were knitted with. To connect 2 squares, you need to form the first loop of yarn and put it on the back side of the first square. The hook is inserted under both loops of the first motif (it should be placed on the right), the loop is grabbed and pulled to the front side.
Then the hook is inserted under both loops of the first column of the second square (located on the left), the working thread is caught on the back side and pulled through to the front side. Next, you should make a connecting column, that is, pull a new loop through the one that was already on the hook.
Then the actions are repeated: the hook is inserted alternately into the loops of the first and second squares and PSt is performed. On the front side of the fabric, such a connection looks like a neat braid, and on the back side - like a zigzag.
In the case when the fabric, composed of square crochet motifs, will have a binding, it should be done after connecting all the squares. Regardless of which pattern was used for the work, the general binding makes the product more complete and integral.
Author: Anna Ocean
Article formatting:Natalie Podolskaya
Video about knitting square motifs
Crochet square motifs - an easy and simple option:
https://www.youtube.com/watch?v=pFPgNHSJsus