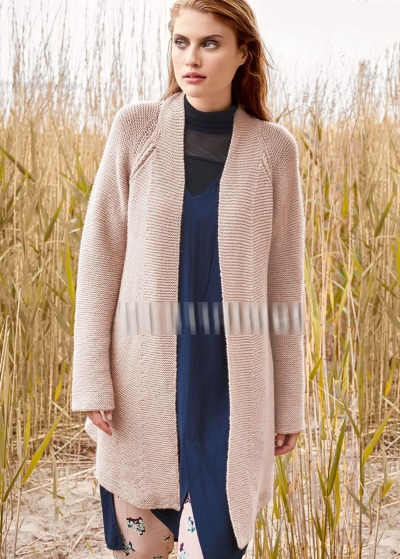
It is not difficult to knit such a universal thing as a cardigan with garter stitch knitting needles. There are many simple models, for the execution of which elementary schemes and descriptions are enough.
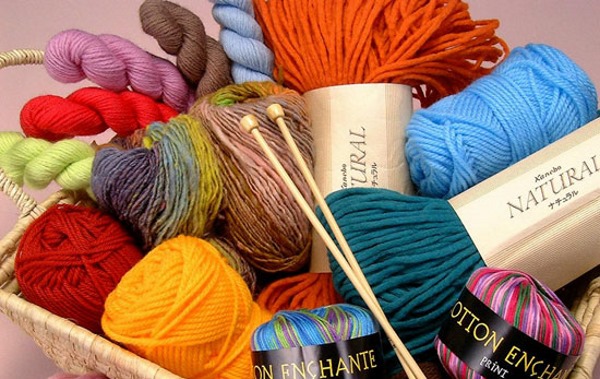
Selection of yarn and tools
Brief recommendations on choosing material and knitting needles for a cardigan:
- assess your skill level;
- determine the estimated time frame for completing the project;
- imagine what the finished product should look like;
- if possible, read reviews on this or that yarn;
- take into account the specifics of caring for a particular type of material (products made from natural materials are washed by hand, and synthetic yarn can be sent to the machine);
- knit samples with several sizes of needles, wash and dry them to determine the best density option;
- calculate how much yarn will be needed for the entire product (large cardigan) in order to plan the budget and take this factor into account when choosing. This will help avoid a situation where the selected yarn is not available in the store in sufficient quantity.
Depending on what kind of look you want the finished product to have, you can choose thin, medium or thick yarn. The thickness of the thread can be found out by studying the technical characteristics of the material.
They are indicated on the label or inside the cone (if it is bobbin yarn). Sometimes bobbin yarn is rewound onto empty cones, but then the seller is obliged to provide reliable information about all the properties of the material.
The thickness of the yarn can be determined by the meterage: the length of the thread in a skein weighing 100 g. The thicker the thread, the less of it fits into a skein, and vice versa. Thus, yarn with a footage of 200 m/100 g will be much thicker than material with parameters of 1500 m/100 g.
A garter stitch cardigan with knitting needles (the patterns and description can be any) is most conveniently knitted from yarn with a footage of 100-300 m/100 g.
A cardigan made from thick yarn will be voluminous, textured and even rough. It will be knitted very quickly and will require only basic skills from the craftswoman. To work with thin yarn, more attention, skills and time are required. However, such fabric will be more flexible and will look more elegant. It can be draped and boldly folded.
The second most important characteristic of yarn is its composition. No matter how beautiful the color of the material, no matter how pleasant to the touch it may seem in a skein, you should definitely find out what fibers the thread is made of. Some craftswomen prefer only natural yarn, others allow knitting from synthetic materials. When choosing one or another composition, you should understand the properties of each of them.
| Natural yarn | Manufacturing | Characteristic |
| Made from raw materials of animal or plant origin | Typically, these types of materials are breathable and absorb moisture well, and are able to retain heat or, on the contrary, “cool”:
|
Such materials also have disadvantages: they are more expensive than synthetic ones, can be damaged by sunlight or insects (moths), can cause allergies (sheep wool) or seem hard for people with sensitive skin. Also, wool and cotton clothes often shrink after washing, and viscose and bamboo fabrics are prone to stretching.
By giving preference to synthetic types of yarn, you can count on their durability, color fastness, absence of any allergies, and relative stability of the fabric (but loosely knitted products can still stretch).
Also, these types of materials are perfectly washable from dirt in the washing machine, and their price is very democratic. Among the disadvantages of synthetic yarn is the inevitable "greenhouse effect" - in winter such a cardigan will be cold, and in summer it will be hot.
The fibers in such threads can quickly pill, the product will be covered with pellets, which will be difficult to remove (unlike lumps of fluff on natural yarn). Many note that knitting with synthetic thread is very unpleasant, that it “squeaks”, it does not have real softness and silkiness.
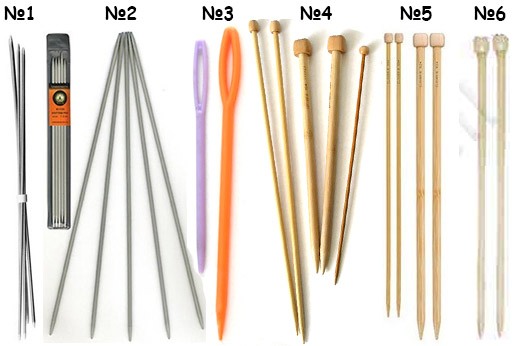
The diameter of the knitting needles directly depends on the length of the thread. Knitting with thin or thick yarn requires thin or large needles, respectively. Usually, the yarn manufacturer provides advice on choosing needles on the labels, but this information should be treated only as recommendations.
The choice of the right tool is largely determined by the individual knitting density of the craftswoman and the composition of the material. For example, for working with thin mohair, tweed or ribbon cotton, you cannot use too thin knitting needles.
The fabric will be too dense, and the beauty of the yarn will not be revealed. At the same time, smooth yarns (merino, regular cotton, smooth semi-wool) should be knitted quite tightly so that the loops are not crooked.
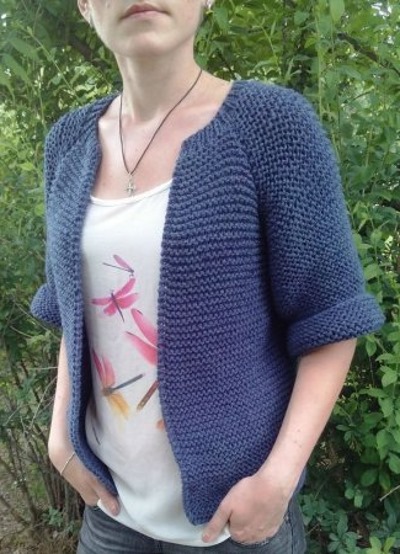
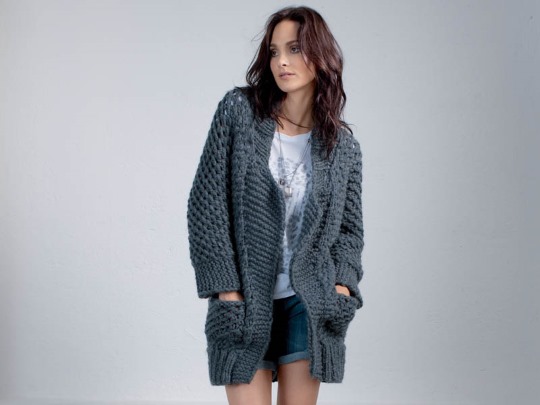
Simple Women's Garter Stitch Cardigan with Knitting Needles for Beginners
A garter stitch cardigan with knitting needles (the patterns and description of such a product will be understandable even to beginners) is very convenient to knit: it looks the same from the front and back sides, is easy to knit and looks modern.

One of the basic models is a product with a rectangular main part. The model can be with or without sleeves.
It can also be knitted lengthwise (the stripes will be horizontal) or across (the stripes will be vertical). The description below discusses the longitudinal knitting option.
It should be noted that this pattern requires more yarn than the stockinette stitch and openwork patterns.
The advantage of garter stitch is that it is suitable for working with any yarn (in texture, composition or thickness).
How to knit a simple cardigan:
- Make a control sample with the selected yarn and knitting needles.
- Wash it in the same way as you will wash the finished product in the future.
- Dry and measure the density. You need to determine how many loops (L) and rows (R) there are per 10 cm in width and height.
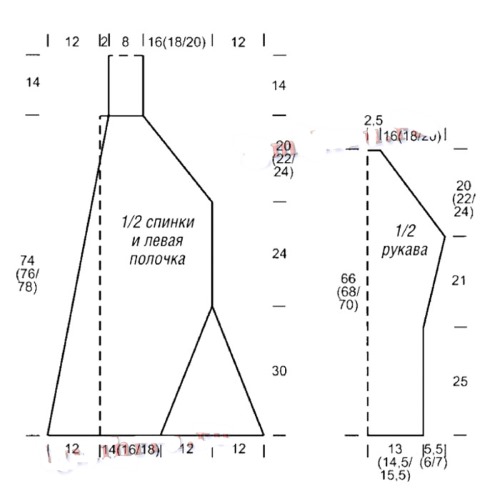
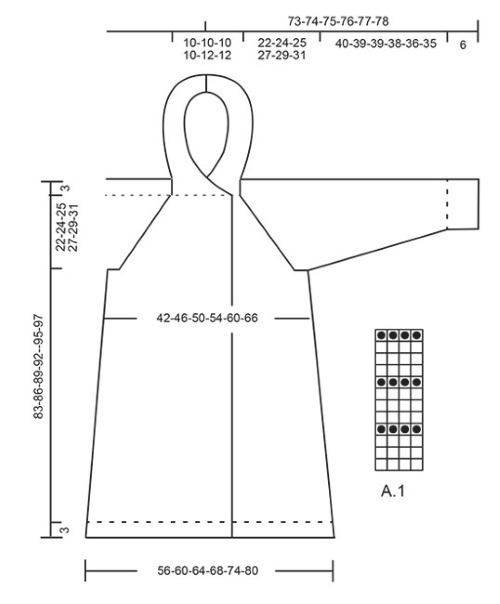
- Take basic measurements to determine the length of the garment, the length of the sleeve (if there will be one), the width of the front panels, the width of the back between the armholes, the height of the armholes, and the width of the sleeve at its narrowest and widest points.
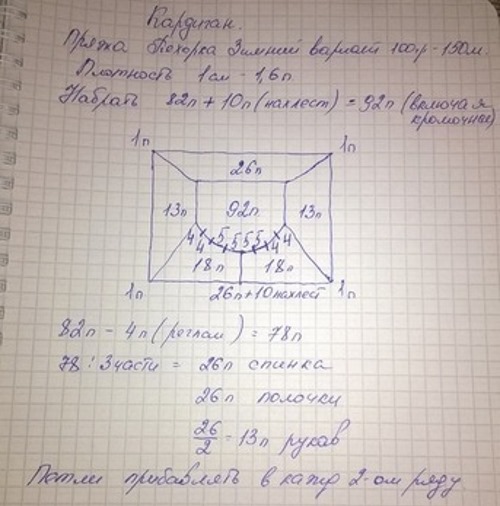
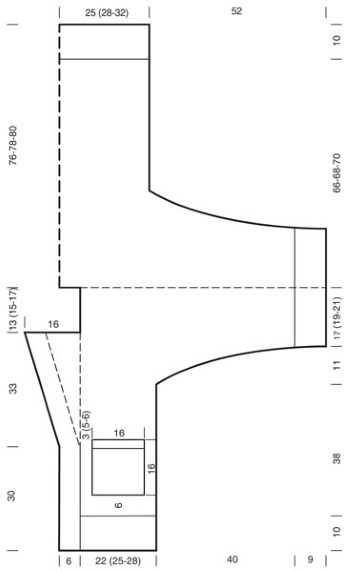
- Draw a technical drawing of the future cardigan. Write down all the dimensions in centimeters (width and height of the fabric up to the armholes, height and depth of the armholes, distance between the armholes along the back, distance between each armhole and the side edge of the fabric, height of the fabric after the armholes).
- Based on the data obtained from measuring the sample, perform calculations for the entire product. For calculations, use the formula, where X is the number of P or R that needs to be found.

That is, you should multiply the length or height of the desired section of the canvas in centimeters by the number of P in the sample and divide this by 10 cm.
This method requires calculating all horizontal and vertical values. But we must not forget that when finding the number of loops, the value of loops should be substituted into the formula, and when finding the number of rows - rows.
For example, if the parameters of the control sample are 23 P x 30 R, then for a cast-on edge of 140 cm in length, you need to cast on 322 P ((140x23)/10). At the same time, to knit a fabric of 73 cm in height, you will need to perform 219 R ((73x30)/10).
If the density of the knitting process changes, the parameters of the fabric will be different. Care should be taken to maintain the same density as when knitting the sample, do not tighten or loosen the loops.
Knitting pattern:
- Cast on P on the needles and knit the 1st R with face loops. The second and all subsequent R are also knitted with face P (this is garter stitch). The edge P can be made in a "braid" or a knotted edge. Knit in this way until the beginning of the armholes.
- Armholes can be formed in 2 ways: give them a more or less regular oval shape or leave them as slits. It will be easier to knit slit-shaped armholes. To do this, you need to divide the entire fabric into 3 parts (the section from the beginning of the row to the right armhole, the space between the armholes and the fragment from the end of the left armhole to the end of the row). These 3 sections are knitted separately for the entire height of the armholes.
- At the final stage, you should gather 3 pieces of fabric into one long row and continue knitting the cardigan to the height of the collar. Close all the Ps loosely.
- If the garment has sleeves, they should be knitted from the bottom up. To calculate the knitting of the sleeves, you should subtract the wrist circumference from the arm circumference at the widest point (+ 5-7 cm for ease of fit). The resulting number is designated by the letter F. It should be divided in half (F/2).
- Next, subtract 7-10 cm from the calculated sleeve length, this will be the length of detail M. This cardigan model does not require a full sleeve cap, a symbolic rounding of 3-5 cm in height will be enough. Subtract 3-5 cm from M and you will get the sleeve length to the cap K.
- Now K needs to be divided by F/2, which will give you the number Z. This will make it clear at what interval P should be added when knitting the sleeve (every Z cm).
- For the cast-on edge, cast on as many P as corresponds to the width of the wrist. Then knit the fabric to a height that corresponds to K cm, adding 2 P (1 at the beginning of the R and 1 at the end) through such a number of R that corresponds to Z cm. The armhole with a height of 3-5 cm is formed quite simply: in each R, 2 P are reduced (1 at the beginning of the R and 1 at the end). All P are loosely closed. The second sleeve is knitted in the same way.
- Assembling the product: sew vertical seams on the sleeves, sew the sleeves into the armholes.
The finished cardigan should be washed and laid out on a horizontal surface until completely dry. If necessary, you can steam it with an iron.
Garter stitch cardigan for plus size women
If you need a more classic cut, you can knit a product from 4 rectangles. Such a cardigan is extremely easy to make. You need to knit 4 rectangles (conditionally, since the shelves can have a round, square or V-shaped neckline) and sew them together.
It is worth considering that for overweight women it is not necessary to choose bulky yarn. It is better to focus on a beautiful, calm color and luxurious texture of yarn.
An important point is to calculate the dimensions of the product. The width of the product without taking into account the bar is calculated by the chest circumference (CG), abdominal circumference (AC), or hip circumference (HC), depending on which measurement is larger than the others. It is necessary to add 10-20 cm for freedom of fit, then divide the resulting figure by 2 (back width) and by 4 (width of each shelf).
To find out the sleeve width, measure your arm at its widest point and add 10-15 cm. By dividing the resulting number in half, the seamstress will get the armhole height. To create a smooth neckline, decrease 1 P every 4-6 R.
The strip that goes through both shelves and along the neck on the back is also a collar. It is knitted at the very end of the work. To prevent the edge of the fabric from being pulled together, you need to dial 3 P from 2 edge P. That is, dial 1 P from 1 edge, then 2 P from 1 edge and so on until the end of the fabric. For the back piece, you need to dial 1 P from 1 P. The height of the strip is 10-15 cm.
Raglan garter stitch cardigan knitted from top down
One of the easiest ways to get a practical and modern product is to knit top-down raglan. Beginners should start with a basic raglan with even increases along the raglan lines.
Advanced craftswomen can design items with an anatomical raglan (different rhythms of increases on the sleeve and body). However, in any case, a sprout will be needed, this is the difference between the height of the back and front detail.
A garter stitch cardigan with knitting needles (patterns and descriptions from different designers may include or ignore the execution of the sprout) will sit better on the figure if you make the back 3-5 cm higher than the shelves.
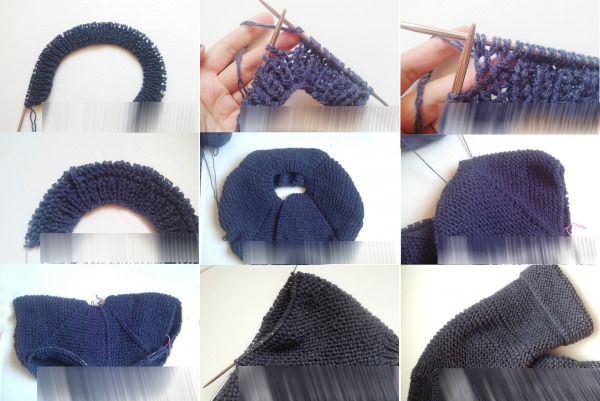
The advantage of top-down knitting is that you can try on the product already at the stage of forming the yoke:
- To start knitting a raglan, you need to dial the number of P that corresponds to the width of the neck.
- Since the cardigan will have 2 fronts and a fastener (it can also be without a fastener), it needs to be knitted in straight and turning rows.
- After casting on P, knit the sprout to a height of 3-5 cm using shortened rows. In this case, the first shortened Ps go only along the back piece, each subsequent row increases by 5-7 Ps, and the last ones should go beyond the raglan front lines.
- At the same time as the sprout, you should begin to form raglan lines; increases are performed at 8 points before and after each line.
- Next, knitting is done in straight and return rows until the height of the fabric is 22-30 cm (depending on the size and model).
- When the yoke is ready, you should divide the fabric into 5 parts: 2 sleeves, a back and 2 fronts.
- Now you need to knit the sleeves: transfer the stitches of one of them to circular knitting needles, add stitches for the undercut (5-7 cm) and close in a circular row.
- How to calculate the rhythm of contractions for the sleeve is described above. You only need to replace the increases of P with contractions.
- After the sleeves are ready, it is necessary to combine the back and 2 front pieces into one P. Between them, P undercuts are cast on with the knitting needles.
- Then the fabric is knitted down exactly to the desired height. If desired, strips are added.
Long knitted cardigan with a hood
Clothes with hoods can be knitted in 2 ways: with a one-piece knitted hood or a sewn-on one. The simplest models of hoods look like a rectangular piece of cloth folded in half and sewn on one side. They do not follow the contours of a person's head, so they must be voluminous. Otherwise, wearing such a product will be uncomfortable.
If the task is to knit a cardigan with an anatomically correct hood, then you need to make a pattern in full size and calculate the knitting of the part according to it. The hood should be shorter at the back (at the back of the head) and longer at the front (at the face).
Otherwise, the cardigan can be knitted using any of the patterns described above. It is most convenient to knit long cardigans top down with a raglan pattern, since you don’t have to worry about running out of yarn.
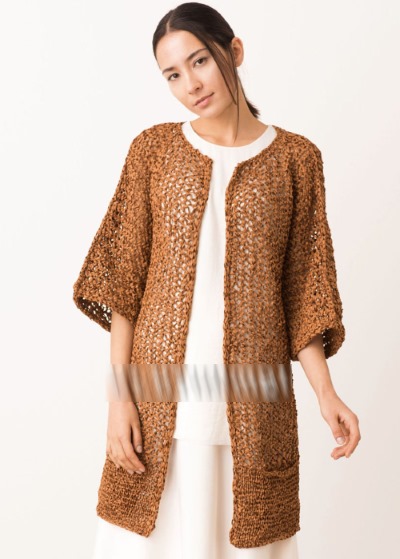
Long cardigan with three-quarter sleeves
Craftswomen who are not afraid of shortened rows and strict adherence to calculations can knit a cardigan with a smooth shoulder line and three-quarter sleeves. It is better to start such a project from the bottom.
If desired, you can form 3 separate parts or combine all the elements of the cardigan into one piece. The lower part of the product is knitted evenly. Then, along the lines of the side seams, P increases are made (symmetrically along the shelves and along the back).
To get a smooth line, it is worth making a life-size pattern and using it as a guide (apply the fabrics or make calculations according to the pattern). The smooth line of the side seam will be with the following rhythm of increases: first +1 P in every 3 R, +1 P in every 2 R, after that +1 P in every R and at the last stage several dozen P are added at once for the sleeve.
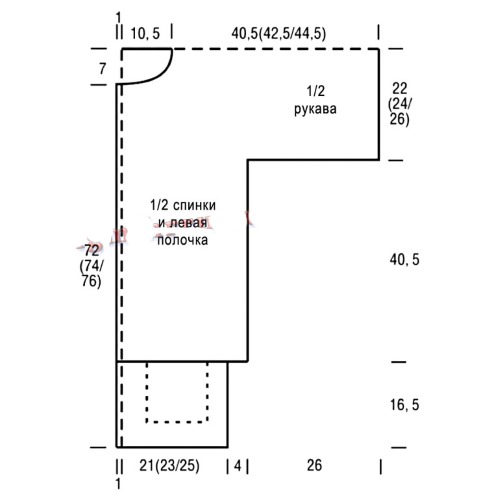
Next, a certain piece of fabric is knitted exactly to a height equal to half the wrist circumference. At the same time, if a deep neckline bevel is planned for the shelf part, then one must not forget about reducing P for this neckline. At the final stage, it is necessary to reduce P to form the shoulder bevel. The loops are reduced thanks to shortened rows.
When all the parts are ready, they should be sewn together, and the product should be washed and steamed (if necessary).
Cardigan made of thick yarn
A garter stitch cardigan with knitting needles (the patterns and descriptions should be the simplest) can be safely knitted from textured yarn. The fact is that all the seams, reductions and additions of loops can look quite rough, so straight fabrics without seams look best.
Models knitted with a raglan from the top or bottom, a cardigan with rectangular parts, as well as items made in one piece (from sleeve to sleeve or from the back to the front) are perfect.
It is important to understand that items made from thick yarn will be voluminous. In addition to the fact that such clothes can visually add weight, they are also heavy in themselves. To make the cardigan practical, you cannot knit thick yarn too tightly.
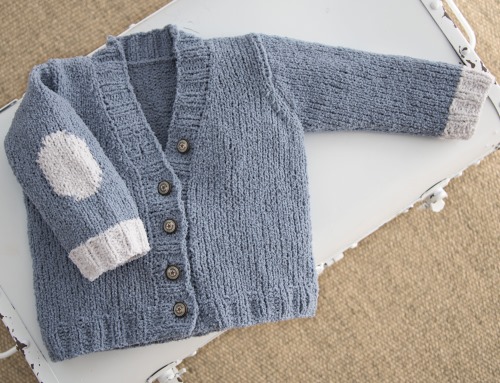
Children's cardigan
The same rules apply to knitting children's clothing as to making adult items. Here you also need to take careful measurements (or use the average size chart), knit the sprout and monitor the knitting density.
There is an opinion that children's things do not need a rise, but then you should be prepared for the fact that the neck will dig into the child's neck from the front. In addition, the product may constantly go to the back and you will have to adjust it. It is better, however, to calculate the rise and then the cardigan will fit the child perfectly.
 Children's cardigans can have a variety of fasteners: buttons, ties, snaps, Velcro, zippers. Since children grow quickly and do not take care of knitted items at all, you can use budget yarn with a high content of polyamide or polyacrylic. Cardigans with cotton in the composition will be truly durable and long-lasting.
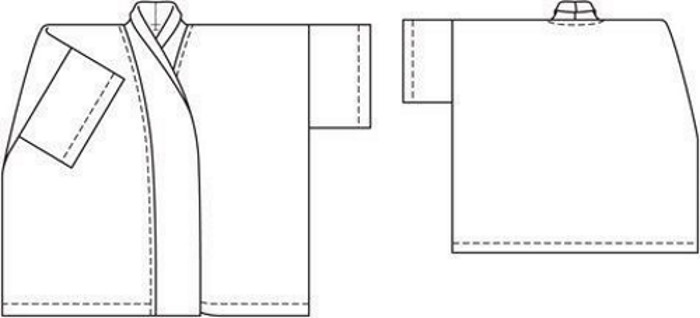
Garter stitch cardigan "Kimono"
One of the most successful and comfortable models is the Kimono cardigan.
Its distinctive features:
- wide "body";
- wide straight sleeves;
- simple neckline treatment (no collar).
These cardigans are often worn with a knitted or leather belt. The neckline can be a classic V-neck, round or square.
The easiest way to knit a garter stitch cardigan in the Kimono style is with one piece of fabric. This eliminates the need to sew in sleeves and make shoulder seams. For such work, you don’t need complicated diagrams and descriptions, a detailed technical drawing is enough.
Knitting starts from the bottom of the shelf parts. When calculating, do not forget that the shelves will overlap each other, so their total width should be much wider than the back.
First, pick up P for one shelf, knit it to the beginning of the sleeve, then pick up P for the sleeve and knit exactly to a height equal to half the width of the sleeve. At this stage, the neckline is made. Then all P are transferred to an auxiliary thread and the second shelf is knitted symmetrically to the first.
When both parts are ready, they are joined together in one common row and knitted exactly to a height equal to half the sleeve width. Between the shelf parts, it is necessary to pick up a P to form the neckline along the back. When the sleeve is already wide enough, the loops at the beginning and end of the row are reduced, and then the lower part of the back part is knitted. All P are loosely closed.
To assemble such a cardigan, knitted with garter stitch, it is enough to make 2 side seams. The advantage of simple models is that the basic diagram and description can be adapted to make products of any size.
Article formatting:Natalie Podolskaya
Video about knitting a cardigan
Garter stitch cardigan with knitting needles - knitting patterns and description: