Nowadays, when you can buy almost anything or give an envelope with money for a holiday, surprising your loved ones with an original gift is not so easy. Hand-made things and crafts carry the warmth of the giver. These are the gifts that always retain their individuality and are intended for a specific person.
The article offers some simple ideas on how to make creative birthday gifts with your own hands.
Why is a handmade gift better than a store-bought one?
Gifts made with your own hands are always unique, often unexpected and very economical. Making such crafts brings pleasure not only to the recipient, but also to the maker, who can feel like a real creator. A homemade product carries a positive charge of energy and is always remembered..
These reasons allow us to say that a handmade gift is much better than a store-bought one.
What to give mom and grandma for their birthday?
Gifts for beloved mothers and grandmothers for their birthday can be made by the whole family, and if it turns out to be not only beautiful, but also useful, loved ones will certainly appreciate it.
Bouquet of sweets or fruits
Instead of a regular bouquet, it is better to please your mother and grandmother with an original and delicious bouquet of fruits or sweets, which can be decorated with live or paper flowers.
To create a fruit bouquet you will need:
- Fruits (pineapple, kiwi, watermelon, melon, orange) and berries (strawberries, blueberries, grapes, blackberries). You can take other fruits, the main thing is that they are not overripe and dense, do not change color after cutting, like an apple.
- Skewers of different lengths, on which the fruits will be planted.
- Cutting shapes fruit shapes. Cookie cutters are great.
- Container for a bouquet (vase or glass), foam, ribbons.
The fruits are peeled, cut into slices and cut out into figures of flowers, butterflies, hearts. If there are no molds, it will be enough to cut the fruits evenly into half rings or triangles. It is better to use berries whole. They are strung on skewers several at a time like beads, except for strawberries. The finished parts of the bouquet are strung on skewers.
If desired, some fruits can be dipped in melted chocolate and allowed to harden.
The next step is to form a bouquet. For this, you can use a low, wide vase, a decorative basket or an opaque glass. It is advisable to place foam plastic inside and stick skewers into it, beautifully arranging fruit figures. Between the fruits and berries, you can place fresh flowers, stems and leaves of plants or dried flowers, and decorate the container with a ribbon.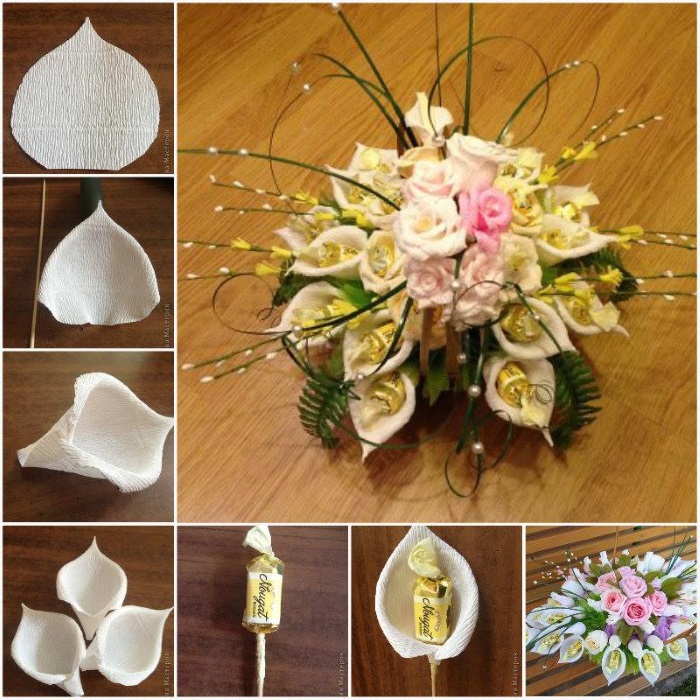
To create a bouquet of their sweets you will need:
- round shaped candies;
- corrugated paper of different colors;
- wide and thin decorative ribbons;
- wire or skewers;
- scissors, nippers, tape, foam;
- floral mesh, clear wrapping paper, organza or flower pot.
The following steps will allow you to assemble an original sweet bouquet for your mother or grandmother in a short time.:
- Cut clear wrapping paper into appropriate sized squares, wrap each candy into a square and secure it to a skewer or wire with tape.
- Another option for decorating flowers is to cut petals from corrugated paper, place them in the center of the formed candy and secure the flower to a skewer.
- Wrap the wire or skewer in corrugated paper or green ribbon.
- You can assemble the bouquet in a pot or wrapping paper. Place foam plastic in the pot and attach the bouquet parts to it. Another option: tie the "stems" of candy flowers together and wrap them with organza or wrapping paper. Finish decorating the pot or bouquet with ribbons and floral mesh.
Tea house
How to make a DIY birthday gift to surprise your grandma? Build her a cute tea house out of decorative cardboard.
First, you need to prepare the details of the house:
- 4 walls measuring 20 x 9 cm;
- 2 roof pieces measuring 10 x 10 cm and 1 piece measuring 10 x 13 cm;
- stand measuring 10 x 13 cm;
- 2 triangles 9 cm high and with a base of 6 cm;
- fastening parts 4 pcs. measuring 20 x 3 cm, 4 pcs. - 10 x 3 cm, 1 pc. - 6 x 10 cm.
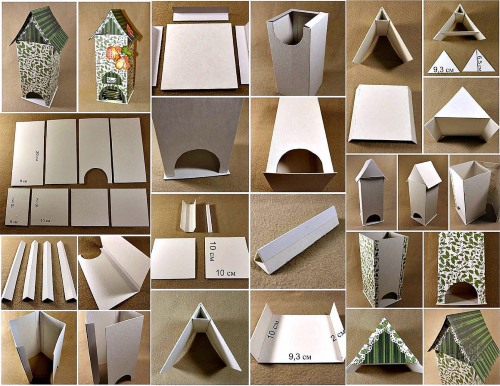
In one wall of the house, at the same distance from the side edges, cut a semicircular hole at the bottom, about 5 cm high and 6 cm long. It is convenient to take out tea bags from here.
Once all the pieces are made, it's time to assemble them using glue:
- All the parts for fastening are folded in half lengthwise, except for a rectangle measuring 6*10 cm. Its short side is divided into 3 equal parts and folded into a pyramid, the joints of which are glued using a 10 x 3 cm part folded in half. The remaining parts should form a right angle for fastening the parts of the house.
- The walls of the craft are assembled by gluing them together using 90° bent fastening parts. The house is glued to the base in the same way, excluding the wall with the hole.
- 2 roof parts 10 x 10 cm are fastened together using a ready-made pyramid part. On the long side of the roof base (10 x 13 cm) 2 cm are measured from the edges and folded down. The base is glued to the sides of the roof with the folded parts down. The finished roof is put on the house without gluing, from here the house will be filled with tea bags.
- You can decorate the walls and roof before gluing or after finishing the work. Any interesting ideas will do, from children's drawings or paper flowers to newspaper clippings or quilling decorations.
Jewelry Storage Box
A box for earrings, rings and brooches is a very useful thing, which can also become a real decoration of the dressing table. The easiest way to make such a gift is from a cardboard reel from wide scotch tape after its use. The lid and bottom are made from cardboard blanks. To do this, you need to attach the reel to the cardboard and trace around the outer circumference with a pencil.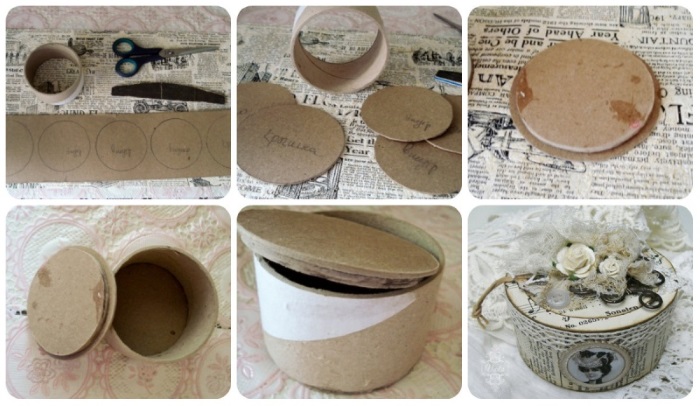
Cut out 2 circles with a margin so that the bottom can be glued to the spool, and the lid easily closes the future box. To ensure that the bottom is glued well, you need to draw along the pencil markings with a hard thin object (ruler or tweezers), then it will be easier to bend the cardboard. To make the bottom strong, several layers of cardboard of a suitable diameter should be glued inside the box.
To make the outer part of the gift smooth, you need to cover the entire surface of the spool with cardboard.
Before making the lid, you need to cut a strip of cardboard half the height of the spool, wrap this strip around the top of the future box and glue the edges. When the rim dries, glue the prepared circle of the lid to it in the same way as the bottom was glued.
You can decorate the finished gift in any suitable way:
- wrapping paper,
- ribbons and beads,
- flowers in kanzashi style
- decorate the box using decoupage.
Topiary of flowers
If your mom or grandma loves artificial flowers, giving them a delicate topiary would be a great idea that is easy to implement. For the craft, you will need artificial flowers and greenery, a pot, plaster, a base ball that can be made from crumpled newspaper wrapped in green knitting thread, a branch with a diameter of at least 1 cm, a glue gun and decorations for the pot, soil and flowers.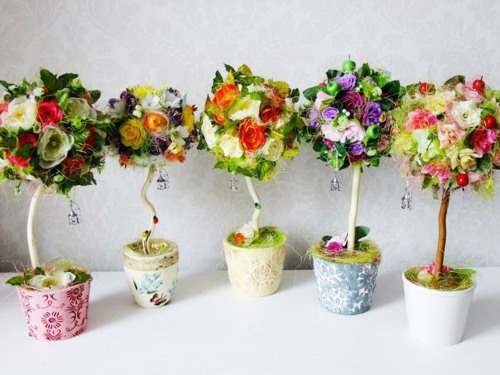
The sequence of actions for creating a topiary:
- place the prepared ball on a branch;
- glue flowers onto the ball;
- secure the branch into the pot using plaster;
- after the plaster has hardened, decorate the “soil” with pebbles or artificial greenery, gluing them on with PVA glue;
- decorate the pot by wrapping it with coarse textiles, twine or ribbons;
- Ladybugs or butterflies can be placed on flowers, on the tree trunk or under it.
Apron with your own hands
Making a kitchen apron is not difficult if you have a sewing machine at home. All you need is fabric, thread, scissors, chalk, a pattern and a sewing machine. The desired pattern is easiest to find on the Internet, but you need to adjust the width of the pattern to the half-waist of the woman for whom the gift is intended. The best models are an apron and an apron with a bib.
The fabric (Teflon, denim, cotton or linen) is washed, dried and ironed before work so that it shrinks. Then the fabric is folded in half lengthwise and the pattern is transferred to the wrong side using chalk. The pieces need to be cut out with allowances and folds of 1.5-2 cm. The edges of large pieces that will not be joined are folded and stitched.
Neck and waist ties are made from strips of fabric of suitable length and width. To do this, fold the pieces in half, sew the two halves together from the inside along the long edge and one short edge, turn them inside out and iron them. Neck ties are sewn onto the bib, the bib and apron are connected by sewing in waist ties at their junction from the inside. The finished product is ironed.
What to give to dad and grandpa?
You need to think in advance about what to give and how to make a handmade birthday gift for your dad or grandfather.
Shirt postcard
To make a postcard you will need thick cardboard as the base of the postcard, colored paper and scissors.
A sheet of cardboard is folded in half widthwise. The back side is cut off at the top by 3 cm. On the front side, at the same distance, cuts are made on the right and left, leaving a solid section of 5 cm in the middle. The ends of the cardboard are folded to the middle so that a shirt collar is formed, and the excess tails of the cardboard are cut off.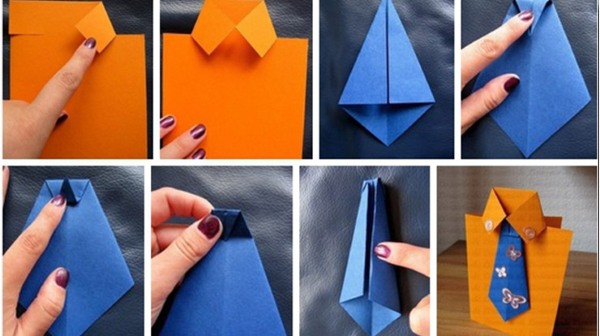
Make a tie out of paper:
- Fold a square sheet of paper in half diagonally, unfold it again and turn it so that the fold line becomes the length of the future tie.
- Fold the 2 side pieces equally towards the middle (towards the fold line).
- Fold the 2 side pieces to the middle again and glue them. Fold the top sharp corner twice, making a tie knot.
Glue the finished tie to the collar and then glue the corners of the collar to the shirt. You can glue the sleeves on the sides, or you can glue the folded sleeve with the cuff to the bottom of the card, imitating a shirt packed in a box. You can decorate the gift with a pocket or buttons on the edges of the collar. On the inside, write a congratulatory inscription.
Knitted socks (step-by-step instructions on how to knit)
Having mastered the knitting technique, you can create interesting socks in the form of sneakers, which will suit the taste of any man. For sizes 43-45 you will need yarn with a wool content of 50%, 100 grams of 2 different colors, and a hook No. 3, laces about 1 m. Socks are knitted with a thread in 2 additions.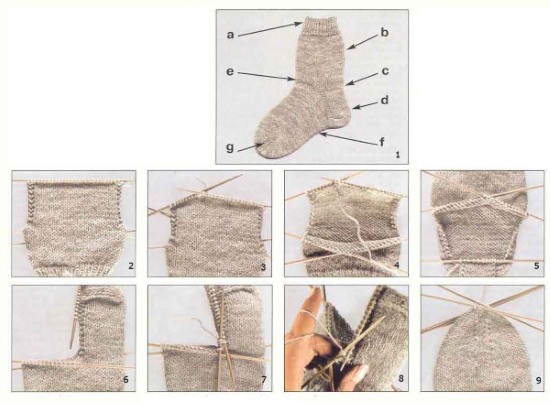
Knitting the sole and the toe:
- 1 row: in the center of the ring, knit 7 single crochet stitches (sc);
- 2-4 rows: knit sc evenly, adding 7 loops (st.);
- Rows 5-8: add 4 sts evenly;
- Rows 9-17: even knitting without increases;
- on the 18th row, turn the work and knit 30 sc;
- repeat row 18 22 times;
- next 8 rows: knit sc, decreasing 2 sts in the middle of each row;
- finish the detail, sew the heel.
Tongue: knit 16 sc in the direction AC (about 30 cm). The upper part is made along the line ABC. Knit 11 rows of sc and continue knitting sc, but do not finish knitting 3 sts at the end of each row. Do 4 rows in this way, and do not finish knitting the next 4 rows by 1 st at the end of each row. Then knit straight sc for about 17 cm. Finish the work with a "crayfish step".
You can decorate the socks by tying the edges with 4 rows of sc, sewing the parts together, threading the laces. You can knit a circle of a suitable color on the side part.
Glasses case
A useful gift is a glasses case, which can be made from felt, leatherette or leather, cotton or jeans in the form of a handbag with a lock, a bag with a magnet or a drawstring.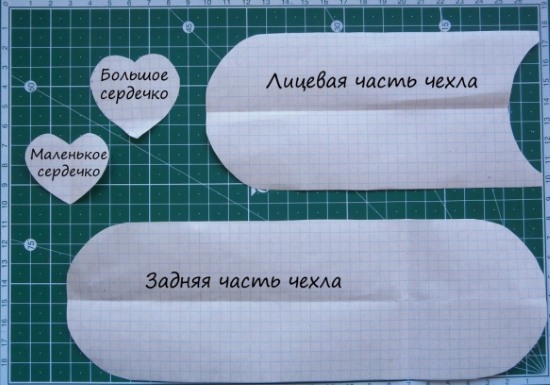
To do this, parts of a suitable shape are cut out of the main material, the same parts are prepared from flannel and synthetic padding (for thin fabrics), and parts slightly smaller are cut out of Whatman paper or cardboard to insert them for compaction between the outer and inner layers.
If a zipper is provided, it is sewn in at the beginning of the work, a magnetic button is sewn in between the layers, and space is left for the string at the top of the cover. When everything is ready, sew 2 layers with cardboard inside from the inside, turn over and smooth out the product.
Personalized cake with wishes
Cake with wishes is a fun surprise made of cardboard that will give you a great mood and 0 calories. This gift is assembled from cardboard “pieces”, inside which you can place small surprises and wishes. Templates for making pieces are easy to find online, print them on suitable paper, cut out and glue.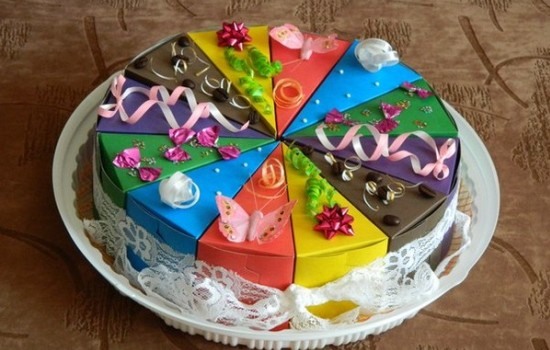
You can decorate the top of the cake with flowers made of corrugated paper, coffee beans, and connect the pieces by tying them with a beautiful satin ribbon.
Ideas for surprises and wishes:
- vigor - coffee bags;
- health - blisters with vitamins or hematogen;
- good luck - lottery tickets;
- wealth - banknote;
- freshness - a pack of Tic-Tac;
- energy - a finger battery;
- love - heart-shaped cookies.
Everyone can come up with similar options themselves, taking into account the characteristics of the birthday boy.
What to give to a friend or sister?
How to please your friend and sister and make a unique birthday gift with your own hands?
It’s not difficult at all, the main thing is patience and a positive attitude!
Instagram-style memorabilia album
A fashionable gift that will appeal to modern girls can easily be made by decorating a photo album or photo book in Instagram style. 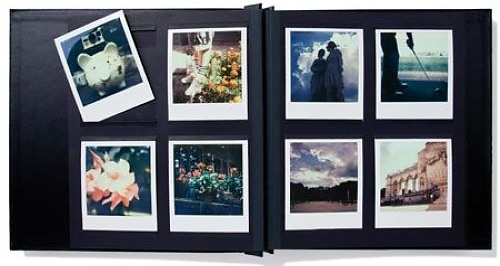 You can depict the icon of a famous social network on the title page, using scissors and a cut-out thematic picture. Or you can fill such an album with the most memorable photos, placing famous Instagram elements and icons next to them.
Chocolate bottle with a surprise
To make a delicious gift for chocolate lovers, you will need the following ingredients:
- 150-200 gr. chocolate;
- small plastic bottle;
- funnel;
- small candies like sea pebbles or nuts.
Sequence of actions:
- open a clean bottle and remove the label;
- melt the chocolate;
- pour it into the bottle using a funnel.
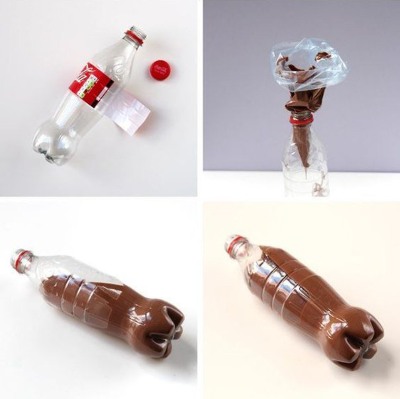
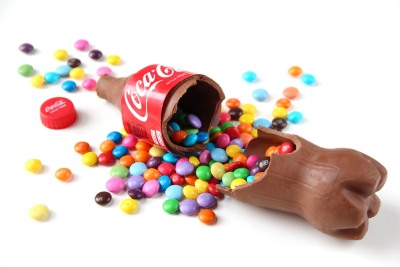
While the chocolate is hot, it is necessary to distribute it evenly in the bottle, slowly rotating it horizontally for some time. To completely harden, place the bottle in the refrigerator. Then pour candies or nuts inside. Carefully make a cut on the plastic and remove the mold without damaging the chocolate. The bottle can be closed with a plastic lid and a label can be attached.
Flower vase
How to turn an ordinary jar into a gift with your own hands and make your friend's or sister's birthday unforgettable? Make a bright flower vase for her!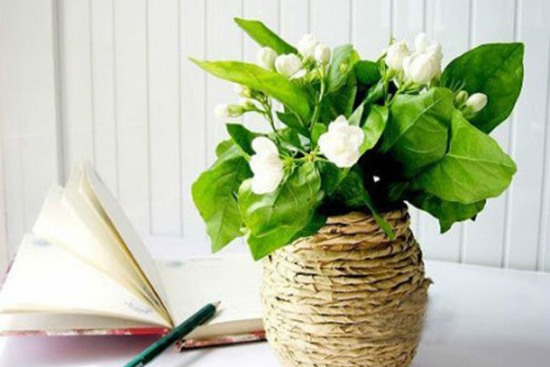
There are many ways to give new life to a glass or plastic container:
- glue pieces of bright napkins or corrugated paper onto the jar (decoupage technique);
- wrap the container evenly with thick woolen threads, satin ribbons or twine;
- Paint the bottle with acrylic paints using a sponge and glue beads and flowers onto the bottle using a glue gun.
Bead and thread bracelet
There is nothing easier than buying beautiful beads and floss in a handicraft store and assembling an elegant bracelet from them. An inexpensive ready-made bracelet or a circle cut out of a plastic bottle can serve as the basis for the decoration. If you bought individual beads, you first need to collect them on a fishing line; if you have ready-made beads sold by the meter, you can immediately start making the product.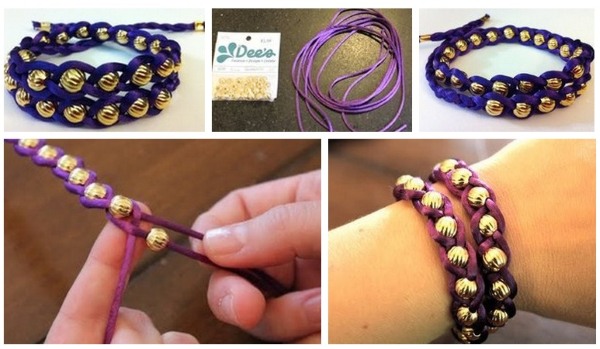
Instructions:
- glue the beads to the base using a glue gun in 1 or 2 rows;
- attach beads to the spaces between beads using brightly colored floss;
- make several of these bracelets, combining threads by color.
Such items look beautiful on the hand if you combine several narrow bracelets.
Candle in a shell
To make a romantic gift in the form of a candle in a shell, you will need candle stubs, a wick from stubs or a string for the wick, 2 toothpicks and 2 rubber bands from money, large stable shells and tweezers.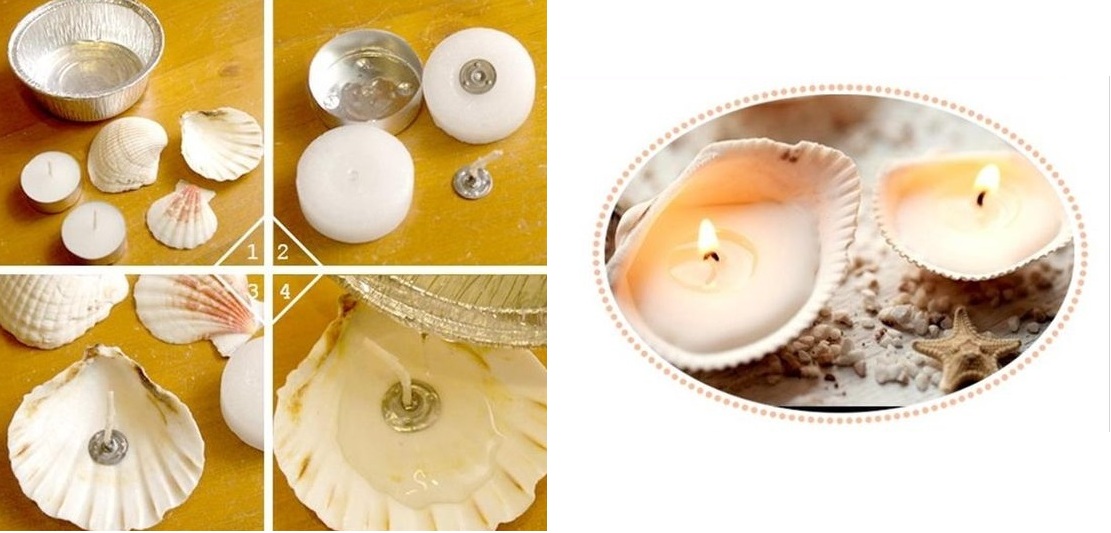
Instructions for making:
- attach the shells to a plate or board by gluing them onto melted candle stearin;
- melt the stubs in a water bath;
- pull out the wick with tweezers or make a new one;
- clamp the wick between two toothpicks, secured at the edges with rubber bands from money;
- place toothpicks on the shell so that the wick is located approximately in the middle of the future candle;
- pour melted stearin into the shell, holding the hot container with stubs with tweezers;
- let the candle harden and then remove the toothpicks from the wick.
What to give to a friend or brother?
A few creative ideas will help you make gifts for friends and brothers that will remain in their memory for many years.
Sleepy pillow
A product such as a funny pillow will be a great handmade birthday gift for those who like to sleep. An interesting idea is to make a pillow in the shape of an owl. Print the pattern from the Internet and prepare fabric (preferably cotton), padding polyester, threads and scissors. If you don’t have a sewing machine, you can sew a small product by hand.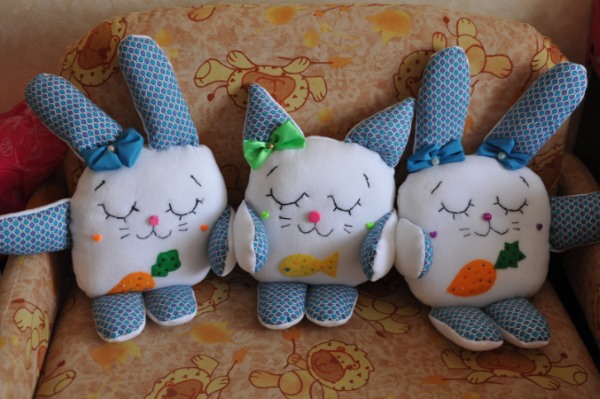
To make a owl pillow, you need to cut out the main parts from the fabric according to the pattern with a margin for allowances. First, design the front side by sewing on the eyes, wings and beak. Sew the 2 halves of the body from the back side, leaving an open space for stuffing the pillow with padding polyester. Turn the product inside out and distribute the padding polyester evenly inside the owl, sew up the opening by hand.
Motorcycle made of candy
Some guys have a sweet tooth just as much as girls, and a candy motorcycle would be a nice gift for them. The motorcycle frame is made of cardboard, wrapped in gold foil or corrugated black paper, and attached to wire guides to create the desired shape.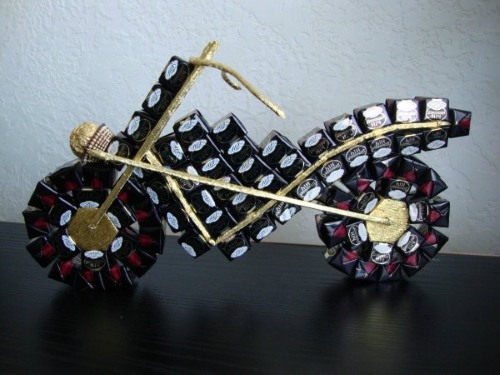
The wheels can be made from several layers of 4.5 cm diameter corrugated cardboard glued together and wrapped in gold or black paper. The handles, exhaust pipe and wheel holders are made from wrapped wire.
Now it will be easy to assemble the motorcycle:
- Glue square-shaped candies in 2 rows around the circumference of the wheels with double-sided tape. Fasten the wheels with gold ribbon. Make a hole in the middle of the wheels and thread the prepared wire through them.
- Fill the base of the motorcycle with candies inside, forming a line of gas tank and seat. Fasten the wheels and base with wire.
- Glue a row of candies to the front panel, attach it to the handles, which are hooked to the product with wire.
- Glue a candy-shaped headlight in front and support the motorcycle on support legs made of wire.
What to give to your loved one?
Poster with sweets
The easiest way to please your loved one is to give them a poster with heartfelt or funny wishes, decorated with sweets "with meaning". The inscriptions can be made by hand or composed from cut-out printed words.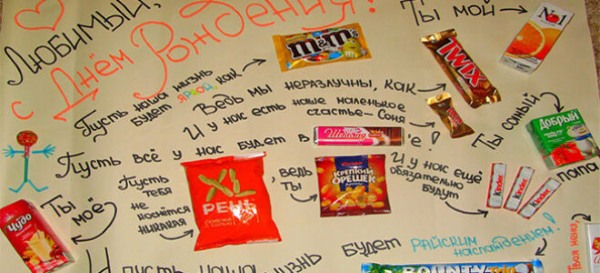
One of the design options could be as follows:
- I wish you endless (chocolate "Inspiration") and prosperity (candies in the form of gold coins);
- let (curd cheese "Miracle") accompany your every day;
- be as cheerful and strong as (a bag of coffee);
- you and I are inseparable, like (Twix chocolate bar);
- you are my most (small pack of "Favorite" juice) person on earth;
- Now we know for sure that (chewing gum "Love is") is our present and future.
Rubik's Cube from joint photos
To make your loved one always remember the happy days spent together, you can make a Rubik's cube from photos for him. To do this, you will need a Rubik's cube with colored stickers that can be removed from each part, glue, clear varnish, scissors, favorite photos and a lot of patience.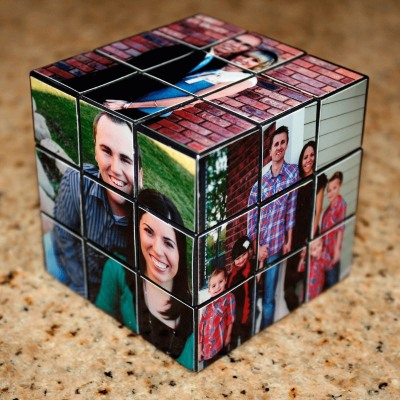
Execution:
- The edges of the Rubik's cube are freed from colored stickers;
- prepare photographs of suitable size;
- on the back side, divide each photo into 9 identical squares, corresponding in size to the squares of the Rubik's cube;
- cut all the photos without mixing them;
- carefully glue each part of the photo onto the corresponding square of the cube and let it dry;
- after drying, disassemble the cube into parts;
- cover each photo with clear varnish and let it dry;
- collect the parts.
Coffee heart
A coffee heart is a fragrant gift that expresses the giver's love. It is made similarly to the creation of a topiary, using a heart-shaped base instead of a ball, pasting it with coffee beans. Another version of a coffee heart is a car pendant.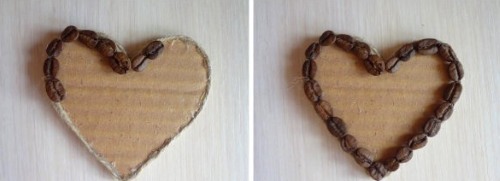
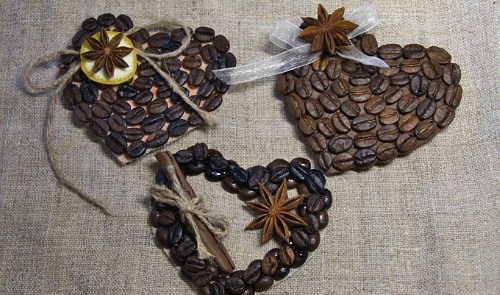
The base for such a heart is made of corrugated cardboard covered with brown velvet or foil, or of floral foam cut in the shape of a heart and pasted with sand as a background. A hook with an eye or wire must be inserted into the recess of the heart to form a pendant.
Roasted coffee beans are tightly attached to each other on the prepared base using a glue gun, so that there are no empty areas. Decorate the heart with a golden ribbon, a star anise or a cinnamon stick.
Balloons with wishes
An original birthday surprise would be a bouquet of balloons with wishes. Pleasant compliments and parting words are written on small pieces of paper and rolled into a tube. Place each one in a balloon filled with helium. Tie each balloon tightly with a thread, tie ribbons and assemble the bouquet.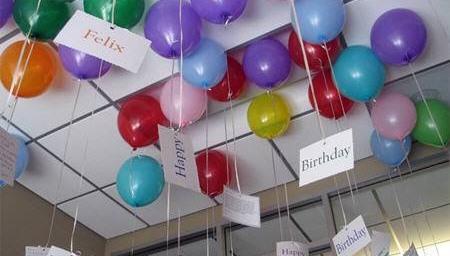
You can attach a card with a gift certificate or a funny wish to the ribbons.
Master class on making flowers from balloons
An unusual bouquet for the holiday can be made from balloons. With a certain amount of skill, you can make a variety of flowers, but to start, it is better to make a chamomile, for which you will need to inflate the sausage-shaped balloons, leaving 3-5 cm at the end, free of air.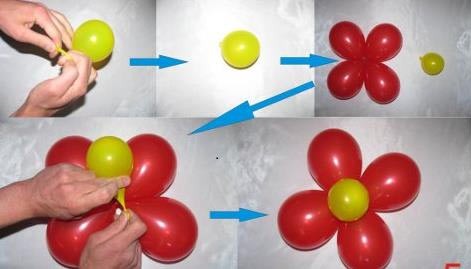
Instructions:
- The beginning and end of a white or other colored balloon are tied together, the balloon is folded in half and twisted twice at the fold.
- The resulting 2 parts are twisted in two places so that 6 identical parts are formed (three on each half of the ball).
- Place the pieces on top of each other in pairs and intercept them at the point where the petals twist.
- With the other hand, twist the petals in the middle to create a flower with a hole in the middle.
- A stem with a center for the flower is made from a green ball. A sausage of about 10 cm is twisted near the knot, it is bent and the same segment is twisted together with the first one.
- Pass the resulting core through the hole in the flower.
- Make several flowers and collect them into a bouquet, tying them with a beautiful ribbon.
3D images on postcards
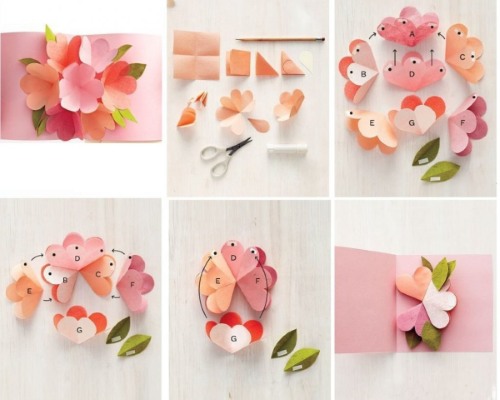
If you add a handmade 3D card to your birthday souvenir, this set will look like the most original gift.
Instructions:
- Fold the double-sided colored cardboard in half, make markings with a pencil on the fold line, from the top edge 4 cm, 1 cm, 5 cm, 1 cm, 5 cm, 1 cm. From the points limiting the 1 cm segments, set off lines perpendicular to the fold, 2.5 cm, 2 cm and 1 cm long.
- Make cuts according to the drawing, you will get 3 bases for the 3D format of different lengths. They need to be folded in half in the middle inside the postcard.
- Glue the finished base onto a second sheet of thick paper folded in half.
- Cut out decorations in the form of gift boxes, the inscription "Happy Birthday!", balloons or butterflies from thick colored paper. Glue the selected details to the 3 bases inside the card. Make sure that the details do not wrinkle when folding the card.
- Sign the card, decorate the outside of the card with details similar to those inside, ribbons, beads or rhinestones.
How to make a gift box?
You can do the gift wrapping yourself. The gift box is made from colored thick paper in the shape of a pyramid, a house, a flower bud, a round or square box. You can find a lot of templates on the Internet, by cutting them out, you can make neat packaging without much expense.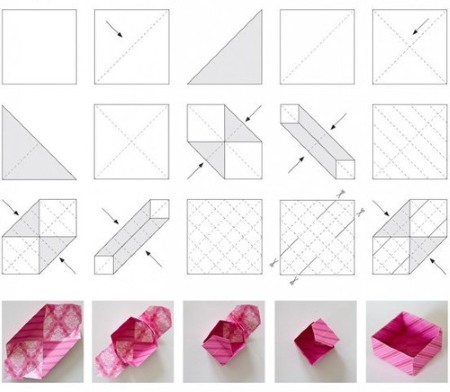
It is very easy to make a cone-shaped box yourself:
- draw a circle on paper (the bigger it is, the higher the box);
- divide the circle in half and form a cone from the half by joining the 2 corners together;
- place a gift inside the box, cover the cone with foil or paper, gluing it to the base;
- Decorate the box with ice cream appliques, ribbons or beads.
Everyone loves to receive special gifts for their birthday. Everyone can surprise their family and friends by making a unique surprise with their own hands.
Having read this article to the end, it becomes obvious that making a gift with your own hands and presenting it on a birthday is almost as easy as buying it. But such a product always contains a piece of true love and best wishes for the birthday boy.
Video: DIY Birthday Gifts, Quick and Easy
DIY gifts, watch the video:
The perfect birthday gift:
