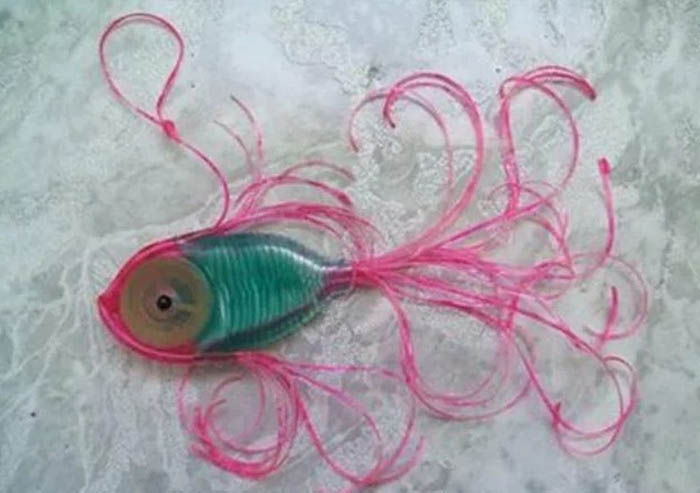
Today, products made from droppers are very popular because they are created the crafts have an original and beautiful appearance thanks to the intertwining texture. The process of creating any figure is simple and does not take much time, so both experienced and novice needlewomen can cope with the task.
Thanks to the idea and invention, you can decorate not only hospital wards, but also rooms in the house. A simple technology is considered to be the creation of a fish, which requires a small amount of material. At the same time, this craft can be made in color.
Necessary tools and materials
Using medical dropper tubes, you can create any figure, because this material is flexible and accessible. There are many different instructions and schemes for designing such a craft.

The technological process is similar to the method of weaving macrame or decorating toys based on newspaper tubes. As a result, the products will be strong and will last for a long time.
If the material used for its intended purpose (for intravenous injections or solutions) is used to create the craft, the tubes must first be washed and disinfected with any antiseptic composition. Some antiseptics can give transparent tubes a different shade.
When disinfecting medical hoses, you must first drain the remaining solution from the system into the wash water. Then you need to remove the needle from the tube and immerse the dropper parts together with the rubber band in the disinfectant. If only the medical hose is required for registration, the remaining elements of the system can be thrown away.
Fish from a dropper requires the preparation of a small amount of material.
In this case, only an injection system will be required, which should include:
- dropper with filter;
- dropper dispenser wheel;
- hose from the system.
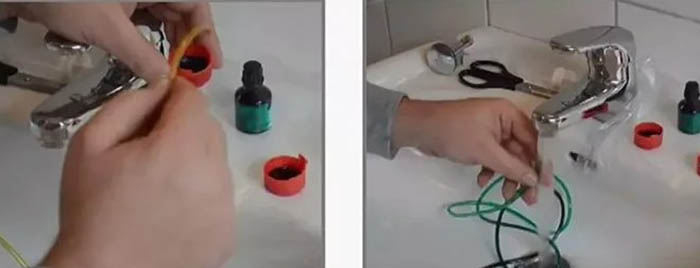
Additionally, you need to prepare 200 ml of boiling water and manicure scissors with a thin blade. The dropper can be purchased at any pharmacy. This product is inexpensive, and it can be purchased without a prescription.
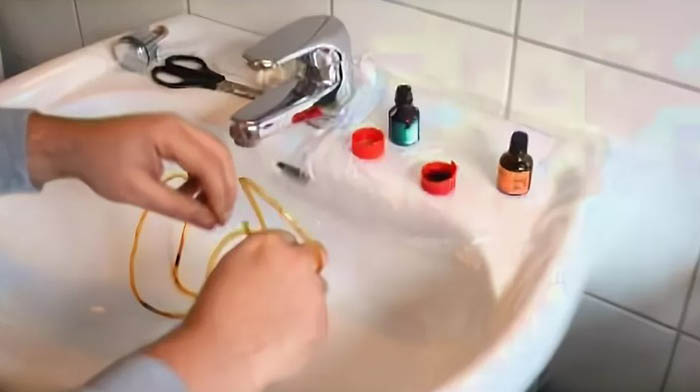
Step-by-step coloring of the dropper
A fish from a dropper requires the use of all the system units in the form of elastic tubes through which medicines enter the body, adapters, units for administering medicines and fixators. Often these materials have a yellowish tint or can be completely transparent.
The finished craft will be beautiful, but multi-colored products look more original. For these purposes, it is necessary to paint the material used. This procedure is considered a mark, so it is recommended to put on an apron or robe to protect clothes, and also cover the table surface with oilcloth.
For painting, you can use any compositions that you have at home, for example:
- potassium permanganate;
- brilliant green solution;
- Fucorcin or iodine;
- ink from a ballpoint pen.
The pen ink helps to give the tubes a blue tint. If you need to get a yellowish color, it is recommended to prepare iodine. To color the dropper in a greenish color, you need to paint the yellow tube blue. When mixing these pigments, you will get a green tone.
It is also permissible to use a solution of brilliant green for these purposes. If you need to achieve a reddish tone, you will need a yellowish tube. This material must be dipped in a solution based on red pen ink and alcohol.
If you don’t have the desire or time to do this work, you can paint the hoses using an aerosol can containing the required pigment.
The ingredients needed to create the blue shade are:
| Components | Quantity |
| Vodka or alcohol | 2 caps |
| Blue ink from a ballpoint pen | 2 pcs. |
Step-by-step painting of the dropper:
- Pour the ink into alcohol or vodka and stir thoroughly until the consistency becomes uniform.
- Pour the resulting liquid into the medical tube. To get the liquid in, draw air in with your mouth so that the composition starts to flow into the cavity of the hose.
- The amount of coloring liquid should be large, but the substance should be mobile.
- Shake the contents of the medical tube for 1 minute so that the coloring pigment is evenly distributed along the walls of the material. If the concentration of the pigment composition is minimal, it is advisable to roll the contents inside the tube for 5 minutes.
- It should be taken into account that after rinsing the tube the shade will be paler.
To color silicone tubes in a greenish tint, you need to take 250 ml of liquid, a bottle with a solution of brilliant green, and also a yellowish medical hose.
Step by step process of changing color:
- First cover the table surface with a plastic bag, oilcloth or unnecessary material.
- Immerse the silicone tube in the brilliant green solution. Additionally fill the inner cavity of the hose with liquid to 1/2 of its volume.
- Then pour the solution from the tube back into the bottle.
- Immerse the painted hose in a container with cleaning liquid.
- Perform similar manipulations on the other end of the tube.
- After finishing painting, leave the hose to dry.
- When the pipe is completely dry, you can start creating the craft.
If there is not enough pigmentation, the hose can be immersed in a brilliant green solution for 24 hours.
To dye a medical hose a yellowish tint, you need to prepare:
- 250 ml liquid;
- infusion system;
- scissors or a stationery knife;
- a bottle of iodine.
Step by step process of painting a tube:
- To avoid staining the table, cover the surface with transparent oilcloth or thick fabric material that will not allow drops of pigment to pass through.
- Before painting, cut off excess parts of the system so that only one tube remains.
- Immerse one end of the hose in a bottle of iodine. From the other end of the tube, draw air through your mouth to fill the system with the solution 1/2 of the way.
- Leave the system in this state for 20 minutes so that the pigment is well absorbed into the walls of the hose.
- After some time, drain the remaining liquid into a bottle, and immerse the painted part of the tube in a container with water for rinsing.
- To paint the other side of the hose, perform similar manipulations.
- After the procedure, leave the medical tube for several hours to dry.
If the hose has not absorbed enough yellow pigment, you can repeat the dyeing procedure to make the shade more saturated.
How to quickly and easily make a fish from a dropper
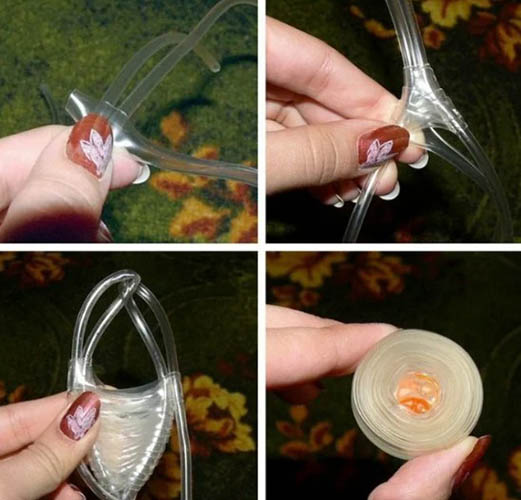
The fish from the dropper requires preliminary preparation of the material used. In this case, it is necessary to cut off the excess elements of the medical tube on each side - the dropper with the filter and the needle. Additionally, it is necessary to get the dispenser wheel. To do this, the device should be brought to the stop and brought up through the hole.
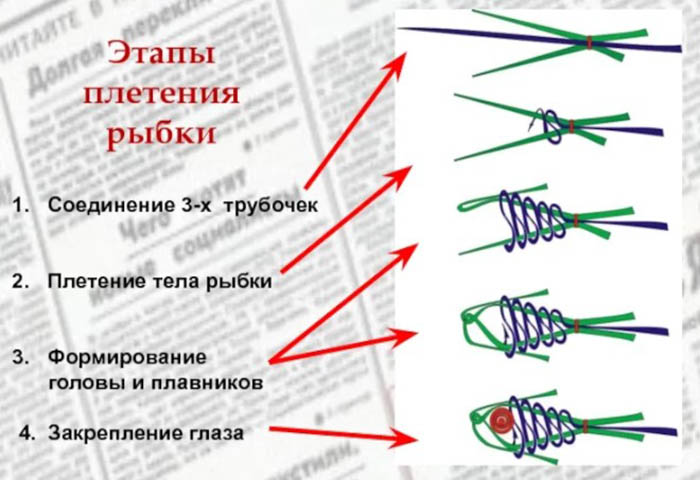
Step-by-step process of creating a product from a dropper:
- After disassembling all the parts, measure the size of the tube. To create the figure, prepare 1 hose 5 cm long and 2 pieces of pipe 20 cm long.
- Cut the remaining tube along its entire length and iron it a little to create a ribbon.
- Join 2 pieces of pipe, 20 cm long, together. Wrap the central part of the piece twice with tape. This will be the beginning of the weaving of the body.
- Then alternately wrap each end of the tube. 6-7 turns should be made. Create tension evenly, and also control the degree of distribution of the tape material. Initially, the process will be difficult, but later the hands should adapt to the work. Upon completion of the weaving, the structure should look like fish scales.
- Once the weaving is complete, you can begin creating the head, as well as the fins on the top and bottom. For a while, the ribbon in the center can be fixed with a needle from the system. If you are not skilled, this technique will allow you to rest your fingers and also look at the weaving pattern.
- Bend the upper tube, measuring a small distance. Rewind the formed knot with tape, having first pulled out the needle.
- Do the same with the lower edge. However, to get a grip, pull the cord through the previously created knot of the upper fin. The head of the fish should be formed.
- Wrap the fin from below with tape and fix it on one side with a needle. Cut off the unnecessary piece of tape.
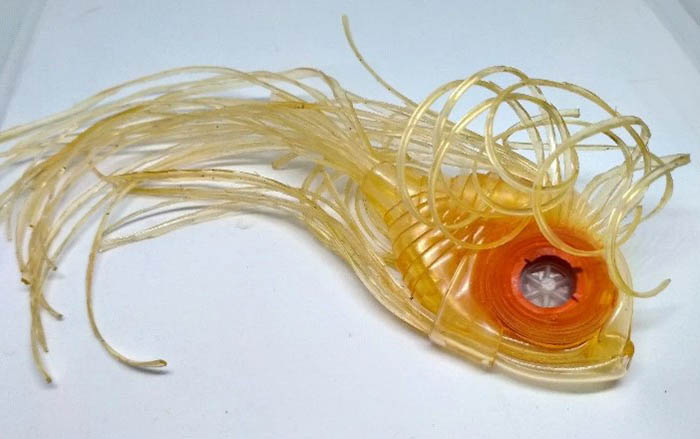
- If there is a lot of excess tape left, the material can be used to create an eye. To do this, cut a 1.5 cm long strip from the tape. Make several cuts at each end to decorate the eyelashes.
- Place eyelashes on the dispenser, which should curl away from the pupil, not inward. Rewind the dispenser with tape.
- Depending on the hole that was left for the eye, it is recommended to control the parameters of this part. Fix the resulting eye in the required area. As a result, the tape used for wrapping the main part will be additionally fixed. Cut off excess material.
- Cut the tubes for the tail and fins into several thin strips to make the product look nice.
- After completing the main work, dip each thin strip into 200 ml of very hot liquid. When in contact with boiling water, the strips will curl.
This type of work is simple and does not take much time. Only the process of cutting the tail and fins into thin strips may seem tedious and long. The strips should not be made too thin, otherwise the blanks will intertwine, creating a lump, or will tear during twisting.
Making a goldfish
From a dropper you can create not only a transparent, but also a goldfish. For these purposes, you need to prepare a spray can with bronze-colored paint.
Step-by-step description of making the craft:
- First make the base. To do this, prepare 2 medical hoses, the length of which should be equal to 35 cm.
- Cut one hose on each side. On one side you should get 8 strips, each 10 cm long, on the other side – 4 strips, each 15 cm long. Do the same with the second hose.
- Make an eye for the fish. For this purpose, use a wheel that regulates the intensity of the drops, as well as 2 hoses, the length of which should be equal to 3 and 5 cm. In the future, it is recommended to take into account the parameters of the eye during the weaving process. Cut the hoses along the entire length. On a small tube, create a fringe that will act as eyelashes.
- Place the eyelashes on the ring. After the formed base is wrapped with a long hose. When cutting, the tube will twist, therefore, when winding, you need to make sure that the tape twists to the front side, but not to the pupil.
- Once the eye is complete, you can move on to the design of the figure's base. Cut the long hose from the second system along its entire length. Also use the 2 tubes prepared earlier. Wrap these parts several times with the resulting tape to secure the 2 tubes together. Then wrap the 2 hoses in turn, using the figure-eight weaving technique.
- Twist 2 base hoses together to make the shape of the product, taking into account the area for the eye. Fix the remaining tails. For these purposes, direct the blanks from each side towards the tail and grab them with a ribbon while weaving in a figure eight.
- Place the finished eye in the required area and secure it with auxiliary eights.
- Once the work is completed, paint the craft in a bronze shade. Put on gloves on your hands beforehand to protect your skin from pigment.
When decorating such products based on medical droppers, it is recommended to additionally create decorative details. For example, you can cut out a crown from some components of the system, and also curl the fins and tail with scissors.
With a crown
A fish from a dropper can be made together with a crown. In this form, the craft will look more beautiful and unusual. In the absence of 2 medical tubes, it is permissible to use any silicone transparent hoses, the length of which should be at least 35 cm.
Rubber tubes are not suitable for these purposes because they will not allow you to create a high-quality and strong weave. At the same time, the fins with the tail section, cut into strips, will not curl.
Technology of creating a product from a dropper:
- Cut the medical hoses from each edge. On one side you should get 4 strips 15 cm long, on the other – 8 strips 10 cm long.
- To design the eye, it is permissible to use a ring that controls the adjustment of the volume of the incoming solution from the system. Additionally, prepare a 50 cm long hose and a 3 cm tube to create eyelashes.
- Cut 2 tubes completely, from one end to the other. On the small hose, make a fringe that will protrude like eyelashes.
- Place the fringe on the eye and wind it with a hose that is longer. When winding, check the cuts along the edges, which should be facing outward.
- Once the eye is finished, you can start creating the main part. Cut the hose from the second system completely, and also prepare the 2 initially cut tubes. Wrap the last parts with tape to fix them. Then wrap each hose in turn using the figure-eight weaving technique.
- Once the weaving is complete, the tubes should be intertwined with each other, which will allow the area for the eye to be prepared. These parts will be directed towards the tail section.
- Place the eye in the desired area. If this element is poorly fixed, it is recommended to add several weaves.
- Cut out a crown from the yellow-tinted system component using a knife or scissors. Secure this element to the product using a dropper needle. If necessary, adjust the shape of the crown with your fingers.
- Once the weaving is complete, the finished craft can be painted to give the fish a colorful appearance.
The technology of weaving a fish from dropper tubes is an entertaining and creative work, so it can interest not only adults, but also children. At the same time, from such material it is permissible to create keychains, hand jewelry and other animals. To make the fake more original, the design can be made multi-colored.
Video about weaving from a dropper
Master class: fish from a dropper for beginners: