Crafts will not only decorate the interior, but also add coziness. Useful things for the home are easy to make yourself, for example, by restoring old furniture or adding a few decorative elements to a lamp. You don’t need to buy expensive materials for this.
Possible materials for crafts
Crafts for home – useful devices that will make life easier for any housewife. Various organizers, homemade cases, holders will help to maintain order in the bathroom, kitchen and bedroom. For example, thanks to handmade hangers, you can easily free up space in the closet.
If you approach the matter creatively, an old chest of drawers can be transformed into a long pouf with a soft seat and drawers for storing clothes.
Useful crafts for the dacha and home can be made from almost anything:
| Materials | Characteristics |
| Tree | Durable material. Furniture, hangers, and shelves are most often made of wood. Fasteners are selected depending on the type of craft: thin slats can be glued, and boards (for example, for a hanging shelf) are nailed or screwed together. |
| Textile | This material is most often used to make crafts for kitchen utensils. You can sew potholders, hot pads, cutlery organizers, and containers with bulk products yourself. Durable fabric is also used to make trunks for outerwear and underwear. |
| Plastic | A relatively durable material. In such crafts you can store toothbrushes, jewelry, sewing accessories (beads, spools of thread, needles) and much more. Plastic can be used to make holders, organizers, shelves for light soft toys. |
| Metal | The most durable metal of all the above. It is difficult to work with if a person does not have the appropriate skills. Table legs, a hanging book shelf or a hanger can be made from metal. |
| Leather | The material is used for decoration. Thick leather belts can be used to make a picture-panel, a vase, straps for a sofa cushion or a key holder. |
| Glass | Glass fragments are used to decorate tabletops or other furniture. Bottles or jars can be used to make candlesticks, vases, and aroma lamps. |
During the process of making the craft, you should always have carpentry tools (saw, hammer, jigsaw, plane), wood glue, nails, and screws at hand.
Useful crafts for home
Crafts for the home, made with your own hands, can significantly save the family budget - it is not necessary to buy knife or teapot stands, organizers and holders in the store.
Handmade items are distinguished by their originality – you can realize any creative idea while spending a small amount.
Towel Holder Made from Tin Cans
Crafts for the home (useful things will not only decorate the interior, but also save space) are actually easy to make. If there is no place to store towels in the bathroom, then a holder will help solve the problem.
To make it you will need:
- 6 tin cans (700-800 ml);
- wooden board (thickness 2-3 cm, width – 20 cm, length – 40-45 cm);
- 2 wall mounts;
- stencil (flowers, vines, butterflies);
- quick-drying paint (in a spray can);
- 6 short screws (no more than 3 cm);
- brushes of different thicknesses.
Instructions for making:
- Tin cans should be soaked in a soap solution for 15-20 minutes. Then carefully remove the label and wash thoroughly. Sharp edges are carefully bent inward or ground down.
- Well-dried containers must be painted from a spray can. Using a brush, carefully draw a pattern through a stencil. Put the jars away for 40-60 minutes in a dry, dark place so that the paint dries completely.
- The rectangular board is sanded and covered with paint or varnish. Fasteners are screwed on the back side at the top.
- The bottom of the can is carefully drilled with a screw, leaned against a dry board and screwed in. Future holders can be placed on the stand in any order.
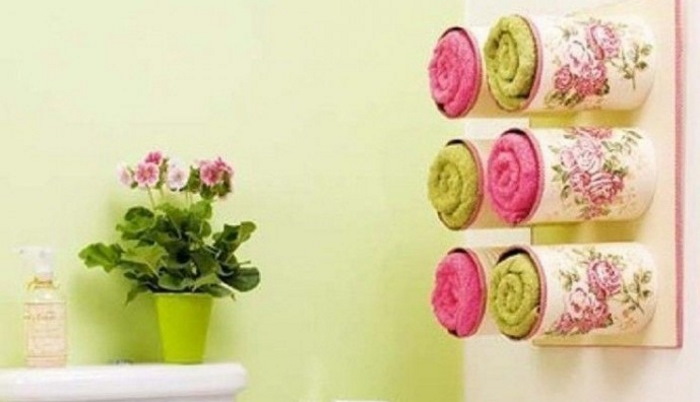
The finished craft can be hung on the wall in the bathroom. The holder can hold up to 6 towels.
Smartphone Pendant Case
If the sockets in your home are located in an inconvenient place or too high, you may have problems charging your tablet or smartphone, especially if the device has a short cord. You can make a hanging case with your own hands from scrap materials.
You will need:
- a plastic flat bottle (for example, from shower gel or shampoo);
- scissors;
- sandpaper;
- decorative elements.
Instructions for making:
- The neck of a flat bottle needs to be cut off. The upper part of the container (approximately to the middle) is removed from the front. A high wall (5-6 cm) is left at the back.
- Cut a rectangular hole (the same size as the charger) in the high wall.
- The case is thoroughly washed with water to remove any remaining gel or shampoo. The plastic needs time to dry completely.
- Use sandpaper to remove any roughness left after cutting and remove the label.
- Decorate the hanging case with rhinestones, beads, sequins or paillettes. Plastic can be painted in any color, depicting patterns, ornaments, plants, insects on it.
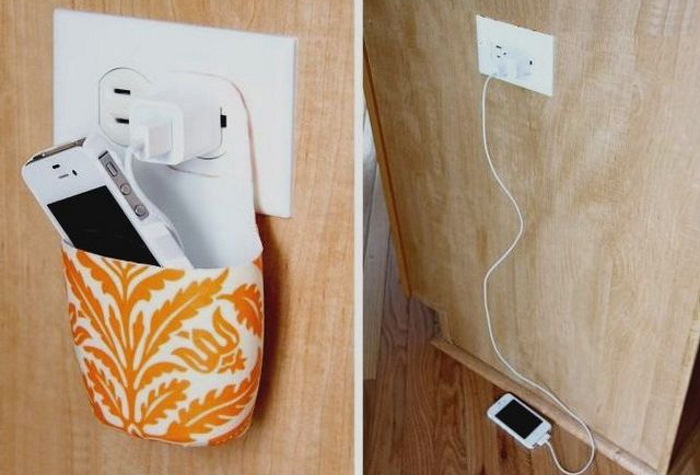
Using the hanging case is quite simple. First, simply insert the charger plug into the hole in the back wall, then plug it into the socket. The smartphone is placed in a plastic "pocket".
Pocket for kitchen utensils
If there is no specially designated place for cutlery in the kitchen, then homemade pocket organizers will help to save the situation. They are made not only from fabric, but also from leather, plastic and other materials.
You will need:
- 4 identical small cutting boards (no more than 15 cm high and 10 cm wide);
- thick fabric (100x50 cm);
- stapler and staples for it;
- bright ribbons in the color of the fabric;
- sharp scissors;
- hot glue gun.
Instructions for making:
- Sand the cutting board to remove any rough spots. You can also coat it with quick-drying varnish.
- Insert staples into the stapler.
- Place the fabric on the board and carefully cut out the future pocket, leaving 1.5-2 cm from the outline as an allowance.
- Fold the finished piece inward on all sides, attach it to the board and fasten it with staples. You need to make sure that the fabric does not stretch too much during the process.
- Apply hot glue to the staples and attach ribbon or bright rope on top, forming a border around the pocket.
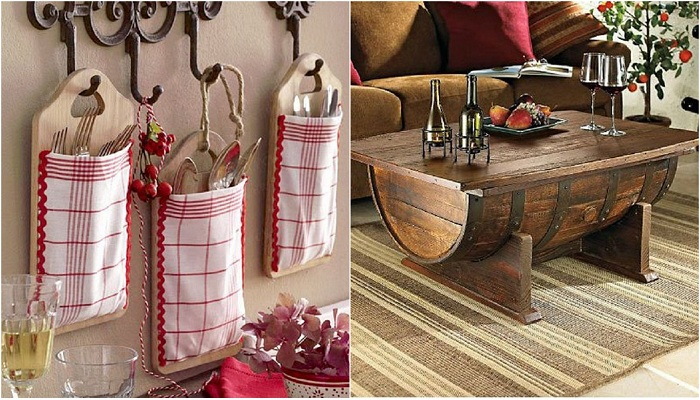
The fabric can be additionally decorated with some pattern, for example, if it is plain. The finished pocket is hung on the wall. If there is no hole in the cutting board, it should be made in advance.
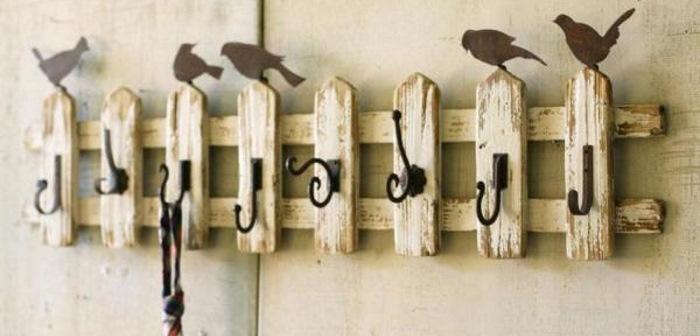
Hanger
The clothes hanger performs several functions at once. The large structure with several compartments serves as a storage for shoes, hats, sunglasses, keys and other small items. You can make the hanger yourself from a panel.
Materials required:
- scissors;
- 4-5 clothes hooks;
- strong woolen threads;
- metal or plastic perforated panel (it is better to purchase it in advance in a furniture or hardware store);
- decorative elements;
- dye;
- fastenings.
Algorithm of actions:
- The perforated panel is covered with spray paint. Two wall mounts are hung on the back side.
- After the panel surface is completely dry, 4-5 clothes hooks are attached. Usually, there is no need to drill them – the hooks are sold with Velcro.
- The panel is decorated with woolen threads. On them, just like on fabric, you can depict a pattern or ornament by simply threading a thread through a hole.
The panel can be decorated with large rhinestones. On one side, the glass is covered with PVA glue, applied to the hole and pressed gently.
Crafts for the home (useful recommendations for making are given below in the article) can be made from an old long box or pallet.
Materials required to make the hanger:
- a piece of rag;
- 4-5 hooks;
- measuring tape;
- simple pencil;
- sandpaper;
- drill;
- gloves;
- jigsaw;
- roller, brush, paint;
- pallet.
Step by step instructions:
- First, you need to prepare the work surface. The tray is cleaned of dirt and sanded with sandpaper. Large "burrs" can be removed with a jigsaw. If necessary, the tray is cut.
- Mark the location of the hooks with a marker or paint. You can use a tape measure to measure the same distance. Drill the hole for the hooks.
- The tray is cleaned of dirt again and painting begins. To make the wooden hanger last longer, the surface is first treated with an antiseptic, then acrylic paint is applied in a thin layer.
- On the back side, 3-4 fasteners are installed at a distance of 5-10 cm from each other.
- The hooks are threaded through the holes and fixed on the back of the hanger.
To prevent the paint from peeling, you can cover the finished hanger with quick-drying varnish. To obtain a relief structure, decorate the craft with wax, colored oil or putty. Work with wood in a respirator so that the smallest particles of sawdust do not get into the respiratory tract.
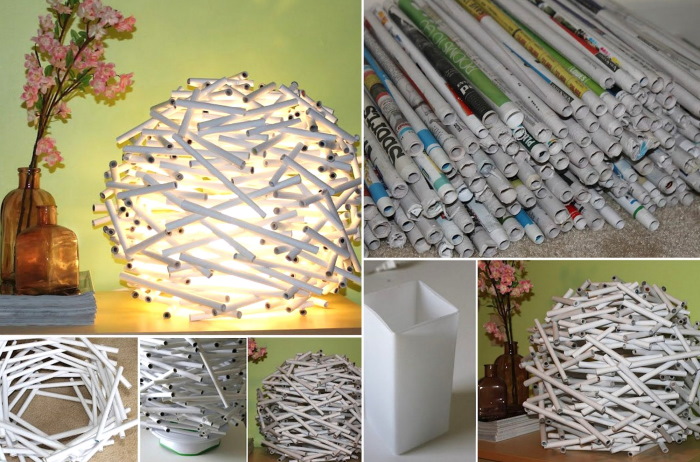
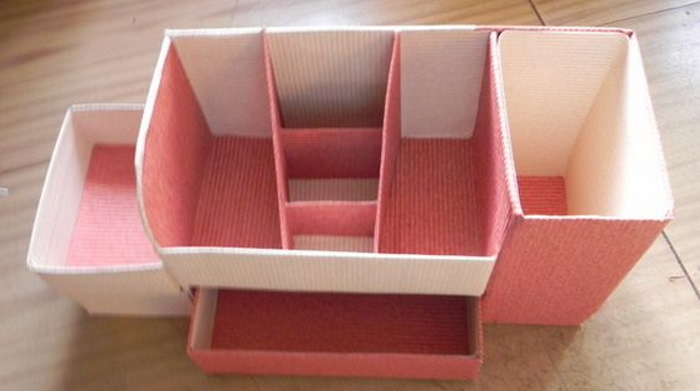
Organizer for small items
The organizer allows you to quickly "unload" the work surface. It is easy to make from cardboard rolls, plastic containers, paper, wooden boards and thick fabric.
During the work, you should always have PVA or hot glue on hand. The pieces of fabric are sewn together with threads. You can cut out the elements of the required size using a stationery knife or scissors.
The size of the cells and the number of sections should be decided in advance. It is also recommended to pay attention to the color of the future craft - the main thing is that it matches the design of the room. You can make an organizer for office supplies from colored paper.
Materials required:
- pencil;
- paper glue;
- scissors;
- 2 sheets of thick cardboard;
- 5 sheets of colored paper.
Algorithm of actions:
- You need to assemble a square from sheets of colored paper. The bottom and top of the sheet are folded in one direction, leaving a small "bottom". The side parts are folded inward and glued together. The result should be a deep envelope.
- According to the above instructions, you need to assemble 5 envelopes. They are glued together, assembling an "accordion".
- A wide strip of cardboard needs to be glued to the bottom of the accordion. Cardboard is also glued to the sides of the accordion. A small ledge needs to be left on top.
The shape of the organizer should resemble an open book.
This jewelry organizer will look very unusual in the bedroom.
To make it you will need:
- a small vase (you can make it yourself from a flat bottle);
- dye;
- brush;
- dry branch with multiple shoots.
Manufacturing algorithm:
- The bark is removed from the branch and given time to dry.
- Using a thin brush, apply paint over the entire surface (it is advisable to use grey or black).
- The vase can also be painted or decorated in any other way, if desired.
Bracelets and chains (one at a time) are hung on dried branches.
Shelf
Crafts for the home - useful household items. A honeycomb shelf made with your own hands can free up space in a bedroom or living room. It is attached mainly to the wall.
Necessary tools and materials:
- several boards (width – no more than 10 cm, thickness – 2 cm);
- screws, self-tapping screws;
- staples, dowels;
- decorative wax, colored oil, glaze or varnish;
- rollers, brushes, paint containers;
- drills, drill;
- sandpaper;
- roulette;
- ruler.
The process of making honeycomb shelves is quite labor-intensive, so you need to be patient.
Step by step instructions:
- On a sheet of paper, you need to create a drawing, determining the number of honeycomb shelves and the options for attaching them to each other. Most often, the structure is assembled in the form of a hexagon.
- Use a tape measure to determine the required length and cut the board at an angle of at least 30°. The markings on the material must be applied in advance.
- First, assemble the structure on a flat surface by placing the boards next to each other. Then drill holes and screw in the screws. You can screw the hexagon parts together using a screwdriver.
- The structure is carefully processed with sandpaper or a grinding machine. After all the roughness has been removed, decorative wax or colored glaze can be applied to the board. The ends are painted white. To get a rich shade, the boards need to be painted 2 times with a roller or brush. An interval of 4-5 hours is maintained between procedures - during this time the paint should dry completely.
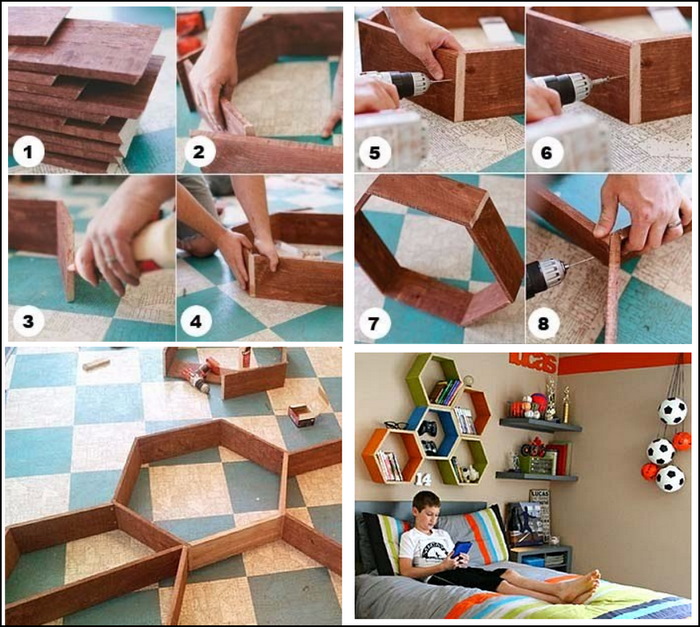
One end of the metal corner is attached to the shelf, and the other to the wall. To make them less conspicuous, you can also paint the fastening with paint.
Interior design ideas
By breathing new life into seemingly old things, you can refresh the interior. Items made with your own hands are always unique and original.
In the process of decoration, various materials are used – from paper and cardboard to wallpaper and metal elements. Various unusual details will highlight the interior and delight guests.
Watch
Crafts for the home - useful, and most importantly, beautiful interior details. It is easy to make a wall clock at home.
Various materials are used in the process:
- tree;
- vinyl;
- paper;
- metal;
- cardboard.
The chronometer can be removed from any watch. Crafts made from vinyl records look very unusual and creative. They can be decorated, changed in shape, cut out various figures and silhouettes with a jigsaw.
To make a wall clock from a vinyl record with your own hands, you will need:
- vinyl record;
- clockwork;
- sandpaper;
- jigsaw;
- template or stencil;
- white thin marker.
Detailed instructions:
- Place a vinyl record in an oven preheated to 170-190° for 120 seconds.
- After the allotted time, take it out, put it on a flat surface and bend it carefully. The shape of the plate should resemble a shallow plate.
- A hole needs to be made in the center and a clock mechanism needs to be installed on the back side and 3 hands on the front side.
- Use a white marker to draw a pattern on the free edges of the plate, which will then need to be cut out. Stencils or templates can be found and printed out in advance.
- Using a jigsaw or drill, carefully cut out the silhouette on the already cooled plate.
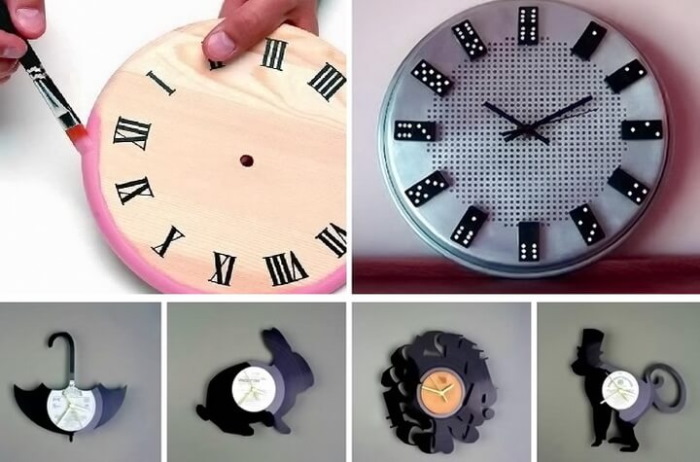
At the final stage, you need to glue a metal loop to the top corner of the wall clock using a glue gun.
Crafts made from cutlery look original. Clocks can be decorated with plastic legs.
Detailed instructions:
- The handles of 250 spoons are cut off.
- PVA spoons are glued to a plywood circle in a circle in the shape of petals.
- The mechanism is removed from the old watch.
- A small hole is made in the center of the plywood circle.
- A chronometer is installed on the back side, and hands on the front side.
Petals made from plastic spoons can be painted or coated with glitter varnish.
Photo frames
You can make photo frames yourself without much effort.
You can decorate them:
- shells;
- coffee beans;
- rhinestones;
- beads;
- buttons;
- paper.
Frames decorated in the decoupage style look unusual. Nothing is required for the work except glue and decorative elements. PVA is applied to a wooden surface, beads, small stones, seed beads, coffee beans and even pearls are carefully laid out on top one by one.
Many designers like decor made from salted dough. Its texture resembles plasticine, so it is convenient to work with.
Ingredients:
- water – 2 glasses;
- flour – 2 cups;
- salt (any) – 1 cup.
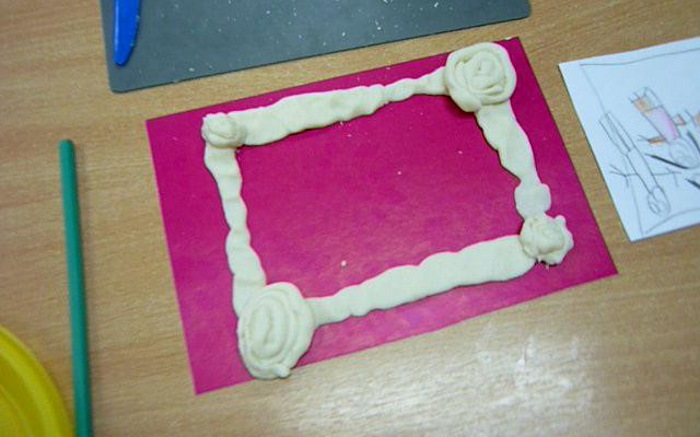
All components should be thoroughly mixed until a uniform consistency is achieved and immediately begin sculpting. Flowers, petals, butterflies and other figures can be glued to the frame.
To prevent the dough from cracking and “glassing” off the frame, the finished composition is placed in an oven preheated to 120-130° for 20-25 minutes.
At the final stage, the salt dough elements are painted with different colors, various details are added to the decor and the composition is covered with varnish.
Tabletop Decor Options
DIY crafts for the home are not only useful, but also unique in their own way. A tabletop that has lost its decorative appearance can be updated using, for example, the decoupage technique. Napkins with bright, beautiful designs should be purchased in advance.
When choosing a material, it is advisable to focus on the color scheme of the room so that the updated tabletop matches the interior. If the napkin is multi-layered, it is divided.
The wooden tabletop is carefully degreased and cleaned with sandpaper. Acrylic is applied to the surface. A small section of the tabletop is greased with PVA and a napkin is quickly applied to it. If air gets under it, the bubbles must be quickly expelled by smoothing the napkin with your fingers.
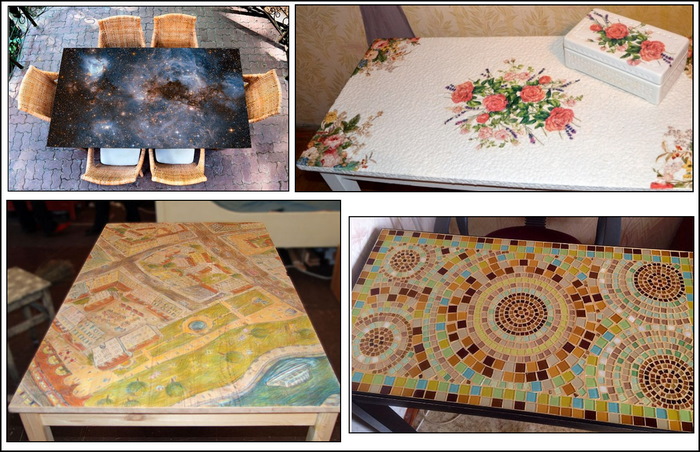
After the restoration is completed, the tabletop is left overnight in a dry, warm room. In the morning, a layer of furniture varnish can be applied to the surface.
Tabletops decorated with epoxy resin look unusual. You can create entire pictures, depicting rivers, seas, forests, flowers and animals on the table. First, remove the layer of old varnish from the wood, sand and degrease, and then use a plane to make indentations in the tabletop, imitating river beds, mountains or parts of plants.
The epoxy resin is diluted according to the instructions, adding dye if necessary. The solution is poured into the grooves on the tabletop and allowed to harden completely. At the final stage, the table is varnished.
Craquelure is a technique that allows you to artificially age furniture. Tabletops are covered with a two-step or one-step cracking varnish.
If there are no patterns on the table surface, then a one-step type is usually used. If there are patterns and ornaments on the table surface, it is better to use a two-step type. Cracks create a unique vintage effect.
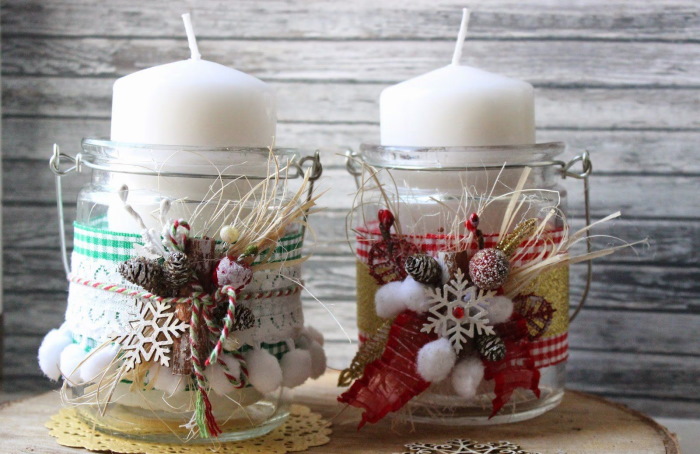
Candlesticks
You can create an unusual and elegant candlestick from:
- glass or tin jar;
- bottles;
- glasses;
- gypsum or alabaster;
- wood, tree bark;
- metal;
- salt dough.
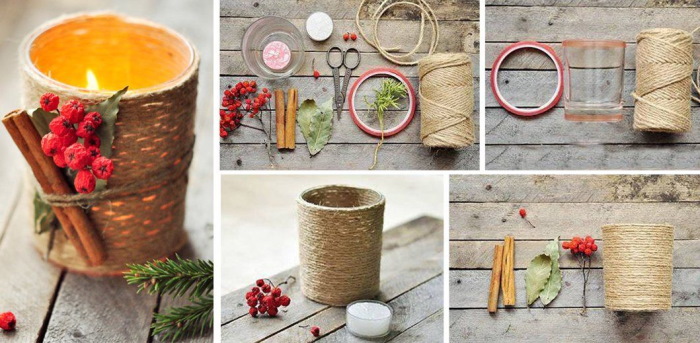
How to make a candle holder from a glass jar:
- Wash the container thoroughly, wipe and dry.
- Paint the glass on the front side with acrylic or decorate with glitter. Let the decor dry completely.
- Fill the jar with beads, coarse sea salt, sand or buttons. Place a candle in the center.
- To create a bright accent, you can place small shells or pine branches in the jar.
Plaster candlesticks will last a long time. You can buy a silicone mold for pouring in a specialized store. Plaster is easy to paint.
Materials required:
- decorative elements;
- silicone mold;
- tall plastic cup;
- water;
- alabaster.
The last two components are mixed until a homogeneous consistency is achieved in a plastic cup. The texture of the mixture should resemble thick sour cream. The solution is poured into a silicone mold, a small candle is placed on top and the future candlestick is allowed to harden completely.
The object is removed from the silicone mold quite easily, according to user reviews, no effort is required. The plaster candlestick can be decorated with glitter, rhinestones, beads or ribbons.
Crafts for the home can be made in your free time. It takes 20-30 minutes to create a useful and simple thing, for example, an organizer or a holder case.
If you are facing a difficult job of restoring old furniture, you need to buy protective equipment in advance: respirators or masks, thick gloves, glasses. The room where the items will be painted needs to be frequently ventilated.
Video about how to make beauty out of trash
Several ideas that will allow you to make interior items from trash.