If you have free time and skillful hands, it is quite easy to make crafts for the home with your own hands. They will bring coziness and individuality to the house. For this, it is not necessary to select expensive components, ordinary materials will do here.
In 5 minutes with your own hands
Skillful hands (DIY crafts for the home are popular among people of all ages) have the opportunity to bring to life the most unusual and at the same time practical projects from different materials.
Egg stand
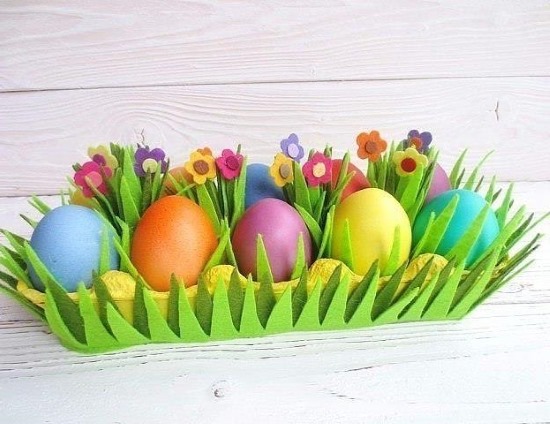
For Easter, you want to decorate your home, and in this case, it is recommended to make an egg stand.
Step-by-step production of the product:
- Make a ring from a paper cylinder to fit the size of the product, or you can buy a ready-made plastic tube.
- Paint or cover the round blank with colored paper.
- Cut out petals from paper material in delicate or bright shades and glue them to the top edge of the base.
- Finally, you need to insert the egg into the hole.
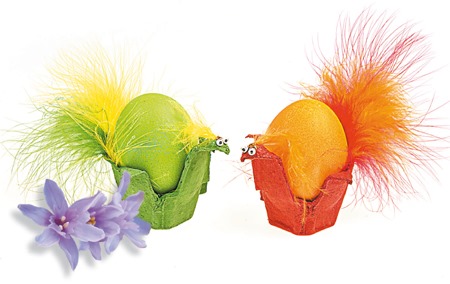
Decorating a decorative stand with feathers:
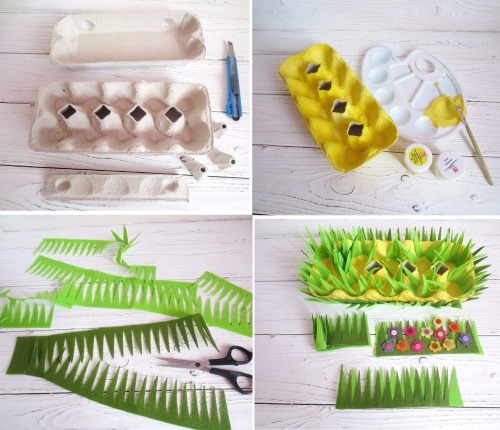
- On a cardboard egg tray, in one cell, you need to draw the outline of the future craft, while at the ends, depicting oblong petals.
- Cut out the workpiece along the contour.
- Paint the future product with any paint, both on the outside and on the inside.
- When the stand is dry, you should glue a colorful fluffy feather to one edge.
- Then you should imagine that it is a bird. To do this, you need to bend the wings and beak on the sides, and glue a small yellow triangle to the edge.
- Draw eyes with a black marker.
Alternatively, you can take a regular cardboard egg tray and spray paint it. The product can be cut into small pieces, 3 or 4 cells each.
New Year's garlands
Garland is considered the simplest way of New Year's decoration.
Several variations of its production:
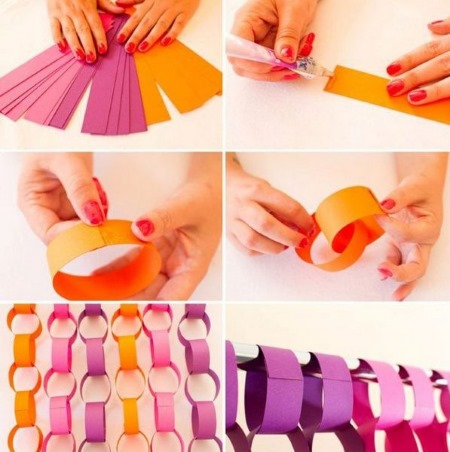
- Option #1:
- From colored paper, cut a large number of small strips, approximately 2x10 cm in size.
- Roll the first piece into a ring and secure with glue.
- Thread the 2nd thin strip through the previously made piece and glue it as well.
- Continue making the decoration in a similar manner until the desired length is reached.
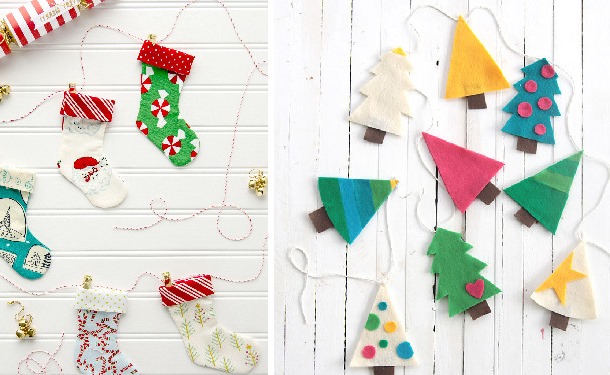
- Option #2:
- From suitable pieces of fabric you need to sew various miniature figures in the form of caps, boots, pants, mittens and a checkered bag.
- Take a clothesline and stretch it across the room.
- Use clothespins to secure Santa's festive attire.
- You can replace the sewn parts with your own bright socks or mittens, or cut out colored boots from felt or colored paper and hang them on a thread.
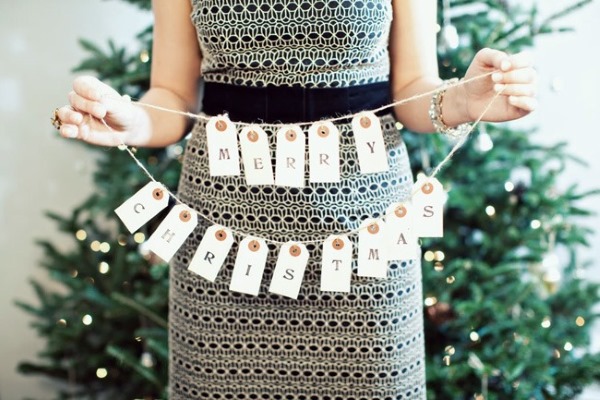
- Option #3:
- You need to cut out a large number of “tags” from cardboard or thick paper.
- Each blank needs to be decorated differently. For example, draw a New Year's image, write a good wish or the names of loved ones, glue your favorite photos or a snowflake, cut out a huge heart.
- Make small holes in the upper part of the “tags”.
- String the pieces onto a cord or decorative ribbon.
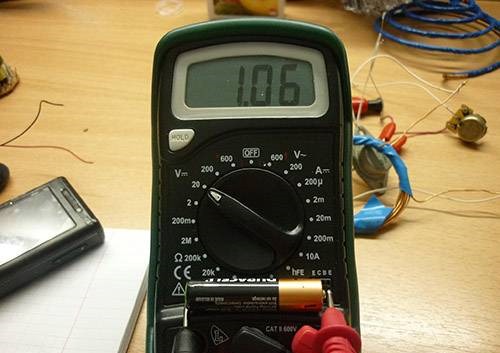
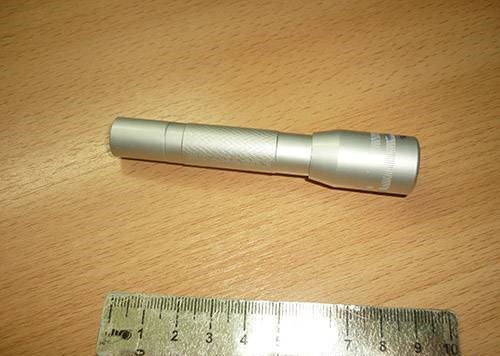
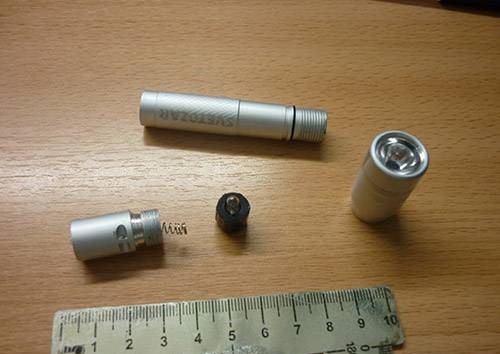
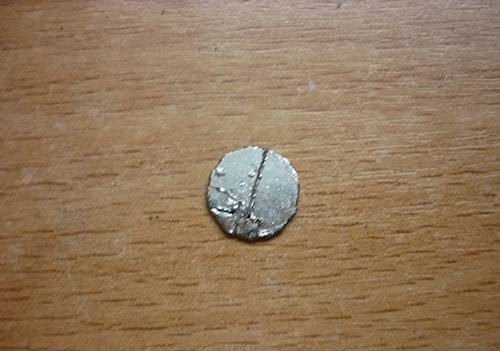
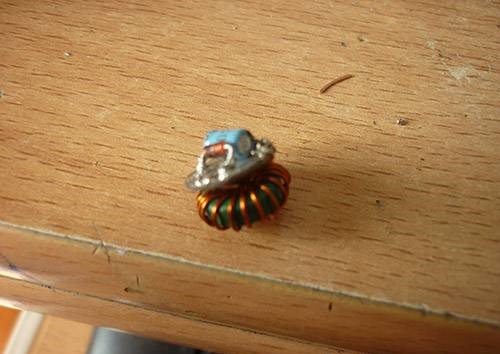
LED Flashlight
Skilled hands (both adults and children can make DIY crafts for the home) can easily make an LED flashlight that consumes less energy than a ready-made model.
During the work you will need the following items:
| Name | Quantity, pcs. |
| non-working lamp | 1 |
| LED lamps | several pieces |
| resistors | |
| silicone based sealant or adhesive | by 1 |
| a plate of any durable material | |
| reflector |
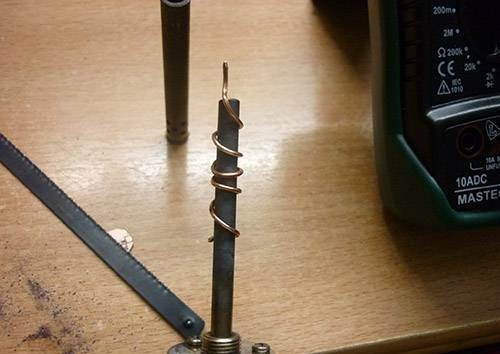
Step-by-step technology for making a lighting fixture:
- First, you need to draw up a connection diagram for the LEDs and resistors. It is easy for an experienced specialist to do this, and information on Internet resources will help novice craftsmen. Here you need to specifically determine the current and voltage, as well as the number of bulbs.
- Then you need to make a plate for the holder. It is advisable to draw a diagram of it on a sheet of paper first, where all the holes for the LEDs are shown. After that, cut out the template and stick it on the plate. Use a drill to make recesses in the designated places.
- The next step involves pulling the semiconductors through the holes, and finally fixing the bulbs with glue. It is important to ensure that the anodes and cathodes are in the correct order.
- Apply another layer of adhesive, then solder the resistors and LEDs with a soldering iron.
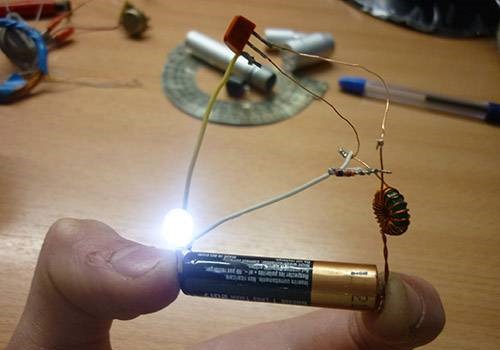
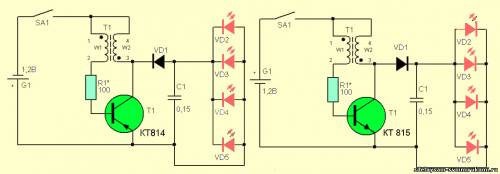
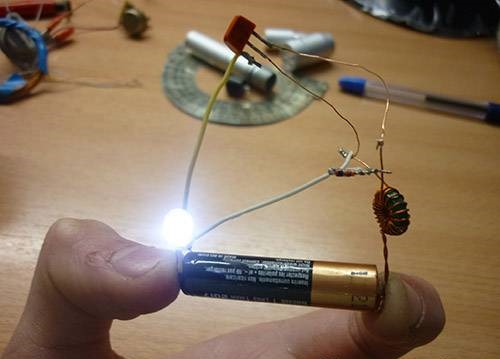
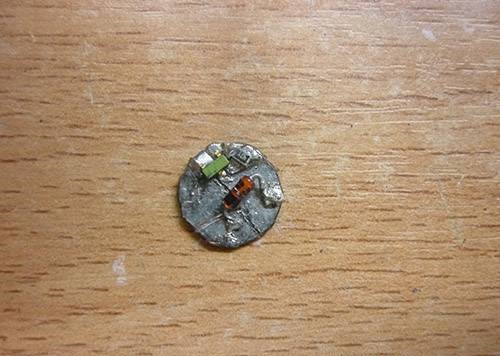
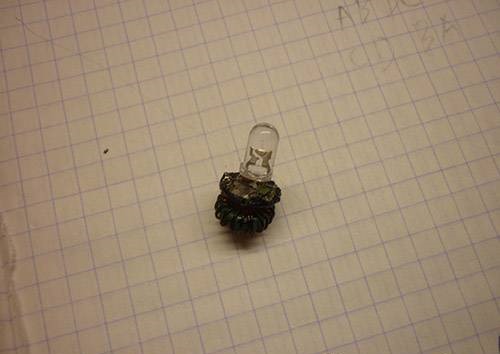
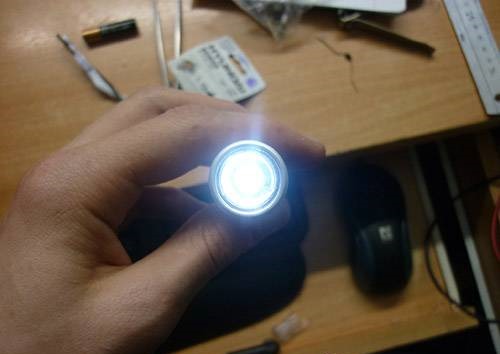
- Next, the contacts will be filled with paraffin or wax.
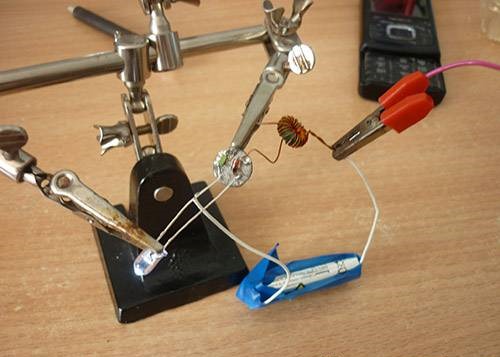
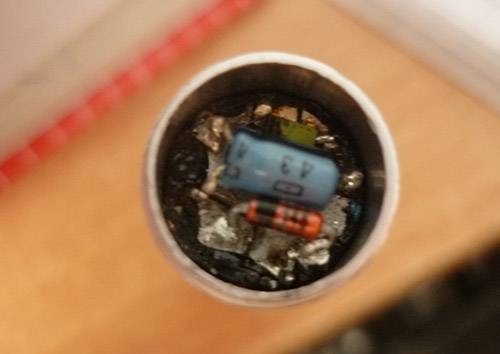
- The reflector increases the power of the flashlight. It is necessary to pull out the halogen lamp and clean it from resin. To assemble the structure, each contact should be tightly fixed.
- Finally, you will need molten plastic for pouring.
- After the plastic mass has hardened, it is advisable to cut off unnecessary leads.
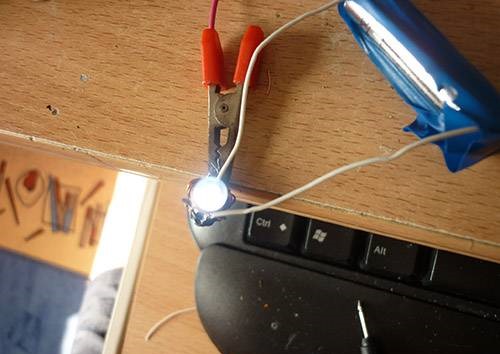
- Connect the finished device to the power supply, and if after a few minutes there is no short circuit, then you can safely use the flashlight.
Security alarm
For the most basic alarm system, it will be enough to install penetration sensors on windows and doors (a magnet and a regular reed switch will do) and connect them to the circuit of the device for sending signals. Here the magnet is placed on the moving part of the door, and the reed switch, on the contrary, on the fixed part, so that it is closed when closed.

Another option for installing an alarm system is to make it from a household light sensor, which is often installed in entryways to save electricity. Here, the light bulb is replaced with a siren.
It is advisable to buy a motion sensor with 2 types of adjustments:
- time setting;
- sensitivity.
The first program will help you set the alarm processing period (its sounding time), the other adjustment changes the sensitivity of the device in case of its failure to respond.
Here you will also need a switch to turn off the device when a person is in its field of vision. It is recommended to install the switch in a hidden place. In addition to the siren, it is advisable to connect a simple light bulb for increased impact on the intruder.
Storage container
Skillful hands (DIY crafts for the home) make quality and beautiful things.
Every household can use storage boxes, and if you make them yourself, it will be beneficial both financially and from an aesthetic point of view.
The easiest way to decorate a container is to cover any cardboard container with a lid with leftover wallpaper, colored paper or self-adhesive film.
Step-by-step method for making a box with handles:
- Take a large cardboard box and make holes in it so that you can easily grab it with your hands.
- Cut off the top of the box and tape the corners.
- Cut the fabric to the size of the box. The piece will look like a square, with fabric fragments pointing in all 4 directions. Their dimensions should match the walls of the base. A similar piece should be cut out for the outer and inner parts of the packaging.
- Coat the box with glue on the outside and inside, then glue the prepared pieces.
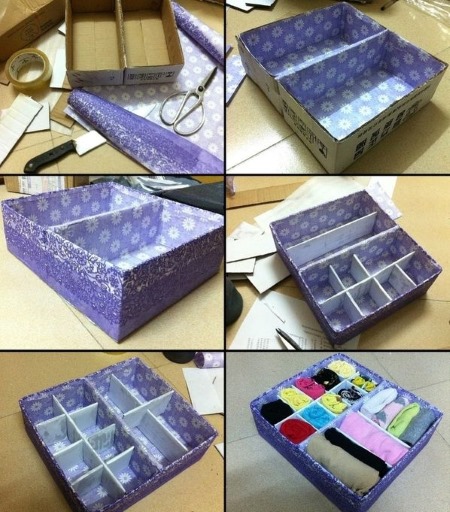
- Wait until the glue dries and connect the top edges of the fabric pieces using thread and a needle.
- Cut the fabric in places for the handles.
Wire shoe dryer
It is easy to make a shoe dryer with your own hands from ordinary water heaters.
Step-by-step implementation of the design:
- Bend both heaters in different directions so that they resemble the shape of a shoe.
- Then you need to connect the wire of one device to the cord of another device using an adapter.
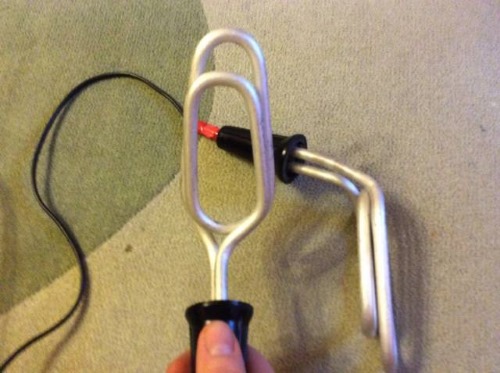
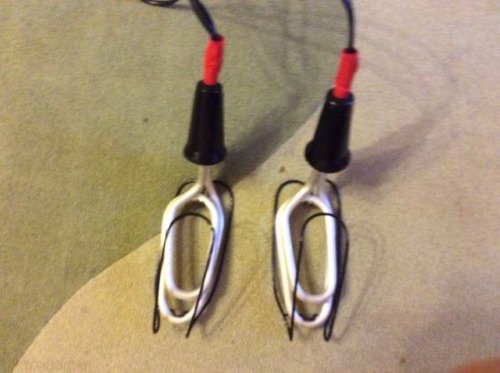
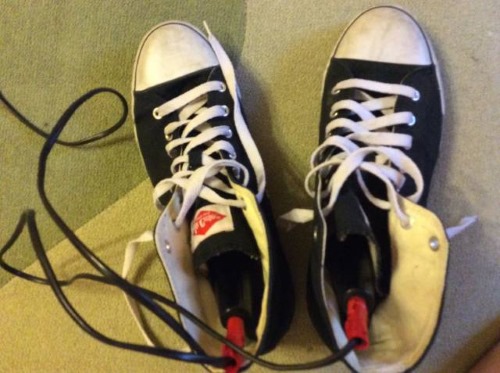
- Isolate all exposed areas.
- Finally, the wire should be used to make nozzles. This process involves bending the coil so that no part of the heater comes into contact with the shoe.
Toilet paper holder
Toilet paper holders can be made from a wide variety of materials.

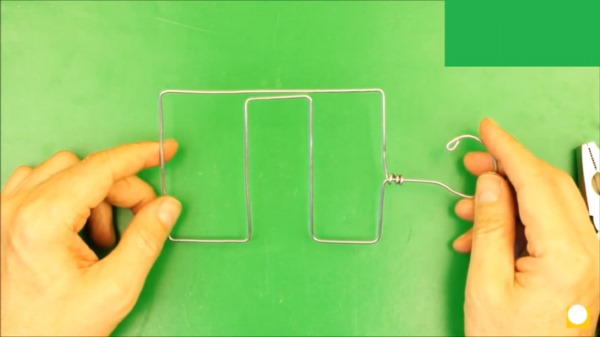
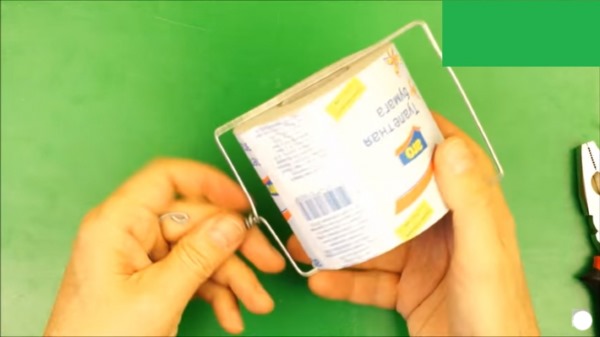
- Option #1:
- You will need 1 m of steel wire (2 mm).
- Bend the workpiece using pliers according to the previously drawn size of the paper roll.
- Cut off the excess wire and you can hang the coil.
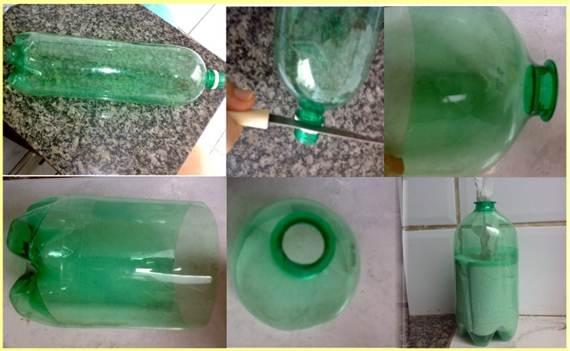
- Option #2:
- Take a 5-liter plastic bottle and cut off the top.
- Make 2 holes on both sides of the container, approximately in the middle of the bottle.
- Insert a thin, strong stick into these holes, while simultaneously threading a roll of toilet paper onto it.
- Fix the handle of the structure to the wall using a nail.
Crafts from plastic bottles
Many beautiful and original crafts are made from plastic bottles.
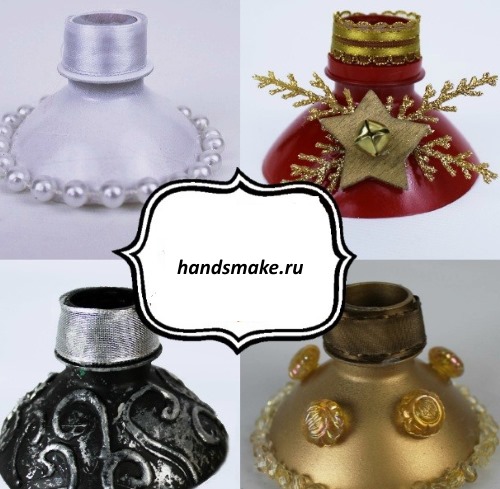
For example, a candlestick requires the following manufacturing technology:
- Take a 0.5 l bottle and mark a line with a marker at a distance of 3 cm from the neck, then cut along the marked line.
- Decorate the resulting blank as desired. It can be painted with patterns or decorated with beads.
- The neck should be wrapped with a wide decorative ribbon.
- The widened part will stand on the surface, and a candle should be inserted into the narrow hole.
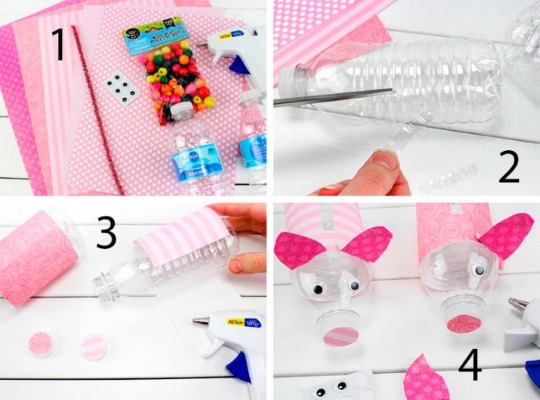
Step-by-step method for creating a piggy bank:
- Cut off the middle part of a 2-liter bottle.
- Glue the remaining 2 parts of the plastic container together.
- Make a hole for coins.
- Cut out ears from thick cardboard and secure them with glue.
- Paint the craft pink and let it dry.
- Draw eyes and a snout with a marker.

Step-by-step method for decorating a pencil case:
- On a 0.5 l bottle, make a mark with a marker at a distance of 4 cm from the neck.
- Cut the container along the markings.
- On the second bottle of the same volume, mark 4 cm from the bottom with a marker, then cut along the marked line.
- Take a zipper and cover it with hot glue, then glue one side to the inside of one piece and the other end of the zipper to the other piece.
- Dry the product and you can use it.
From glass jars
Using glass jars, you can make original and beautiful crafts for your home.
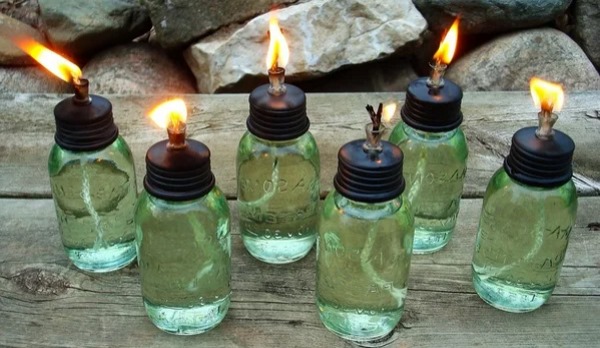
Method of making an oil lamp:
- Take a small glass container and fill it 2/3 full with kerosene, then close the lid.
- Place the rope in the oily liquid and leave it for 1 hour to soak.
- Make a hole in the lid and pull the soaked rope through it.
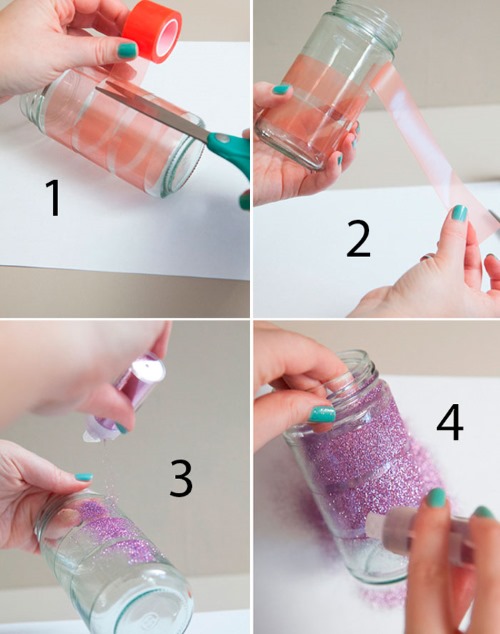
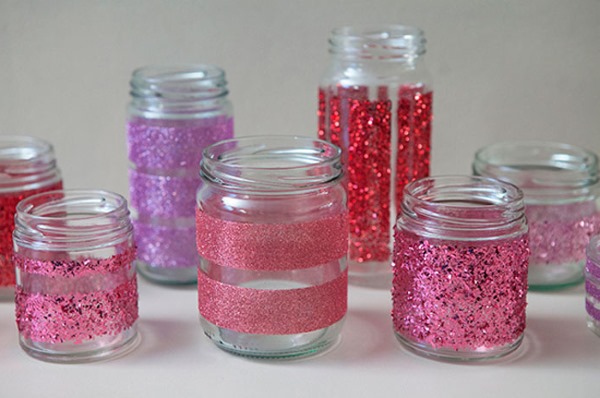
How to decorate a shiny vase:
- Cover the jar with strips of tape in the desired direction (horizontally, diagonally or vertically)
- Remove the adhesive tape.
- Sprinkle glitter on the container, it will stick to the sticky surface.
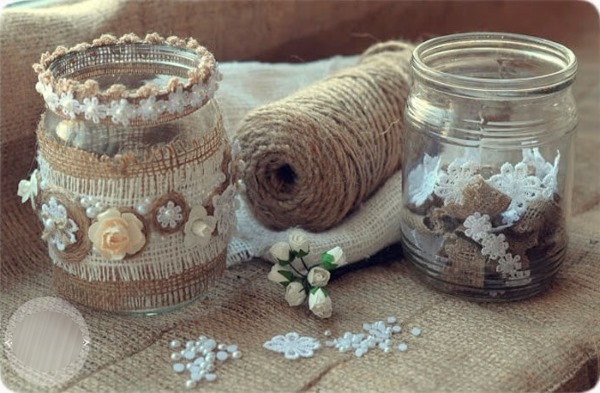
Vintage style vase decoration:
- Cut a rectangular piece of light brown burlap and glue it to the glass container.
- Cut a strip of white burlap and glue it to the jar.
- Form inflorescences from the twine. To do this, take the edge of the twine and gradually twist it. Then fix the flower with glue. In a similar way, make several blanks of different sizes.
- Attach the blanks to the container using glue.
- It is recommended to decorate the vase with lace and beads.
From CDs
Skilled hands can make DIY crafts for the home from the most unusual materials, for example from CDs.

Step-by-step production of a napkin holder:
- Take 2 disks and cut off 25% of each along a straight line.
- Another whole plate will serve as the basis for the craft.
- Use a glue gun to secure 2 cut pieces to 2 sides of the base as holders.
- Wait until the stand dries.
- Decorate the product to your taste.
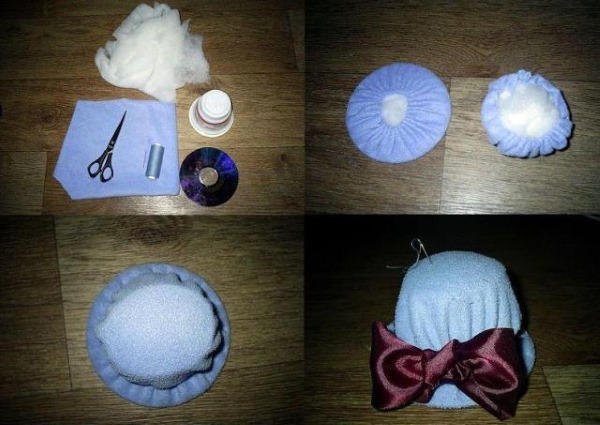
Technology of making a pincushion from disks:
- Cut a circle out of the fabric that is 1.5 times larger than the plate.
- Baste the circle along the edge, leaving a small section unsewn.
- Turn the material inside out and fill it with synthetic padding.
- Insert the disk inside and tighten the part slightly.
- Cut off the bottom of a plastic cup (from under dairy products), and cut out a blank from fabric so that it completely covers the mug.
- Fill the plastic container with synthetic padding.
- Connect the created parts together to form a hat.
- Decorate the craft with a ribbon, making a bow.
Scratching post with a house for cats
You can build a house for your pet yourself, along with a scratching post.
Manufacturing process of the product:
- Initially, you need to sketch out the configuration of the future building on paper.
- To make it you will need an OSB sheet (12 mm thick) and 1 linear meter of carpet.
- Cut the wood board according to the dimensions shown in the drawing.
- The next stage involves assembling the house using corners and screws.
- The penthouse can have 1 or 2 levels.
- After the floors have been formed, it is necessary to cut out the entrances.
- From the remaining paper rolls from under the carpet, you need to make a scratching post, fixing it inside with a wooden plate, and attach it to the base of the house.
- Then the craft should be covered with carpet and secured with a construction stapler.
- Finally, wrap the scratching post tightly with thick rope.
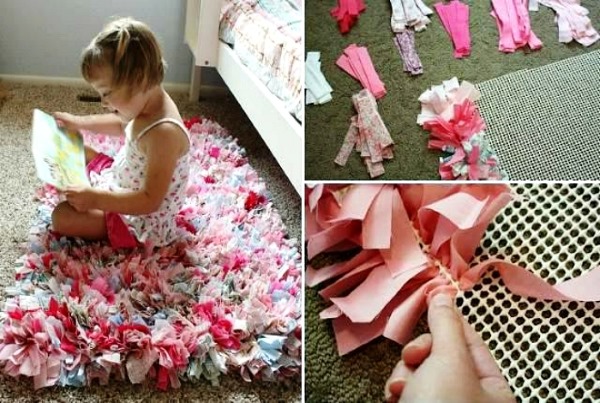
Rugs made from scraps of fabric
With your own hands, for your home, with the help of skillful hands, you can easily create various fabric crafts, for example, a rug.
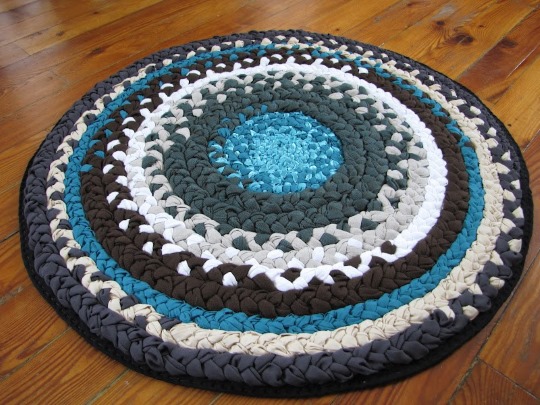
Technique for making a rug from fabric scraps:
- Cut off the bottom seams of old T-shirts.
- Cut the knitwear into long narrow strips or cut the T-shirt to form 1 continuous piece.
- To make a rectangular rug, you need to knit with regular sc and a large hook.
- To make a round craft, you should make a chain of 5 ch, close them into a ring and add loops in each subsequent row.
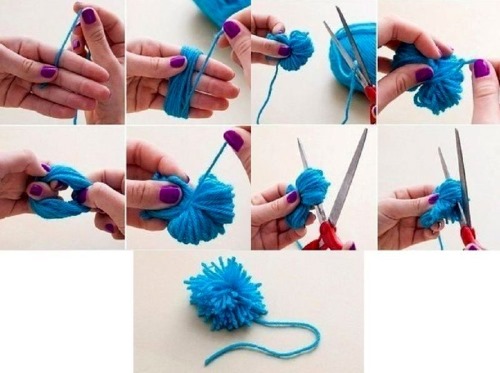
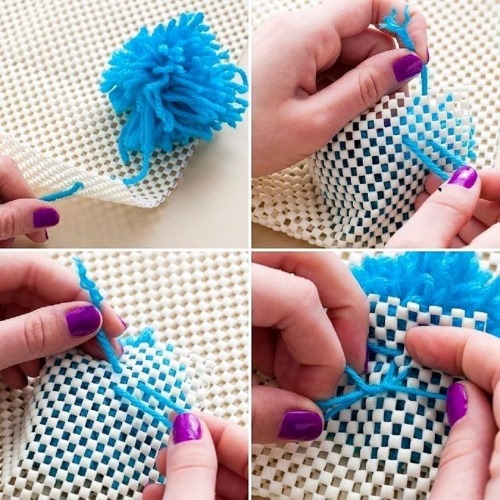
The process of making a soft pom pom rug:
- Cut small squares of the same size from the knitted fabric.
- Form balls from foam rubber or synthetic padding.
- Place stuffing into fabric pieces to form pom-poms.
- Place the resulting blanks tightly on a fabric base and then sew them on.
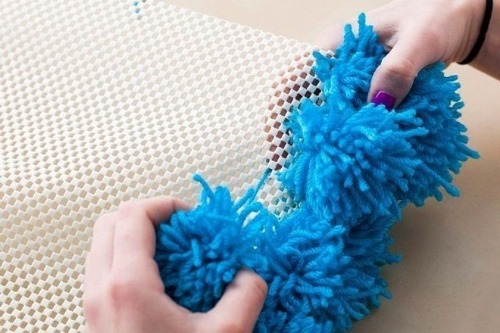
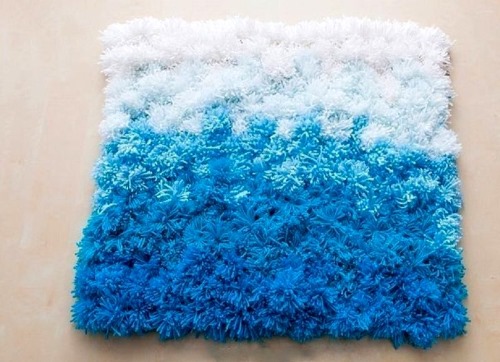
Making a grass mat:
- Cut the knitted or cotton fabric into strips.
- Take a rigid mesh with large cells as a basis.
- To weave, place the fabric blank under the mesh, then pull both ends of the tape up, pull it a little and tie a tight knot on the wall of the cell.
- Fill all the recesses using the same method.
Craft ideas for kids
Making crafts with children will bring the family closer together and help develop the child’s creative abilities.
Options for the fastest and easiest products:
- Painting multi-colored sea pebbles with acrylic paints.
- Filling a clear glass bottle with colored sand.
- A panel in the form of an applique of leaves or outlines of pears and apples.
- Wind a thread soaked in glue onto a balloon, then pierce the balloon and glue a nose, mouth and eyes onto the resulting configuration.
- Cut out butterfly wings from colored paper and secure them with a bright clothespin.
- Paint plastic plates with gouache in the shape of fish, glue on fins and a tail.
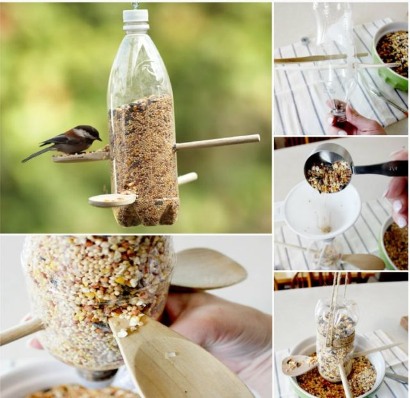
- Fill a plastic bottle with grain, puncture it in several places and insert a spoon. Birdseed will gradually pour out of the holes onto the cutlery.
- Cut out bookmarks from felt, decorate them as desired, make a hole in the top and insert a thread into it.
- For the Christmas tree, you should make a paper base in the shape of a cone, paint the wine corks in green shades and glue them perpendicularly on top of the paper.
- Button appliques.
- Form a hedgehog figure from plasticine and stud it with sunflower seeds. Attach a dark nose and eyes.
To make your home stylish and cozy, you will need skillful hands. Even people who do not have much experience in handicrafts will be able to create crafts with their own hands from the simplest and unnecessary things. This will require perseverance and a little free time.
Article formatting:Natalie Podolskaya
Video about making crafts
DIY crafts for the home or skillful hands for all occasions: