Those who want to quickly draw a beautiful pig encounter difficulties at the initial stages. To avoid this, you should understand basics of construction easy cartoon characters. Then the finished drawing of a pig will be a reason for joy for children, and for pride for parents.
Before drawing
The first thing that can prevent you from drawing a pig is the psychological factor. Children think that these animals are aggressive, dirty and unfriendly. This obstacle can be overcome by explaining to the child that he or she will be drawing a decorative pet or a cartoon character.
Before explaining the drawing process, an algorithm of work that is understandable to the child is determined.
Each action must be accompanied by a visual example. Only then will the child be able to independently repeat or perform the task properly.
Before the lesson begins, you should make sure that the child understands well what simple geometric figures (circle, oval, etc.) look like. After all, they will be used to construct the image.
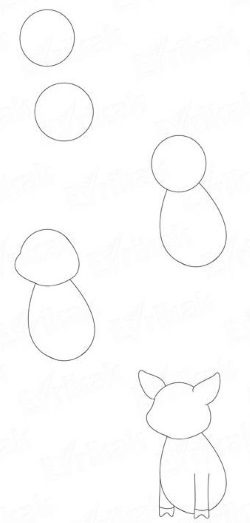
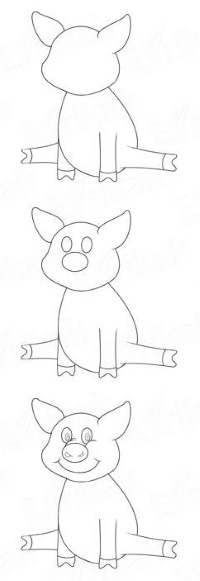
How to draw a pig with a pencil step by step
It is easier to draw a pig for children by following the step-by-step drawing of the following details:
| Detail | Execution |
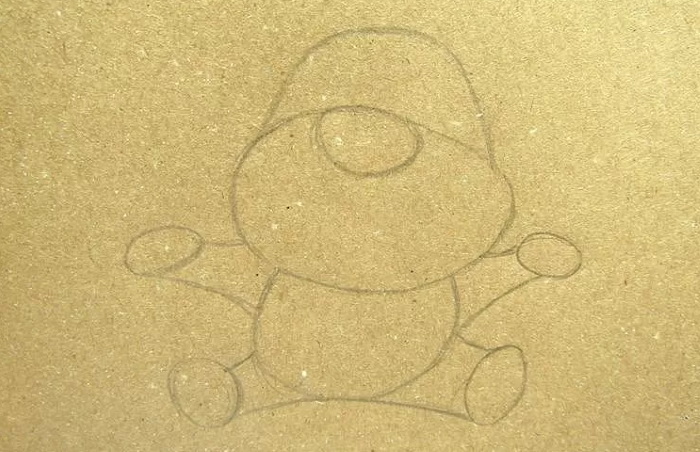
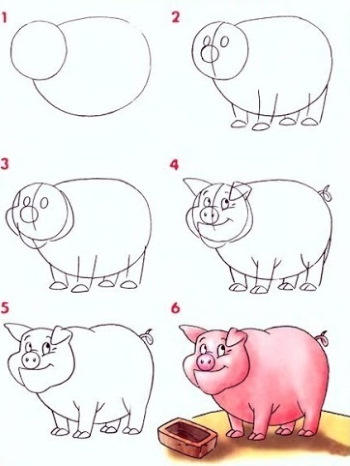
| Form | For this, geometric figures are used (in this case, 5 circles). In their place will be the head, neck, ears, body and legs. The largest circle is the body – about 50% of the entire drawing. It should be depicted slightly to the right of the center. Further to the right, overlapping by approximately 30%, the second circle is drawn - in its place the back leg will be depicted. The 3rd circle - also overlapping the largest one, but on the left, and it will be 2 times smaller than the one depicted for the back leg. The 4th is the main one, since the head will be drawn in its place. This circle is depicted on the left, close to the third circle, and its dimensions are equal to the one in the place of which the leg will be drawn. Inside the circle for the head, the 5th is designated - for the ears. |
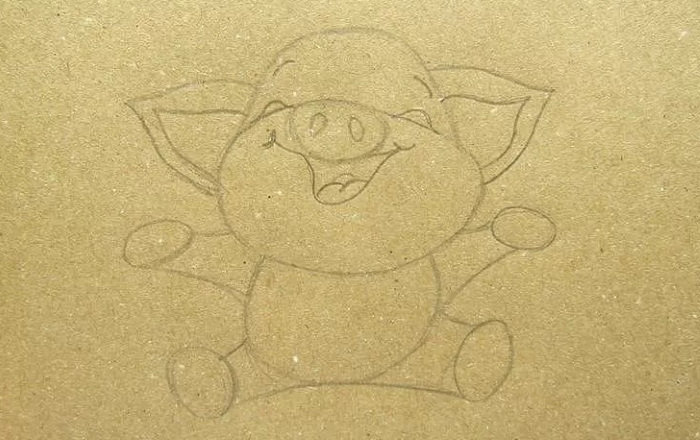
| Head | Animals and birds are drawn starting from this part of the body. From the center of the 4th circle, a line is drawn diagonally to the left edge of the sheet - this will be the upper part of the nose. The 2nd line is drawn so that the shape of the nose resembles a trapezoid.
Between the ends of these lines, draw a snout with a nostril. Then draw the mouth. In the center of the diagonal from the ear to the nose, draw an eye. In the 5th circle, draw a pointed ear with an ear canal. The final stage of drawing the pig's head is drawing smooth lines from the 4th to the 3rd circle - this is where the neck is located. |
| Body | To do this, draw soft, smooth lines along the tangent of the 1st, 2nd and 3rd circles. The body of the correct shape should be formed. |
| Legs | In parallel with drawing the body, the area for the legs is outlined (2nd and 3rd circle). It is important to understand that the main difference between the hind legs and the front ones is both in thickness and in the knee joint (it is bent outward).
The shape of the legs is rectangular, slightly concave in the middle. The length is approximately equal to the height of the body. The end of this stage is drawing the hooves. They are two-toed and trapezoidal. |
| Tail | Tail. It should be depicted as straight or hooked, but necessarily with a tassel at the end. |
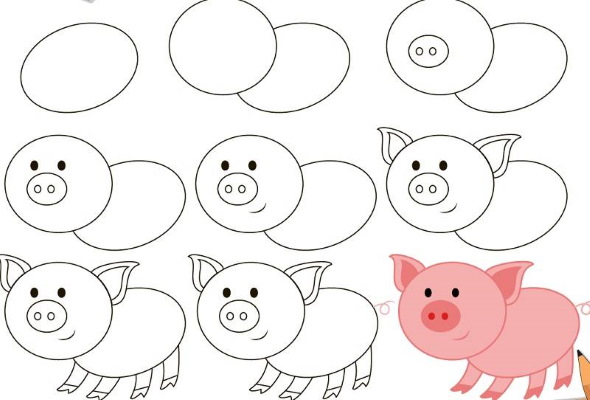
After this, all the circles are erased and strokes are added to draw the fur.
Kawaii pig
Drawing a pig, according to the previous algorithm of actions, gives a good understanding of the animal's anatomy. For children, drawing a kawaii pig will be an easy task.
Materials needed for work:
- pencil;
- album sheet;
- eraser.
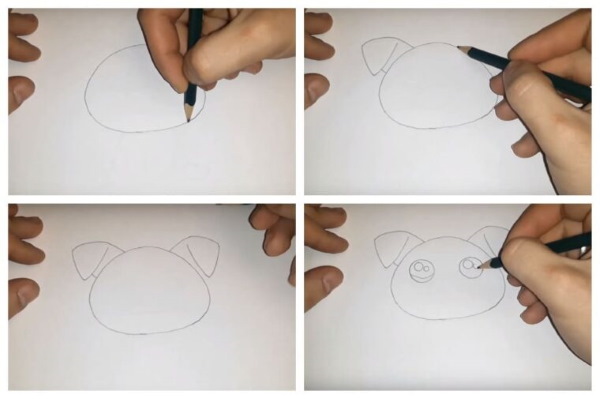
Next steps:
- You need to take an A4 sheet, draw a circle in the center. Stepping back a little from the top edge of the geometric figure, draw an ear. Draw the 2nd in the same way. This is the head.
- Draw 2 round eyes in the middle of the circle. Then you will need to carefully bend the upper part of each eye and the lower area. In the upper part, draw 2 small circles very close to each other. In the lower part, separated by an arc, draw even vertical lines.
- Just below the eyes, you need to draw an oval with a slightly flattened bottom, and in the middle of the figure, draw 2 circles, and the snout is ready. Then add a smiling mouth a little to the side, draw thin eyebrows above the eyes, and a chin at the bottom of the head.
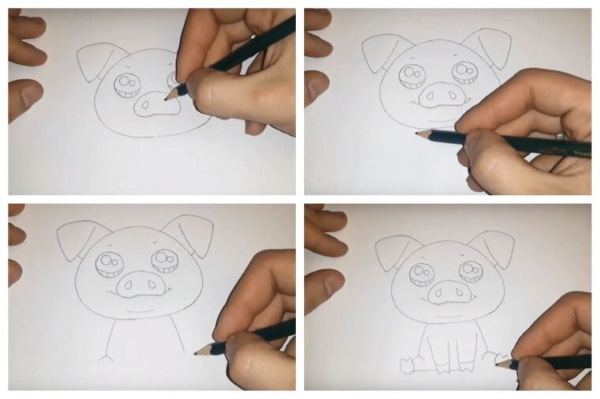
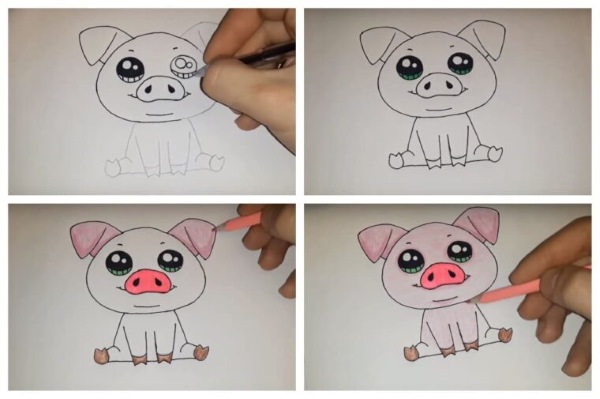
- Next – the body. First, you need to draw arched vertical lines from the head, then connect them at the bottom with a semicircle. The front limbs should be drawn on the side of the body, almost from the head itself. At the bottom, add the back legs, on each of which highlight the hooves. The pencil drawing is ready.
- Next, use a black gel pen to outline the drawing and all the separate parts. Completely paint the eyes, excluding the small circles and the lower separated part, and “blacken” the nostrils of the snout.
- Afterwards, take a gel pen with green ink and color the shaded bottom of the eyes. For the snout, use a pink pen.
- Now take some colored pencils. Color the hooves with brown and the remaining uncolored parts with pink. Even a toddler can handle such a simple drawing.
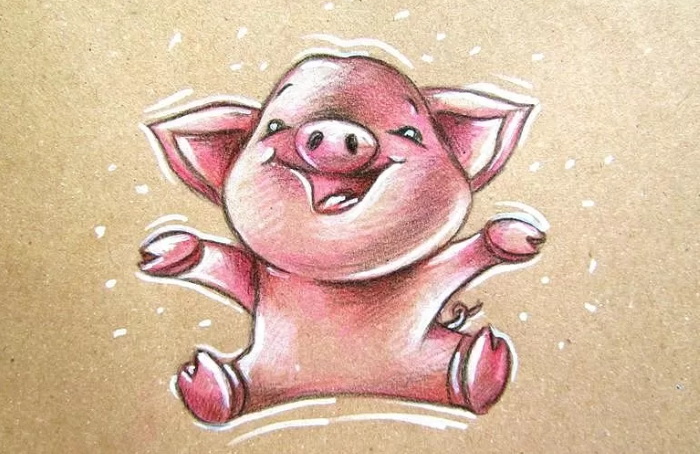
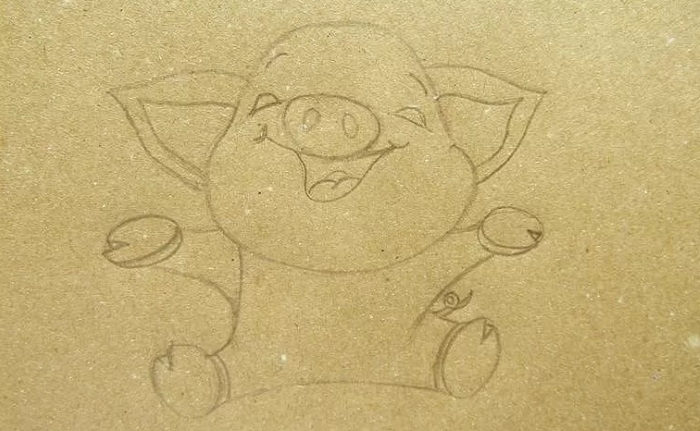
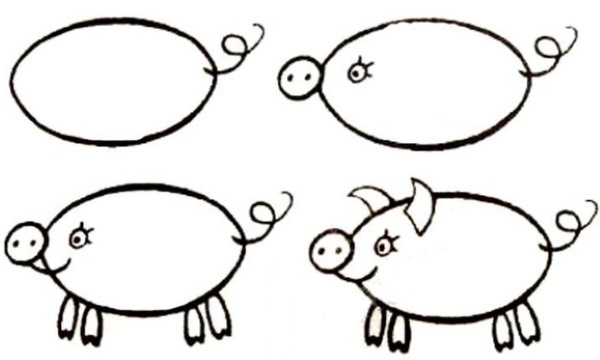
How to draw a pig on craft paper. Step by step instructions
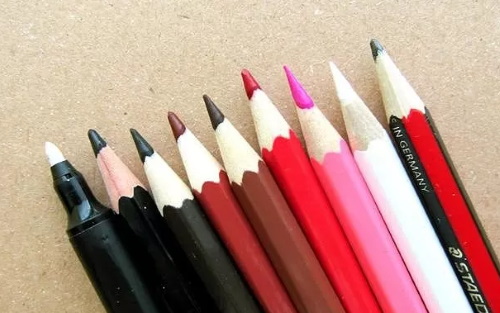
First, you need to prepare the necessary pencils and kraft paper - a highly durable paper made from weakly cooked long-fiber sulfate cellulose, widely used as a wrapper for various objects, products, and sometimes in professional painting.
The process of drawing a pig in cartoon style looks like this:
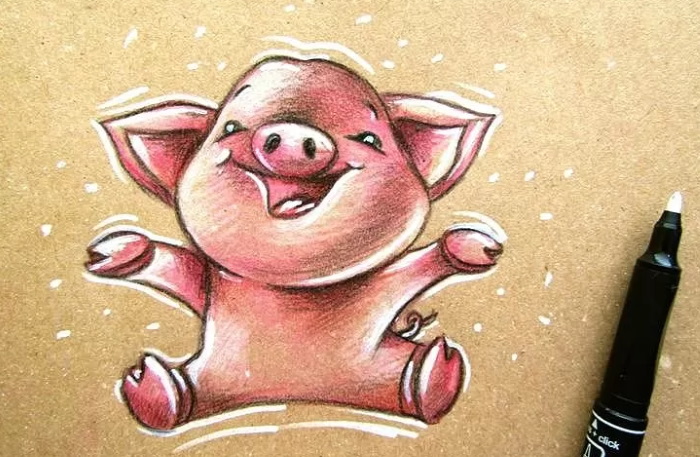
Funny pig
The drawing of a pig for children is the result of a fun process of their work.

And the depicted animal will turn out to be appropriate if you follow these steps:
- You can start drawing a playful facial expression without drawing circles. To do this, first draw a slightly turned to the right raised snout with nostrils, and on the sides above it - eyes in the shape of a half-sun with an upward arc. The pupils look straight. Then add the outlines of the head, cheeks, a sly smile and drooping ears.
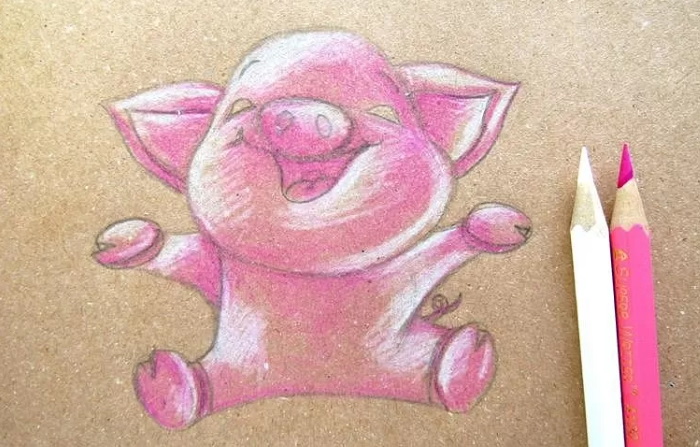
- Then the oval body, short, plump legs, two-toed hooves and a hooked tail are added.
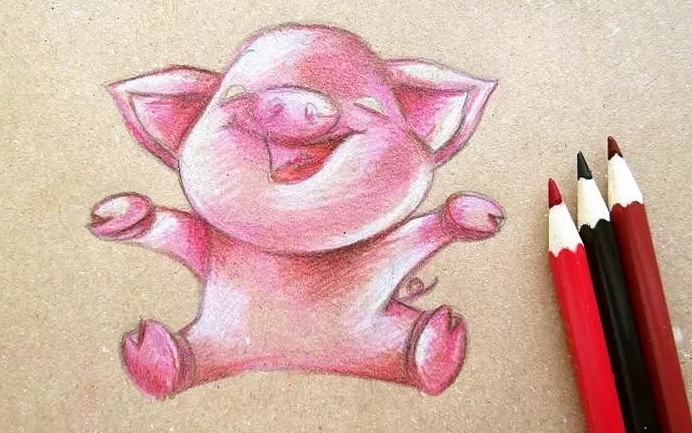
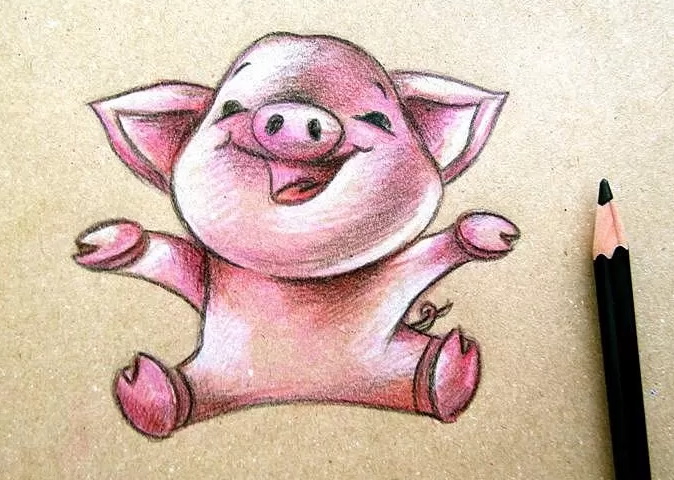
- The funny piglet does not have to be realistic, so bright pink is chosen as the main color. To get a distinct snout, it can be painted in 2 layers, and the body and tail - in 1. For the pupils and nostrils - use black, for the hooves - brown. When drawing on the latter, you need to make highlights in the form of white straight lines.
The drawing is complete.
Cartoon pig
In nature, this animal seems dirty and clumsy at the same time. That's why the cartoon pig and its actions make the child laugh.
Drawing a pig for children develops their imagination no less than cartoons.
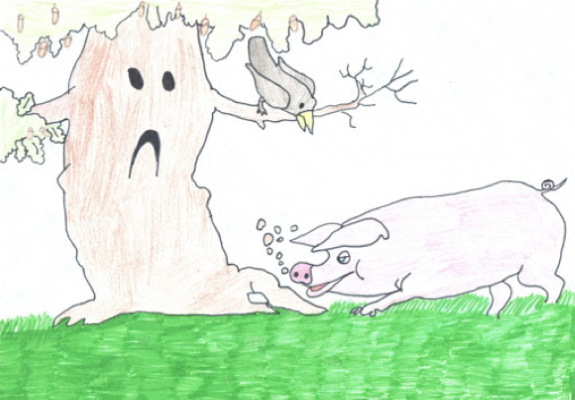
The best idea in this case would be to depict a happy cartoon character under an oak tree:
- Pig. First, all parts of the body are drawn in circles according to the rules of construction. Then smooth connecting lines and pointed ones are drawn, imitating wool. The body should be slightly tilted, because the pig digs acorns under the oak. After that, all unnecessary lines and circles are erased. The final stage is coloring. The snout will be bright pink, the animal is already a light shade. On the body, dirty areas are marked in gray.
- Nature. Bright green grass covers the hooves. In the background, a bright blue sky and distant objects are drawn in blurred shapes.
- Oak. It will be spreading with green foliage and a dissatisfied face, since the pig, digging with its snout, damages the roots of the tree.
- A crow sits on an oak branch and caws at the animal, trying to drive it away.
- Shadows. They are depicted from the pig and the oak in one direction.
The cartoon scene is ready.
Funny little pig
Some children's drawings can be used as exhibition drawings. But then the child must be able to build a composition. And if the previous method seems a little complicated, then depicting a cheerful pig-cook is much easier.
Drawing of a pig for children will help:
- develop an eye;
- understand and correctly depict the proportions of an animal on a sheet of paper;
- study the techniques of creating color harmony.
What you will need:
- thick A4 paper (Whatman paper or watercolor paper);
- a simple pencil marked M, 2M or B, 2B;
- eraser for erasing search lines;
- paints;
- palette;
- brushes.
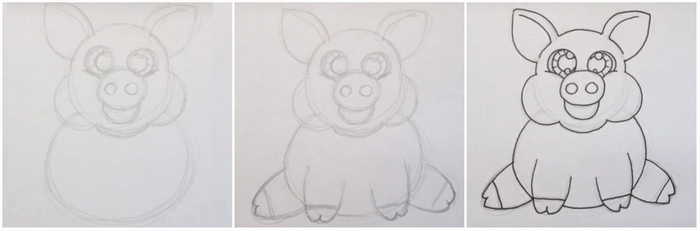
Actions with a pencil
 The initial stage is the formation of a sketch. For children of younger and older preschool age, it can be simplified by offering to color the finished drawing.
For work you will need: a sheet of paper, soft pencils, an eraser to remove search lines.
At the beginning of the work, you should decide on the position of the drawing on the sheet of paper; to do this, you need to divide it conditionally in half.
At the top, outline the piglet’s head, depicting it using a large circle, approximately half the size of the sheet.
It is important that all the markings are done with a simple pencil without pressing hard. "Indented" lines are difficult to erase. On the right and left sides of the circle, draw 2 large, pointed ears.
Stage 2 – drawing the muzzle. It is marked by dividing the circle (the piglet’s head) in half. Below the dividing line there will be a snout – an oval, slightly flattened at the top. Above the line are the eyes. They should also be presented as an oval, but elongated upwards.
Next, the child continues to add expressiveness. On the snout, draw nostrils (small circles in an oval), and above the eyes - eyebrows (arches). Adds highlights inside the oval using small circles. Works on the pig's eyes and the direction of the gaze. Under the snout, draw an arc of the mouth. If you place it slightly to the side of the nose, you will get a funny muzzle.
 The child imagines a chef's hat above the pig's head. To depict it, he draws a cloud above the circle and draws 2 lines from it to the figure. This is how the chef's hat turned out.
Next, you need to dress the pig in an apron. The child draws a vertical rectangle with two stripes-“straps”.
Decorate the apron depending on the intended gender of the pig. For a girl, decorate with ruffles or flounces, for a boy - with various pockets and buttons.
Then he draws the legs and arms behind his back. To make the drawing more expressive, he adds a spoon or ladle behind the piglet, as if he were holding them in his hands.
Completes the composition by depicting the kitchen tiles with squares and rectangles up to about the middle of the sheet. At the end of the work, remove all additional and marking lines.
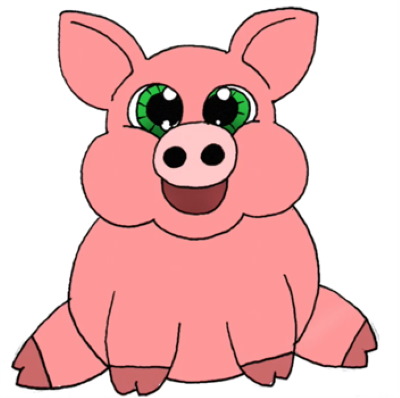
Working in color
It looks like this:
- To obtain pink, white and red colors are mixed in the palette. The intensity of pink depends on their ratio. The child selects the necessary tone through experience.
- When he is satisfied with the pink color, he paints the piglet without touching the eye area. After that, he adds a little red. With the resulting rich pink color, he highlights the snout, cheeks and mouth.
- Chooses a color for the background, which is the tiled floor. A contrasting "cold" color diluted with white will look best. For example, purple. The child first mixes a pale color on the palette and paints the tiles with it.
- Then, just like with pink, add brightness and work on the diamonds and squares. Paint the top of the sheet with any other contrasting pale color, paying attention to the fact that the pink pig still remains the center of attention. For example, light green.
After the pink gouache has dried, he begins adding details to the drawing. - Then he returns to the purple color - this will be the basis for the cap and apron. Having diluted the purple with white and having obtained a not too saturated color, the child shades the details of the chef's uniform and the spoon behind his back.
- Then, using black color, very carefully draws small details - buttons and pockets located on the apron. Also, adds eyelashes on the upper eyelids, hooves and marks the mouth line.
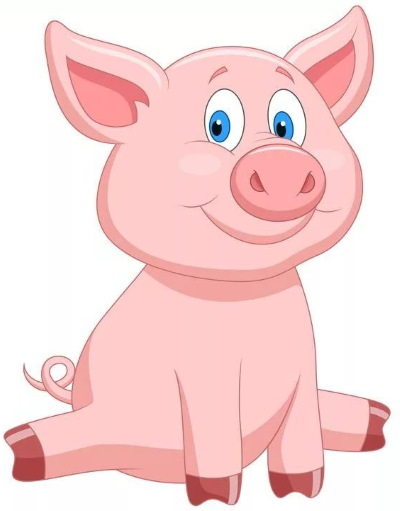
Little pig
Drawing a pig for children can be the easiest task if they master this technique:
- in the middle of the sheet draw a chicken egg lying on its side;
- closer to its wide side, draw a parallel arc, indicating the central area of the muzzle;
- along the egg, slightly above the center, draw a downwards concave arc;
- from the lower central and side parts draw flared legs;
- next to it they will add a second pair of legs and on all four they will depict arcs, concave upwards – these will be hooves;
- on the narrow side of the egg, draw a hooked tail, and on the wide side, ears and a muzzle;
- erase the extra lines and color it pink.
Funny pig
What you will need:
- album sheet;
- simple pencil;
- rubber band;
- compass;
- colored pencils.
Stages of drawing:
- Head. For this, a small circle is drawn at the top of the sheet.
- Torso. On the right side of the sheet, draw a circle twice as big as the one intended for the head. You can use a compass.
- Connecting the head to the body. It is necessary to connect 2 circles with an arched line from the bottom. The same line is drawn on the right so that the lower circle is in the middle of the drawn lines.
- Correction. The circle drawn for the future body should be carefully erased with an eraser so that the final image of the body is obtained.
- Outline of the head. The upper circle needs to be adjusted so that the head is not round, but larger towards the bottom (cheeky).
- Ears. Draw 2 ears on the head, slightly curved triangles. The left one sticks out a little to the side.
- Forelegs. Draw 2 legs approximately from the center: the 1st is drawn using 2 parallel vertical lines, the 2nd is located behind the 1st and a little lower. On each leg, draw hooves separated by a horizontal line.
- Hind legs. This pair is located close to each other, drawn from below. Just like on the front legs, hooves should be drawn.
- Place the patch in the middle of the head, giving it an oval shape.
- Draw the eyes as vertical ovals. The pig's eyes are above the snout, located not far from each other.
- Muzzle. You also need to draw pupils, cheeks, a smile and nostrils in the snout.
- Ear details. On the inside, you need to draw triangles, but their ends should not be sharp.
- Draw the tail in the form of a curl.
- The piglet needs to be painted pink and its eyes blue.
Fairytale pig with a gift
All the above methods give the child the opportunity to understand how to draw a pig (both cartoon and realistic).
And you can depict a fairytale pig with a gift in this way:
- Prepare materials: you will need simple and colored pencils, a sheet of paper, a black liner to mark the contours, and an eraser.
- Also use geometric shapes and auxiliary lines to depict correct proportions.
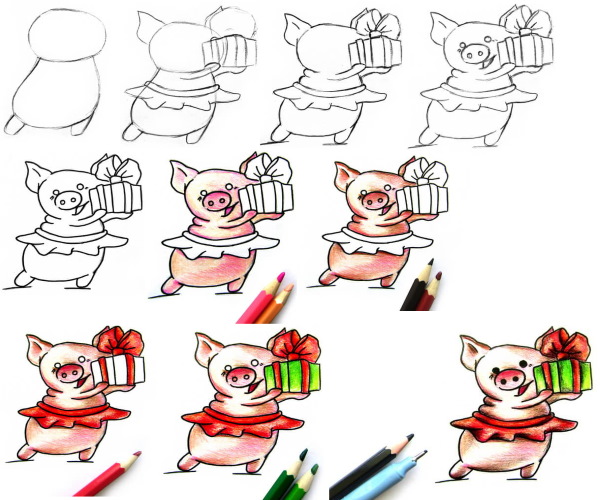
- The fairytale pig will stand in a ballet tutu, dancing slightly and holding a gift with a large bow and a magic wand with its front legs.
- Draw a horizontal oval in place of the head, a vertical oval in place of the body, and connect them so that the presence of a neck and a slight tilt of the body can be felt.
- Draw the left lower leg straight, the right one slightly to the side.
- Draw soft folds and a skirt on the body.
- Draw the upper legs from the side so that the gift and the magic wand are at the level of the muzzle.
- Draw a gift with ribbons around the perimeter and a large bow.
- Finish the sketch with pointed ears and a happy face.
- Trace the outline drawing and details with a liner.
- Overlapping light strokes paint over the body, increasing pressure on the pencil in the shadow and heel areas.
- You can use any bright color for the pack, but when painting it, keep in mind that the upper parts of the folds are always lighter than the deep ones.
- If the skirt was pink or red, the bow can be painted in the color of the tutu, and for the gift box, choose yellow to create a contrast between it and the stick.
- Finish the work by adding floor lines under the feet and coloring in the eyes, mouth and nostrils.
Thus, the resulting drawing of a pig will become an excellent postcard made by the child's hands. For children, the methods indicated may seem complicated at first glance, but as you learn the rules of construction, depicting a pig will not be difficult.
Animal Drawing Videos
Drawing of a pig for children: