Everyone is familiar with Krylov's fable about the hard-working ant and the idle dragonfly from childhood. If you need to draw an illustration for a famous Russian fable or a drawing is required for a biology lesson, then the task should be completed step by step.
Drawing tools
The main tools and materials for drawing an ant will be:
- simple pencil;
- sheet of paper;
- eraser – for removing unnecessary lines;
- sharpener – for sharpening a pencil;
- colored pencils, markers or paints – for coloring the drawing.
Paper
The ant (a drawing for children that is distinguished by its brightness and expressiveness) is depicted on paper, which can vary in texture and density.
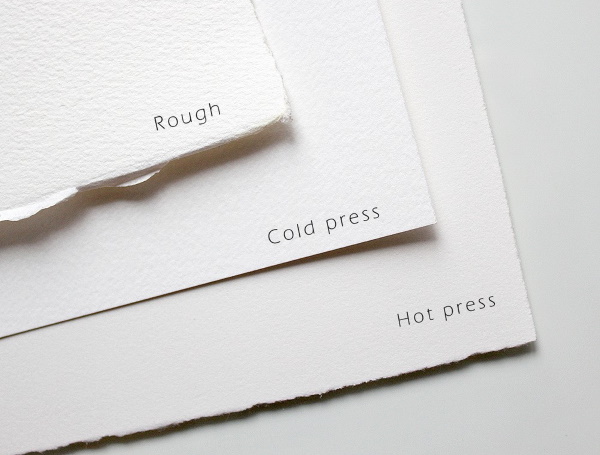
It is divided into the following 3 categories:
| Paper type | Description |
| Fine grained | It has a texture, but not too rough. It is best suited for those who are just starting to paint with paints. |
| Smooth | Excellent for fine detail work |
| Torchon | It has a hard texture. Small particles of paint, settling on its surface, create interesting effects |
Many manufacturers have sets with samples of paper of different categories.
Also, one of the most important characteristics of paper is density. Dense material can be used for drawing on both sides. The best option is paper with a density of 300 gsm. It does not warp when the paint dries and allows you to correct the drawing.
Pencils
It is best to have 3 pencils of different hardness:
- H (hard);
- B (soft);
- HB (hard-soft).
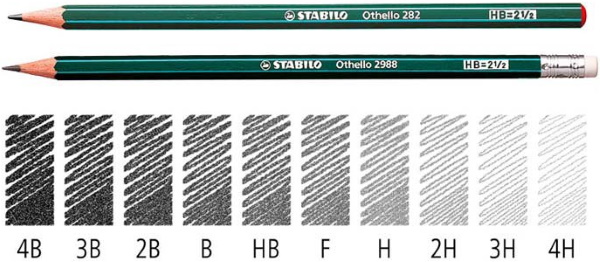
To make the lead longer and sharper, it is recommended to use a stationery knife instead of a sharpener. However, a sharpener is more suitable for beginners.
Paints
Paints are an important component of watercolor materials. You can't do without them, but you don't have to choose an expensive option - imported paints in beautiful packaging or a large set of all the colors.
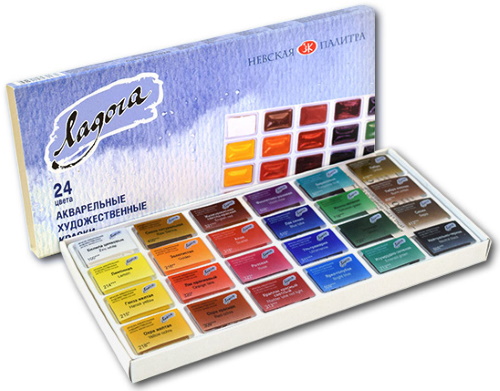
A good choice would be to purchase paints from the Nevskaya Palitra company. They are used by almost all Russian artists. As for foreign manufacturers, one of the best options is Winsor & Newton. When choosing between tubes and cuvettes, it is worth keeping in mind that the latter can be taken with you on a trip, and the paint in tubes is thick and juicy.
Master classes
Once you are ready to start working, you can begin drawing a hardworking and strong ant.
Pencil drawing
The ant (a drawing for children should start with a pencil) appears on paper with outlines, after which more details are added.
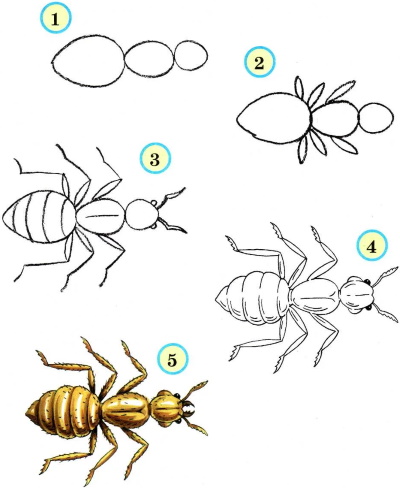
All work can be divided into the following stages:
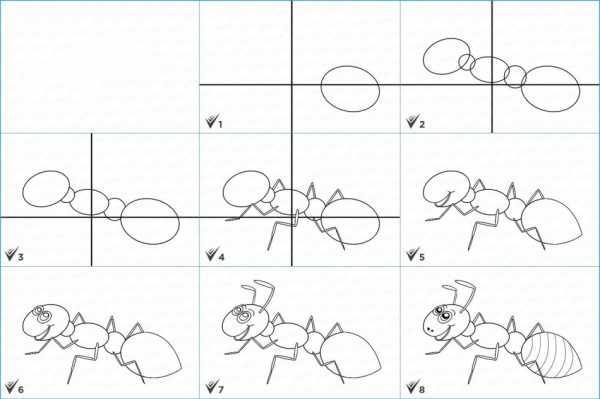
- Create the outlines. They are 2 ovals connected by a line and several small ovals located at the bottom.
- On the right side of the sheet of paper, draw a large oval, which will become the body of the insect in the future.
- To the left, at a distance of several cm, draw a smaller oval. This will be the head.
- Connect both drawn ovals with a line, but do not make it straight.
- Draw 3 more small ovals under the line. They are needed to simplify the work on drawing the limbs in the future.
- Draw the body. The ant has several segments. Draw 3 more ovals on the line drawn earlier. The one on the left, which is next to the head, should be larger. The one on the right, which is located near the body, should be the smallest. There should be a medium-sized oval between them.
- Draw the limbs. To do this, it is enough to draw a few short lines. However, before this, it is necessary to outline the 3 lower circles with elongated downward semi-ovals.
- Detail the drawing. First, remove unnecessary contour lines - the line connecting the head and body, as well as 3 small ovals that were used to draw the limbs.
- Detail the ant legs. To do this, give volume to the lines that were drawn in the previous stage. These parts of the legs should become thicker.
- Draw another line down from each of the legs. These will be the thinnest segments of the ant legs.
- Having finished with the ant's legs, move on to the head: draw 2 eyes, each of which is represented by a small circle.
- Draw smaller details. Pay special attention to the head. The ant has small jaws that look like scissors. The ant's eyes are large and bulging. It also has antennae and a symmetrical pattern on its head. It is not necessary to be precise when drawing this pattern, but a couple of main lines must be drawn.
- Move on to drawing small details of the body and limbs.
- Apply shadows. To do this, decide from which side the light is falling. If from the left, then all parts of the body on the right side will be darker. If the light source is located on the right, then the body parts will be shaded on the left side.
- When shading the eyes, be sure to leave some glare. To do this, leave a small area unshaded. At first, it may seem that the glare on the eyes is an unnecessary element, but it will create the impression that the ant is looking at the person admiring the drawing.
- If you want to leave the ant black and white, then you don't need to use anything other than a simple pencil for coloring. If you want the drawing to be colored, color it with colored pencils.
Cartoon Ant
Drawing a cartoon ant for kids consists of the following steps:
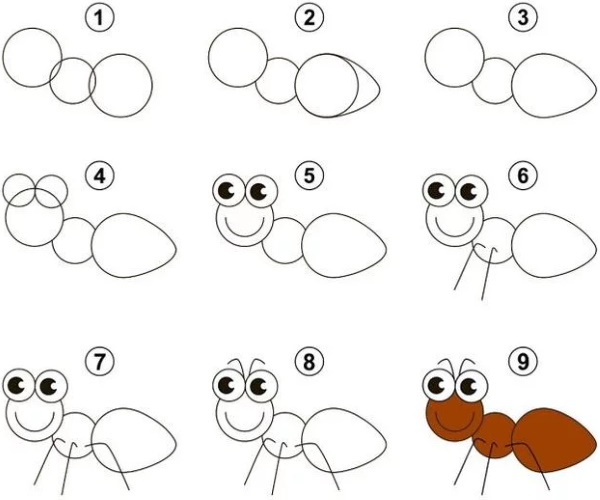
- Create contours. To do this, draw 2 circles of different sizes. The large circle, which will become the head in the future, should be at the top of the sheet. A small circle should be located under it. The difference in the sizes of these circles should be multiple: the lower one should be 4-5 times smaller than the upper one. The lower circle is the basis of the body.
Step by step drawing of an ant for kids. - Draw an arc line inside the upper circle. As a result, the circle should be divided into upper and lower halves. This line will simplify the work on the details of the ant's head in the following stages. It is auxiliary, so it should be removed closer to the end of the work.
- Draw the outline of the head and a pair of antennae above it. The head should not be perfectly round, so you need to outline the large circle again.
- Make a bulge at the bottom of the head. This will be the ant's mouth, similar to scissors.
- The antennae above the head should be voluminous. Therefore, for each of them, draw 2 curved lines connecting at the top and bottom.
- Work out the details of the head. To do this, draw large bulging eyes, a nose and a mouth. Both eyes should be located on the arc line drawn in stage 1, which divides the head into 2 halves. The eyes should be large, with large pupils in each. Draw both as ovals.
- Below, between the eyes, place an ant's nose, which can be represented as a short wavy line.
- At the bottom of the head, draw the ant's mouth, which is a pair of triangles.
- Draw the body. Its shape is similar to that of a bee.
- Using the small circle drawn in stage 1 as a basis, draw a figure similar to the body of a bee. It will be something like an oval, only pointed at the bottom. At the same time, there should be several arced lines on the body, running from left to right or from right to left.
- Draw the limbs. The ant has 6 legs, but in this case only 4 of them will be visible. The 2 upper limbs on the left (these will be the 2 right upper limbs of the ant) are hidden behind its large jaws. You only need to draw 3 limbs on the right side (these will be the left limbs of the ant) and 1 lower limb on the left side. Each leg should be represented by a line with 1 bend. All these lines start from the body of the ant, then the 2 upper limbs bend upwards, and the 2 lower limbs bend downwards.
- Remove unnecessary lines. To do this, erase everything that was drawn at the very first stage.
The work can be considered completely finished if there is no desire to color the drawing using colored pencils, markers or paints.
Ant Question
Ant (a drawing for children can be in the form of a fairy-tale curious character) Questioner - a schoolboy who is studying the world around him. His assistant is a wise turtle, who showed him the way to school.
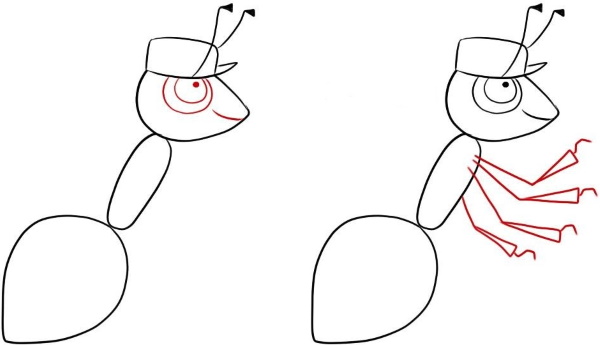
Drawing the ant Voprosik is not difficult, the work takes place in the following 4 stages:
| No. | Stage | Description |
| 1 | Sketch of contours | You need to draw 3 simple figures:
|
| 2 | Head detailing | To do this you need:
|
| 3 | Drawing the paws | Necessary:
|
| 4 | Add a backpack to a character | The questionnaire goes to school, so he should have a first-grader's backpack on his back. It is important not to forget to add a few buttons and 1 pocket to the backpack. |
The resulting drawing can be colored as desired.
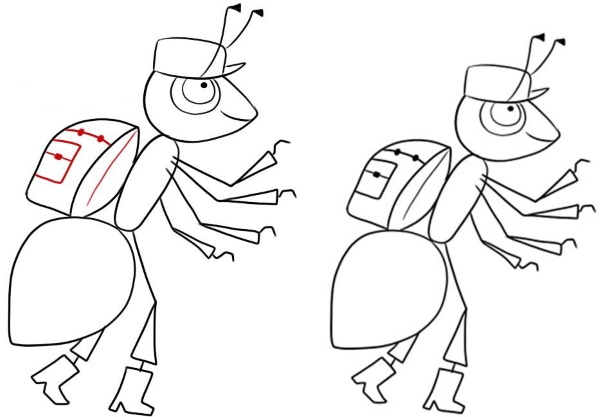
For example:
- make the boots and headdress green;
- the ant's body is brown;
- backpack - yellow.
Drawing an ant is not difficult. If children cannot do everything right at once, there is no need to despair. With due diligence, the drawing will become better with each new attempt.
Video about drawing an ant
Step by step drawing of an ant: