A titmouse is a small, beautiful bird with bright plumage. It is often drawn with children in kindergarten or primary school. Before starting to draw a titmouse with a child, an adult should try to depict it himself. If he has never done this type of creativity before, he will need to be patient. Step-by-step diagrams will help with this.
Drawing tools
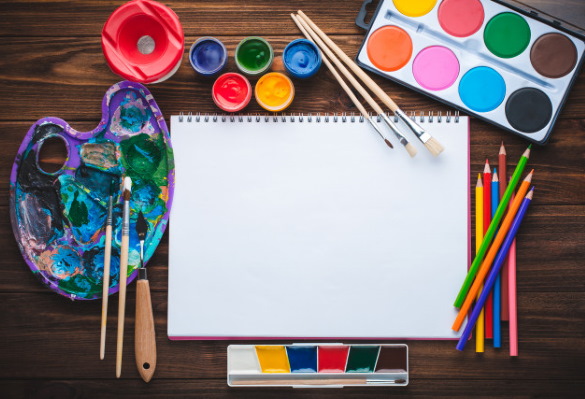
A drawing of a tit with children can be done in various artistic techniques, the main thing is to prepare the necessary amount of materials and tools before work.
Namely:
| Affiliation | Description |
| Paper | It will act as a canvas for creating a drawing. |
| Simple pencil | It will be used to create outlines in the early stages. |
| Eraser | Necessary to remove unnecessary lines |
Some drawings can be done with just a pencil. If you need to add color to the images, you should use colored pencils or paints.
You can purchase:
- watercolor;
- pastel;
- gouache.
Paper
For drawing you can use:
- sheets from an album;
- small sketchbooks;
- office paper.
Before purchasing any of them, it is worth deciding what tools and materials will be used to create a tit drawing. For example, if you plan to work with watercolors, you will need special paper - watercolor.
Instead, you can buy other high-density drawing paper. Its value should not be less than 250 g per 1 sq. m. You can also use thick Whatman paper.
Pencils
In art supply stores you can see many sets of simple pencils. They differ in price and quantity in the set. A beginner does not need to buy the whole set. Most often, 2-3 simple pencils are enough.
It is recommended to prepare 1 hard and 1 soft pencil, each of which has its own advantages over the other.
Solid types are marked with the Latin letter "H" or the Russian letter "T". A beginner should buy a tool marked "H" or "2H" (respectively, "T" or "2T"). If the numbers opposite the letter "H" are higher, then such tools can ruin the paper: they are too hard and require certain skills to work.
Soft pencils are designated by the letter "B", if the pencil is of a foreign manufacturer or "M" - if domestic. It is more difficult to spoil the paper with them. You can use pencils that are marked "5B", "6B", "7B".
However, when combined with hard pencils "H" and "2H", they give a large contrast of tones, so for a single style of drawing it is better to choose the same marking. If the marking is "2" for hard pencils, then "2" should be chosen for soft ones as well.
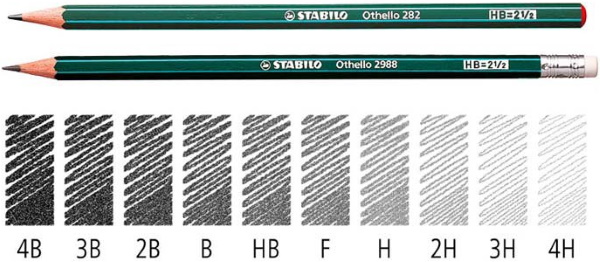
Additionally, you can purchase an "HB" pencil. This is a medium-toned option, occupying an intermediate niche between "H" and "B". Also, such a pencil can be designated with just one letter "F". It is good because it allows the artist to create smooth transitions between tones.
Eraser
When working with simple pencils, an eraser is necessary. The best option is to buy a nag and a rubber one.
It is important to remember: erasers of different colors and fancy shapes are not suitable for work. They do not perform their function well and can ruin the drawing so that it will not be possible to correct the situation. For example, after using them, traces of grease may remain on the surface of the paper.
Coloring tools
Titmouse (a drawing for children can be colored with various tools) with a pencil or paints requires their correct selection.
When choosing colored pencils, it is better to give preference to those that have a triangular or hexagonal cross-section. They, unlike round ones, will not roll off the horizontal surface of the table during work and the child will not have to be distracted from the process of creating a drawing.
Watercolor paints spread well on damp paper. This property can be used to create beautiful streaks and convey the fluffiness of a bird's feathers.
Those who want their drawings to have bright colors are advised to try pastel paints. The advantage of using it is that it does not require the use of water. You will also not need any brushes or palettes.
Master classes
Once the basic materials and tools are prepared, you can move on to drawing a tit. Beginners are advised to start with simple options.
Simple drawing
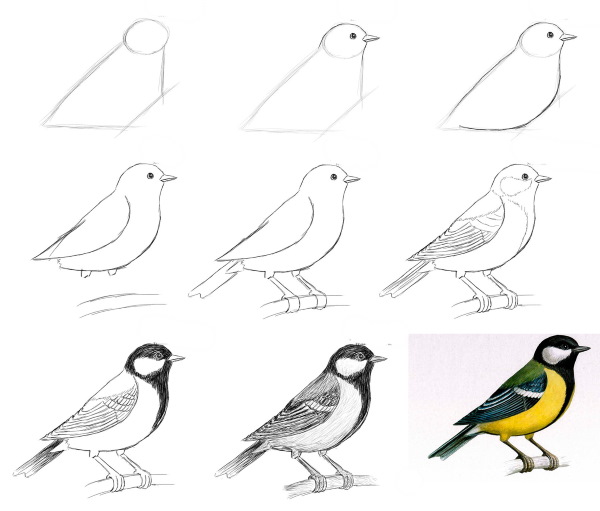
The titmouse (the drawing of the bird for children has many options) in a simple version goes through the following stages:
- Draw a diagonal line from the top left corner of the paper to the bottom right. This will be the main axis. It will need to be removed later.
- Draw the bird's body. It is oval in shape, so an oval should be drawn on the axis drawn earlier.
- Inside the oval, outline the outline of the titmouse's body.
- Finish drawing the tail, which is located at the bottom right, slightly above the main center line.
- Finish drawing the details: abdomen, wing, head, beak. Delete extra lines.
- Apply a few strokes to the surface of the titmouse's wing.
- Draw the bird's eye in detail, not forgetting about the black pupil.
- To complete the drawing, depict a thin branch on which the bird is comfortably located. It is drawn with a pair of parallel lines. You can add a small twig to it.
- Draw both paws with which the bird grasps the branch.
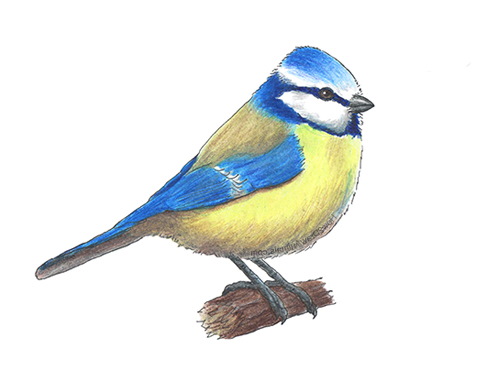
- Color the finished drawing. For the plumage, it is better to use black, white and yellow shades. Make the beak red, and the branch on which the tit sits brown.
Titmouse on a branch
This option is also suitable for beginning artists and children who are just getting used to holding pencils and other writing instruments.
The bird in the picture is located in the 3rd quarter in relation to the viewer. The main elements are the powerful body and the head, which is pulled into the shoulders, because the action of the picture takes place in winter and the titmouse is cold.
Drawing takes place in the following stages:
- Draw an axial line that starts from the head, runs along the back and ends at the tail. Remember: this line is not quite straight, because the tit's tail should be slightly raised relative to its back.
- Separate the head from the back with a small notch.
- Draw a small straight beak.
- Make the tit's forehead convex. The chest should be fluffed up, which noticeably protrudes forward.
- Draw small paws. The fingers on them are thin. They clasp the branch on which the bird is located. Half of the tit's legs are hidden in the plumage on the abdomen.
- Draw the tit's narrow tail. In this example, it is a continuation of the midline of the body.
The drawing is almost done. It remains to give its main character features that are typical of a tit, and not of any other bird. Here, tools designed for coloring will help. When working with a child, it is better to use colored pencils for coloring
You will need the following colors:
- yellow. It is used to color the belly and small beak;
- black. It is necessary for painting the back, wings, head and tail;
- green. It is recommended to add to the wing and tail areas.
The area of the head below the bird's eye should be left white.
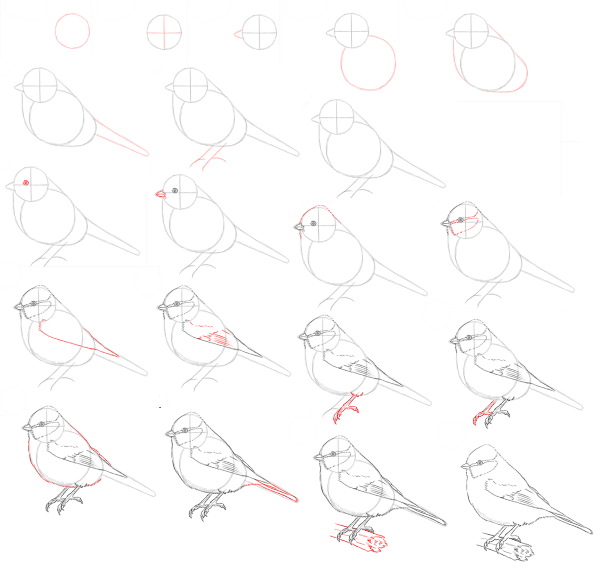
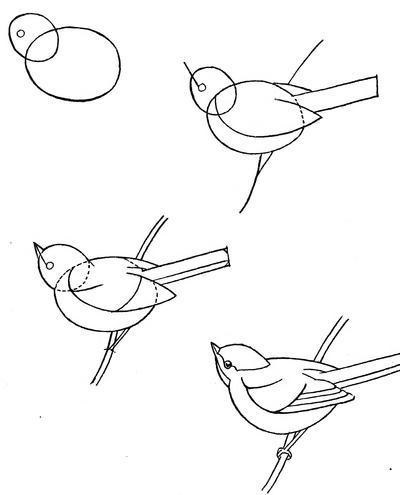
Titmouse leaning forward
The titmouse (a drawing for children can be done with an addition) on a thin branch is depicted easily. However, it is slightly tilted forward.
The work can be conveniently divided into 4 stages:
- Make a sketch using a simple pencil. The bird's body is dense, shaped like a large drop. Its head is large, and the neck is not expressed.
- Draw the tail. The tit sits on a thin branch, leaning forward, so its tail is noticeably raised. This helps it maintain balance.
- To give the resulting feathered creature a resemblance to a tit, it is necessary to make characteristic patterns on the wings and depict a “beret” on the head.
- Color the image.
Simple drawing on ovals
It is easy to draw a titmouse using ovals and circles as the basis for the drawing.
The work takes place in the following stages:
- In the upper left part of the face, draw a circle that will become the bird's head.
- Place a large oval slightly below and to the right of the circle, which will become the titmouse's body. Both figures should slightly intersect with each other.
- Connect the oval and the circle with a pair of arced lines.
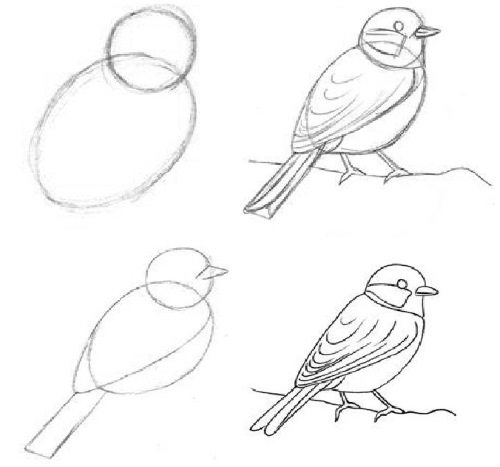
- Draw a tail that is located at the bottom of the oval. It looks like an elongated triangle.
- Draw a wing located at the top of the body.
- Use the eraser to remove unnecessary lines. This applies to everything that is within the contours of the bird's body - the borders within the oval and circle, as well as the lines that are within the contours of the wing.
- Draw a branch on which the titmouse sits. It can be represented by a pair of arced lines. The distance between the lines should not be large, because the branch is thin.
- Each of the bird's legs, with which it grasps the branch, is represented by 3 short lines. These will be the titmouse's toes.
- Detail the head. To do this, draw a small circle, this will be the eye. On the left, place a small triangle, this will be the beak.
- Color the tit. To make the process easier, you can first draw small stripes near the beak, and also highlight the feathers on the tail and wing.
Drawing with paints
If you need to draw 3 titmice using only watercolor paints, you need to follow these steps:
- Draw 3 yellow ovals in the middle of the sheet.
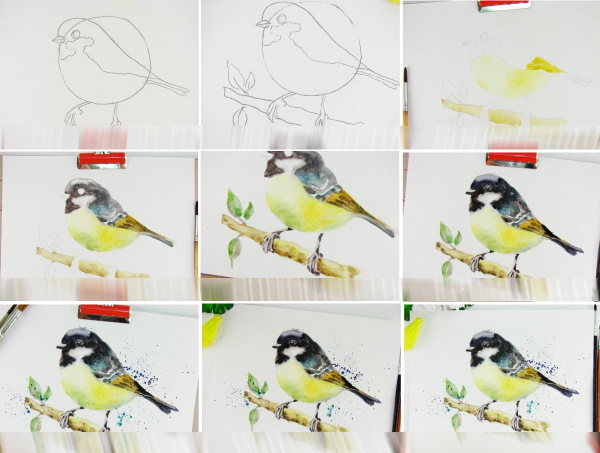
- Paint the top half of each of the 3 previously drawn figures green. Their bottom parts should remain yellow.
- Draw 1 circle near each of the ovals with black paint. These will be the titmice's heads. Also draw a triangle-shaped beak and eyes.
- Draw a black stripe from the head to the edge of the yellow half, without finishing it.
- On the other side of the body, draw a tail using black paint. The tail should be forked.
- Draw a black wing in the shape of a triangle on the green half near the tail.
- Draw an arc line above the wing with white paint.
- Place a thin brown branch under each of the 3 birds.
- Finish drawing the paws in the form of small brackets.
Tits fly to the windows of houses more often than other birds during severe winter cold. They will happily eat a treat that a person puts in a feeder. Thanks to such help, the birds will be able to survive the cold winter, and then in the spring they will delight with pleasant singing, posing on branches and feeders for children and adults to draw.
Video about drawing
Titmouse - drawing: