The French knot is a simple, effective technique that is often used in embroidery. It is used to create entire volumetric paintings, panels with a clearly expressed perspective of the image or highlight individual details of the pattern.
History and features of the French knot
This technique (embroiderers also call such loops "frouzels", "French") allows you to add volume to embroidered works. This type of needlework came to Europe from China. It acquired its name thanks to the French women who really liked this method of embroidery.
The goods embroidered in such a technique brought by merchants from China simply conquered the French seamstresses with their beauty. They began to actively popularize it among needlewomen, decorating the garments of monarchs and representatives of the aristocracy with knotted embroidery. Usually, the decoration was done with gold, silver threads, satin ribbons.
The French stitch is a round stitch that protrudes above the surface of the fabric. In the middle it has a hollow. Such a loop resembles a bead or a small bead. Its size depends on the thickness, quality and number of folds of threads. The tension force, as well as the number of turns around the needle are also of great importance.
Each knot is made separately, highlighting different elements. For example, snowflakes, flower stamens. Or they are collected in groups. This is how tree crowns and clouds are decorated. All work can only be done in this technique. The pattern looks expressive, original and impressive. Especially if various color combinations are used.
Where can the French knot embroidery technique be used?
The French knot in embroidery adds unusualness to things. Skilled craftswomen create unique items using this technique. For example, blankets, towels, bags. They also decorate icons, brooches, hairpins. They also decorate entire paintings.
Items embroidered with satin ribbons look very elegant. The author selects their width according to her idea. Narrow stripes are taken for small details. Such patterns turn out convex, lush. They are incredibly eye-catching.
Ribbons are used to decorate knitted items, clothes, interior items. And also accessories. For example, bracelets, necklaces, pillows.
Pictures made in this way look incredibly attractive. Works made entirely in this technique look original. They have their own zest and appeal. Works supplemented with a contour drawing have a modern look.
Often, using this technique, only certain individual moments in the plot are emphasized. For example, tree foliage, images of people or animals, decor in clothing. These can be volumetric elements in paintings.
What do you need for embroidery?
Before you start creating, you should prepare the necessary materials and tools.
Threads
Threads are selected based on the intended goals. Darker tones are usually used in the foreground to make the image look more voluminous. Using a wide range of colors allows you to achieve very unexpected results.
Small details like beads are embroidered using floss. Wool yarn is chosen for large elements. Satin ribbons are used to create voluminous flowers. However, you should not take too long threads. They get tangled during work. 30 cm will be enough.
Needles
Tapestry needles are used mainly for ribbon embroidery. They have a wide eye and a blunt end. However, you may need regular sewing or beading needles with sharp ends. They are used for thread embroidery.
Fabrics
Fabrics require special attention. Pictures or flowers should be embroidered on a thick canvas. Otherwise, the stitches may spread or fall through due to the loose structure of the fabric.

In principle, the knotting technique can be used on any finished product. The main thing is that the material is dense. And even knitted and crocheted items can be decorated with ribbons.
Other accessories
It is also necessary to prepare other tools:
- scissors;
- drawing schemes;
- pencils, felt-tip pens, markers of different colors;
- hoop;
- square frames for embroidery;
- carbon paper, graph paper;
- thimble;
- ruler.
Where can I get patterns for volumetric embroidery?
Unfortunately, patterns designed specifically for French knot embroidery are extremely rare. But there is always a way out.
For example:
- The selected patterns are transferred to the canvas. Then the drawings are filled with multi-colored fruzels or stitched along the contour.
- When working with ribbons, sketches for satin stitching are used.
- They draw the plots of future paintings with their own hands using pencil.
- French knots are made according to the patterns used in embroidery, with beads or crosses. The designations of crosses or beads are replaced by stitches.
Master class for beginners: step-by-step creation of a seam
Fruzelki give the works a beautiful texture and splendor. Rarely located elements make them airy and light.
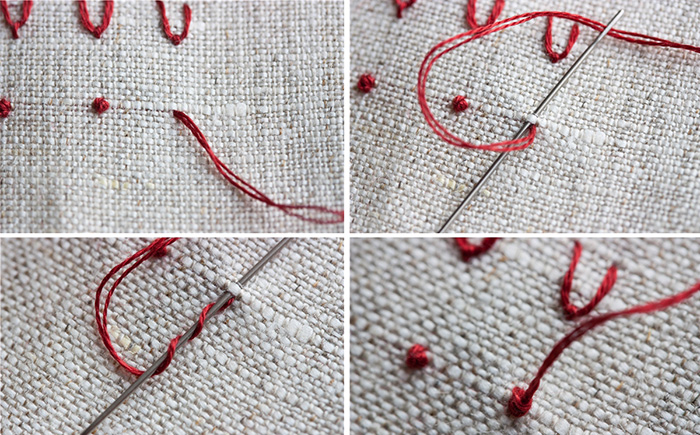
The process of embroidery with floss:
- First of all, a thread is secured on the back side of the fabric.
- Then, in the place where the element will be located, the needle is brought out onto the face.
- Next, it is held parallel to the surface of the fabric.
- Now it is wrapped around the floss, making one or several turns. This depends on the desired volume of the part.
- Next, the thread is carefully held.
- Then the needle is brought out to the wrong side.
- It is pulled out from the point located closest to the place from which it came out onto the front side.
Then the picture is supplemented with other loops, if necessary. But this is done after washing and ironing the finished work.
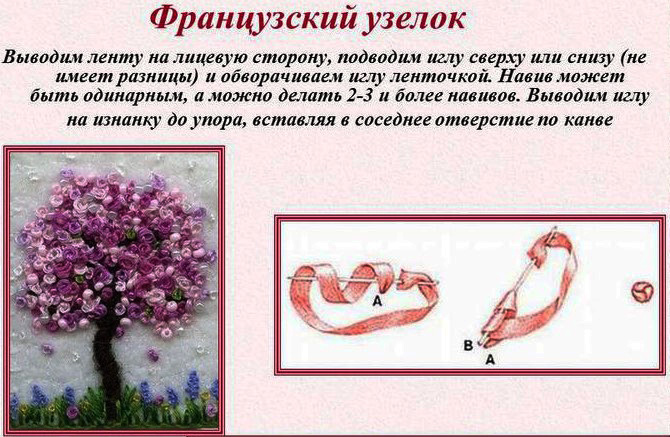
How to embroider with ribbons:
- First, a satin strip of fabric is attached to the back of the product.
- Then it is brought to the front side.
- Next, the ribbon is pulled tight and then placed underneath the needle.
- Then make one turn around the needle clockwise.
- Then they move slightly away from the initial puncture point, and insert the needle into the point located directly next to it.
- Next, the ribbon is moved to the tip of the needle. It is pulled up, forming a not too tight French.
- Then the needle is pushed through the knot and pulled out from the inside.
- Then the satin strip is pulled to complete the creation of the detail.
Here the size of the satin bead depends on the width of the strip.
Beautiful diagrams and description of work in the French knot technique
There are now various schemes on the Internet using French.
The French knot in embroidery adds volume to the paintings where it is needed. Therefore, the plots become interesting and unique.
Combinations with cross stitch
Fruzelki are often combined with cross stitch:
- They are used to decorate the faces and bodies of animals, making them look more realistic;
- This technique allows you to highlight the foliage on trees or flower petals.
- Using this method, clouds, the sun, and other natural and climatic phenomena are created.
Raindrops, sunny or cloudy days are also depicted with knots. Other elements of the picture are cross-stitched. Lilac flowers look quite natural if they are decorated using the French fruzel technique. A dog's nose or eyes, sewn in this way, will look quite realistic.
However, it is permissible to embroider only small fragments with fruzelki on the panel. Only then the work looks more harmonious. Almost any needlewoman can cope with such a technique, knowing its basics.
Step by step instructions:
- First, the needle pierces the back of the fabric. Then it is brought out to the front.
- Next, take the floss with your left hand. Hold it with two fingers approximately 3 cm from the surface of the fabric. Pull the thread tight.
- Then the thread located between the canvas and the fingers is wrapped around the needle twice.
- Be sure to ensure that the coils do not unravel.
- Then the needle is inserted into the fabric at the point where the working thread comes out.
- Then it is pulled to the wrong side.
A knot like this is not at all difficult to embroider. The presented technique can be used in almost any work. More detailed instructions are available only in specialized books or thematic magazines.
It is worth saying that the described method is almost no different from the technique that came from China. In the Chinese version, they do not make two twists, but one turn around the needle.
The French knot in embroidery fits well on regular fabric. It will not slip through its fibers. But most often, cross stitch is sewn on canvas. And its structure is characterized by fairly large distances between the threads. Therefore, such elements may not tie or slip through them over time.
It is necessary to adhere to certain rules when working in order to avoid such situations:
- It is preferable to use thick woolen threads or floss folded several times;
- a large number of turns should be made around the needle;
- It is best to choose a canvas with the smallest cells.
When choosing one of the above methods, you need to practice working with knots more to determine for yourself which of them will be the most acceptable. This is how experience is gained.
Beginner needlewomen often ask: “Which pattern with knot elements should I choose?” The answer is quite simple: “Absolutely any guide used in cross stitching will do.”
For example, a winter landscape with snow made into knots, or the Eiffel Tower rising against the backdrop of the night sky, where the stars are depicted in a similar way.
A lamb or sheep is depicted in the same manner.
And a novice needlewoman will easily master this simple embroidery pattern:
- First, a sketch of the animal is applied to the canvas.
- Then the sheep's face is made with a cross stitch, and the wool is embroidered with French stitches.
Black and white woolen threads are used.
Combination with ribbon embroidery
Ribbons add splendor to the works, making them voluminous. For example, you can use them to embroider the "Lilac" panel.
Necessary list of materials and tools:
| needles | You should take special tapestries |
| drawing scheme | Embroidery is done on it |
| carbon paper | With its help, they translate the ornament they like. |
| fabric (curtain fabric) | They embroider a plot on it |
| silk and satin ribbons | They are used to embroider ornaments |
| frame | The finished product is designed in it. |
Progress of work:
- First of all, the drawing should be transferred to the canvas. Any pictures can be used as a basis.
- Carbon paper is placed on the fabric and the pattern is simply traced with a pencil.
- Next you need to take a lilac ribbon.
- It is threaded through a needle and then brought out from the wrong side to the front side. A small free end of 1.5 cm is left.
- Then the index finger is placed on the ribbon. One turn is made, and then it is brought out to the wrong side. The remaining loops are created in the same way.
- In this case, it is necessary to ensure that the needle does not hit the previously embroidered ribbons from the inside.
- Next, the buds are made. The needle is inserted on the front side.
- Then the ribbon is placed on the canvas, leaving a slight distance.
- The needle is again stuck directly into the tape. Afterwards it is pulled out to the wrong side.
- It should be noted that the greater the indentation, the larger the bud.
- Using this technique, fill the entire stencil.
- Next, depict the stem. Take floss and simply embroider it with satin stitch.
- Then the panel is framed.
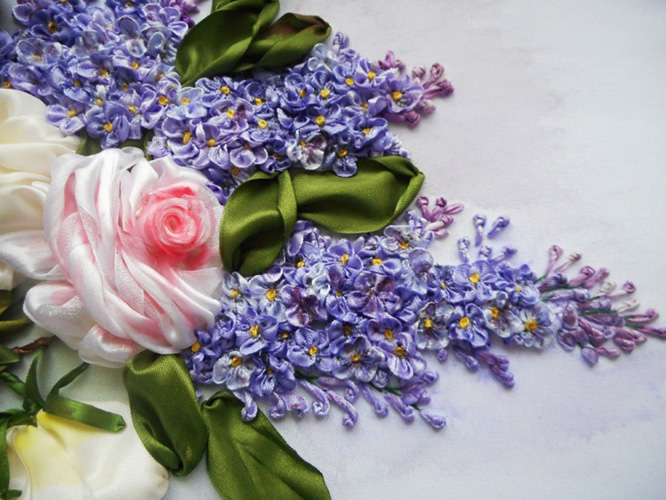
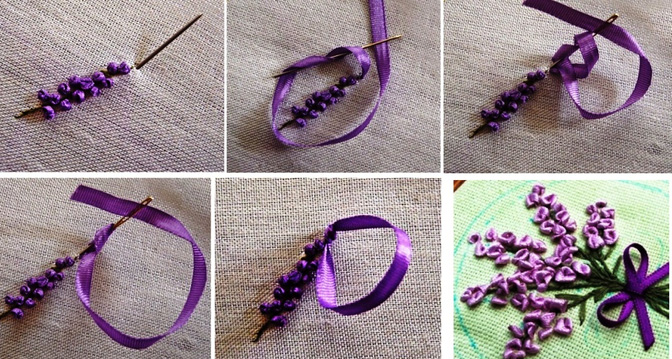
Other flowers are created using a similar technique. For example, forget-me-not buds.
Job Description:
- First, the tape is pulled to the front side of the fabric. A 1 cm tip is left on the back side.
- Next, the strip is pulled tight. Afterwards, it is thrown over the needle about a centimeter from the fabric.
- Then the needle is wrapped with satin, making a couple of turns. Still continuing to pull.
- Then the end of the needle is injected 1 mm from the entry point.
- Next, it is brought to the wrong side, pulling out the ribbon.
You can also create a flowering tree.
Materials:
- satin ribbons in white, beige and pink shades, size 0.4 mm.
- floss in brown tones;
- needles;
- hoop;
- scissors;
- scheme;
- thick fabric;
- frame.
Work process:
- First, the tree design is transferred onto thick fabric.
- Then the fabric is placed into the hoop.
- Next, the outline of the trunk is embroidered with a wrap stitch. Then its bark is highlighted. The floss is taken in 3 folds.

- Then simply wrap around the marked stitches. Use threads of several shades of brown.
- Then the tree crown is sewn with a French knot. The elements are arranged according to the pattern or in the desired order.
- This is a small panel with an area of 10 x 15 cm. Therefore, one turn of the satin strip is made around the needle.
Pure French embroidery on fabric
A French knot in embroidery can completely decorate the entire panel. A striking example of this is the painting "sunflower"
Materials required:
- floss, woolen threads, and also iris;
- flax 100;
- scissors;
- hoop;
- needles;
- saucer;
- pencil.
Step by step instructions:
- First, draw a circle using a saucer.
- Then it is divided into 3 parts.
- Then they draw the sunflower petals.
- You can also simply transfer the image of the flower onto the canvas and then fill the spaces with embroidery.
- Next, start sewing the middle. Here you can take thicker threads of a green shade.
- Then they embroider with “lemon” floss.
- The third part is sewn with dark brown or black threads.
- Then the boundaries are “blurred” by adding orange and also brighter yellow tones.
- When the base is ready, the petals begin to be filled with knots.
- Upon completion, the work is framed.
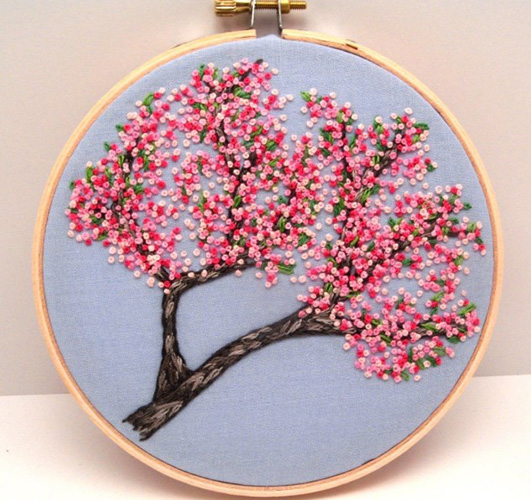
The "cherry blossom" panel will look good in any interior.
It is necessary to prepare:
- dark brown wool threads;
- white, peach, pinkish floss;
- needles;
- hoop;
- scissors;
- scheme;
- simple pencil.
Description of the work process:
- First, the pattern is applied to the canvas or the tree is drawn by hand.
- Then the trunk is stitched with satin stitch using woolen threads.
- Also, stitches are placed over the sewn seams. This will make the bark look more textured.
- Then they sew the twigs.
- Next, the crown of the sakura is embroidered with French threads. The floss is taken in 4-6 folds to make the drawing more voluminous. The colors are arranged in a chaotic order.
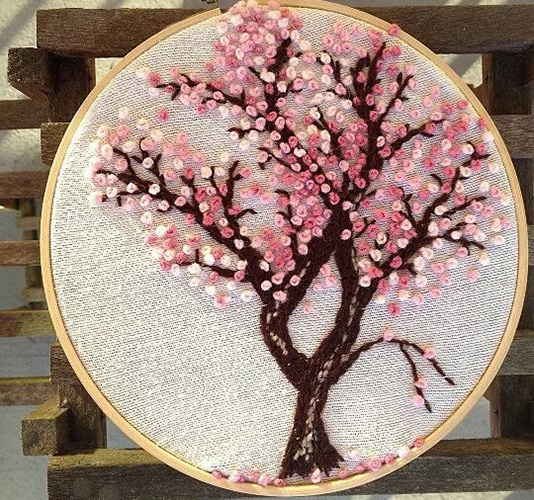
- The finished painting is framed.
A spectacular owl can decorate a child's room. A cross stitch pattern will do.
You should prepare:
- floss in red, brown, yellow shades;
- white, burgundy cotton threads;
- needles;
- sketch on paper;
- scissors;
- hoop;
- tracing paper.
Execution of work:
- First, the pattern is transferred to the canvas.
- Next, the bird's eyes are embroidered with black threads. White threads are used for the owl's "glasses" and the background.
- Then the head, the middle of the body, and the tail are filled with red knots.
- Then the paws and nose are sewn with yellow floss.
- Next, the body frame, consisting of 4-5 rows, is embroidered with brown or burgundy threads.
- And finally, the branch with the crown is sewn with brown floss.
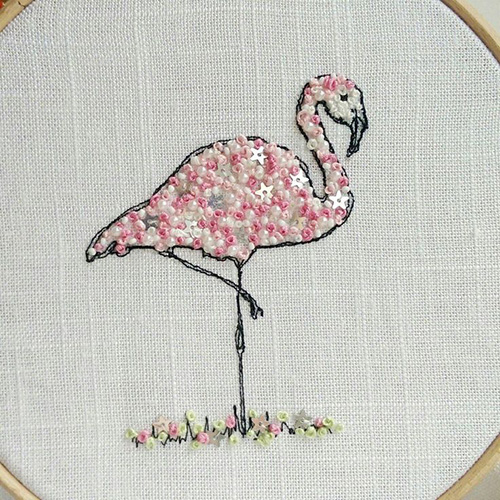
This technique looks good in monochrome. For example, a bird.
What you will need:
- cross stitch pattern;
- floss of any desired shade;
- needle;
- scissors;
- hoop;
- tracing paper.
How to work:
- After the design is applied to the fabric, it is filled with French loops.
- Each knot is embroidered in the place where the cross should have been located.
- The background can be sewn with threads of different tones as desired, or left as is.
- The work is then framed.
The French knot looks beautiful in any embroidery. For example, you can make a picture, a landscape in black and white shades. And then use knots to place red accents. Artists also use a similar technique.
Video about french knot embroidery
Mimosa embroidery with French knot: