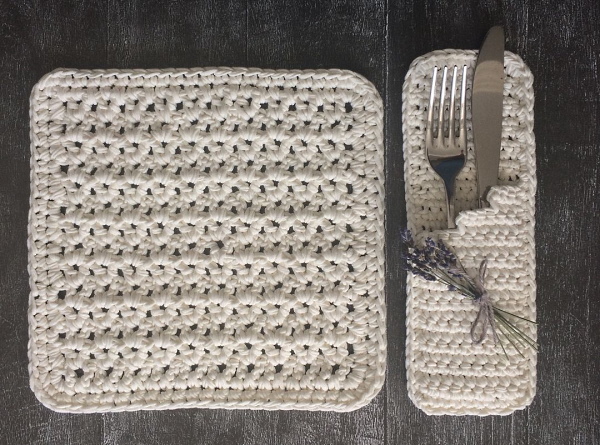
Rectangular napkins, crocheted, can consist of motifs, have simple and complex patterns. To learn how to knit such products, you need to familiarize yourself with graphic patterns and their detailed descriptions, as well as learn how to choose the right tool and yarn.
What yarn is best for knitting napkins?
The threads for crocheting napkins should be thin and strong. Experienced needlewomen prefer yarn that contains at least 85% cotton. The thickness of the thread can vary from 0.7 to 3 mm. The yarn is sold in skeins or on spools. The weight of the skein and the length of the thread are indicated by the manufacturers on the packaging.
Example of marking: 50 g/330 m, where the first number corresponds to the weight of the skein, and the second to the length of the thread. The higher the latter figure, the thinner the yarn.
List of popular Russian manufacturers producing yarn for knitting napkins:
- "Pelican" - 100 g/660 m;
- "Rose" - 50 g/310 m;
- "Iris" - 50 g/290 m;
- “Phlox” – 100 g/600 m;
- "Snowflake" - 50 g/450 m;
- "Lacemaker" - 100g/480 m;
- “Lily” – 50 g/290 m.
It is difficult to knit from very thin threads such as “Snowflake” and “Lacemaker”. It will require good skill, patience and keen eyesight. The thickness of this yarn resembles ordinary sewing threads, so for knitting it is used folded in 3.
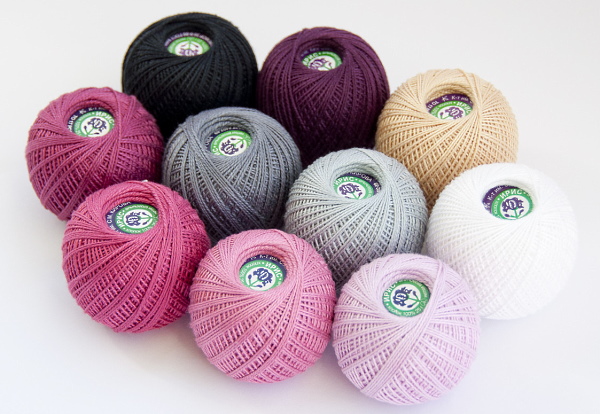
Beginners should give preference to threads from the companies “Phlox”, “Iris” or “Rose”. They are made of mercerized cotton, which gives the finished product a smooth, satiny sheen. In addition, such yarn is thicker and easier to work with.
Choosing a hook
The hook should be selected according to the thickness of the thread. If it is too big, the knitting will be too “liquid”, and if the tool is small, then, on the contrary, the fabric will be tight.
For thin spool threads, hooks of 0.5 - 0.8 mm are suitable. To knit a napkin from "Iris", "Phlox" or "Rose" you will need a tool of 0.9 - 1.25 mm. For yarn of 3 mm thickness, hooks of 2 mm are needed.
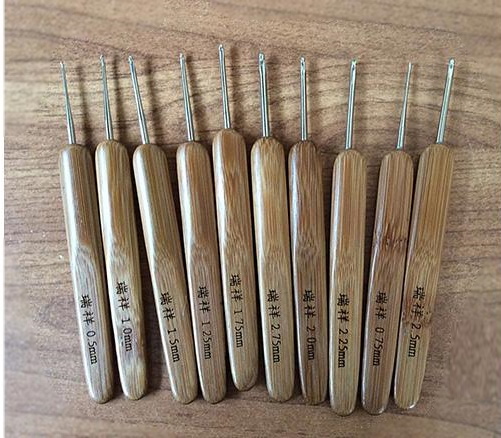
It is more convenient to knit from thin threads using metal tools. For medium thickness yarn it is better to use plastic hooks.
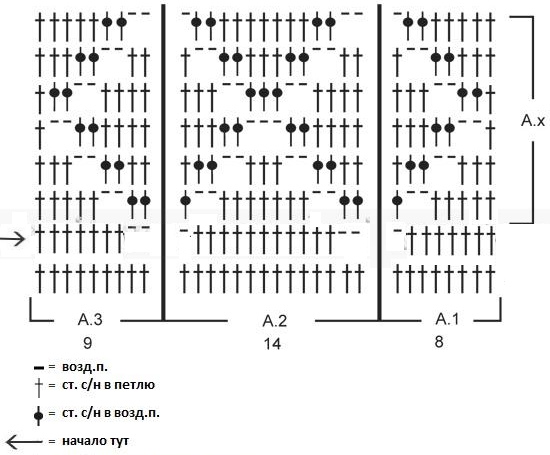
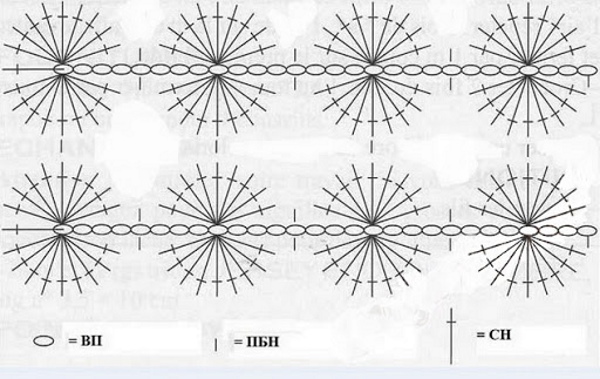
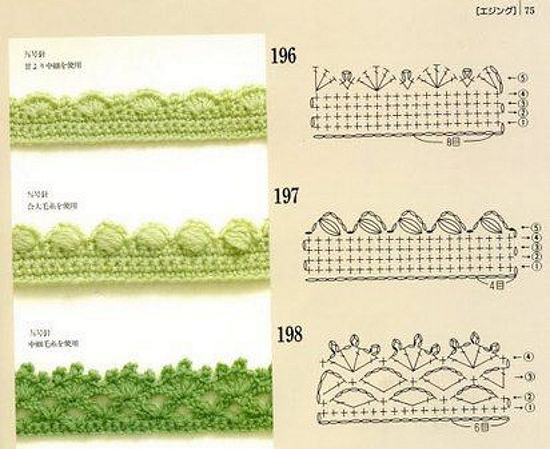
Symbols in napkin diagrams
Rectangular and other napkins are knitted according to patterns. To learn how to read them, you need to know what the main symbols mean.
| Symbol | Meaning |
| ◦ | Air loop |
| ⑥ | A chain of 6 air loops, closed in a ring. The number indicates the number of air loops and can be any. |
| ︵ | Arch of air loops. The number under the bracket indicates the number of loops that need to be dialed. |
| ▽ | Pico |
| ◠ | Connecting column |
| ❙ | Half dc single crochet |
| ✛ | Single crochet |
| † | Column with 1 yarn over |
| ‡ | Column with 2 yarns. Yarns are indicated by horizontal lines, there may be more of them. |
| ? | Lush column |
You can crochet without using graphic patterns, just read the text descriptions carefully and follow the sequence.
Beautiful rectangular crochet napkins. Scheme and description
Knitted napkins are needed for interior decoration. Small products are suitable for decorating shelves, work tables, children's rooms. Medium-sized lace napkins can be used for serving festive tables. Large works decorate beds in the bedroom, sofas in the living room, or give them as a souvenir to friends and family.
By following the step-by-step instructions described in the article, you can knit several beautiful napkins in different styles.
Classic version
A rectangular crochet napkin (the diagram and description will help beginners in creating their first work), knitted in the classic version, should be white, and the pattern should be as simple as possible. This master class describes the "diamond" pattern.
To work you will need:
- White threads "Iris" or "Phlox".
- Metal hook size 1 mm.
- Scissors.
- Iron with steam function.
How to knit:
- Cast on a chain of 65 air loops. Knit 3 more air loops and move to the 2nd row. All transitions will be done in the same way.
- In the 1st row, you need to alternate an arch of 3 air loops and 14 columns with 2 yarns. Knit like this until the end of the row, starting with the arch.
- The next chain starts with 2 double crochets. Then knit an arch of 3 air loops and 10 double crochets, then 2 double crochets again and an arch. Alternate this combination until the end of the row.
- A new row starts with a lift, then you need to knit 3 columns with 2 yarns and an arch. Then 6 columns with 2 yarns alternate with an arch.
- In the next row, knit 6 double crochets. Then alternate an arch and 2 double crochets, another arch, and then 10 double crochets. Repeat the combination until the end of the row.
- The next chain starts with a transition. Then you need to knit 8 columns with 2 yarns and an arch, alternate this combination further.
- The diamond pattern will already be clearly visible. Now you need to continue it by following the instructions in reverse order from point 5 to point 2.
- The fabric consists of 25 rows.
- When the last chain is connected, you need to tie the napkin along the edges with arches of 5 air loops.
The finished product should be rinsed in cold water and dried on a flat surface. Then steamed with an iron from the back side. This will help make the napkin smooth and beautiful. You can use such a product as a hot stand or for table setting.
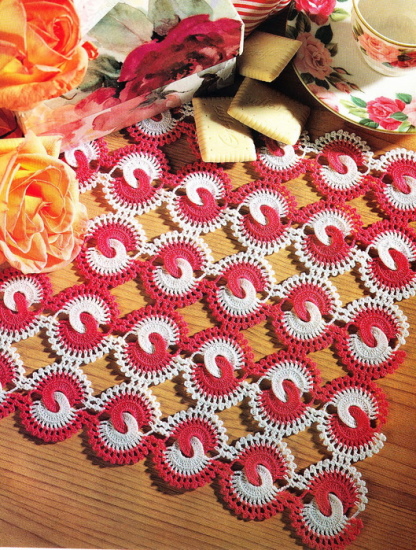
Model from disks
This napkin is suitable for everyday table setting. The pattern looks like small circles connected in parallel chains. For work, you can choose bright yarn, for example, yellow, orange or red. Threads from the manufacturer "Rosa" are suitable. The size of the crochet hook is 0.9 mm.
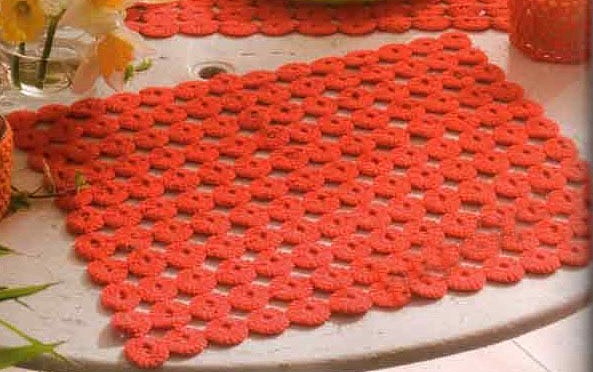
Detailed description:
- Cast on a chain of 110 stitches.
- Knit 1 half double crochet. In the 4th loop of the chain, knit 10 columns with 1 yarn over. Skip 4 loops and knit 1 half double crochet. Again, skip 4 loops and knit 10 columns with 1 yarn over.
- The pattern repeats 14 times.
- The last row should be knitted with 20 double crochets.
- 2 half strips are knitted alternating half double crochets and 10 double crochets. Repeat the combination between the rapport. Finish knitting with 1 half double crochet and 2 double crochets.
All the following strips are knitted similarly, each of them should have 14 circles. The upper and lower disks are connected to each other with half-columns without a crochet. There should be 11 strips in total.
Beginners should not worry if the pattern does not work out the first time. Models with disks are not easy to knit. In case of failure, you can always unravel the product and start over.
Japanese pattern
The patterns are called this way because in the 1990-2000s such patterns were printed in Japanese handicraft magazines. Japanese-style knitting remains popular to this day. The most common are double two-color motifs.
To knit a rectangular napkin in Japanese style, you will need 2 skeins of Pelican yarn in white and pink colors, as well as a 1.25 mm hook.
Step by step instructions:
- From white thread, make a chain of 14 air loops and close into a ring.
- Cast on 3 chain stitches and knit 27 double crochet stitches in the ring.
- Connect the beginning of the row and the last loop of the 27th column with a half-column.
- Next, you need to tie half of 1 chain, alternating 14 columns with 1 yarn over and 1 air loop between them.
- To prevent the knitting from unraveling, you need to pull out the last loop by 3-5 cm and put it aside.
- From pink threads, make a chain of 14 air loops.
- Pull the resulting chain through the middle of the white ring and close.
- Crochet the pink ring with double crochet stitches, repeating steps 2, 3 and 4.
- Make 1 air loop and connect the pink ring with the white one using a half-column. The hook should be inserted into the beginning or end of the 2nd row of the white blank.
- Now, with pink thread, you need to knit 3 chain on the white ring. Cast on 3 air loops, then alternate 1 column with a yarn over and a picot of 3 air loops to the end of the row.
- Pull out the last pink loop and insert the hook into the white pulled loop. Pull it tight, dial 1 air loop and connect the row with a half-column to the 2nd chain of the pink ring.
- Repeat step 10 with white threads.
- Connect the white and pink rows together with a half-column on 2 sides.
For a napkin measuring about 30x30 cm, you will need 25 motifs. They are connected to each other with half-columns, 2 on each side.
It is not recommended to iron items made from such motifs, as this can cause the openwork trim to wrinkle. It is better to use a sender. Hot steam will smooth out the threads and the napkin will be even.
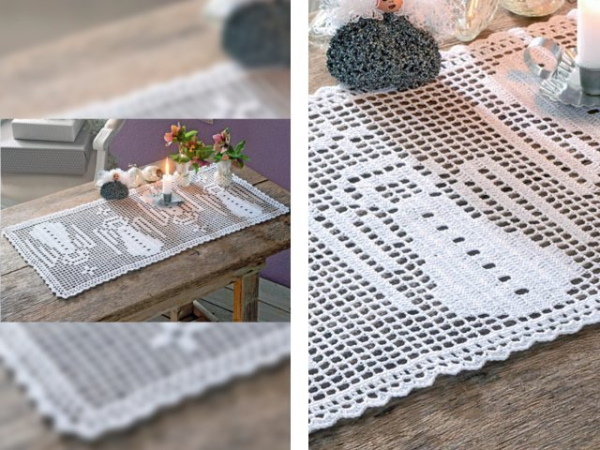
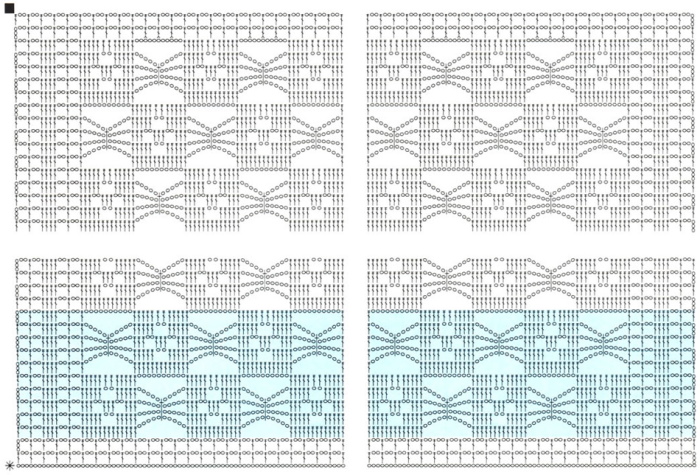
Filet knitting
Rectangular crochet napkin (the pattern and description of this knitting style are very simple) knitted in the fillet technique is considered one of the easiest products. The basis of knitting is a mesh. It is knitted by combining columns with 1 yarn and 2 air loops.

The patterns for filet knitting are similar to those used in cross stitch. Empty cells are filled with tightly knitted columns with 1 yarn over.
How to take a small napkin with a large rose:
- Cast on a chain of 25 air loops. Knit 2 rows with columns with 1 yarn over.
- In the next row, knit 2 double crochets, 21 fillet squares and again 2 double crochets. Each new row should begin and end with 2 double crochets, so these steps will be skipped in the description below. It is important to remember them.
- In the next row, knit 5 cells, then 3 columns with 1 yarn over and a filet net to the end of the row.
- A new chain starts with 4 empty cells. Then 6 columns with 1 yarn over are knitted, 3 cells, 3 columns with a yarn over and again 3 empty cells.
- 6 cells, 5 double crochets, 1 cell. Another 5 double crochets and 2 empty cells.
- 14 cells, 4 double crochets and 1 empty cell.
- 7 cells, 3 double crochets, 1 empty cell. 2 double crochets, 3 cells, 2 double crochets, 2 more double crochets and 1 cell.
- 4 empty cells, 2 double crochets, 1 cell. 7 double crochets, 5 empty cells.
- 3 cells, 3 double crochets, 1 cell. 7 double crochets and 5 cells.
- 3 cells, 3 double crochets, 6 cells. 4 double crochets and 3 cells.
- 2 cells, 3 double crochets, 2 cells. 4 double crochets, 2 empty cells, 4 double crochets and 2 more cells.
- 2 cells, 2 double crochets, 1 cell. 7 double crochets, 2 cells, 3 double crochets. 2 more empty cells.
- 3 cells, 1 double crochet, 1 cell, and 1 more column. 4 cells, 3 columns, 1 cell. Another 3 double crochets and 2 cells.
- 4 cells, 1 double crochet, 1 cell and 1 column. 4 empty cells, 2 double crochets, 1 cell. 2 double crochets, 3 empty cells.
- 4 cells, 1 double crochet, 2 cells and 1 column. 1 cell, 1 double crochet, 2 empty cells. 2 double crochets and 3 empty cells.
- 4 cells, 1 double crochet, 2 cells and 3 columns. 1 empty cell, 2 double crochets, 1 empty cell. 2 double crochets and 3 cells.
- 4 cells, 3 columns with a yarn over and 4 cells. 1 column, 1 cell, 1 column. 5 empty cells.
- 6 cells, 5 double crochets, 1 cell. 2 double crochets, 5 cells.
- Knit 3 rows of fillet mesh.
- Work 2 more rows with double crochet stitches.
The following threads are suitable for filet knitting: "Iris", "Pelican" or "Phlox". You can choose any color of yarn, but especially beautiful products are obtained from white threads.


Beginner knitters can create patterns for filet knitting themselves. On a squared notebook sheet, you need to mark the location of the columns with a yarn over. The empty cells will symbolize the grid.
Napkin with a dense border
Dense edging is most often knitted on fillet napkins. Since knitting in this style is very light and delicate, the products quickly lose their shape. The edging helps to maintain clear rectangular outlines.
The edging is knitted separately or attached to the finished product. Option 1 is described in more detail below. You will need the same threads that the napkin is knitted from. You can choose a different color to make the product look more interesting.
How to knit:
- Tie the edges of the napkin with single crochet stitches.
- Knit the next row, alternating 1 half-column and 2 air loops. In the corners, you need to knit 2 columns with a yarn over.
- A new chain starts with 4 air loops. Then 2 double crochets are knitted coming out of 1 point, alternating them with 2 air loops.
- Next comes the alternation of 1 half-column, 2 air loops, 1 half-column and an arch of 4 air loops.
- In the next row, tie 1 arch as follows: tie 4 double crochets through 2 chain stitches. Make 3 picots, first from 3, then from 4 and again from 3 loops. Knit another 4 double crochets through 2 chain stitches. Tie another arch with 2 half-columns. 1 picot from 3 chain stitches and another 2 half-columns.
- Alternate tying the arches until the end of the row.
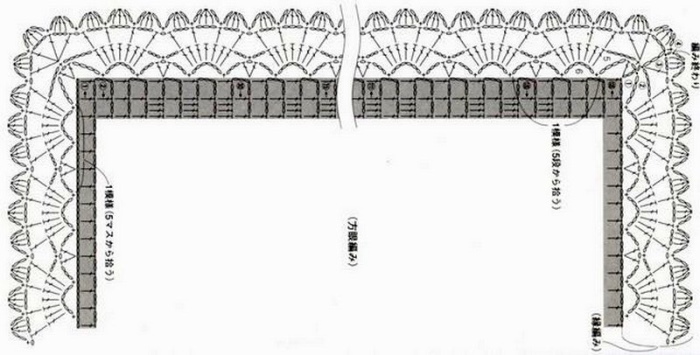

The knitting turns out beautiful and dense. The edging can be decorated with beads or seed beads. Any color edgings are suitable for white napkins. Threads with the addition of lurex look beautiful.
Rounded corners
Rectangular crochet napkin (the diagram and description will help beginner knitters create a napkin of the correct shape) knitted according to the diagram with rounded corners has an unusual look. The shape remains rectangular, but the corners of the napkin are not sharp, but smooth.
For work you will need blue yarn "Pelican".
How to knit:
- Cast on a chain of 6 air loops and close into a ring.
- Knit through the ring an alternation of arches of 5 air loops and 2 columns with a yarn over that have a common top.
- The next row consists of alternating 1 half-column and arches of 6 air loops.
- A new chain starts from the middle of the lower arch. First, knit 3 air loops for lifting, then an arch of 4 air loops. On the next arch, skip 2 loops and knit 6 columns with a yarn over, then again an arch of 4 air loops. Alternate until the end of the row.
- The row starts with 3 loops for lifting, then you need to knit 1 column with a yarn over, then an arch of 4 air loops. Knit 6 columns with 1 yarn over. Alternating them with 1 air loop. Make an arch of 4 air loops, knit 2 columns with yarn overs coming out of 1 point. Between them, make 1 air loop. Alternate these actions until the end of the row.
- In the next row, the arrangement of the air arches and columns coming out of 1 point is similar. Above 6 columns with a yarn over and air loops, you need to knit 4 air arches.
- In the new chain the number of air arches is reduced to 3. There should be 4 columns coming out from 1 point.
- The next 3 rows are knitted similarly, decreasing the arches by 1, increasing the columns coming out of 1 point by 2.
- The penultimate row is knitted with columns with 2 yarns coming out from 1 point. Alternating them with 1 air loop.
- Then you need to tie the napkin, alternating 2 air loops and a picot of 3 loops.
The napkin should be rinsed in cold water and dried on a flat surface in a straightened form. If necessary, you can steam the product.
Flowers on a napkin
A rectangular crochet napkin (the diagram and description of the main pattern should be light, without large patterns) can only be crocheted from filet mesh. Flowers will become decoration or serve as a lush and beautiful border. Each flower must be knitted separately.
For work you will need 2 skeins of yarn "Iris" in light and dark green colors.
How to knit:
- Using a light thread, make a chain of 35 air loops.
- Knit upwards 40 rows with fillet mesh. Fasten the thread and change it to a dark one.
- Cast on a chain of 9 chain stitches and tighten into a ring.
- Knit the next row with 18 half-columns (2 in each loop).
- Row 3: knit with double crochet stitches.
- Knit a new chain with arches of 4 air loops, alternating with 1 half-column.
- Each arch is a petal. They need to be tied as follows: tie an arch of 4 air loops. Knit through the arch of the bottom row 1 column with 2 yarns, 3 columns with 3 yarns and another 1 column with 2 yarns. Again tie an arch of 4 air loops and secure it with a half-column.
- When all the petals are tied, you need to secure the thread.
To decorate the napkin, you will need to knit about 40 flowers. Then they are placed along the edges of the product and sewn to it with green sewing threads and a needle. In the middle of each flower, you can add 1 large bead of gold or white color.
Napkin with a pocket
These napkins are intended for everyday or festive table setting. Cutlery is placed in the pocket. For work you will need yarn "Pelican" of 3 colors: light green, dark green and white.
How to knit:
- Using dark green thread, cast on a chain of 70 air loops.
- Work a row alternating 1 half double crochet, 1 double crochet, 3 double crochets coming out of 1 point and another double crochet. Repeat to end of row.
- Knit the next row with white threads from half-columns.
- With light green threads, knit 2 columns with 1 yarn over coming out from 1 point at the top. Knit 1 single crochet with a left tilt, 1 air loop, 1 half-column, and 1 more loop. Knit to the end of the row.
- Next, the rows are knitted in the same way, alternating dark green, white and light green threads.
When the canvas is knitted, you need to make an edging. It is knitted with white threads:
- Tie the edges of the napkin with 2 rows of half-columns.
- In the corners, knit 4 columns with 2 yarns coming out from 1 point.
- The rest of the pattern is knitted as follows: half-column, 1 double crochet, 2 double crochets coming out of 1 point, 1 double crochet. Then knit 1 half-column again. Knit to the end of the row.
To knit a pocket, you will only need white yarn:
- Cast on a chain of 8 stitches.
- Knit a row of half double crochets.
- Knit the next chain with double crochet stitches.
- Alternate rows until the number of chains reaches 12.
- The last row is crocheted as follows: half-column, 1 double crochet. 2 double crochets coming out of 1 point, 1 double crochet and half-column. Knit to the end of the row.
Then, using white sewing threads, sew the pocket to the napkin. It is more convenient to place it on the left side, closer to the bottom corner of the napkin.
The pattern of the main fabric resembles waves. If you replace the green shade of the threads with blue and light blue, you will get a napkin in a marine style.
Products made from solid-color motifs
You can knit a beautiful rectangular napkin from square motifs. All the details should be of the same color. For work you will need yarn "Phlox" or "Rose".
How to knit motifs:
- Cast on a chain of 6 chain stitches and tighten into a ring.
- Through the ring, knit an alternating arch of 3 air loops and 3 columns with 2 yarns.
- Further, the pattern also consists of elements. In the 2nd row, you need to knit 3 air loops for lifting, then 2 air loops and 3 columns with a yarn coming out of 1 loop of the lower arch. In the corners, so that the motif turns out square, you should make an arch of 3 air loops. Then alternate columns and 2 air loops until the end of the row.
- All the following rows are knitted similarly, but the columns and arches are arranged in a checkerboard pattern. 1 motif consists of 5 rows.
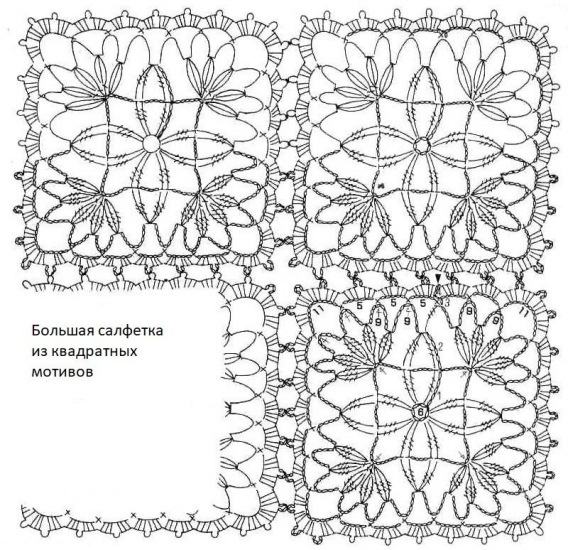 To assemble the napkin, you will need 35 ready-made motifs. The width of the product is 5 squares, the length is 7 squares. The blanks are connected to each other with 2 half-columns in each corner. Beginners can use medium-thick threads to make the work easier.
Napkin-runner
These are long items that are used to decorate festive tables. To knit a beautiful napkin-runner with a simple pattern, you will need a shiny thin silver thread and black yarn "Rose".
How to knit:
- Using shiny thread, cast on a chain of 70 air loops.
- Knit 6 rows of filet mesh. The cell consists of 1 column with a yarn over and 2 air loops.
- Knit 4 empty cells, then change the thread to black and knit an alternation of 5 air loops and 2 columns coming out of 1 point. Repeat 4 times. Knit 4 more shiny fillet cells and repeat the alternation again. Finish the row with 4 cells.
- A new row begins with 4 cells. Then knit 10 columns with yarns coming out of 2 air loops of the previous row, a half-column and again 10 columns. Alternate columns and half-columns 5 times. Again knit 4 empty cells and repeat the alternation of 10 columns 5 times. Finish the row with 4 empty cells.
- The next 5 rows are knitted similarly. The pattern is repeated from points 1 to 4 until the end of knitting.
The entire filet mesh should be shiny, and the square pattern should be black. This will create an elegant table decoration in a discreet style. Do not cut the yarn when you need to change its color. It is enough to pass the unnecessary thread under the pattern and knit overlapping it.
Openwork
Openwork is a pattern with many holes. You can knit a napkin with an openwork chess pattern. For work you will need white threads "Lily" or "Iris".
 How to knit:
- Cast on a chain of 70 stitches.
- Knit 2 rows of fillet mesh.
- Start a new row with 12 double crochets. Then knit an arch of 10 air loops. Repeat the alternation until the end of the row.
- Start another chain with 5 double crochet stitches, knit 1 fillet square, then 5 more double crochet stitches. Next, make an arch of 10 air loops, connecting it to the lower arch in the middle with 1 half-column. Knit like this until the end of the row.
- Start a row with 3 double crochets. Work 1 cell, 3 double crochets and 1 more cell. Work 3 double crochets and an arch of 10 air loops, connecting it with the previous one. Knit to the end of the chain.
- Repeat step 4, then step 3.
Then the pattern is repeated from point 1 to 6. It must be arranged so that the dense squares are above the arches and vice versa, then you will get a checkerboard pattern. It is not recommended to iron this napkin; you can use steam to avoid wrinkling the arches.
A rectangle is one of the simplest shapes for crocheted napkins. Experienced craftsmen recommend that beginners take such patterns for creating their first works.
If you follow the step-by-step descriptions, you can easily understand the graphic symbols and knit a beautiful product with your own hands.
Video on the topic: rectangular crochet napkin
Crochet. Rectangular napkin: