Knitted blouse for women easy to knit if you follow the detailed instructions. Using ready-made patterns, you can create unique items that will become part of your everyday wardrobe.
Fashionable models of women's knitted sweaters
Designers often present hand-knitted sweaters in their collections. That is why you can now see many interesting models demonstrated on the catwalks.
Conventionally they are divided into 3 groups:
- Styles with voluminous, strong or loose knitting.
- Openwork variations.
- Products made of smooth knitwear of various thicknesses.
The appropriate model is usually selected taking into account the season, the style direction prevailing in the wardrobe, the preferred color scheme. Other wardrobe elements are also taken into account. They should harmoniously combine with ready-made items.
Openwork sweaters
Openwork knit sweaters are mostly worn in the summer. They are worn with light skirts or shorts. Products with a large, voluminous pattern are best suited for cold weather. They are worn with jeans or tailored trousers.
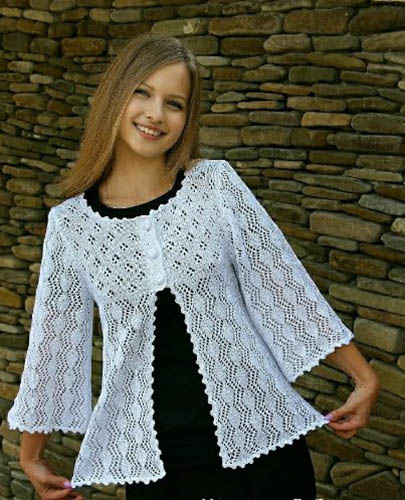
Patterns in the form of braids, stripes, geometric figures help to correct individual features of the silhouette. Large knitting looks expressive and stylish, and also allows you to create new bright patterns.
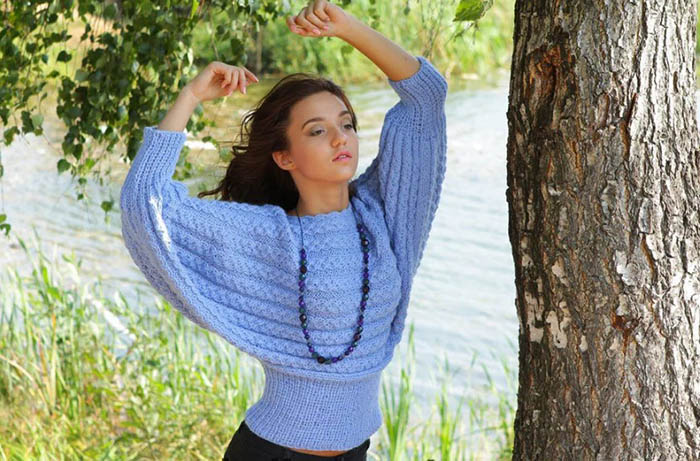
Oversized sweaters
Voluminous styles of sweaters are very popular among fashionistas. However, such things require efforts and skills from the craftswoman. The apparent shapelessness and external illusion of the absence of a certain size is achieved only by precise observance of all proportions corresponding to the parameters of the female body.
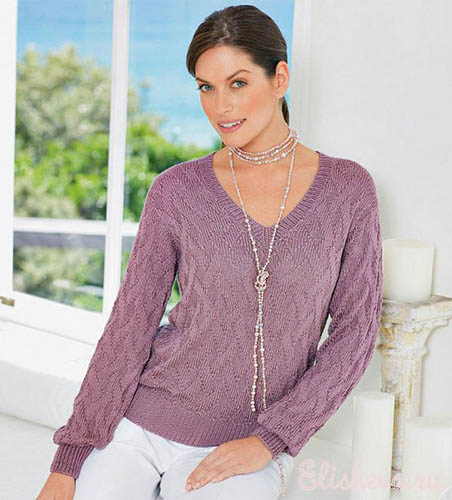
Sweaters with different necklines
The appearance of a knitted product is largely determined by the shape of the neck. Styles with a V-shaped neckline are in fashion. Designers consider this model very convenient if a shirt with a turn-down or stand-up collar is worn under the jumper.
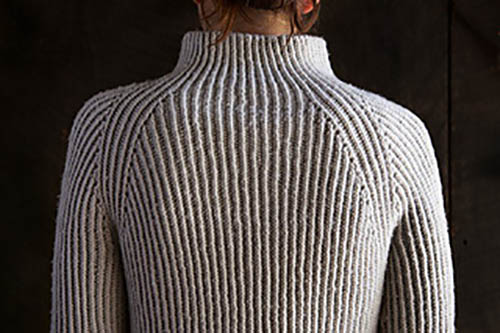
Items with a boat neckline are no less relevant. They visually increase the size of the shoulder girdle and add sexiness to it. A stand-up collar and a turtleneck are considered universal by designers. They look strict, but are more typical for sweaters.
Measurements for knitting a women's sweater
A knitted blouse for a woman (there are different knitting patterns, which allows you to choose the right model) is created quite simply if you have basic skills in needlework. However, before starting work, you need to take measurements. Focus on the nature of the product, the type of yarn.
The increase is made for a loose fit.
| 4 cm | A blouse made of thin yarn, with or without sleeves. |
| 6 cm | Pullovers knitted with knitting needles No. 3 and larger diameter. |
| 8 cm | Jackets worn with blouses and pullovers. |
| 10 cm | Coats or sportswear worn over thick shirts and similar items. |
First, you need to prepare the tools:
- measuring tape;
- sheet of paper;
- pencil or pen.
Required parameters:
| Abbreviations | Name of the measurement | How to measure |
| OG | Chest circumference | The centimeter is placed horizontally at the level of the armpits. It is used to encircle the body, including the highest points of the chest. |
| FROM | Waist circumference | It is girdled with a ribbon. |
| ABOUT | Hip circumference | Measurements are taken at the level of the required length of the jacket. The hips are wrapped with a centimeter tape, without tensioning. |
| OSH | Neck circumference | The tape measure is wrapped around the neck and closed in the dimple at the front. |
| OR | Arm circumference | Two measurements are taken. One at the fullest part of the hand. The other at the narrowest part of the wrist. |
| DS | Back length | The distance is measured from the 7th cervical vertebra to the waist level. |
| DR | Sleeve length | The arm is held down and slightly bent. Measure from the end of the shoulder joint to the wrist. |
| SHS | Back width | The measurement is taken between the shoulders and under the armpits. |
| OZ | Wrist circumference | The base of the brush is wrapped with a centimeter-thick tape. |
| DP | Shoulder length | The distance is measured from the beginning of the neck to the shoulder bone. |
| DI | Length of product | The centimeter tape is placed between the 7th cervical vertebra and the desired length of the jacket. |
Selecting yarn
Having decided on the model, materials are selected. For example, if the items are supposed to be worn directly on women's underwear, they are made from threads that contain as much cotton as possible. Synthetics have a longer service life, but they are not as hygienic.
To make a sweater, you can use a variety of yarns, for example:
- wool;
- alpaca;
- mohair;
- merino;
- angora;
- mink down.
Threads may vary in thickness. Thick thread and needles of the corresponding number are used for bulk knitting. Then the jumper is knitted without making openwork patterns.
Warm sweaters are also knitted from thick threads. But they must contain wool. Which allows for openwork knitting.
Mohair products look very feminine. Such products are weightless, delicate, and perfectly warm in any cold weather.
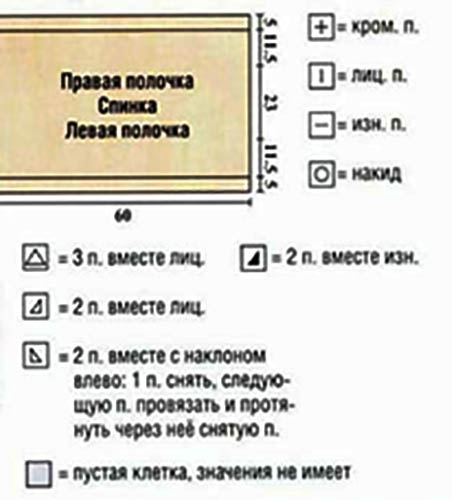
Conventions and abbreviations in master classes
Legend:
| p. | loop |
| reg. lin. | raglan line |
| lion. | left |
| persons. | face loops |
| elm. | knitting |
| res. | rubber |
| approx. | add |
| start | start |
| nak. | yarn over |
| spokes. | spokes |
| r. | row |
| out. | purl stitches |
| plat. elm. | garter stitch |
| schematic | scheme |
| p. | arrow |
| chrome. | edge loops |
| rap. | rapport |
| Art. w/o n | single crochet |
| right. | right |
Master classes on knitting sweaters with knitting needles
For women, there is a huge number of all kinds of knitted blouse models with simple patterns and instructions for their creation.
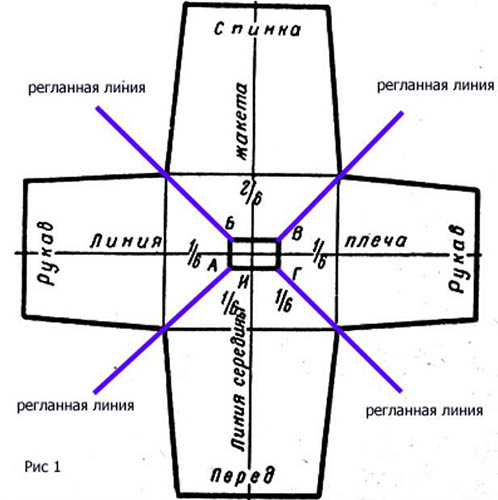
Jacket with a rounded collar and raglan lines
First, calculate the number of loops. Count how many sts go on the neck. Divide their total number into 6 parts. Then add 4 sts, marking the raglan lines.
For the sleeves, use 1/6 st. For the front and back - 2/6 st. The reg. lines can start from 1, 2, 3 sts. Or 4 sts. For example, the sweater is knitted with a crew neckline. Its diameter is 42 cm. Knitting density is 25 sts / 10 cm. In other words, 1 cm (2.5 sts).
In this model, you need to dial 105 sts. They are rounded up to 106 sts. For example, each reg. line is knitted from 4 sts. It turns out 4 * 4 = 16 sts. They go to all reg. lines. They are subtracted from the total number of sts: 106 - 16 = 90. Then 1/6: 90/6 = 15 sts.
It turns out:
- 2/6 (30 sts) – back and front piece.
- 1/6 (15 sts) – for each sleeve.
Technique of execution:
- First, collect a number of loops equal to the diameter of the collar.
- Then knit 1 row.
- The loops of the previous row continue to be knitted in a circle (close it).
- Next, the loops are distributed on the reg. line, the front part and the back. And also the sleeves. They are guided by the calculations made.
- The reg. line is marked with a needle and multi-colored threads.
- Usually, all product design is carried out on these lines.
- In even rows, before the reg. lin., and also after them, perform one nak.
- These lines are arranged according to Fig. 1.
- Usually the neckline is deeper in the front. This is taken into account during work.
- In other words, the back, as well as part of the sleeve, are knitted with elongated rows.
- Each subsequent row is longer than the previous one.
- Next, knit the circle to the middle of the right sleeve to form the neckline.
- Before and after the reg. lin. there is a nak.
- The product is turned.
- Next, knit along the wrong side in the opposite direction to the middle of the left sleeve.
- The work is being resumed.
- And again knit to the central part of the left sleeve (with a yarn over at the reg. lin.).
- Knit another 5-6 sts. Turn the product over again.
- Thus, knit until you reach the middle of the front part (the last row must be knit) in any row.
- Then the fabric is knitted in a circle.
- After each row, from each end of the reg. st. add 1 st.
- Increases are made until the reg. line reaches the required length.
Back and front
Then only the back and front are knitted.
Procedure:
- The sleeve loops are transferred to spare knitting needles or thick thread.
- For the reg. line, string 4 sts on the sides.
- Place the back and front pieces with reg. lin on circular knitting needles.
- These parts of the product are knitted in a circle to the required length.
Completion
Finishing knitting.
Algorithm of actions:
- The sleeve loops are placed on knitting needles with a fishing line.
- For reg. line 4 sts are cast on at the armhole.
- Also knitted in a circle. Loops are reduced at the reg. lin.
- Then the sleeves are simply sewn together with a vertical stitch on the surface.
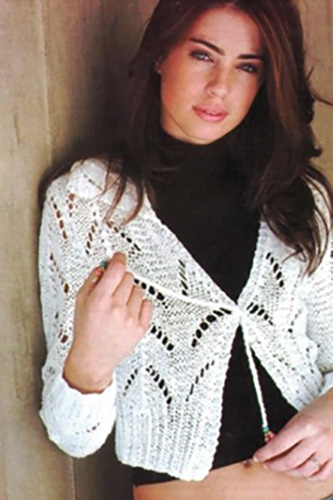
Short sleeve bolero jacket
A blouse with knitting needles for a woman (there are a variety of patterns for such models, you just need to choose the style you like) in the bolero style is knitted by an experienced craftswoman quite quickly.

You will need yarn (100% cotton) 150 g, stocking and circular knitting needles No. 2. Knitting density: 14 sts. (24 rows) = 10 x 10 cm.
Technique of execution:
- Knit a 1 x 1 elastic band (2 front, 1 back).
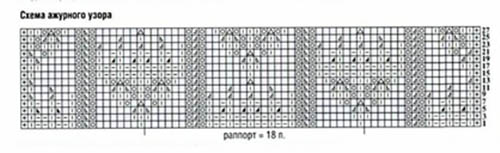
- Then knit an openwork pattern according to the diagram.
- In width, start with the loops in front of the 1st arrow.
- Rapport is repeated = 18 sts.
- Finish with loops after the 2nd arrow.
- In height, repeat from the 1st to the 28th row.
Job Description
One-piece knitted back, left and right front.
Execution technology:
- Cast on 93 sts.
- 12 rows knit with 1 X elastic
- Next, knit 112 rows, following the openwork pattern.
- Then knit 12 rows of elastic again (1 x 1).
- All sts are closed in one row.
Assembly and finishing
These are fairly simple procedures.
Procedure:
- The part is folded in half.
- Sew the side seams, leaving the armholes open. Use the pattern as a guide.
- The armhole lines are tied in the following way:
- On circular needles make a set of 48 sts.
- 8 rows knit with 1 X elastic
- In row 9 all loops are closed.
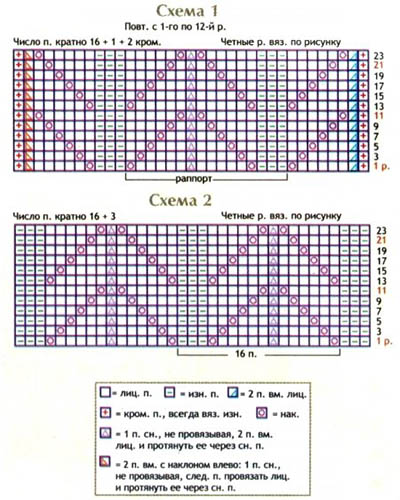
Openwork hip-length blouse made of thin yarn
Knitted blouse for women (the patterns of this product are not complicated) with a simple openwork pattern. This youth style with a tie is knitted from thin cotton yarn.
You will need a 380 g skein (100% cotton) of a light shade, a set of knitting needles No. 4, 4.5, a hook No. 3. And also multi-colored beads. Knitting density: 10 X 10 cm - 16 sts. (20 rows).
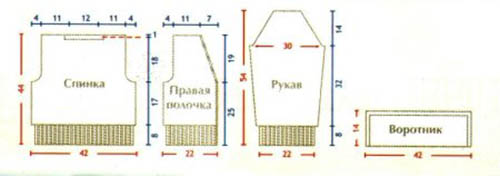
Back
The product is knitted with 2 threads.
Procedure:
- Cast on 66 sts using size 4 needles.
- 8 cm knit row 2 X
- Next, use knitting needles No. 4.5.
- Knit using diagram 1 as a guide.
- On the 1st approx. 1 p. = 67 p.
- At a height of 25 cm from the beginning of knitting, close 3 sts for armholes on both sides.
- In other words, in every 2nd row there are 2 sts and 1 st.
- After 18 cm from the beginning of the armholes, the first and last 18 sts, as well as the middle 19 sts, are knitted with purl stitch.
- At a height of 44 cm, close 18 sts for each shoulder and 19 sts for the neck.
- Knitting is finished.
Right shelf
First, take knitting needles No. 4.
Procedure:
- Make a set of 37 sts.
- Over a distance of 8 cm, 3 sts are knitted with purl stitch, and 34 sts are knitted with 2 X ribbing.
- Continue working with needles No. 4.5.
- The plank is done in the same way, and the remaining 34 sts are knitted using pattern 1.
- At a height of 25 cm from the start of the work, make an armhole on the side seam (as on the back).
- At the same time, decreases are made from the opposite end to bevel the neck.
- In every 2nd row, decrease 7 times by 1 st, having first retreated 3 sts from the edge.
- And in every 4th row, decrease 1 st 6 times.
- Again, at a height of 44 cm, close 18 sts for the shoulder and finish knitting.
The left shelf is knitted symmetrically to the right one.
Sleeves
Again take knitting needles No. 4.
Method of execution:
- Cast on 34 sts.
- Again 8 cm knit with a 2 X elastic band
- Next, the pattern is knitted using diagram 1. Select knitting needles No. 4.5.
- In the 1st row add 1 st.
- Then make increases in every 8 rows.
- Additions are made 7 times by 1 st. = 49 sts.
- At a height of 40 cm from the beginning of the knitting, 3 sts are closed on both sides for the armhole.
- Then in every 2nd row decrease 12 times by 1 st.
- The remaining 19 sts are closed.
- The total height is approximately 54 cm.
Collar
In this work we use knitting needles No. 4.5.
Procedure:
- Cast on 67 sts.
- Row 24 is knitted according to pattern 2.
- 4 rows knit purl stitch.
- The loops are closed.
- The total height is about 14 cm.
Assembly
It's a fairly simple procedure.
Sequence of actions:
- They are making seams.
- The sleeves are sewn into the armholes.
- The collar is sewn to the neckline. Capture 15 cm of each shelf.
- Using a double thread, knit 2 chains of air stitches using a hook.
- Their length is 30 cm.
- A long thread is left at one end of the chain.
- Beads are strung on it.
- These ties are sewn to the shelves.
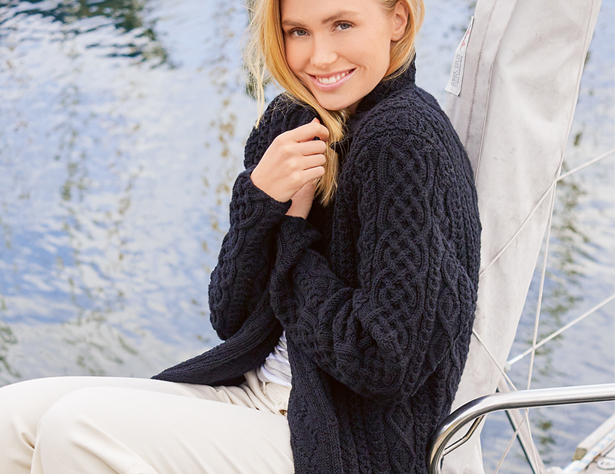
Warm button-down sweater
Knitted blouse for women (patterns of warm blouses are quite diverse and interesting, you just need to choose the right model), which has unusual interlacing patterns like traditional arans. They look expressive in dark colors.
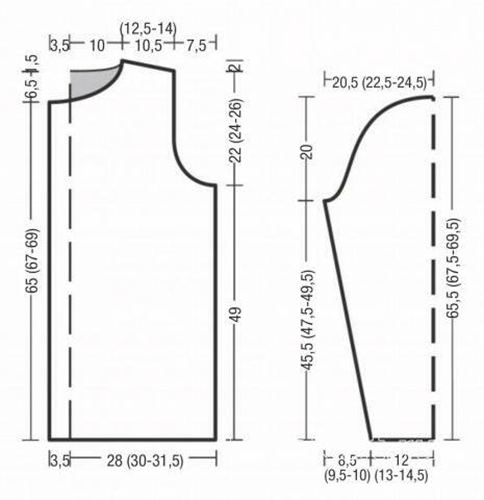
Sizes: 40 – 42, 44 – 46, 48 – 50.
You will need:
- yarn 900 – 1000 g (100% wool, 50 g / 120 m);
- straight and circular knitting needles No. 4 (40 cm cord);
- hook No. 3.5;
- buttons – 9 pcs., diameter 18 mm.
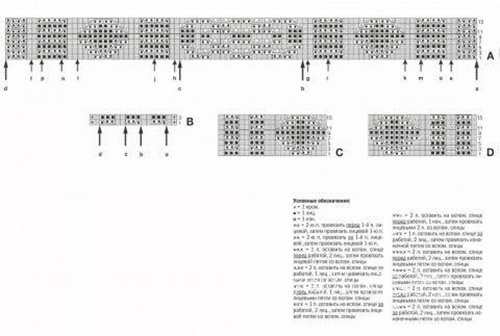
Braid pattern
It is knitted according to pattern A.
Sequence of actions:
- Loops are distributed according to the instructions. Rows 1–16 are repeated.
- Elastic band with "braids"
- It is knitted according to pattern B.
- Start with 2 sts before arrow a. Rapport A is performed 11 times from 5 sts between arrows a and b.
- Between arrows b and c, knit 3 sts from 1 time.
- Then between arrows c and d, pattern B is performed 11 times from 5 sts.
- After arrow d, finish with 2 sts.
- Continuously repeat rows 1–4.
Diamond patterns A and B
Knit 21 sts using diagrams C and D. Always repeat rows 1–16.
Density: 27 sts (28 rows) = 10 x 10 cm. Knit with the “Braids” pattern
Back
Beginning of knitting.
Technique of execution:
- Cast on 152 (164 – 172) sts.
- Knitted with a "braid" pattern.
- From arrow e (g — i) to row b, knit edge, 29 (1 — 5) sts. Rapport A is knitted from 34 sts.
- Between pages a and b, perform 1 (2 – 2) times.
- Between pages b and c 24 sts.
- Between rows c and d, rap. B of 34 sts is knitted 1 (2 – 2) times.
- From row c to row f (h – j) knit edge 29 (1 – 5) sts.
- After 49 cm (row 138) from the initial row, close 6 sts on both sides of the armholes once.
- Next, in every 2nd row, close 4 sts 1 time, 3 sts 1 time, 2 sts 2 times. Another 3 times 1 st.
- You get 112 (124 – 132) sts.
- After 22 (24 – 26) cm = 63 (68 – 72) rows from the beginning of the armholes, close 8 (8 – 9) sts on both sides for the shoulder bevels once.
- In every 2nd row 3 times 7 (9 – 10) sts.
- At the same time, 0.5 cm from the beginning of the shoulder slope, close the middle 50 sts for the neck.
- And first they complete the left side.
- From the inner edge in the next 2nd row, close 2 sts 1 time to round the neck.
- The other side is finished symmetrically.
Left shelf
They are making a shelf.
Procedure:
- Cast on 86 (92 – 96) sts onto the needles.
- They are distributed as follows: edge, then from row c (g – i) to row b 29 (1 – 5) sts, then between rows a and b knit 1 (2 – 2) times rap. A from 34 sts.
- Then follow 21 sts of the diamond pattern A, edge.
- After 2 cm (6 rows) from the initial row, make the 1st hole for the button.
- In other words, close the 5th and 6th loops from the end before the edge.
- And in the next row they recruit again.
- The next 8 holes are made in the same way, leaving a distance of 7.5 (8 – 8) cm = 20 (22 – 22) rows.
- Then, after 49 cm (row 138) from the beginning of the row, close 6 sts 1 time on the right side of the armhole.
- Then in each 2nd row 1 time 4 sts and 3 sts, 2 times 2 sts. Another 3 times 1 st.
- Total 66 (72 – 76) sts.
- When you have knitted 16 (18 – 20) cm or 46 (52 – 56 rows) from the beginning of the armhole, for the neckline, close 13 sts 1 time from the left edge.
- Then immediately in every 2nd row 1 time 6 sts, 5 sts, 4 sts. Next 1 time 3 sts, 2 times 2 sts and the same number of times 1 st.
- At the same time, having knitted 6 cm (16 rows) from the beginning of the neck, for the shoulder bevel from the right edge, close 8 (8 – 9) sts 1 time.
- And in every 2nd row 3 times 7 (9 – 10) sts.
Right shelf
The right shelf is knitted similarly to the left one. However, holes for buttons are not made.
Technique of execution:
- Distribution of loops: edge, 21 sts, pattern of “diamonds” B.
- Then between rows c and d 1 (2 – 2) times knit rap. B of 34 sts.
- Then from row c to row f (h – j) perform 29 (1 – 5) sts, edge.
- The holes for the buttons are also made on the right shelf if desired. Simply close the 5th and 6th sts after the edge. And in the next row, cast on again.
Sleeves
For each piece, cast on 66 (72 – 80) sts and knit using the “Braids” pattern.
Execution technology:
- Knit the edge, from row k (m – o) to row b 20 (23 – 27) sts.
- Then between rows b and c knit 24 sts.
- Then from row c to row l (n – p) knit 20 (23 – 27) sts again, edge.
- For bevels on both sides in the 5th row from the beginning of the row add 1 st 1 time.
- Then in every 6th row 13 (12 – 12) times. In the 4th row 10 (13 – 14) times 1 st.
- You get 114 (124 – 134) sts.
- Next, on the added sts, repeats A and B are performed all the time.
- Then, when you have knitted 45.5 (47.5 – 49.5) cm or 128 (134 – 138) rows from the beginning of the row, for the armhole, close 3 sts 1 time on both sides.
- In every 2nd row 1 time by 2 sts, 22 times by 1 st, 3 times by 2 sts. Another 1 time by 3 sts.
- Then, when you have knitted 20 cm (56 rows) from the beginning of the formation of the armhole, close the remaining 42 (56 – 62) sts.
Assembly
It is not difficult to assemble all the parts of the sweater.
Sequence of actions:
- Sew the shoulder seams. Sew in the sleeves.
- The sleeve seams are completed and the product is sewn along the sides.
- The outer edge of the product and the edges of the sleeves are tied with sc. Using a hook.
- Then from the st. sc of the neck on circular knitting needles No. 4 inside cast on 117 sts. Knit 1 row. purl.
- Next, knit with an elastic band with “braids”.
- When you have knitted 13 cm (40 rows) from the set of sts, close all the loops according to the pattern.
- Sew on buttons.
For a woman who knows the basics of knitting, it will not be difficult to knit a blouse for herself. There are a huge number of different patterns, so before work, all that remains is to choose the model you like.
Video about knitting a blouse
Master class: delicate blouse with knitting needles: