Beautiful and interesting crafts can be made not only from store-bought craft supplies, but also from waste materials - disposable cups, plates, spoons, garbage bags and other improvised means. This article describes several options - from simple toys that are suitable for independent children's creativity, to complex structures with lighting.
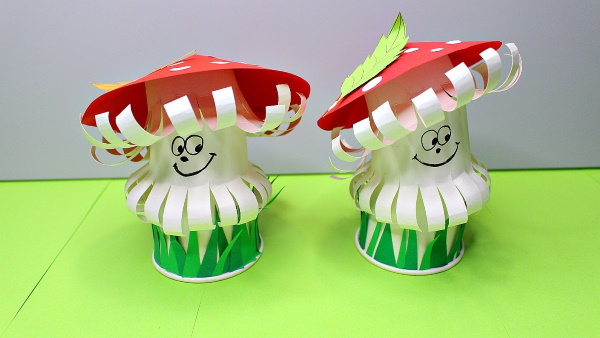
Fly agaric from a plastic cup and paper
This bright and simple craft can decorate the interior of a child's room. It is also used for thematic competitions - "Gifts of Autumn", "Queen Autumn" and others dedicated to children's arts and crafts.
Creation continues.
Tools and materials
To make a fly agaric you will need the following tools and materials:
| Name | Quantity |
| white plastic cups | 3 pcs. |
| scissors | 1 pc. |
| a small plate for tracing the outline of the mushroom cap | 1 pc. |
| glue stick | 1 pc. |
| black felt-tip pen or marker | 1 pc. |
| round pencil | 1 pc. |
| white and colored paper red, yellow, light and dark green | 1 piece each |
Step by step manufacturing process
Crafts from disposable cups in the form of fly agarics are made as follows:
- First, you need to cut off the rim at the top of the cup.
- After this, use scissors to cut longitudinal strips about 1 cm wide around the entire circumference, leaving about 1.5-2 cm from the bottom of the cup.
- Fold each strip outward and wrap it around a pencil.
- Cut off the neck of the second cup and make slits along it at ½ the height.
- Bend the resulting strips inward using a pencil.
- Then cut elongated triangles of different sizes from green paper to imitate grass. They need to be glued with a glue stick along the edge of the neck of the third cup.
- In order for the fastening between the glasses to be elastic, you need to make "accordions" from 2 strips of paper, bending them crosswise between themselves. You will need 2 of these "accordions".
- Glue the end of one of the “accordions” to the bottom of the cup with the “grass” and the cup with the ends bent inward, placing it on top.
- Glue the glass with stripes to the outside through the second “accordion”.
- Now you need to make the mushroom cap. To do this, place the plate on the red paper, trace the outline with a pencil and cut out the circle.
- Cut a small segment from the circle to give the hat a conical shape. Glue the edges of the segment together.
- Cut out small circles from a small piece of white paper and glue them onto the hat.
- Generously coat the bottom of the top cup with glue and glue the cap on.
- Cut a leaf out of yellow or green paper and glue it to the hat.
- On the front of the mushroom, use a felt-tip pen to draw eyes and a mouth.
Rabbit from a plastic cup
Plastic cups can be used as a base (body) for various animals - turtles, chickens, frogs, pigs, cows and others.
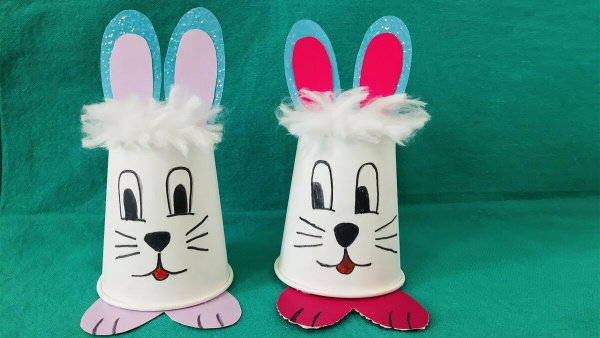
The easiest option is to paint the cup and glue additional elements (ears, tails) to it from available materials, such as paper, chenille wire, or a piece of fabric.
Tools and materials
To make a rabbit you will need the following tools and materials:
- plastic cup – 1 pc.;
- shiny paper;
- pencil;
- white and pink paper;
- hot glue gun;
- scissors;
- stationery knife;
- black and red marker;
- a piece of cotton wool or white woolen thread.
Step by step manufacturing process
The process of making this craft is as follows:
- First, you need to draw an elongated ear on plain paper and cut it out.
- Then apply it to the shiny paper and trace the outline with a pencil, cut out 2 ears.
- Then cut out smaller ears from pink paper and glue them to the shiny ears using a hot glue gun.
- Make 2 slits in the bottom of the cup with a stationery knife and push the ears through. To make them easier to insert, the slits can be widened with scissors. After this, the ears need to be secured with a hot glue gun.
- From a small piece of cotton wool, form the rabbit's bangs and glue it to the bottom of the cup between the ears.
- Also make a pompom out of cotton wool or thread and glue it to the back as a tail.
Use a felt-tip pen to draw the animal's eyes and mouth.
"Snake"
Crafts from disposable cups in the form of a snake and dragons are also easy to make, like the previous ones. They are suitable for children's creativity at an early age (together with parents). If it is not possible to buy multi-colored cups, then they are pre-painted or pasted over with colored paper.
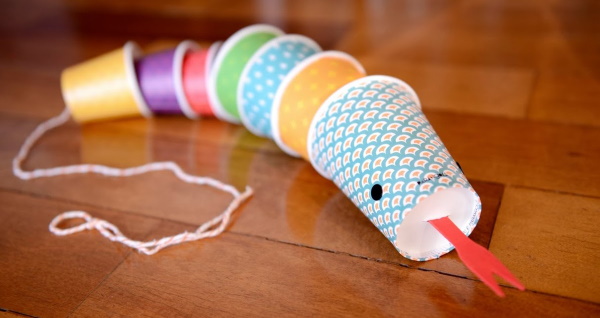
In a similar way, you can make a dragon in the oriental style, decorating its "body" with ribbons of colored tissue paper. If you make a hole in the last cup and tie a skewer to it, such a "dragon" will be able to fly.
Tools and materials
To make a "snake", you will need the following materials and tools:
- colored cups – 7 pcs. (you can take more, then the toy will be longer);
- soft kitchen sponges – 2-3 pcs.;
- wire 1-1.5 mm in diameter;
- elastic band 1 cm wide (or thicker wool thread);
- several toothpicks;
- scissors;
- stationery knife;
- markers (or felt-tip pens) of black color;
- ice cream stick;
- Scotch tape (or electrical tape).
Step by step manufacturing process
The craft is made as follows:
- First, you need to cut circles from the sponge with scissors so that they fit on the bottom of the cup. The outline does not have to be even, since they will not be visible in the finished craft anyway.
- Bend the wire in half, it will be used as a “needle” to pull the elastic through the cups.
- Make a knot at one end of the elastic band, thread 2 toothpicks through it, tighten the knot and tie another one.
- Trim the free sharp ends of the toothpicks with scissors for safety purposes.
- Then make a hole in the bottom of the cup using scissors.
- Thread the wire through this hole so that the loop is behind the cup.
- Place the rubber band into the loop and pull it along with the wire through the hole in the bottom of the cup.
- After this, pierce the sponge circle with wire and also pull the elastic through it.
- Place the sponge inside the cup and pull out the rubber band.
- Do the same with the rest of the cups. If you place half of the cups in the opposite direction, and take some of the cups of a larger size, then the "snake" will gather in the middle. But you can also make a simpler version, in which all the cups "look" in one direction.
- The ice cream stick needs to be cut with a stationery knife into the shape of a snake's tongue and painted red.
- In the last cup you need to make a slit and insert your tongue into it.
- If you used a thread to assemble the cups, you can simply attach it to the tongue using tape. For the elastic, you will need to wrap a thick layer of tape on the free end of the ice cream stick and tie the elastic above it. There is another option - secure the second end of the elastic with toothpicks (just like the first), and to hide them, put on another cup, which will be the head.
- Draw a funny face on the snake's head using markers or felt-tip pens.
Easter Egg Basket
Crafts can serve not only for the creative development of children, but also as interior decoration.
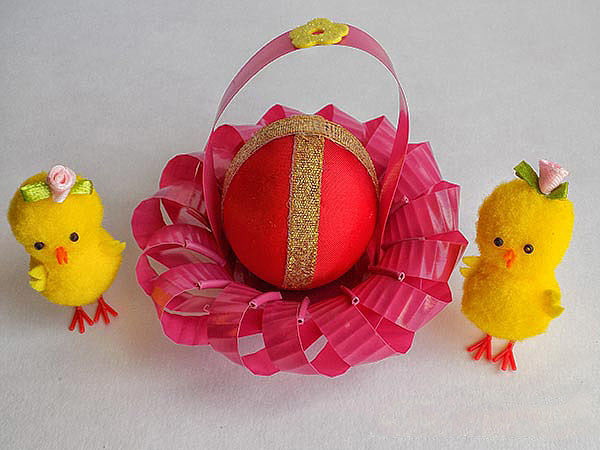
For this simple disposable cup arrangement, it's best to use a colored plastic cup as a base, but if you don't have one, a clear one will work as well.
Tools and materials
To make the basket you will need:
- 2 plastic cups;
- decorative elements (bow, beads or artificial flower);
- scissors;
- double-sided tape or universal glue.
Step by step manufacturing process
To make this craft, you need to do the following:
- Using scissors, cut strips 7-10 mm wide along the length of the cup. The slits should not reach the bottom by the length by which the height of the basket is calculated.
- Take one strip, move it down and hook it with a flange (roller) onto the base of another strip, through one.
- Do the same with all the cut strips.
- Cut off the top smooth part of the second cup to a width of 1.5-2 cm, then cut off the rim.
- The resulting strip must be turned inside out and secured to the basket using double-sided tape cut into 2 small squares.
- After this, you can glue the decor to the composition (using the same tape or glue).
Doll from a disposable cup
These funny figures can be made in the same way as fly agarics, but in this case the composition is not voluminous, but flat.
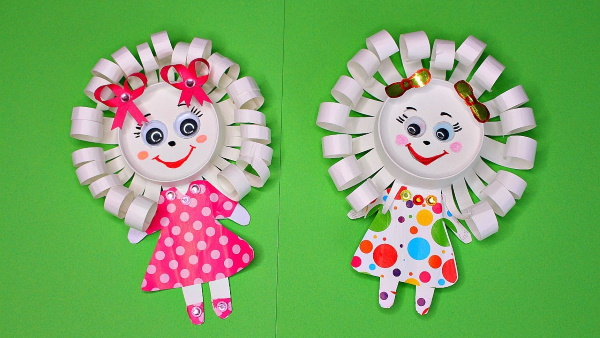
Other characters are collected in the same way – animals, the sun.
Tools and materials
To make a doll you will need the following materials and tools:
- plastic cup – 1 pc.;
- a small piece of colored paper - plain and patterned;
- felt-tip pens;
- scissors;
- narrow ribbons, rhinestones and other decor;
- glue stick;
- eyes.
Step by step manufacturing process
To make a doll, you need to do the following:
- First, make a slit in the cup, 5 mm from the bottom, then cut off the rim with scissors.
- Cut narrow strips about 5 mm wide along the height of the glass. Leave one of the strips wider – about 2 cm.
- Bend the ends of the narrow strips using a felt-tip pen or pencil, pressing the material firmly against it with your fingers. Leave the wide strip.
- Then turn the cup over and mark the doll’s legs on the back side and cut them out.
- First draw the dress on plain paper, cut it out with scissors and use it as a template for the colored paper. Cut out 2 dresses by folding the colored paper in half.
- Glue the dress to the body using a glue stick.
- Then glue the “arms” and the second dress on the back side.
- Draw the doll's face on the bottom and decorate it with additional decor to taste.
Little train
Plastic yogurt containers are more rigid than regular disposable cups, so you can make more stable structures out of them – cars, trains, airplanes and animal figures.
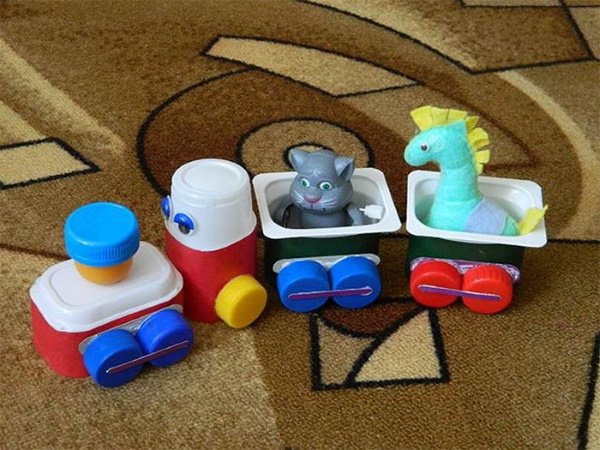
A child can make the “train” craft almost entirely on his own, without the help of his parents.
Tools and materials
To make this toy you will need:
- plastic yogurt cups according to the number of "wagons";
- plastic bottle caps;
- Moment glue (or Superglue);
- colored paper;
- scissors;
- eyes;
- cardboard;
- plasticine;
- Kinder Surprise capsule;
- glue stick.
Step by step manufacturing process
Crafts from disposable cups in the shape of a steam locomotive are made as follows:
- Cut strips of colored paper to match the height of the cups and glue them to hide the advertising messages on the containers.
- Cut strips of cardboard about 1 cm wide, and glue the “wheels” made from the lids to them with PVA glue.
- Then glue the wheels to the carriages.
- The driver's cabin must be made from 3 cups, the edges of which must be cut off.
- Glue the eyes to the train.
- The "pipe" of the locomotive is made from half a capsule from a Kinder Surprise and a plastic lid. It is better to glue them together with "Moment" glue. If you don't have it, then plasticine will do.
- You can connect the carriages together using plasticine or thread.
Snowman from cups
A craft in the form of a snowman made of cups will be appropriate for New Year's decoration. The number of cups depends on the size and number of "snow" balls (2 or 3). If you put a lamp or LED lamp inside the ball, the snowman can be used as a backlight in the evening.
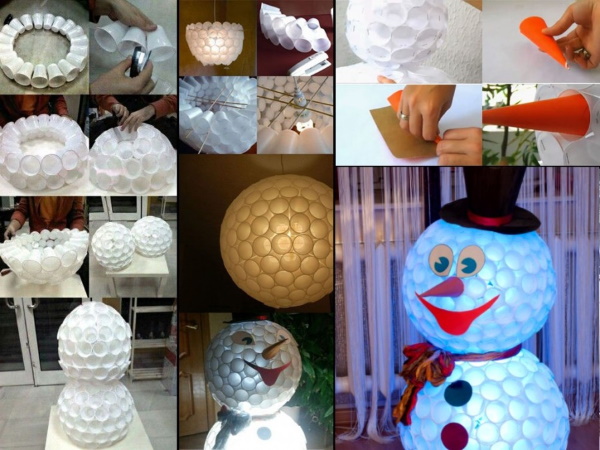
For decoration, you can use various additional elements - hats, caps, cardboard “buttons”, New Year’s tinsel. Making this craft takes longer than the previous ones.
Tools and materials
To make a snowman you will need the following materials and tools:
- disposable white or transparent cups with a capacity of 200 ml – about 300-350 pcs.;
- a stapler and the number of staples for it corresponding to the number of cups;
- orange cardboard or paper for the “carrot” – 1 sheet;
- scarf;
- white, black, colored paper for making head elements;
- hot glue gun.
Step by step manufacturing process
The process of making a snowman is as follows:
- To speed up assembly, it is necessary to connect the cups in pairs with a stapler, setting it to half the depth.
- The first (central) ring will require approximately 25-26 glasses. Paired glasses should also be stapled together.
- The second ring of cups is also first fastened in pairs, and then to the lower tier. It will take about 20-22 cups.
- The third tier will require 17-18 cups. If there are small gaps between them, it is not a problem, in general the whole structure will not suffer from this, you need to adjust them on site.
- The fourth tier will require about 15 glasses. Gradually, you will get a hemisphere, which should be assembled from the bottom in the same way.
- Using the same scheme, a second “snowball” of a smaller diameter is made for the snowman’s head.
- Also fasten the snowman parts together with a stapler.
- Roll a piece of orange cardboard into a cone, glue or staple the edges. Insert the "nose" into one of the cups on the upper sphere.
- Cut out the whites of the eyes from white cardboard and glue circles of black cardboard or paper to them (“pupils”).
- Cut the snowman's mouth out of red paper or felt and glue it on with a hot glue gun.
Disco ball made from plastic cups and garland
Crafts made from disposable cups in the form of glowing disco balls are an original and inexpensive interior decoration that can be made for the New Year or another holiday.
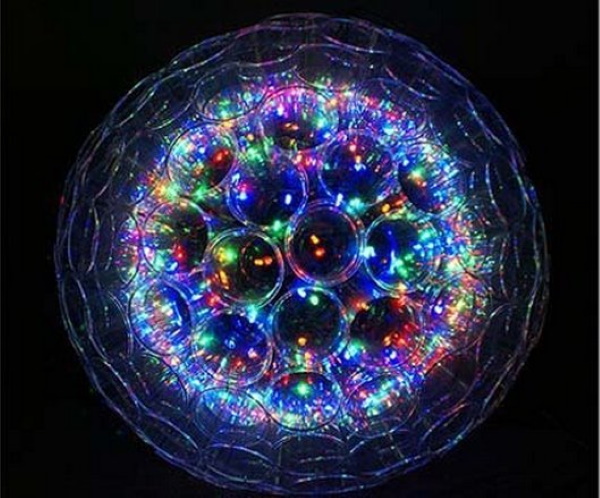
If you use opaque cups, you will get a softer, “matte” light.
Tools and materials
To make a disco ball you will need the following materials and tools:
- disposable transparent cups – about 180-200 pcs., depending on the desired size of the ball;
- a stapler and the number of staples for it corresponding to the number of cups;
- electric garland – 1 pc. (the number of bulbs depends on the number of cups);
- stapler and paper clips for it;
- soldering iron.
Step by step manufacturing process
The production of a disco ball is as follows:
- Assemble the first hemisphere as described in the previous version. The cups must be fastened together loosely, without tightening, otherwise the structure will warp. The total number of cups, as in the previous case, depends on the angle of their expansion from the bottom to the top. The smaller it is, the larger the sphere will be and the more material will be needed.
- Use a soldering iron to burn holes from the inside of the hemisphere in the bottoms of the cups.
- Insert one bulb of the garland into each hole. It is best to start from the center to the periphery.
- Assemble the second half of the sphere in a similar manner, but it is necessary to run the plug outward to connect to the network.
Dress made from cups, bags and napkins
The basis of this craft is also made up of rows of plastic cups, connected in sequence.
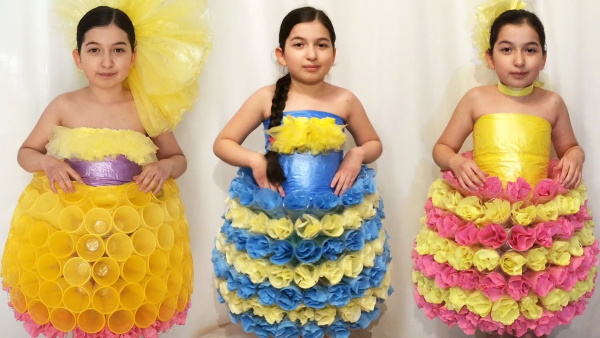
There are many options for making such an outfit - you can use spoons, plates, bottles, lids together with disposable cups, make a fluffy "skirt" to the floor, and insert corrugated paper instead of napkins.
Tools and materials
To make the dress you will need:
- disposable cups (transparent or colored) – 100-150 pcs.;
- 2 packs of colored paper napkins;
- disposable garbage bags – 1-2 rolls;
- scissors;
- stapler, thread and needle.
Step by step manufacturing process
The production of this craft consists of the following steps:
- Just like in the previous cases, you need to make the base of the dress in the form of a ring of cups connected together. Their number depends on the desired width of the skirt. For a child aged 10-12, you will need 24-26 pcs.
- In each subsequent circle, the number of cups should be reduced by 2 pieces. The number of rows depends on the desired length of the skirt.
- The round rows of cups must be stapled together.
- Cut a strip approximately 2 m long from a roll of disposable bags.
- Place the middle of the strip down to the center of the skirt and staple the edges to the cups. The free ends of the roll will be used to wrap around the waist.
- Fold each napkin in half diagonally and round the edges. Then unfold it and place it in the cup. To prevent it from falling out of the cup, you can also staple them together.
- Wrap trash bags around your waist and tie them. Sew a few napkins to them for extra decoration.
Vase from disposable cups
A vase made from plastic cups can be decorated in various ways - dot painting (acrylic paint), compositions made from salt dough, papier-mâché or polymer clay, knitted elements, decoupage.
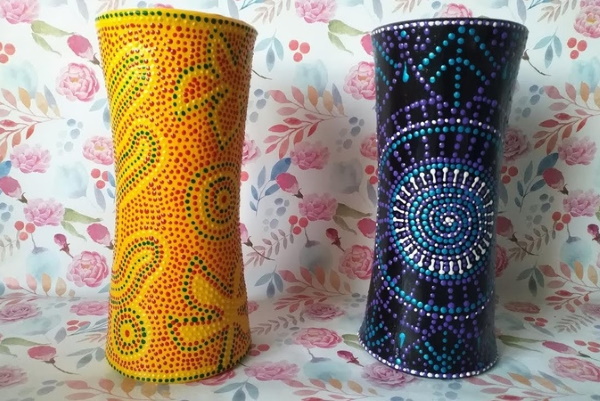
The advantages of such a design are that it is light in weight, inexpensive to make and does not let water through, like a real ceramic or glass vase. To "strengthen" it, plaster and several layers of papier-mâché are used.
Tools and materials
To make a vase you will need:
- 2 plastic cups (preferably with a slight slope on the walls);
- stationery liquid PVA glue – 150 g;
- PVA construction glue – 100 g;
- wide masking tape;
- newspaper;
- white paper;
- gypsum – 100 g;
- acrylic paints;
- fine-grained sandpaper;
- brushes - stationery, glue and paint brushes, 3-4 cm wide;
- deep penetration primer.
Step by step manufacturing process
The vase is made as follows:
- Place the bottoms of the 2 cups together and glue strips of masking tape to secure them together.
- Dilute PVA glue in 100 g of warm water.
- Cut pieces of ordinary paper about 2-2 cm in size and glue them to the outside of the cups, generously coating them with glue solution on both sides.
- Tear the newspaper into pieces of approximately the same size and glue them onto the second layer over the paper. Let the paper dry for 3-4 hours.
- Dilute PVA construction glue with water in a 1:1 ratio and mix thoroughly until a homogeneous structure is obtained.
- Pour gypsum into the resulting mass and stir. It should become a creamy mass. If necessary, add more gypsum or glue.
- Coat the vase with this mixture over a layer of newspaper using a wide brush.
- When the plaster is completely dry, go over its surface with fine sandpaper to remove any unevenness.
- Blow off excess dust or brush it off with a dry brush.
- Next, cover the plaster layer with a deep penetration primer. This must be done so that the paints will adhere better later. Allow the primer to dry completely.
- Now you can start decorating. Paint the background with acrylic paint, and after it dries, apply patterns with a thin brush (or special acrylic paint in tubes with a thin nozzle for dot painting).
Crafts from disposable tableware are a good way to reuse plastic. Eco-decor from cups can be combined with other types of materials, and its exceptional properties - flexibility, lightness and good moldability - are suitable for both children's creativity and as a basis for complex compositions.
Video about crafts from disposable cups
Crafts from disposable cups: