Popular today crafts from unusual materials. For example, original items can be made using popsicle sticks. These items can be a surprise or a gift for friends and family.
Preparation for creative work
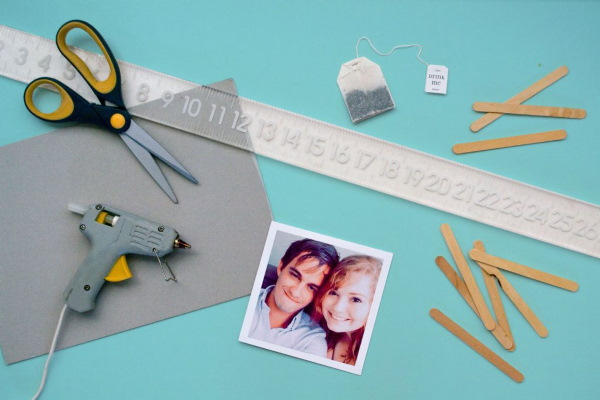
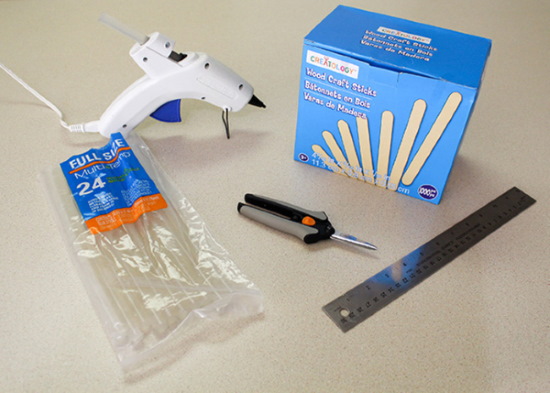
To make your work enjoyable, you need to decide on the model of the product in advance and prepare the sticks.
To do this you need:
| Option 1 | Option 2 |
|
|
| |
The importance of the procedure is that dirt and unnecessary food layers are removed from the workpieces. The material becomes elastic, which makes the work easier.
Step-by-step master classes for children on making beautiful crafts from ice cream sticks
The remaining ice cream sticks can be used as bookmarks or craft material. The products can be useful or decorative. The simplest ones are photo frames. Both adults and small children can easily cope with such a task. To do this, it is enough to paint the sticks in different bright colors and after drying, combine them into a square using glue.
The manufacturing stages are as follows:
- Glue 2 pieces together at an angle.
- Connect 2 more sticks.
- Place a drawing you created yourself or a picture you like inside the frame.
However, older children choose more complex crafts for their creativity.
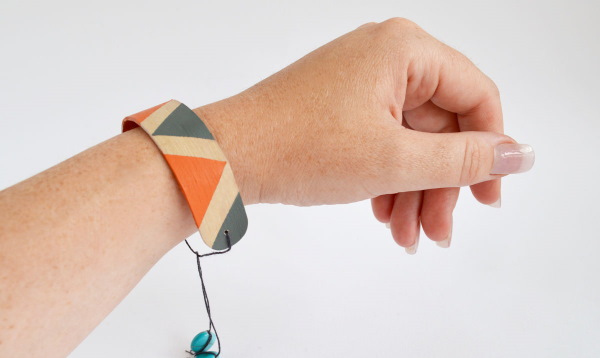
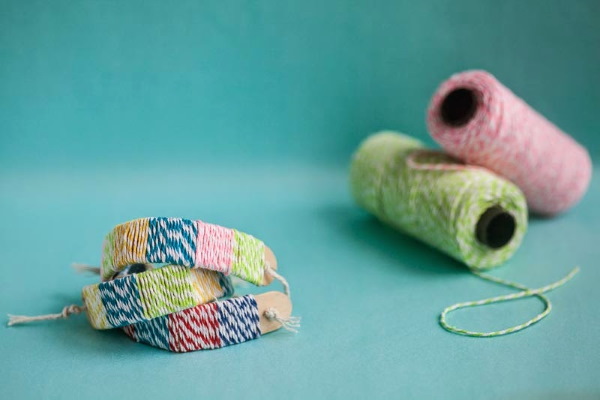
Bracelets
Girls love to wear baubles and bracelets. If you make them with your own hands, the product will be even more valuable. A bracelet made of wooden sticks, if desired, will become an indispensable decoration that you can give to a friend, sister or mother.

To work you need to prepare:
- ice cream sticks (about 11 pcs.);
- marking marker;
- picture or decor;
- wood glue;
- a sharp stationery knife;
- a piece of satin ribbon of the required width and length.
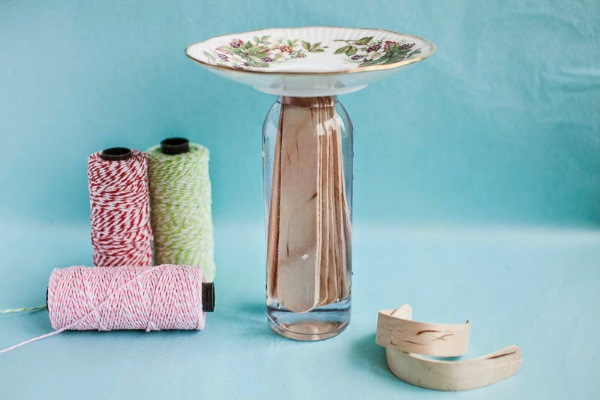
The process of pre-treatment of the material consists of the following steps:
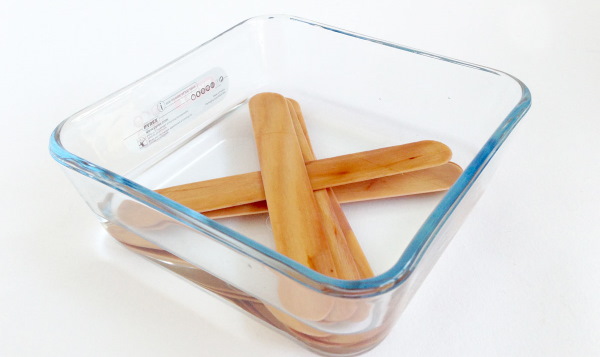
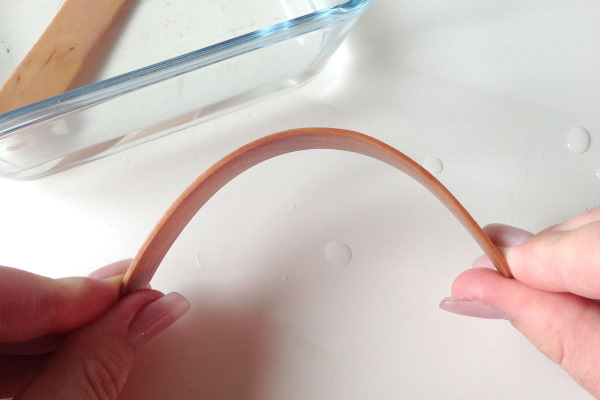
- Soak the required number of sticks in water.
- Select a jar for drying the blanks.
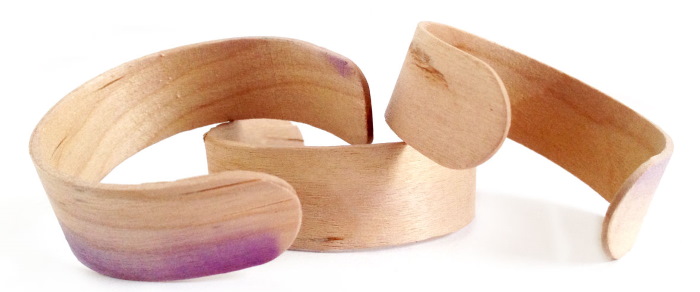
- After swelling, place the sticks in a jar and give them the desired shape.
- After complete drying, connect the parts of the workpiece and cover with protective varnish.
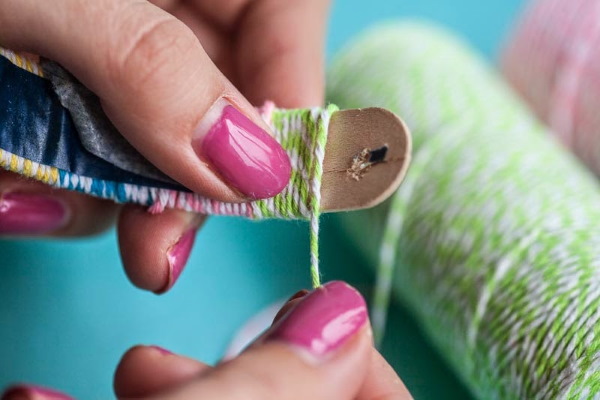
- Add decoration, tie with a beautiful ribbon.
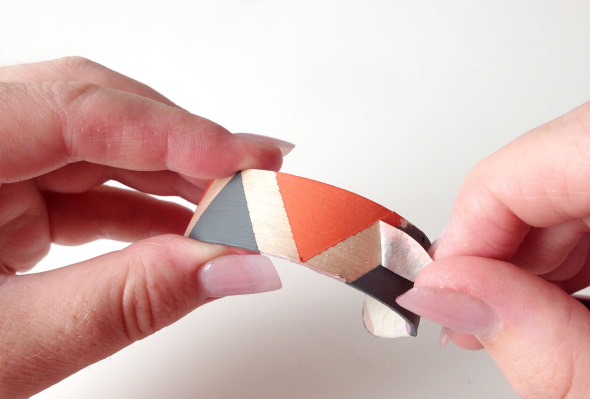
You can also make an unusual mosaic bracelet.
To do this you need:
- Take a picture you like, divided into separate parts.
- Place the processed sticks end to end on the table and stick the selected image onto them.
- Turn the blanks over and write a short wish.
- Using a stationery knife, separate the blanks and connect the mosaic parts into a single whole with a satin ribbon.
It is better to give such a bracelet in disassembled form, so that you can put together the mosaic yourself and read the wish.
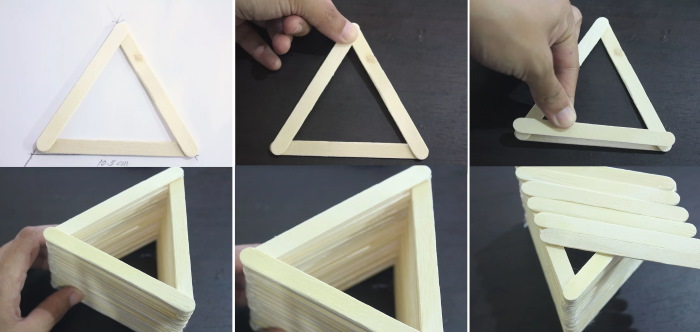
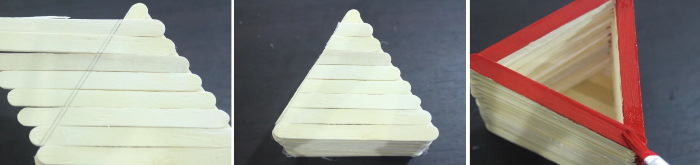
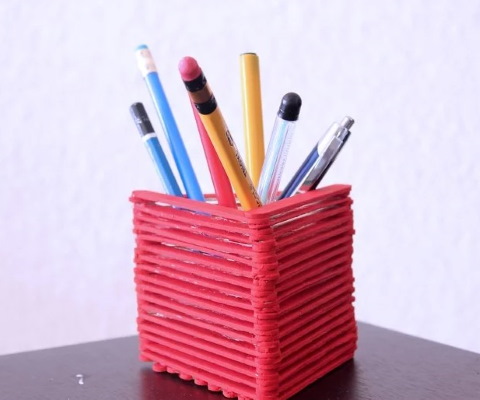
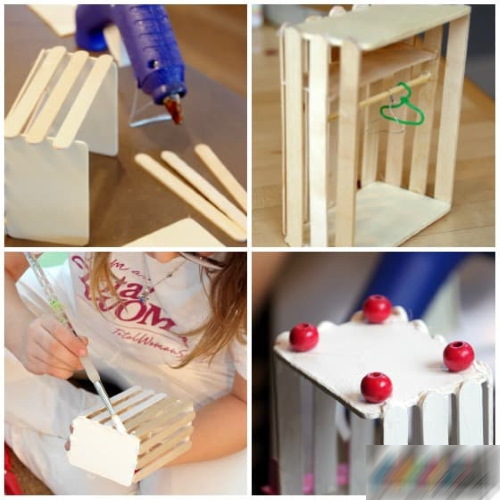
Pen and pencil holders
Crafts made from ice cream sticks can be presented as an original device for storing pens, markers and pencils. This product will be useful because the child will happily start putting office supplies in a jar made with his own hands, rather than scattering them on the table.

In addition to the sticks, you will need the following tools for work:
- a small box made of thick cardboard. This could be packaging for tea, toys, kitchen utensils;
- set of paints;
- decor for decoration;
- strong wood glue or PVA.
After processing the material, the box is first pasted over from the outside to ensure the stability of the structure, and then the inner perimeter is finished. Finally, the product is painted in the desired color and, after drying, decorated with various details and glue.
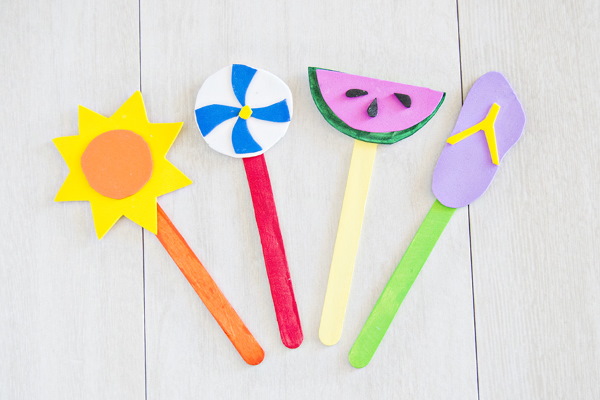
Bookmarks
For students, a bookmark is an important thing, because you can't bend pages, it spoils the sheet. With a beautiful bookmark, you don't have to worry about having to look for a long time to find the place where reading was interrupted, and in class, the textbook will open faster to the desired section.
Crafts from ice cream sticks in the form of bookmarks are easy to create. For boys, it is recommended to choose a scheme in the form of a car or an airplane, girls will like dolls or flowers more.


The principle of operation is as follows:
- Find a drawing of the required size, transfer it onto thick cardboard and cut out 2 identical pieces.
- Color them in different colors. This will make the bookmark more interesting.
- Attach the picture details to the stick on both sides.
To make a bookmark in the shape of a car, you will need to make 2 copies, which are glued to an ice cream stick on both sides.
The decoration can be made not only from cardboard, but also from thick felt or foam board. This material allows you to cut out small details, such as wheels or eyes. This will liven up the craft, especially if you make a dress from colorful fabric for the doll and make the eyes from glass beads. In this way, you can create an animal zoo or a garage with cars and change the bookmarks every day.
Magnets
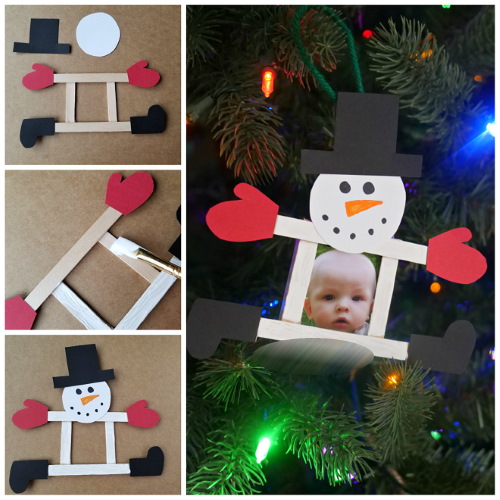
To make a magnet for a child with your own hands, you can use as a basis a frame made of sticks with a photo of a friend or family member, as well as an airplane or another figure made of the same material.
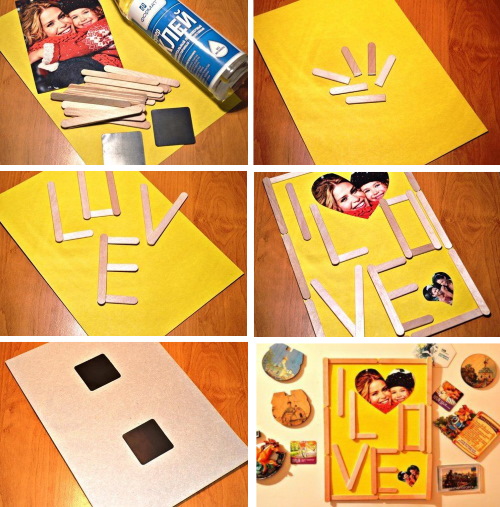
After finishing the work, a magnet is attached to the workpiece, and the product can be used to decorate your home or as an original gift.
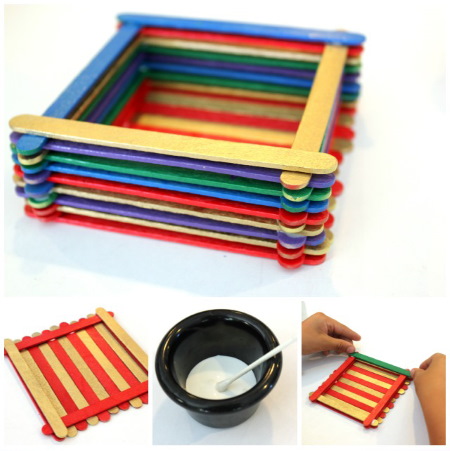
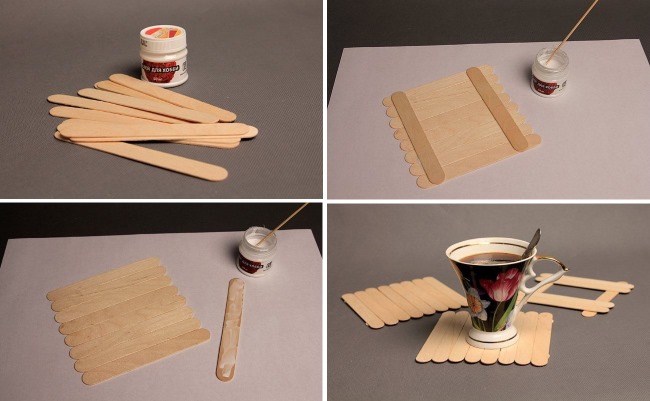
Photo frames
Making a photo frame is the easiest way to use popsicle sticks. It doesn't require any special skills and is suitable for developing the creative potential of young children.
For work, in addition to the sticks, you will need:
- regular paints;
- office glue;
- decoration in the form of pieces of felt, beads, glitter and other accessories;
- a piece of cardboard.
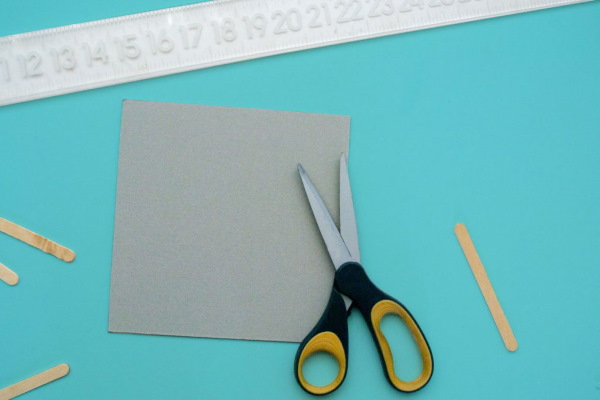
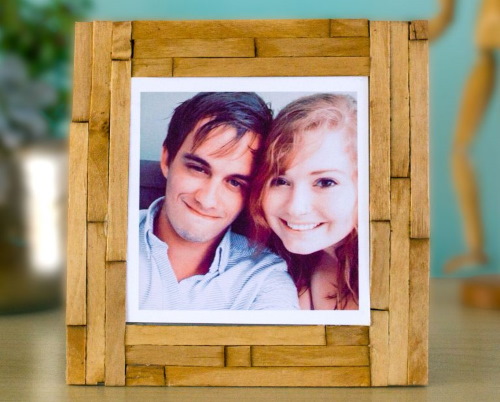
The manufacturing stages are as follows:
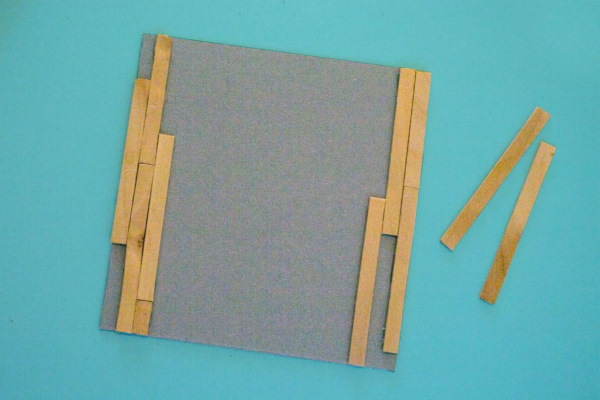
- Glue the sticks along the entire perimeter of the cardboard, cut to the required dimensions, leaving the outer side uncovered.
- Select 4 more sticks and paint them in the chosen shade using a marker or paints.
- Place the sticks crosswise and glue them to the base.
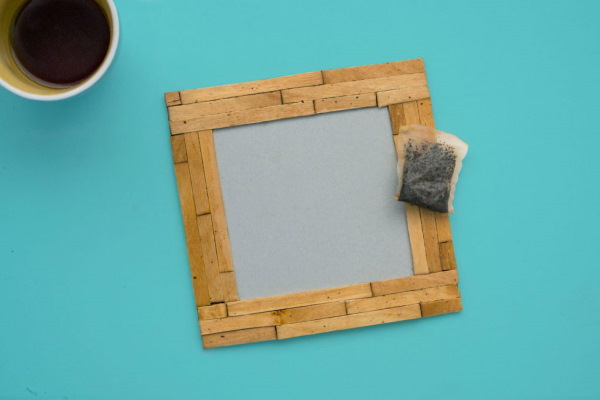
- Glue a photo or drawing onto the improvised frame.
- Decorate the frame with flowers, buttons or other small details.
- After attaching the photograph, close the joints with sticks decorated with decor.
It will look unexpected and spectacular if the sticks are not laid evenly, but with a slight shift in relation to each other. They can be pushed out to one or several sides.
Toys
Boys can create a crossbow from ordinary popsicle sticks, rubber bands, paper clips and paper tubes. Ballpoint pen refills are used as arrows.
The manufacturing process is as follows:
- Connect the sticks with glue in a T-shape.
- Glue the binder (trigger mechanism) to it with superglue.
- Thread the elastic through and pull it tight.
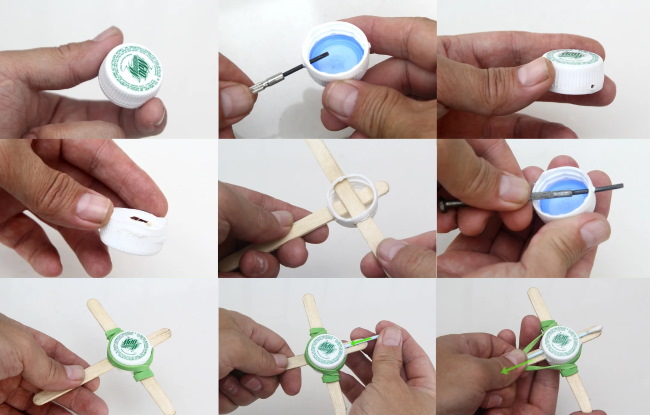
Another interesting product will be a catapult. Children will like this toy, because you can shoot paper balls from this weapon.
To work you will need:
- 7 sticks for the base and 2 for the trigger;
- bottle cap;
- metal or disposable plastic spoon.
All elements are connected using rubber bands, and the lid is placed on double-sided tape.
You can make a gun out of ice cream sticks, which will have a moving trigger, just like a real one. Stationery rubber bands are used as cartridges. These crafts are especially interesting for older boys.
A slingshot is another weapon made from sticks. For strength, the parts are attached with glue and then secured with electrical tape. You can shoot with paper clips, but you need to explain to children that aiming at people and animals is unacceptable, because you can cause injury.
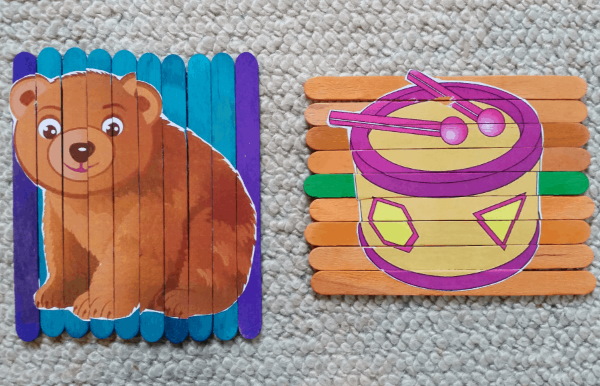
Puzzles are made for kids:
- Draw geometric shapes on several sticks.
- Mix the parts.
- Invite your child to find the necessary parts to assemble the whole picture.
Airplane
To create the plane, in addition to the sticks, you will need wooden clothespins. After gluing the blanks in the form of the plane frame, secure it with a clothespin, having previously painted it in the desired color.
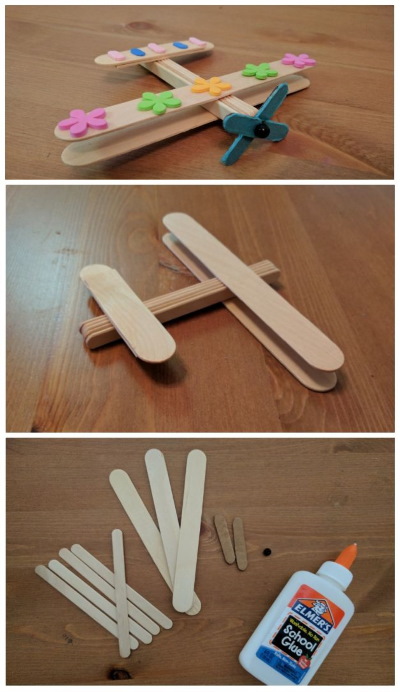
The dragonfly is made in almost the same way, only it will not have a tail, and the wings will be replaced by crossed sticks.
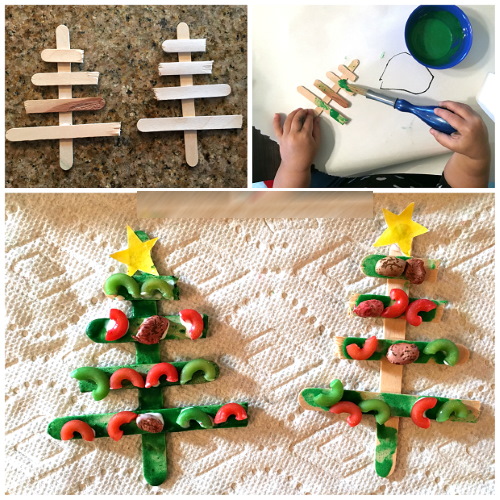
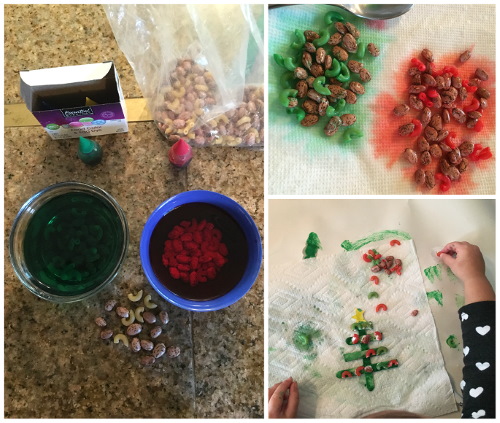
New Year's decorations
The New Year theme is an endless space for implementing complex ideas. To decorate your home and tree, you can use not only store-bought toys, but also handmade ones. Products made from ice cream sticks are practical and have a long shelf life.
For example, to create an asterisk you need to take:
- 5 pre-treated sticks;
- brush;
- glue gun;
- PVA glue;
- paper sheet, glitter or sparkly confetti.
The production is as follows:
- To create the base, you need to fold the sticks into a star shape.
- The position of the parts should be fixed with glue.
- The surface of the workpiece must be covered with PVA and sprinkled with glitter.
- After drying, you need to glue a figure of a deer or a hare in the middle.
Bird feeder
Crafts made from popsicle sticks can be made into bird feeders.
To make it you will need the following materials:
- about 40 sticks;
- strong glue;
- a long stick for attaching to a surface;
- strong rope.
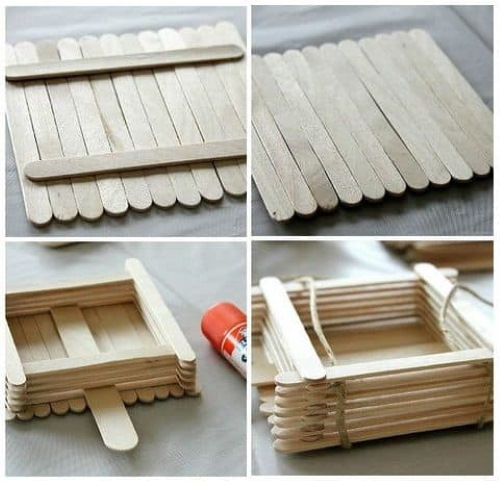
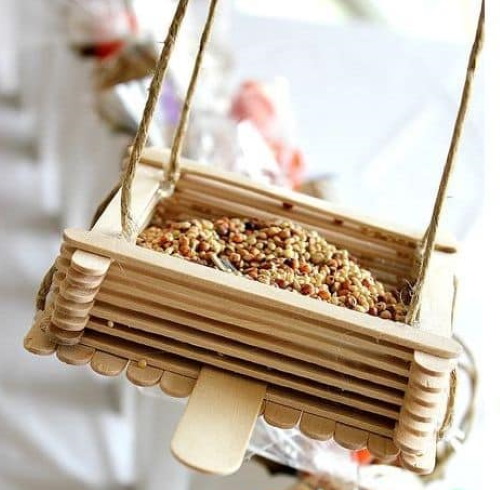
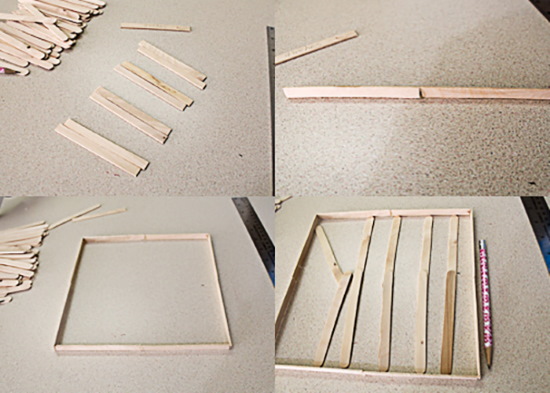
The method of creating the product is as follows:
- Place 2 sticks parallel to each other on a horizontal plane.
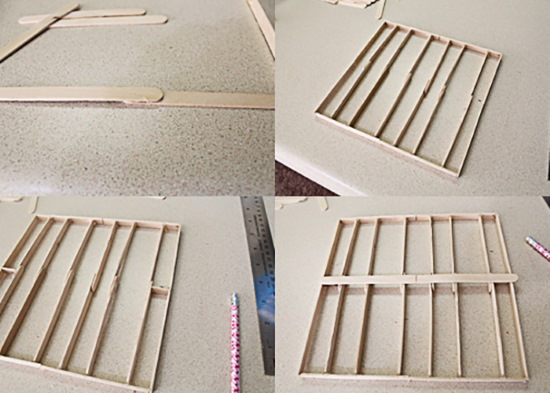
- Glue 12 wooden sticks to 2 sticks in a vertical plane. This will be the bottom of the future feeder.
- After drying, turn the bottom over so that the 2 parts serve as stands.
- Assemble the walls. To do this, attach sticks on one side and the other, indicating the direction of work. Attach the side ones from below, and the rest from above.
- As in the previous step, lay out 6 sticks on each side.
- Attach a large stick to the center of the bottom of the feeder. Attach a rope to it for hanging.
When the product is ready, you can hang it out the window and, having filled it with grain, admire the birds flying in to feed.
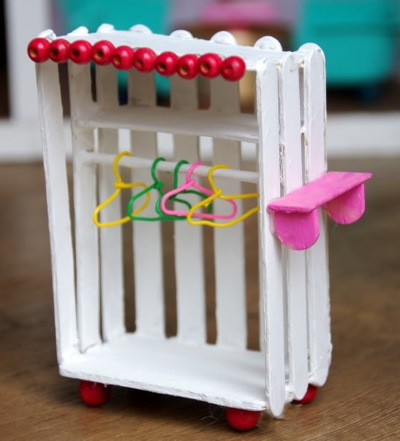
Houses
Mom and daughter can create a cozy house for their favorite doll on their own. It is interesting and, unlike expensive toys, will develop motor skills and creativity.
The main thing is to read the instructions carefully and perform all operations carefully.
Before starting work, you should prepare the following materials:
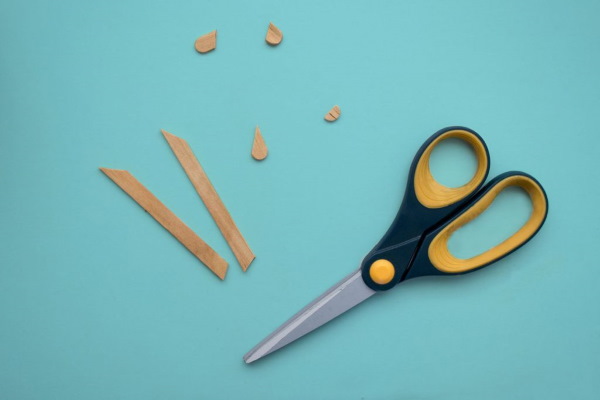
- sharp scissors;
- silicate or PVA glue;
- ice cream sticks;
- fabric of a matching color;
- a piece of synthetic padding.
One child cannot cope with such work. Here you need to carefully calculate the parameters of each wall. It is best to draw a diagram on paper. This will allow you to find out how many sticks are needed for the project. If you take 14 blanks for each wall and floor for the base, you will get a compact house.
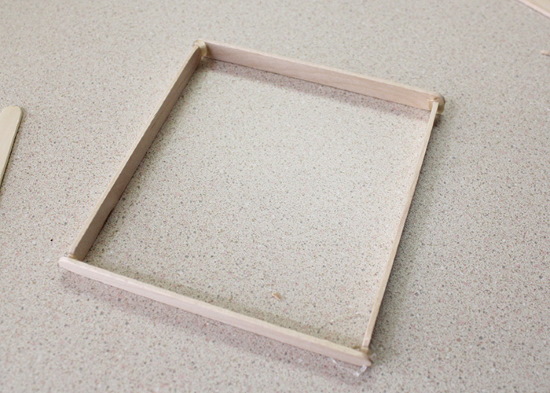
Its production is as follows:
- Place 12 sticks on a flat tabletop. Treat their sides with glue and connect the pieces together.
- To prevent the structure from falling apart after some time, glue 2 sticks perpendicularly.
- Make 7 blanks using this principle: fasten 2 of them with 3 sticks instead of 2.
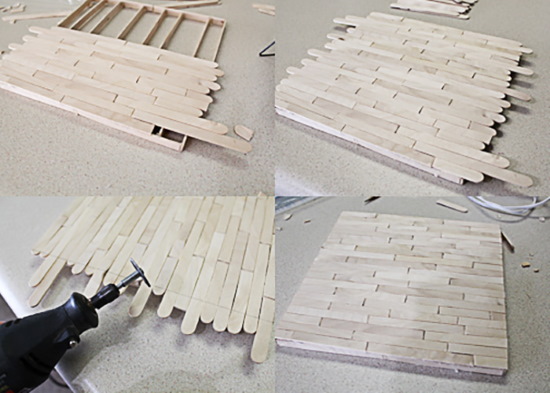
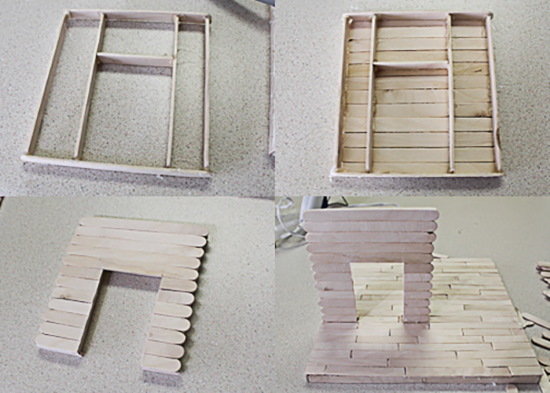
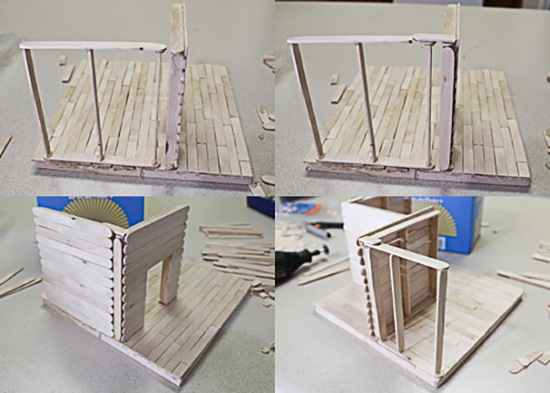
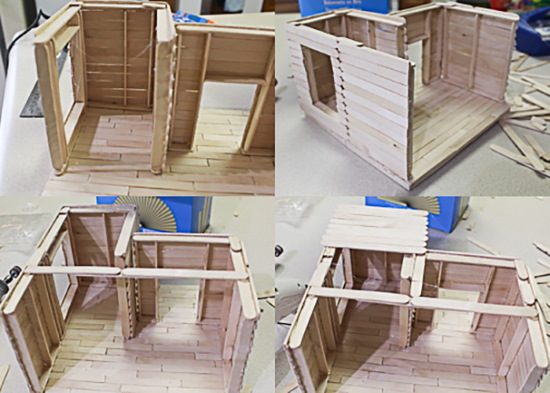
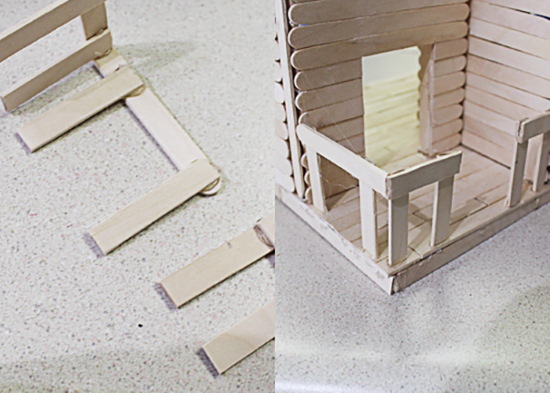
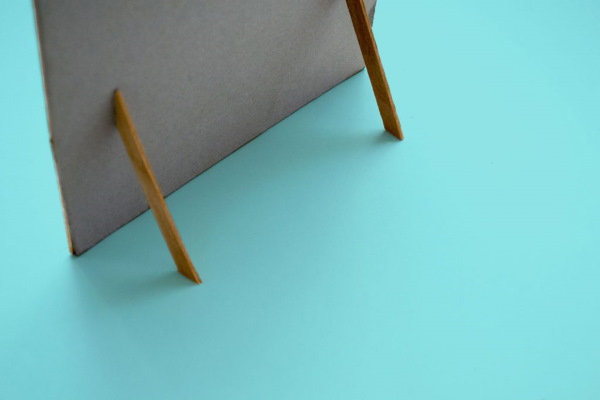
- One structure is placed on the table and four guides are mounted on its sides, onto which the walls will be attached.
- At the base, which has 3 sticks, connect into a triangle. This will be the roof for the house.
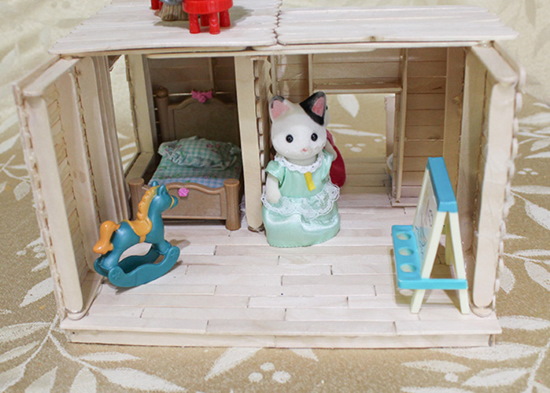
- Add details, place stairs and furniture.
More serious work lies ahead if you want to create a fairy-tale house on wheels.
To work you will need:
- leftover ice cream sticks;
- wooden skewers;
- thick cardboard or plywood;
- glue gun;
- small furniture hinges;
- dye;
- knife;
- ruler;
- sharp scissors;
- pencil;
- a piece of wallpaper;
- napkin;
- decorative elements.
The work is carried out as follows:
- Cut out a small rectangle from cardboard and mark it as the foundation of the future building.
- Cut out 2 smaller rectangles in the same way. In both cases, the height should be identical to the length of the sticks.
- In one of the rectangles, make windows in the center.
- Connect the base and rectangles to get the wall of the house. It is important to measure the width between the walls.
- Cut out a rectangle whose width is equal to the distance between the two walls.
- Round off the top of the 1st and 2nd rectangles.
- Glue the first piece between two walls, and in the second one, first cut out a hole for the door, then glue it.
- Make a layout in the window frame using crossed skewers.
- Cover the facade with prepared sticks.
- Cut a rectangle out of cardboard the size of the window. Then cut it in half and round the top corners. These will be the shutters.
- The shutters are also covered with sticks, then furniture loops are attached to them and glued to the window.
- Make a window sill from the same sticks and glue it to the designated place.
- After pasting the sticks and installing the hinges, attach the door to the doorway.
- Make a fence from the remaining sticks and glue it to the base of the house for stability.
- Make wheels from plywood or thick cardboard. Put them on skewers and attach them to different sides of the house.
- To create a residential interior, make a staircase inside and cover the walls with wallpaper.
- Make curtains from lace.
The house itself can be painted and, after drying, decorated with flowers, ribbons or stones using decor.
Furniture for dolls
When the dollhouse is ready, it needs furniture to be in perfect harmony. It can also be made from ice cream sticks. The table and chairs are assembled according to the diagram.
To make the table you will need:
- Take a few sticks and glue them together to form a tabletop.
- Make a leg with a stable base. You can make it at the leg, or get by with 1, but thick.
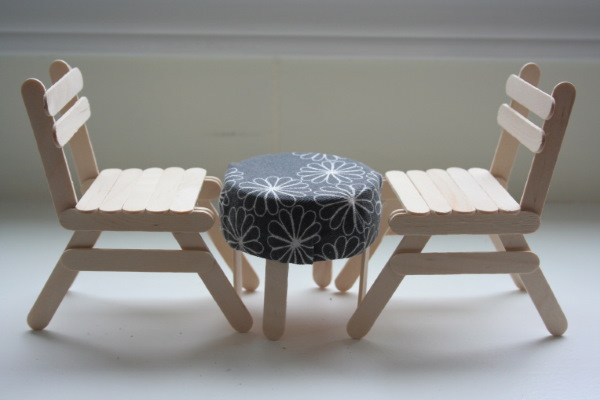
For the chair you will need:
- Take 2 sticks.
- Place the sticks on their edges, a few mm apart.
- Fix another vertical stick at the base as a blank for the back. You need 2 of these parts.
- The seat and backrest are also made from sticks.
- Insert the legs and the chair is ready.
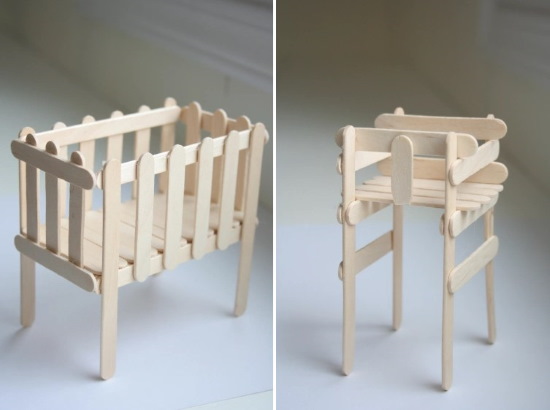
If desired, you can make a bed, wardrobe and other pieces of furniture using the same principle.
Puppet theatre
Crafts from ice cream sticks can be in the form of characters for a home puppet show. The characters can be drawn on the sticks or a cut-out applique with a face can be attached to the base.
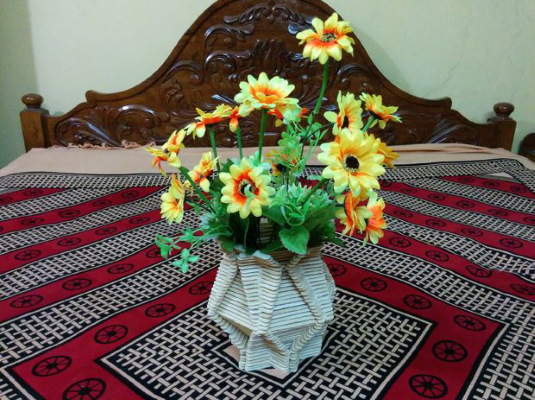
Vases
To make them, the sticks need to be soaked in water. They should be flexible and easy to take the desired shape.

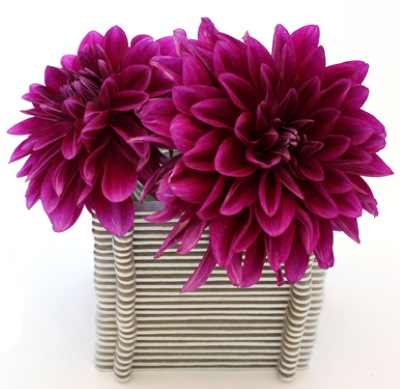
The stages of work are as follows:
- For the future vase, take a glass container.
- Using tweezers, insert each stick into the container so that when dry, they take on the shape of its walls.
- After the parts have become hard, take them out and assemble them again. This will be a wooden vase.
- Paint and decorate the vase with decor or paper using the Decoupage technique.
To prevent the product from falling apart, it is better to attach the sticks to a similarly shaped base or vase, but on the outside.
Swing
To create a miniature swing, you need to prepare the following materials:
- ice cream sticks;
- decorative chain;
- scissors;
- glue;
- skewers.
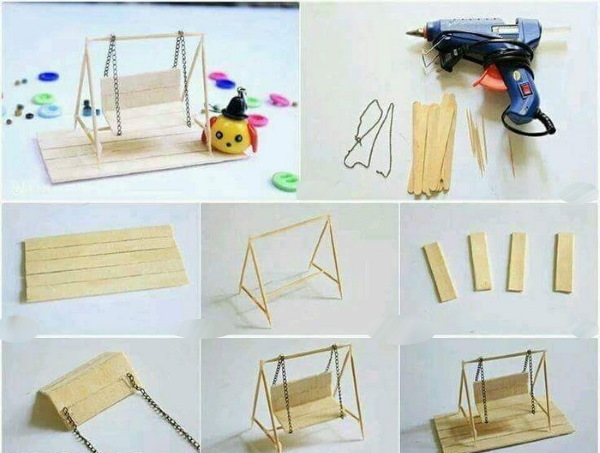
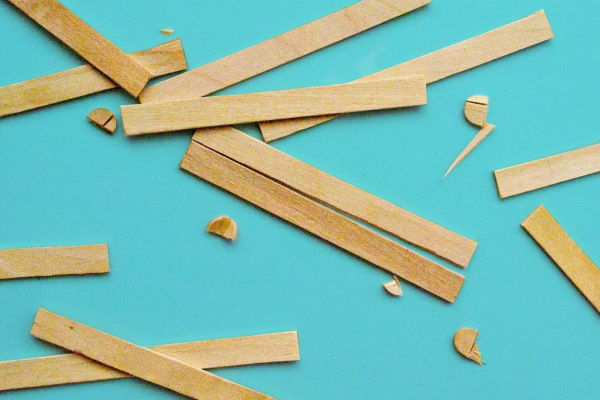
The order of actions is as follows:
- Cut off the round parts of the sticks and glue 2 pieces together.
- Connect 2 blanks at a right angle.
- Attach a chain to the finished seat.
- Prepare the base with posts.
- Glue the swing seat to the posts and you can start playing.
Hot stand
To make a hot stand you will need:
- at least 50 ice cream sticks;
- large and small beads;
- wood drill;
- rubber.
The production process is as follows:
- Using a thin drill, make 3 holes in each stick at equal distances from each other.
- Cut off a large piece of elastic and make a strong knot at its end.
- Thread a stick onto the elastic band through the top hole, then a large bead. Repeat the process until a semicircle is formed.
- Tie another knot on the elastic band and leave a small piece so that you can tie it.
- Prepare another piece of elastic with a knot at the end and repeat the procedure. Only the sticks are threaded through the central hole, and the beads are taken in a smaller size.
- After completing the semicircle, finish the weaving and tie another fixing knot with a tail at the end.
- The same thing happens with another piece of elastic and the lower hole. Small beads are also used for this weaving.
- At the end, connect all the woven pieces into a single structure.
A beautiful and convenient hot stand is ready and will serve for many years.
If you show desire and imagination, you can make many crafts from ice cream sticks. Products made from them can be given to friends or loved ones, and evenings spent in creativity are remembered by children for a lifetime. Growing up and already being an adult, the child will be able to take a toy made with his own hands, because with proper care, the wood will last a long time.
Video about crafts from ice cream sticks
Crafts from popsicle sticks: