You can crochet not only clothes, but also cozy things to decorate your home interior. To update your room with your own hands, you need to read several descriptions of original and beautiful things, and then try to knit them.
What You Need to Crochet Home Decor Items
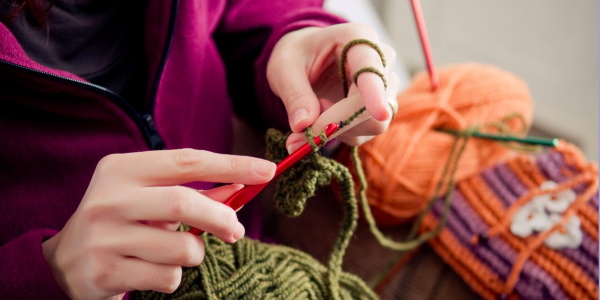
You can make your home interior more cozy by knitting a few new and useful things with your own hands. Any yarn that matches the color scheme of the overall style of the room will do for the job. The texture of the threads can be very different: from soft and fleecy to rough and smooth. You need to choose the right hook for each type of yarn.
The table shows the tool numbers and a short description of the threads they are suitable for:
| Hook number (mm) | Type of yarn |
| 0.6-1 | Very fine cotton threads for knitting lace, tulle and tablecloths |
| 1.25-1.75 | Thin cotton, linen, silk or viscose. Summer items are usually knitted from such yarn. |
| 2-3.5 | Medium-thickness threads, such as acrylic, wool, soft cotton or semi-wool with lurex |
| 4-5 | Medium thickness yarn, folded into 2 threads |
| 5.5-6 | Thick threads with long fluffy pile |
| 7-8 | Thick wool, tapestry yarn, thin cords |
| 9mm-1cm | Thick cord, twisted yarn, bulky synthetic threads for rugs and large knitted blankets |
Sometimes the thickness, composition and texture of the yarn depend on the purpose of the future product. For example, if it is a starched basket for sweets, the threads should be thin so that they easily absorb the starch mixture and hold their shape well. They should not have lint. For rugs, blankets and decorative pillows, wear-resistant yarn is needed. Acrylic or wool with the addition of nylon thread is considered a good option. Some products require additional tools and materials.
List of things to have on hand:
- Sewing threads of different colors and needles.
- Scissors.
- Zippers (for pillowcases).
- Iron with steam function.
- A set of hooks of different sizes.
- Beads, rhinestones and buttons for decoration.
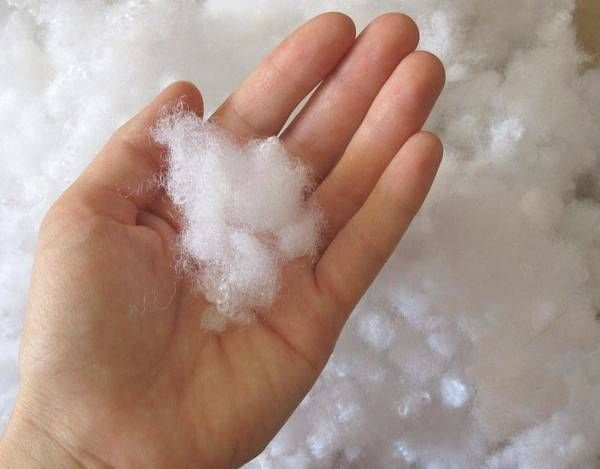
- Hollowfiber for pillow stuffing.
The knitting process is affected by the material the hooks are made of. Plastic and metal tools are smooth and suitable for fluffy or double yarns. Wooden hooks are needed for thick single yarn.
Conventional symbols in master classes
Crocheting for home and comfort (new items and step-by-step descriptions of works can be considered in more detail later in the article) is carried out according to patterns. You need to learn to read them in order to avoid mistakes.
The table shows examples of symbols that are most often found in diagrams, as well as their decoding:
| Symbol | Meaning |
| ○ or ✕ | Air loop |
| ◯ | A ring of air loops. The number of loops is indicated in the center of the circle. |
| ┃ | Single crochet |
| ✝ | Column with 1 yarn over |
| ☨ | A column with 2 yarns. The number of yarns is indicated by horizontal lines. If there are 3, then there should be 3 yarns. |
| ✛ | Half a column |
| 0 | Lush column |
| Ⅴ | 2 columns coming out from 1 point |
| Λ | 1 column out of two |
| X | Crossed columns |
| ︵ | An arch of air loops, their number is written under the symbol |
| △ | Loop of the crayfish |
| ⤵ | Knitting from under the arch |
| ▽ | Pico from 3 air loops |
In foreign or complex diagrams, you may encounter other symbols. They are usually explained on the same page.
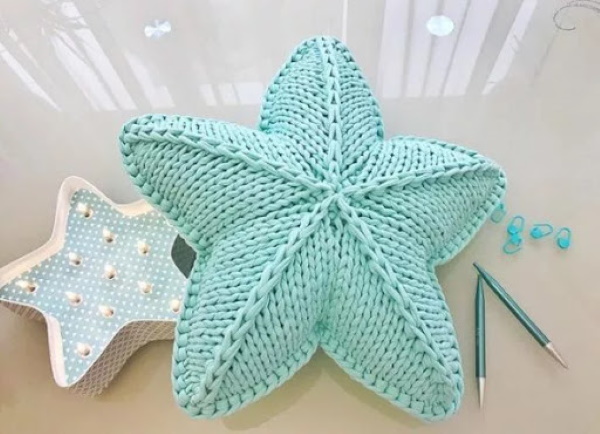
Starfish pillow
An unusual and versatile pillow that can decorate a bedroom, children's room, living room or even a kitchen. You can choose any yarn, hard or fluffy, the main thing is that the thread is of medium thickness. The knitting should be dense, since the pillow will be without a pillowcase, so the stuffing should not come out through the holes in the fabric. The number of skeins depends on the texture of the threads, the density of the knitting and the size of the pillow.
Step-by-step instructions for knitting a 30x30 cm pillow:
- Fasten the chain of 6 air loops into a ring.
- Move up to the 2nd row, making 3 more chain stitches. Knit an arch of 3 chain stitches and a double crochet. Alternate this combination to the end of the row.
- The transition to each new row is carried out by knitting a chain of 3 air loops. In this row, you need to alternate 3 double crochets, 1 air loop, 3 double crochets again and 1 lush column. Knit to the end of the chain.
- The shape of the workpiece should already resemble a five-pointed star. Alternation of elements in the 4th chain: 4 columns with 2 yarns, air loop, lush column, 1 more air loop. Again 4 columns with 2 yarns.
- Further rows will be the same, only there will be more columns with 2 yarns. In the 5th row there are 7, in the 6th chain – 9, in the last – 12.
To make the pillow bigger, the number of rows should be increased and crochet 2 more double crochets than in the previous row. The description shows only 1 half of the product. You need to make 1 more part according to this instruction. Then they are applied to each other with the wrong side and tied at the edges with the same threads. 10 cm should be left unsewn to stuff the pillow with padding polyester. After filling, the edges are sewn to the end and tied with single crochets in a circle again.
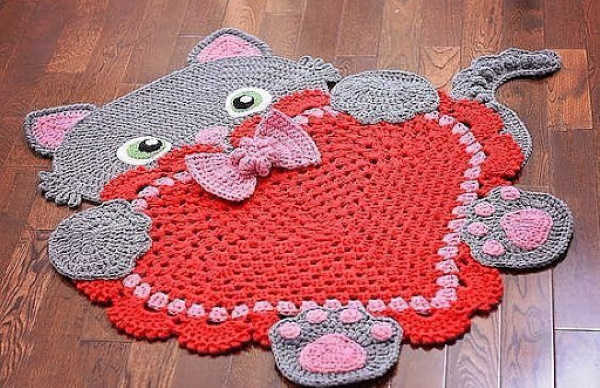
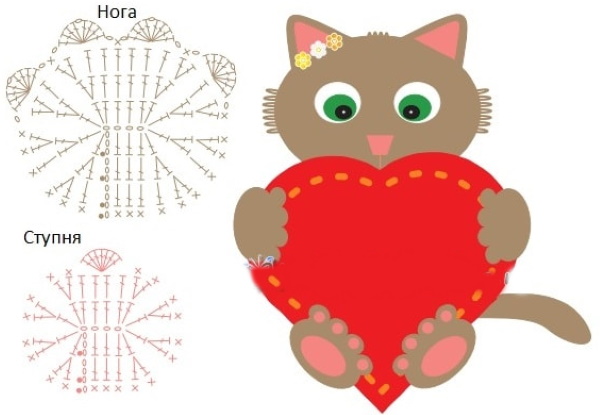
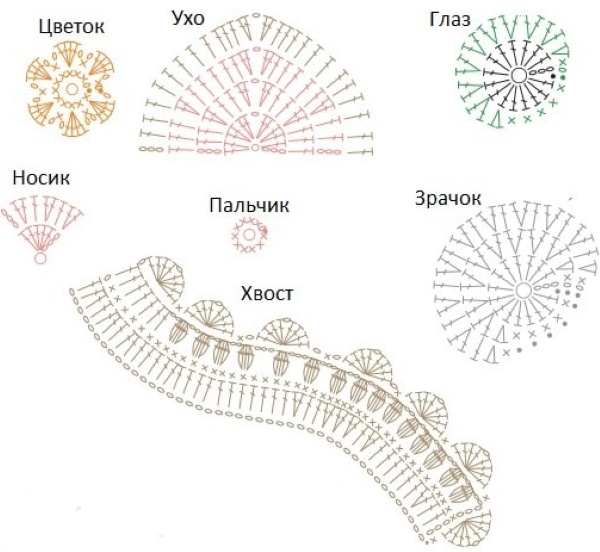
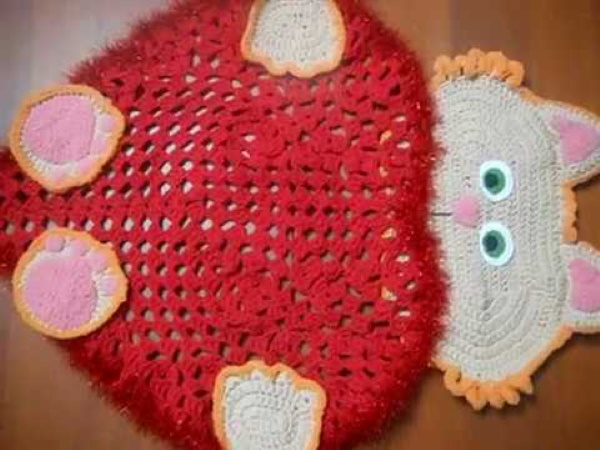
Kitten with a heart rug for children's room
Crochet for home and comfort (new items knitted with your own hands complement home interior well) can consist of simple details. Lace, tassels and other decorations serve as an addition that gives the product a special charm. To knit a funny rug in the form of a kitten, you will need acrylic or wool yarn of medium thickness. It is desirable that the yarn contains nylon thread. It will increase the wear resistance of the rug. If you cannot find such threads, you can buy several skeins of nylon yarn separately and knit in 2 threads. The yarn can be any color.
The following shades were used in this master class:
- light brown;
- pink;
- red.
What else will you need:
- green, white, black felt for eyes, yellow and pink felt for decoration.
- pink satin ribbon;
- rubberized mesh for mats;
- sewing threads and needle.
The size of the rug is 70x100 cm. The yarn consumption depends on its composition and knitting density.
Step by step instructions:
- Using brown yarn, make a chain of 7 air loops and secure into a ring.
- Knit 3 rows in a circle with columns with 1 yarn over.
- The following rows are done similarly, but along the edges it is necessary to make 2-4 increases so that the fabric acquires an oval shape. Knit 22 rows.
- This part will be the kitten's head. Now you need to knit the ears. From brown yarn, dial a chain of 14 air loops. Knit 3 rows with columns with 1 yarn over.
- The following rows are knitted similarly, decreasing 2 loops from each edge. You should get a triangular-shaped blank. Knit the 2nd blank.
- Using brown sewing threads, carefully sew the ears so that the edge of the oval piece overlaps the triangle. The seam should be 1 cm below the edge of the oval piece.
- Once the ears are sewn on, you need to take a brown thread and tie the kitten's head along the edge with arches of 6 air loops.
- From brown yarn, knit 4 round blanks with a diameter of 7-10 cm, with columns with 1 yarn over. These will be the cat's paws.
- Now you need to mark the fingers. To do this, you need to knit 4 arches on the edges of the round blanks. Then, through the arches, knit columns with yarns, 6-7 columns per 1 arch.
- From pink yarn, knit 8 small circles with a diameter of 2-3 cm using single crochet stitches. Sew them to the toes of the cat's hind paws. Knit 2 more circles with a diameter of 5 cm using single crochet stitches. They will imitate the pads on the hind paws.
- From pink yarn, cast on a chain of 7 air loops. Knit 2 rows, and then, similar to point 5, knit 2 triangular blanks. Sew them inside the ears.
- Knit the cat's tail from brown yarn. Cast on a chain of 14 air loops and knit 3 rows of single crochet stitches in a circle.
How to knit a large openwork heart:
- Using red thread, make a chain of 8 air loops.
- The next row consists of 9 lush columns, alternating with arches of 9 air loops.
- In 3 air loops in the middle of each arch of the previous row, knit 9 columns with 2 yarns, alternating them through 1 air loop.
- The next chain consists of arches with 5 air loops.
- Through the middle of each arch, knit 1 column with 3 yarn overs, alternating them with arches of 3 air loops.
- Through the middle of each arch of the previous row, knit a new chain of arches with 6 air loops.
- Decorate the edges of the heart with lush columns.
To increase the size of the heart, you need to knit a few more rows with air arches, increasing the number of air loops by 2 in each new chain.
Assembly of the product:
- Sew the kitten's head to the top of the heart using sewing thread.
- The front paws should be placed parallel to each other along the edges of the heart, as if the kitten is holding it.
- Sew the hind legs and tail from below.
- Cut out circles from felt: white – 4 cm in diameter, green – 3 cm in diameter, black – 1 cm in diameter.
- Place the circles on top of each other, white, green and black. Sew them together with white threads, piercing through, and attach the kitten's eye in place.
- Cut a nose out of pink felt and sew it to the head where the notch in the heart is, so that the kitten appears to be peeking out from behind it.
- You can cut out 3 small flowers from yellow and pink felt and sew them under the kitten’s right ear like a bow.
- Light the ends of the satin ribbon with a lighter and thread it along the edges of the heart, tying a bow at the top.
To prevent the mat from sliding on the floor, you need to sew a special rubberized mesh on the back side. You can buy it in craft stores or in construction departments.
The rug is placed on top and the blank of the required shape is cut out. Then the mesh is carefully sewn to the product with threads.
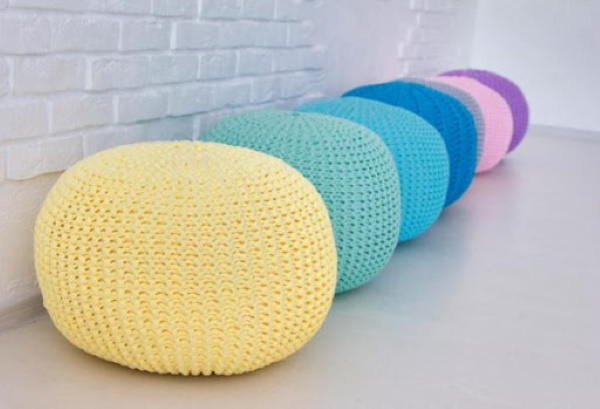
Cover for pouf
This cover is suitable for cylindrical poufs. The product can be knitted from thick yarn or cord. First, you need to measure the diameter of the upper round part. Then wrap the tape around and calculate the length of the fabric that will cover the walls of the pouf. It should be noted that the blanks should be 2-4 cm larger.
Step by step instructions:
- Make a slip stitch and knit 8 double crochets through it. Tighten the stitch.
- The following rows are knitted behind the back wall of the previous ones. You need to knit 16 half double crochets, 2 in 1 loop.
- In the 3rd row, the increases should be alternated through 1 loop. The chain consists of 24 half double crochets with 1 yarn over.
- Now you need to make increases in every 3 loops. The row consists of 32 half double crochets.
- Then the increases are increased by 1 loop in each new row. There should be about 11 rows in total - this is 87 half-columns with 1 yarn over in a row. If the diameter of the pouf cover is larger, then you need to knit more.
- Next, you need to knit the walls of the pouf. To do this, insert the hook behind both walls of the previous row and knit 1 column with a yarn over. Then you need to knit 7 half-columns without a yarn over behind the back wall of the fabric.
You need to alternate half-columns and 1 double crochet until the end of knitting. As a result, there will be an unusual, relief pattern with a slope on the walls of the pouf. The cover needs to be knitted a little more so that it is easier to take off and put on.
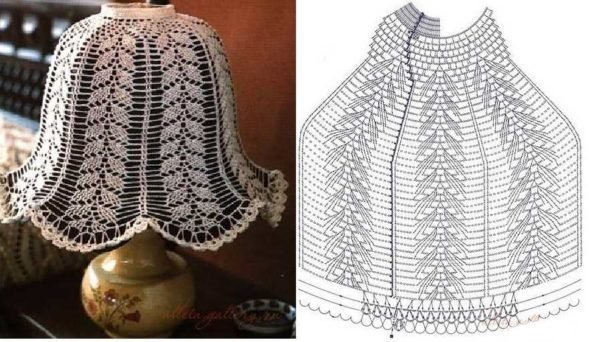
Lampshade for a lamp
Crocheting for home and comfort (new items knitted with your own hands can be a good gift for family and friends) is considered a useful hobby that helps relieve fatigue. And if you knit an openwork lampshade for a night lamp, then relaxing in the evening after work will be doubly pleasant. For work, you will need thin cotton threads. The color should be light, since the product will be starched. Otherwise, white stains will appear on the lampshade. Threads with the addition of lurex look especially beautiful.
What else you will need:
- smooth glossy cardboard and tape;
- pins;
- thin wire;
- spray;
- water and starch.
Step by step instructions:
- Cast on a chain of 30 stitches and close into a ring.
- In the next row, alternate 1 double crochet and a chain of 3 air loops.
- In the middle of each arch of the previous row, knit 3 columns with 2 yarns, alternating them with an arch of 3 air loops.
- In the 4th row you need to alternate: an arch of 3 air loops, an arch of 6 air loops, 2 columns with 2 yarns, 3 air loops. Again 2 columns with 2 yarns, and an arch of 6 air loops.
- Knit a small arch of 3 loops, then a large one of 6 loops. Knit a lush column, a chain stitch, 5 columns with 2 yarns. Then 1 chain stitch and a large arch. Then the pattern alternates until the end of the row.
- The next row is knitted in the same way. But 2 columns with yarns are added.
- In this chain, the double crochets are replaced by arches of air loops. There should be 4 arches of 4 loops.
- The number of arches is reduced to 3. They are staggered. The large arch is reduced by 2 loops.
- Knit 2 arches between the lush columns, in the next row 1 arch.
- Tie the edges with arches of 6 air loops.
- When the workpiece is ready, it needs to be steamed with an iron.
- Then, add a solution of 1 tbsp of starch to 1 liter of water into a spray bottle.
- Make a form out of cardboard and tape on which the lampshade will dry.
- Soak the blank with the mixture and stretch it onto a cardboard form. Use pins to correct any unevenness and fix it until it dries completely.
- When the lampshade is dry, you need to insert thin wire at the bottom and top so that it holds its shape well.
Such lampshades can only be used if the night light contains a bulb that does not heat up, otherwise a fire hazard may be created.
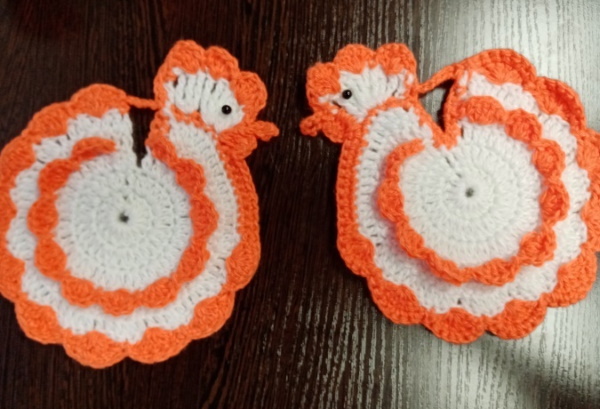
Chicken potholder
Crochet for home and comfort (new items knitted with your own hands can be not only beautiful, but also functional) can be simple, but very beautiful. For example, you can knit a potholder in the form of a chicken from bright but coarse threads. It is important that the yarn is of medium thickness, and also resistant to high temperatures. In this master class, yarn of 3 colors is used: yellow, red and white. You will also need 1 black bead.
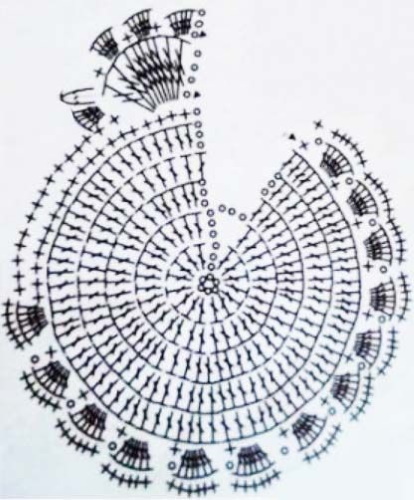
Detailed description of the work:
- Using yellow thread, make a chain of 6 air loops and close into a ring.
- In the next row you need to knit 12 columns with 2 yarns, 2 in each loop.
- In the next row, increases should be made every 3 loops. Knit with columns with 2 yarns. The row is not completed to the end. You need to stop, leaving 4 loops unfinished.
- The next row I knit not in a circle, but in a line. You need to knit with columns with 2 yarns with an increase of every 4 loops.
- So, you need to knit 3 more rows. You should get a circle with a cut, like the diagram.
- Change the thread to white and start a new row from the side of the chicken's "neck". Knit 30 half-columns without a crochet. Then knit 6 columns with 3 yarns coming out of 1 point. Knit 1 air loop and a half-column. Again knit columns with yarns from 1 point. Repeat alternation to the end of the row.
- Change the thread to yellow and start the row with the chicken's "head". It needs to be knitted with elongated columns with 4 yarns. Knit 8 such columns. Then knit 2 more columns with 2 yarns. Knit the beak separately.
- Continue the row with half-columns to the very end.
- Using red threads, knit the comb and beard, alternating lush columns and 2 air loops.
The black bead needs to be sewn in place of the chicken's eye. The product needs to be steamed and then used for its intended purpose. The home interior can be decorated with cozy knitted items. New items made with your own hands will be a good gift for friends and family. Even a novice craftsman can repeat the models described earlier in the article if he chooses the right yarn and hook.
Videos about crochet
How to crochet a pencil container:
The new items are very interesting. I will knit. Thanks for the review!