In recent years, the art of decorating clothes, accessories, and interior items with ribbon decor has come back into fashion. This technique is used to create panels and paintings. The technology of this art is similar to thread embroidery. But using ribbons, even for beginner needlewomen it will not be difficult to create both relief and three-dimensional images.
Basics of Ribbon Embroidery
To master this type of creativity, it is necessary to understand the specifics of its technology, which consists of selecting the necessary material and mastering the skills of execution.
Selecting fabric for the base
Craftsmen embroider with ribbons on any canvas, except for high-density materials. To create a painting, you should take canvas or other mesh fabric. Craftsmen advise using a base with a slight weave. The image then looks interesting and textured. The fabric used is strong so that it holds the stitches. But the needle should pass through the material without difficulty.
Selection of ribbons for embroidery
During the work process, you can use tapes made of different materials. Their width can vary from 3 mm to 5 cm. The most convenient is a narrow tape. It is easily threaded into a needle and passes well through the fabric. In needlework, you can use satin, silk, and nylon ribbons.
| Satin ribbons | Silk ribbons | Nylon tapes | Veil tapes | |
| Advantages |
|
| add texture variety to the embroidery |
|
| Flaws |
| high price |
|
|
Satin ribbons
This is the most common material used by craftswomen when embroidering. The front side of satin ribbons differs from the back side in texture. They add expressiveness, brightness, and picturesqueness to the picture. You can use both soft and thick ribbons. It is better to crumple them a little when working.
Devices for work
When starting handicrafts, the master must have all the necessary tools with him. To ensure the result is neat and high-quality, you need to use a hoop. The sizes of hoops vary: from 10 to 45 cm in diameter. Medium hoops stretch the fabric tightly, preventing it from sagging. Small hoops are convenient for small-sized embroideries.
Wooden or plastic hoops are provided with a screw connection, thanks to which the clamp of the fabric is adjusted. A lighter is used to singe the ends of the ribbon. An awl and scissors may be useful in the work.
Selection of needles for embroidery
How to embroider with ribbons (it is important for beginners to know little secrets) and choose a needle is described below. The main criterion for their selection is the length of the eye.
The tape needs to pass through the hole easily. The thinner the tape, the larger the needle size should be. For a 3 mm tape, #24 is suitable, and for a 12 mm strip, it is better to take a #18 needle.
Its thickness also depends on the quality of the fabric. For delicate material, you should select appropriate thin needles. When working with coarse fabrics, craftsmen advise using larger tapestry needles. "Sinelle" are the most commonly used needles for ribbon embroidery. It is better to select one needle for each individual ribbon. This reduces the cost of time and material.
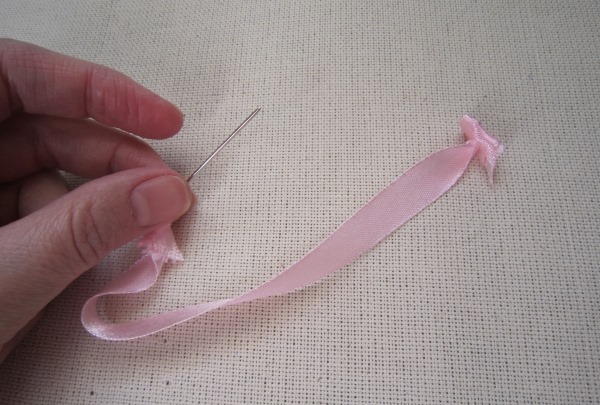
How to insert the tape into the needle
To ensure that the ribbon fits easily into the eye, needlewomen cut it at an angle and thread it into the hole. They melt the other end to prevent unraveling, pierce it in the middle at a distance of 1 cm from the edge. Holding the needle with your hand, pull the melted edge of the tape until a knot is formed, preventing it from constantly slipping out of the eye.
Transferring a motif onto fabric
There are several ways to transfer an image to a base:
- Transfer the contours onto tracing paper, apply the material to it, secure with pins, and transfer the pattern onto the fabric with a self-disappearing marker.
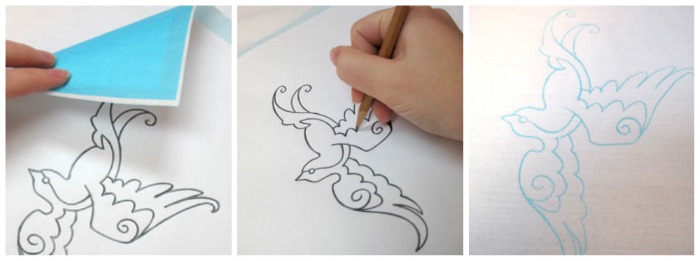
- Copy the design with a gel pen, turn it over, draw exactly along the line with a transfer pencil, apply the material and iron. Its traces will remain on the base.
- Transfer the outline of the intended painting using carbon paper, but in this case there is a risk of staining the fabric.
- Transfer the image onto tracing paper, place it on the canvas, stitch along the outline with basting stitches, then carefully remove the tracing paper from the fabric, tearing it along the edge of the outline.
The latter method is used when working with canvas, on which pencil lines are uneven.
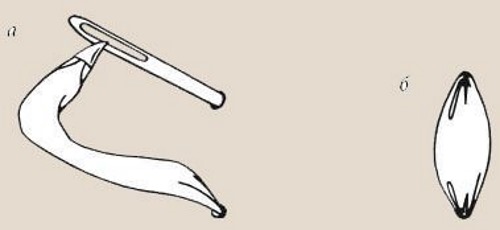
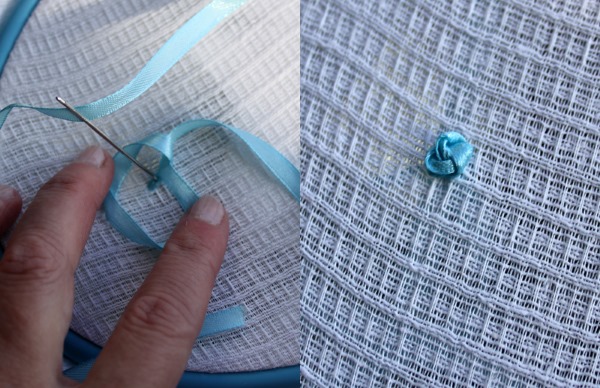
Securing the silk ribbon
In order for the back of the embroidery to look aesthetically pleasing and the ends of the ribbons to be held firmly, it is necessary to fix them correctly at the beginning and at the end of the process. Experienced embroiderers advise piercing the fabric and pulling the needle to the front side, leaving 10-15 mm of ribbon on the back of the fabric. Then you need to make a stitch and pull the needle out through the remaining end.
The next method is to fix the tape with a knot: fold its end into an accordion, pass a needle through this thickness and tighten. Repeat everything when the tape ends.
Embroidery technique
How to embroider with ribbons (for beginner needlewomen, the most important thing is to learn how to make seams and stitches used in work in different ways, described below.
Straight stitch
Execution algorithm:
- secure the tape and bring it to the front side;
- smooth it out, then after a few mm, slightly to the side, pull it through to the wrong side, piercing the tape in the middle.
Twisted stitch
Execution algorithm:
- pass the tape to the working side;
- twist it with your hands and bring it out after a few cm (depending on the length of the stem) to the wrong side.
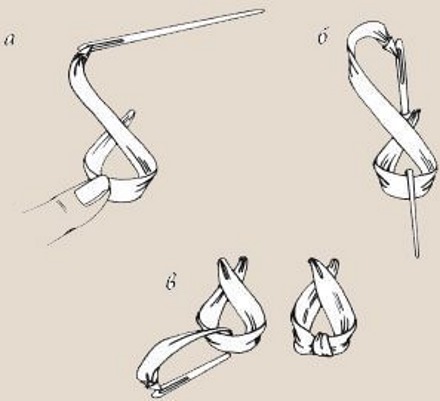
French knot
Execution algorithm:
- draw the tape to the front side;
- wrap it around the needle 2-3 times;
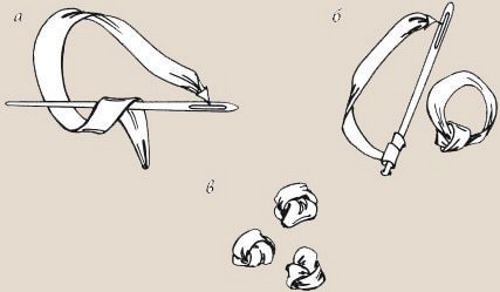
- pull through the curls, holding them with the fingers of your left hand;
- Bring the needle to the wrong side, piercing the fabric in the adjacent cell.
Chinese knot
Execution algorithm:
- output the tape;
- make a loop or one turn through the needle;
- Pass the needle through the loop and tighten until a knot is formed.
Double Chinese Knot
Execution algorithm:
- output the tape;
- after a few cm from the start of the work, fold it into an accordion;
- pull the needle through the ribbon and only then make a loop;
- insert a needle into it and make a knot.
Ribbon stitch
This is a type of straight stitch used to create petals of various shapes.
Stages of implementation:
- pull the ribbon to the working side, bring it to the length of the petal;
- at its top point, bend the edges of the tape and pull the needle through them;
- form a knot and bring the ribbon to the wrong side;
- To give the petal a different shape, you need to twist it at the top, pierce it with a needle and bring the ribbon to the back side.
Japanese stitch
Course of action:
- bring the needle out;
- after a certain distance (depending on the length of the petal), pierce the ribbon and pull it to the back side.
"Air" stitch
Execution algorithm:
- bring the tape to the front side;
- lay it out, put a pencil under it, pierce it in the middle;
- Pass the needle through to the wrong side, leaving the edges of the ribbon slightly folded inward.
Volumetric flowers
Ribbons can be used to create beautiful three-dimensional compositions.
Lilac branches
Progress of work:
- At the first stage of work, a sketch is always made.
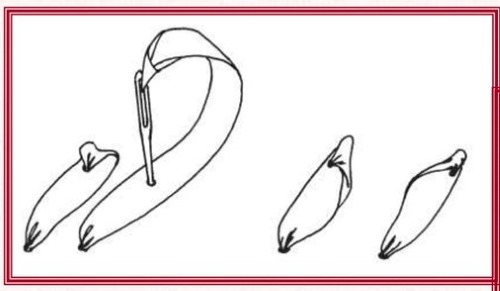
- To embroider lilac buds, use ribbons of the corresponding colors, 4-6 mm wide. The buds are made using the "French knot" technique, but the ribbon is brought out to the wrong side, retreating from the tip of the needle by half a centimeter. The buds can be of different sizes and several shades, so the width also varies.
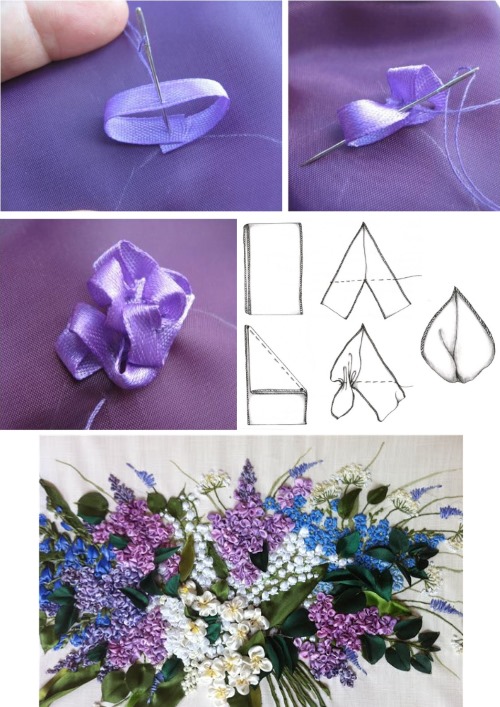
- The leaves are created with 2.5 cm wide ribbons using a "ribbon", "Japanese" or "air" stitch. To make them curved, the ribbon is bent and brought out to the wrong side at an angle of 45º.
- The lilac branches are made with a brown ribbon of the same width. It is brought to the front from the beginning of the branch, twisted and carried to the back side.
Fuchsia flowers
How to embroider complex flowers with ribbons (for beginner needlewomen it is important to know the nuances of the work), you can understand using the example of fuchsia. For work you will need ribbons of pink, purple and green colors 12 mm wide.
Algorithm of actions:
- Make a skirt for the flower by folding the ribbon like an accordion, trimming the edges and cutting out the petals, then making a skirt out of them.
- Sew to the canvas in the desired direction.
- Make the top part of the leaf from purple ribbon: make a “French” knot one and a half cm long at the base of the skirt and close it with a stitch, passing it near the skirt, continue higher.
- Make the wings with straight stitches.
- For the stamens, fold the threads in several stages and sew them to the base inside the skirt.
Peonies
Straight and curved stitches are used to create peony petals.
Algorithm for making a curved knot:
- bring the tape to the face;
- bend it at the bottom of the stitch so that the back side lies on top;
- holding the folded edge, bring the tape to the wrong side, shifting away from the vertical line.
The peony stem is embroidered with a green ribbon 1 cm wide. The leaves are formed using a straight and curved stitch, with a ribbon 2 - 2.5 cm wide.
Sunflowers
Progress of work:
- The petals are made using Japanese stitch.
- The middle is formed using a French knot.
- To embroider the stem, use a twisted stitch.
Tulips
Beginner needlewomen are always interested in how to embroider volumetric flowers with ribbons. To create a flower, you will need yellow and red ribbons 15-25 mm wide.
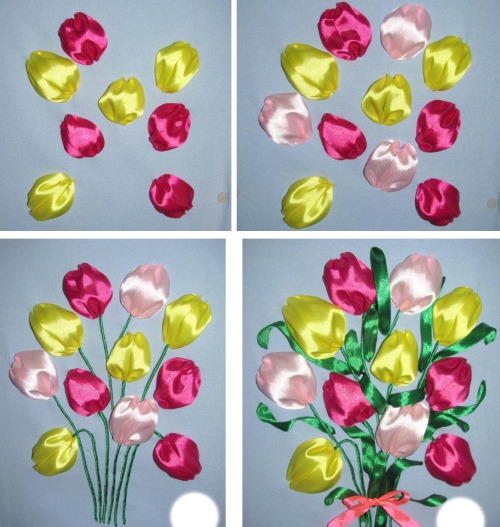
Let's look at the algorithm for making tulips:
- Place the ribbon on the front side at the top of the bud.
- Make a straight stitch and pull the ribbon to the back side at the base of the bud.
- Step back 2 mm from the place where the tape comes out and bring it out to the front side.
- Make a straight stitch with an overlap to the top of the petal.
- Embroider all the buds using the described technique.
- The finished buds are collected into a bouquet using stems made from twisted knots.
- Embroider the leaves using straight and curved stitches.
Lilies of the valley
Algorithm of actions:
- Take a white ribbon and make a knot at the end, bring it to the wrong side, the knot remains on the front side, it gives the detail a convexity.
- From the base of the resulting knot, make three Japanese stitches.
- Each stitch ends with a loop, which must be secured with a needle.
- Then fix the position of the bud with white thread, make 2 more stitches.
The stem is made with green ribbon using a twisted knot, and the leaves are embroidered with straight and curved stitches.
Red poppies
For work you will need a red satin or nylon ribbon 5 cm wide, a green ribbon 25 mm wide.
Algorithm for making petals:
- Cut the ribbon into pieces, the length of which is 4 times longer than the width of the petal.
- Fold their edges diagonally and sew basting stitches along the edge.
- Pull the thread tightly and form a petal, cut off the remaining ribbon.
- Make six of these petals and sew them to the canvas with their centers.
The core is made with French knots from narrow yellow and black ribbons along the edge. The stem is embroidered with a twisted stitch. The leaves are formed with straight and curved stitches.
Chamomile
To make the chamomile flowers, you need white and yellow ribbons 4 and 6 mm thick, 1 cm. The petals and leaves are made with straight and curved stitches. When fixing them, the ribbon is not laid out evenly, but is bent to the left or right, based on the pattern. The core is formed from short straight stitches and French knots.
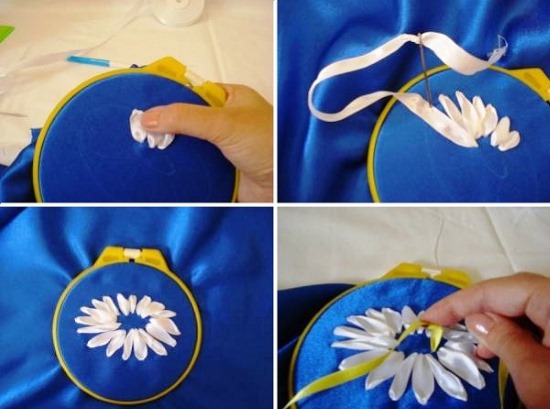
To obtain a stem, use a stem stitch:
- Bring the tape to the face.
- Pierce the fabric, bring the needle with the tape out at the point of the first puncture.
- Pull the tape to the back and place it on the face in the middle of the straight line between the first and last punctures.
- All subsequent stitches are performed in the same way.
During the process, it is important to ensure that the tape does not twist.
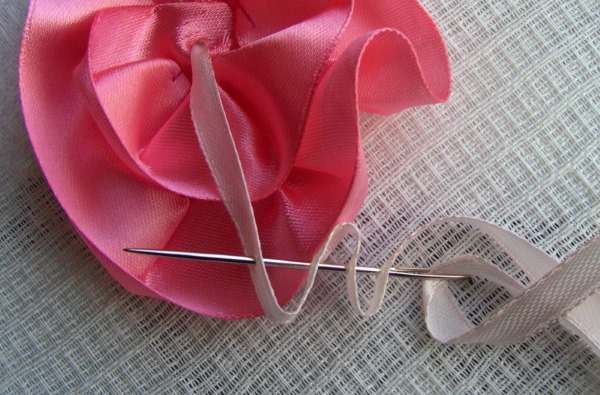
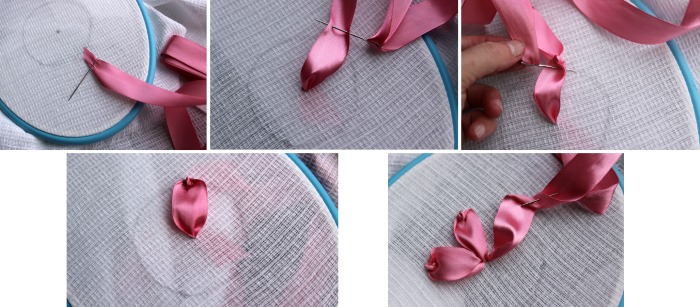
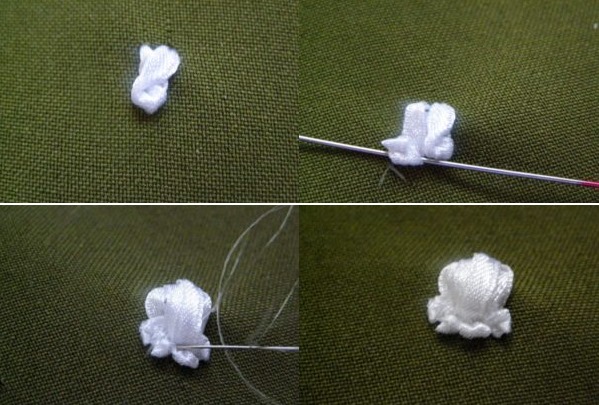
Roses
For work you will need: ribbon 25-50 mm, lighter, needle with a large eye, thread in the same color as the ribbon, fabric in a hoop.
Execution algorithm:
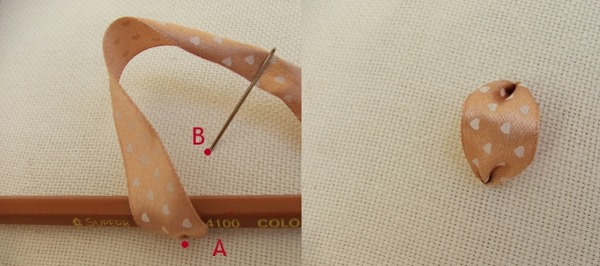
- First, you need to draw a sketch of the future rose: a circle with a diameter of 7 - 8 cm, determine the direction of the rose's tilt.
- Bring the ribbon to the front side. Place a pencil under it and form an airy petal and pull it to the back side. To make the top of the petal round, pull the ribbon down. This is how the first three petals of the rose are formed.
- Then embroider 2 more upper petals. Only when bringing the ribbon to the wrong side, pierce the lower petal. This creates a layering effect. You get five petals.
- Now you need to form the center. It can be filled with French knots or made in the form of a twisted, beautifully laid out rose.
- Fold 2 side petals, which should embrace part of the central bud from both sides. For this, a curved Japanese stitch is used, when the ribbon is pierced from one side at the place of the output to the wrong side.
- Similarly, make a few more petals, using the sketch as a guide.
If something doesn't work out, you can pull out the tape and form it again.
Orchids
The orchid petals are made of straight stitches and a few reverse Japanese knots, embroidered with a 13mm wide white ribbon. First you need to shape and lift the petals and only then proceed to the next one.
The middle is made with a 1 cm wide yellow ribbon using a French stitch. Then around it, embroider three small petals from the main ribbon using a curved stitch, making them stick out slightly from the flower.
Butterflies
The body of the insect can be embroidered with a black or brown 6 mm ribbon, the wings can be made using a white 25 mm wide ribbon, and the antennae can be created using a black “Iris” thread.
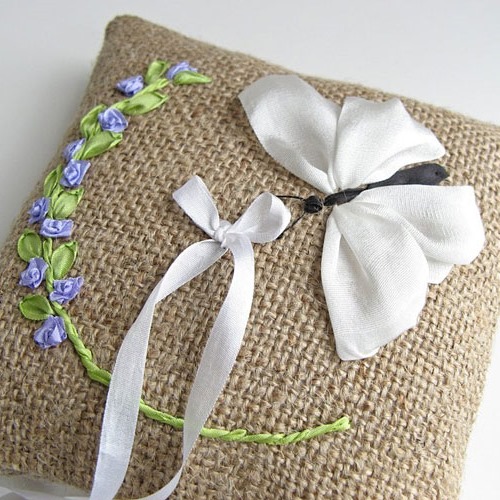
Course of action:
- Make the head with a French knot and cover it with a straight stitch on top.
- The first, elongated part of the body is made with two straight seams: an internal stitch for volume and an external knot covering the first. The second part of the body is embroidered with the same straight stitch. For additional volume, you can make another one covering the lower stitch.
- The large 2 wings start to be made from the middle of the elongated part of the body. They can be made with straight knots, forming volume along the outer edge of the wings. They need to be made symmetrical, identical.
- The lower wings are narrower than the upper ones, so the ribbon should be appropriate. The knots are pulled tighter.
- Embroider the antennae with straight stitches using black thread; the ends of the antennae can be finished with French knots.
Heart
For their work, the craftsmen use nylon or bright satin ribbons of various sizes, and canvas with a fine weave.
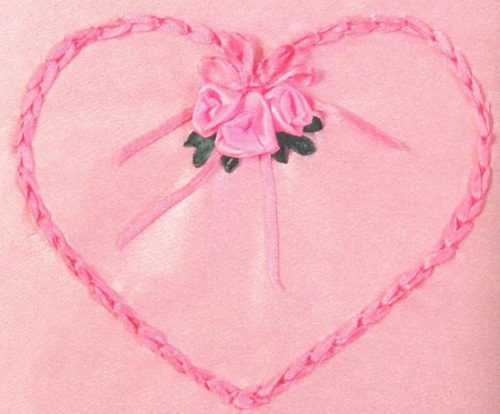
Execution algorithm:
- Draw the outline of the heart with a pencil or a self-disappearing marker.
- Transfer the tape to the front side and form a Japanese stitch 1 cm long. Step back 2 mm and pull the tape to the front side. Sew along the contour of the heart, following the described technology.
- Decorate the heart with a flower, for example, a rosehip, using air stitches. Make the core with a narrow yellow ribbon using a French stitch.
- Embroider several leaves along the outline of the heart.
Strawberry
Use a red ribbon 3 cm wide.

Execution algorithm:
- Cut the ribbon into strips of 5, 6, 7 cm, as the berries are of different sizes.
- Fold it in half along the wrong side, draw the outline of the strawberry and stitch it.
- Turn the product right side out and insert some padding polyester inside for volume.
- Take a red thread, sew the berries along the outline and tighten it near the stalk; use the same thread to attach the berries to the canvas.
- Make the stalk from green ribbon using straight stitches.
- Embroider the berry seeds with white or yellow thread.
Trees
You will need green tape up to 25 mm wide and brown tape 3 mm wide.

Execution algorithm:
- Draw the outline of a tree 8 cm high, in this case, a spruce.
- Embroider the tree trunk with green ribbon: first, make running stitches along the entire trunk, second, wrap it with diagonal stitches.
- The paws of the tree are made using Japanese stitch, starting from the base of the tree trunk and bringing the ribbon to the wrong side above the horizontal line.
- As you move towards the top, make the knots shorter: if at the base it is 3.5 cm long, then at the top its length is 1.5 cm.
- The lower part of the trunk is made with brown threads using straight stitches along the pattern.
New Year theme
How to embroider entire pictures with ribbons (this is relevant for beginners) is discussed using the following compositions as an example:
- New Year's wreath.
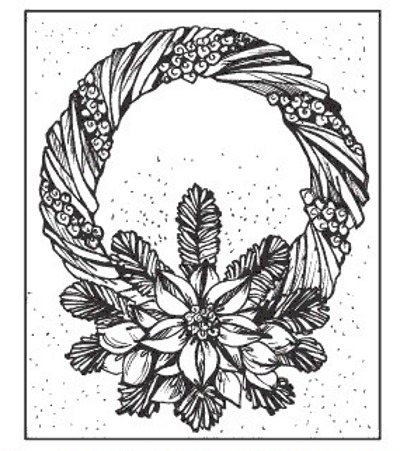
Execution algorithm:
- Using a twisted stitch, form a wreath of green ribbon in different shades.
- At the base of the wreath, embroider a poinsettia flower: 2 curved knots for each petal, make the buds with Japanese stitch, and use the same stitch to embroider the spruce branches.
- Spruce branch.
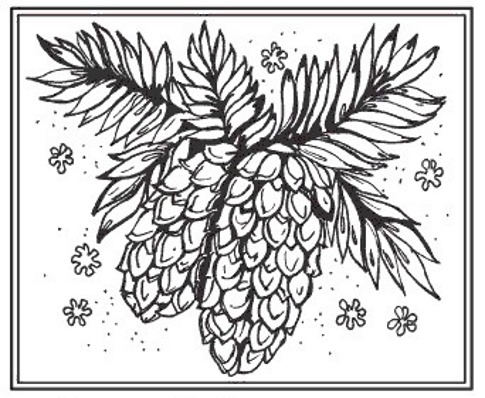
Execution algorithm:
- Embroider the branches with a twisted stitch using brown ribbon.
- Using green ribbon, make the spruce's legs using straight and curved stitches.
- Embroider the cones using Japanese stitch, using brown ribbon, starting from their tips.
Mother's Day Embroidery Ideas
Based on the algorithms considered, you can create paintings for Mother's Day:
- A bouquet for my beloved mother.
Execution algorithm:
- Draw the outline of the drawing.
- Start working with the bottom flower (the algorithm for making a rose is given above).
- Embroider the stem with a twisted stitch using a green ribbon 25 mm wide.
- Leaves are made using Japanese stitch; you can bring the needle out to the wrong side by piercing the ribbon in the middle or closer to the edge.
- To make a butterfly, start with the body and head, then embroider the wings, starting from the far one.
- Form the second upper wing of the butterfly by layering it on top of the first.
- Embroider the lower wing.
- Touch up the edges with fabric paints.
- Heart for mom.
Execution algorithm:
- Draw a sketch of the painting.
- Start embroidering it from the top sunflower, for this take a yellow ribbon, 30 mm wide, and a brown ribbon, 20 mm wide.
- Form a rose in the upper part of the drawing using the above algorithm.
- Then make a large sunflower flower using a 50 mm wide yellow ribbon.
- Create the second rosebud: first embroider the inner, barely visible petal, place the second one on top of it, made with Japanese stitch, bring the needle to the wrong side, piercing the ribbon closer to the left edge, do not pull it too tightly, then embroider the third petal, bringing the ribbon closer to the right edge.
- The stem is made with a twisted stitch.
- Make the leaves using Japanese stitch.
- Sew the heart with twisted knots and attach it to the fabric with thread in several places.
- To obtain different shades in flowers and leaves, you need to use fabric paints.
For beginners, to frame their finished work, you can buy a frame of the required size in a store and thick cardboard.
You need to put a fabric with ribbon embroidery on it, securing it with several long stitches. To make the work look neat on the back side, you can put another sheet of cardboard. Then you need to insert the picture into the frame. To cover the work with glass, you need deeper frames or specially made mats. For this, you should contact a bookbinding workshop.
Article formatting:Natalie Podolskaya
Video about ribbon embroidery
Video on how to embroider with ribbons for beginners: