Compositions of fir cones become part of the holiday, and when it comes to New Year's celebrations, everyone considers it their duty to make something interesting for the New Year's table.
Children and their parents make appliques, teenagers already skillfully use materials for creativity and can create incredible decorations for the home. Cones can be used as the main working material, as well as an addition when decorating details.
Preparation of material
Working with spruce cones is quite simple, but the material requires processing before use. This is necessary for convenience and high quality of the finished product. Since the cones have a pleasant pine aroma, many try to preserve it during the preparation process.
Natural raw materials can be processed in different ways:
- To maintain the shape of the cones, they should be kept in wood glue for about 1 minute. This will allow them to remain in a closed position for a long time.
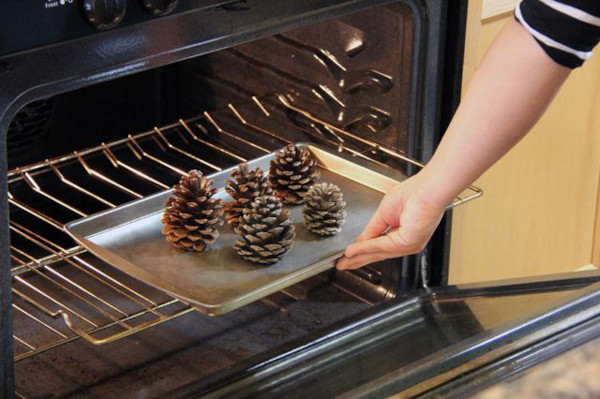
- If you managed to collect a lot of closed cones, and you need open models for the applique, then it is best to "open" them using heat treatment. You can use boiling - put them in a saucepan for 40 minutes and boil. After drying, put the cones in the oven for 2 hours. This process will help kill germs.
- To correct the shape of the "scales", you can use salted water. You should place the cones in a cold salt solution to soften the "scales", and then tie with a thread those places where the cone is too open. This method helps to give shape to the future working material.
- If the cones are too dark, you can lighten them with bleach. The solution is prepared on a water basis 1:1. After soaking the cones in it, they should be rinsed under running water.
If the buds do not need to be lightened or reshaped, you can skip these steps.
For simple crafts, materials collected from the ground are suitable. It is enough to wash and dry them. For large complex crafts, it is advisable to prepare cones using the first method. This will prevent scattering, chipping of parts and the formation of crumbs and debris in the process of working with glue.
New Years ideas
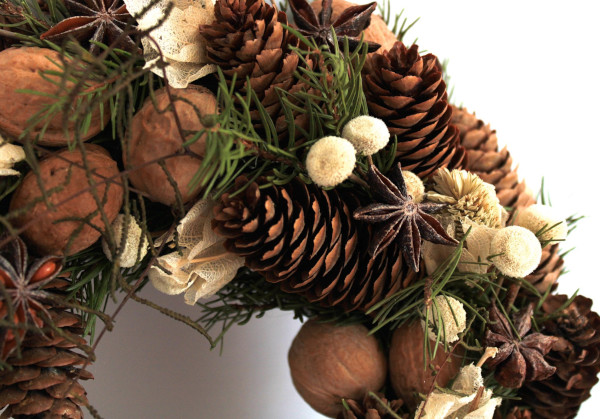
Compositions of cones can be combined with fir applications, crafts from other natural materials. Such works can be taken to kindergarten, school or left for home decor.
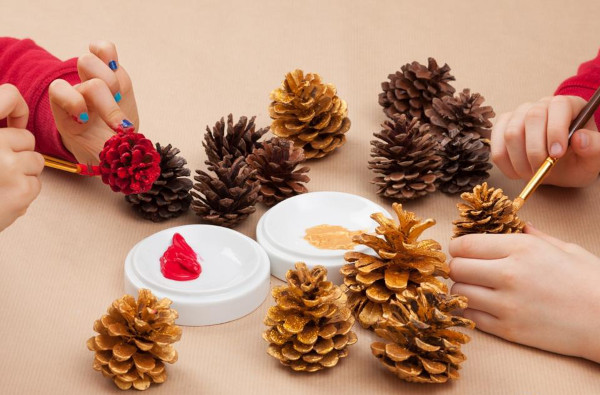
In addition to preparing the cones for work, they can also be decorated after - they can be painted and tinted. Below are master classes showing how to make crafts and various ideas for creativity.
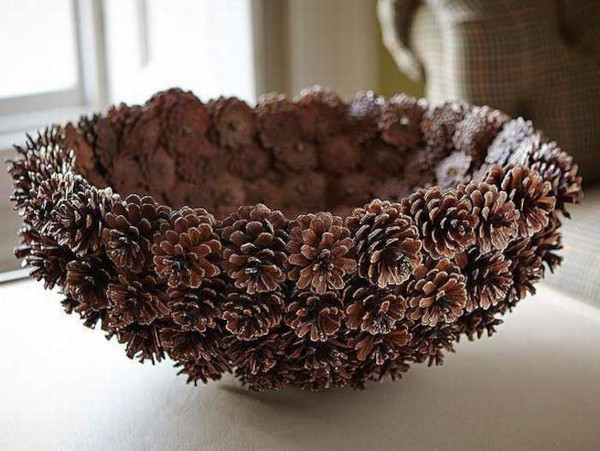
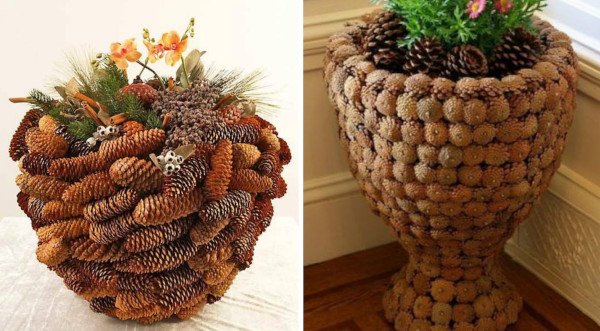
Basket of fir cones
To work, you will need to collect 50 small cones for a small craft. For a large workpiece, you need to take 250-300 pieces.
You should also prepare:
- glue gun;
- wire or bundle;
- superglue;
- primer or finishing varnish.
Before you start, you should prepare the cones for work. The process of creating blanks is described above.
Next, you need to complete the following steps:
- The wire needs to be cut into pieces 15-20 cm long.
- You need to wrap each cone with wire so that part remains for attaching to the next one.
- The cones should be placed with the bottom facing outward and the top facing inward into the circle.
- The wire must be connected between the cones by twisting the pieces.
- When the desired circumference length is reached, the circle can be closed.
- The second row of cones should be made using the same technique. The height can be adjusted - depending on the desired size, you can make 2-4 rows.
- The rings should be fastened together with wire.
- To keep the cones in place where they are connected, glue them from the inside with hot glue or superglue.
- To make the basket narrower at the bottom, you should make rings of a larger diameter at the top.
- The bottom needs to be covered with the remaining cones. You can use wire or glue.
- If desired, you can make a handle - string cones on a wire and connect the edges to the base.
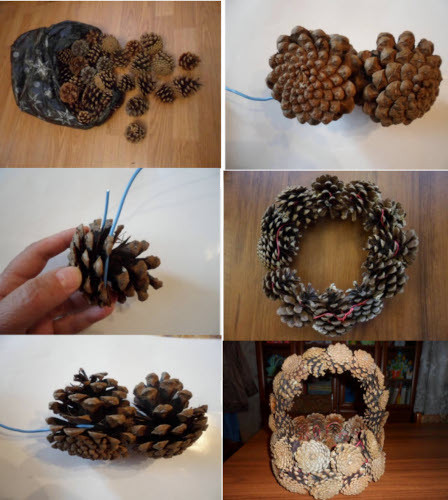
The finished product should be varnished to secure the result. If you need to decorate or paint the basket, do this before applying the finishing coat.
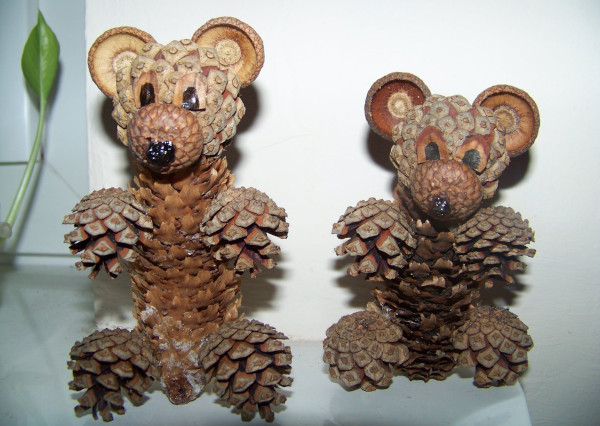
Teddy bear made of pine cones
A composition of pine cones in the form of a bear can decorate the interior; such a craft can be given as a New Year's gift to a teacher, friend or parents.
Depending on the size of the finished product, you will need:
- from 25 to 50 cones;
- glue gun;
- superglue;
- 2 pcs. black buttons;
- scissors;
- white fabric;
- scarf.
For decoration, you can use doll clothes, or do without them.
- To create the bear's body, you will need 3 large oval cones.
- You will need a large fluffy pine cone for the head, 2 round and 2 oval ones for the paws.
- To create the body, you need to glue 3 cones together with hot glue.
- The bear's head needs to be glued to the base of the body. It is best to duplicate the gluing of the parts with superglue.
- The formed body of the bear needs to be supplemented with paws - glue the remaining cones at the level of the lower and upper paws.
- Glue black buttons at the level where the eyes should be.
- From white fabric you need to cut out ovals to imitate paws and glue them to the cones.
- Cut out circles from the same or different fabric and glue them to the cones to imitate ears.
- The bear's muzzle can be made from white fabric, having first cut out a circle in the center with a diameter of 2-3 cm. The blank must then be glued to the bear's muzzle.
- You can tie a scarf for decoration.
A composition of fir cones will please guests and relatives. You can also make several varieties of crafts. If not a bear, let it be a hare, a fox or another New Year's animal that has become a symbol of the holiday.
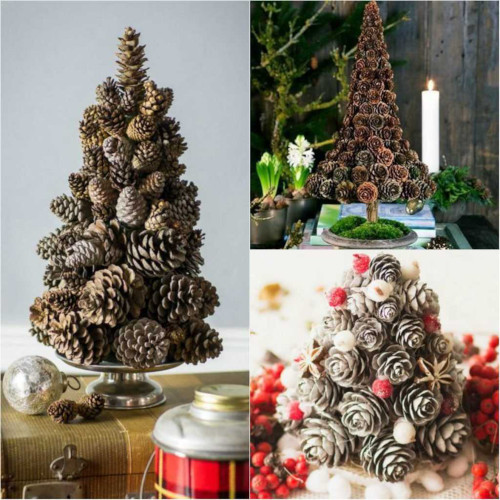
Christmas tree made of cones
A banal Christmas tree can be made from cardboard, paper, and also from fir cones. The simplest applications will take no more than 2 hours without decorating and painting.
And to create it you will need available tools that are available in every store:
- glue gun and glue sticks for it;
- coniferous branches, artificial or natural;
- tinsel;
- cardboard;
- cones.
It is worth noting that this master class can be done with glue, as well as with a needle and thread. The cones can be planted on cardboard in the shape of a cone for reliable fastening if you do not have good glue at hand.
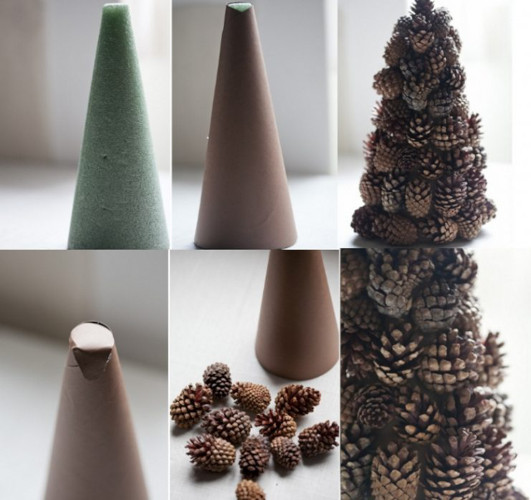
In both cases, the cones must be prepared in advance:
- First, you need to prepare a cardboard cone. The diameter can be any, as can the height of the finished product.
- To glue the cones evenly, you need to start from the bottom and move upward.
- If the tree turns out to be tall, then smaller cones should be glued at the level of 2/3 of the cone.
- Large cones should be fixed with hot glue and additionally secured with superglue. You can wrap them with thread, forming a ring, and put each row on a cone, like a children's toy "pyramid".
- The finished tree can be painted or decorated.
It is worth remembering that the cones are prepared for crafts in advance. If the product is ready earlier, and you need to decorate it after its manufacture, it is important to remember the rules for painting such cones.
| Technique | Tools | Process |
| Spray coloring | Sprayer, spray paint, dry dye | Painting should be done at a distance of 30-35 cm from the product in a ventilated room. Dry dyes should be applied to the adhesive base or undried varnish. |
| Painting | Acrylic paints | Acrylic paints are considered the safest to work with. You can use foil, a dish sponge, brushes and homemade stamps for embossing. This method is suitable for individual creation of a pattern on cones. |
| Adhesive | PVA glue, glitter, decor | The method is suitable for partial coloring of cones, for example, for "scales". The glue should be applied to those areas where it is planned to make decoration. You can use glitter, colored PVA glue to create a bright opaque base. |
If desired, you can paint the cones with any materials. It is permissible to use water-soluble dyes, oil paints and gouache. However, it is important to remember that paints can stain your hands even after drying, so you should cover the paint with a finishing layer of PVA glue or varnish.
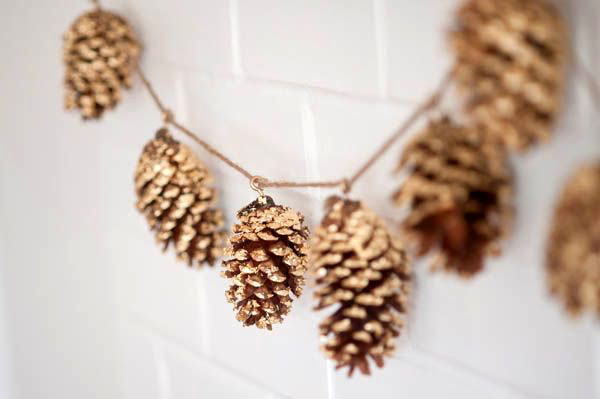
Garland of pine cones
A composition of cones in the form of a garland is made quite simply.
To work you will need:
- colored cones or decorated ones;
- glue;
- rope or tourniquet;
- hot glue;
- spray paint;
- glitter;
- garland optional.
This craft can be made to glow, or you can make a typical garland to decorate your home.
- The prepared cones need to be dried and sorted by size.
- If you plan to install LED elements in the garland, you need to select a piece of thread equal to the length of the garland.
- There should be a winding of thread between the LED lamps. And the mount of the cone will be in the area where there is a LED.
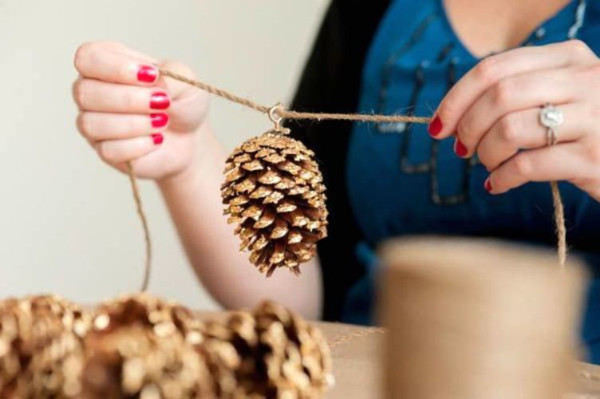
- The cones must be secured in advance with thread at a distance from each other equal to the distance of the LEDs between them.
- When stretching the garland with lamps, the thread with cones needs to be stretched. The cones can be simply wrapped with thread or secured with glue.
- On each side of the garland, you should leave 10 cm of free edge for fastening.
- This garland can be hung on the wall, placed above the fireplace, or used to beautifully decorate a work surface.
As a backlight, you can use LED candles, garlands on batteries due to their small weight. Such a simple decoration will fill the house with an atmosphere of coziness and celebration.
Children's crafts
Almost all children love to make crafts from what they find on the street. In cold weather, pine cones will serve as such natural raw materials. They can be used to make crafts for kindergarten and elementary school classes.
Often parents have to come up with complex applications to stand out from other kids in the group. But, fortunately, there are several ideas for creating simple children's crafts for any age.
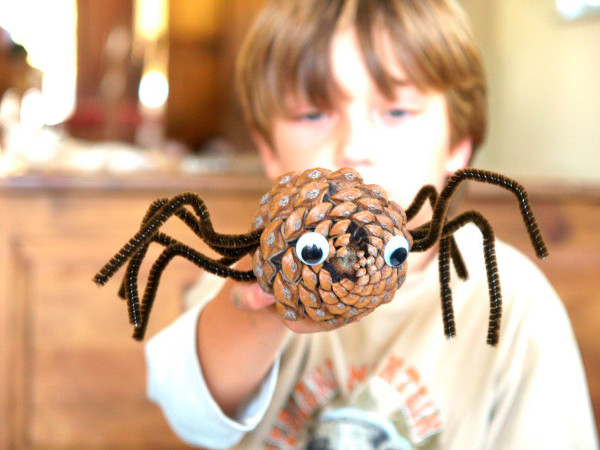
Spider
A funny spider can be used as a Halloween decoration or a simple decoration for a group in a kindergarten.
To create this craft you will need:
- small lump;
- wire and thread;
- colored wire;
- glue;
- a tourniquet or strong thread.
To decorate the future spider, you can take fabric to imitate eyes and a mouth. You can do without it.
- The cone needs to be prepared and dried well.
- It is advisable to cover it with varnish or finishing glitter so that debris does not fall off during the process of creating the craft.
- You can wrap the wire with thread or buy ready-made colored wire with tinsel.
- You need to cut the wire into pieces 5-6 cm long.
- The ends of the wire should be bent to avoid puncturing your fingers.
- On the cone, visually mark the area where the spider's legs will be attached.
- Apply glue to both sides of the cone one by one and glue the wire.
- Once the glue has dried, the wire can be bent to create spider legs.
The chenille wire can be replaced with colored cardboard. Plastic tubes from children's juices, which have a corrugated bend, will also work.
Vase with pine cones
Pine cones are great for imitating flowers. Even a child can make a vase from scrap materials.
For this craft you will need:
- small cones;
- scissors;
- jar or glass;
- acrylic paints;
- green paper;
- hot glue.
First, you need to paint the cones in any colors and leave them to dry. At this time, you can make a vase.
Acrylic paints dry quickly, without releasing vapors or odors, so the composition can be made together with the child within 2 hours:
- It is necessary to collect brushwood or dry tree branches.
- Future flower stems can be painted, but colored paper is best for adding a green tint. Green paper should be cut into long strips and wrapped around each stem. If you have tape, you can use it.
- The branches need to be trimmed to a height that will fit the vase.
- You need to make a beautiful composition from the outside of a jar or glass. You can glue or paint it, or buy a ready-made lightweight vase for this craft. The paper glass should be weighed down - put several bags of salt or sand on the bottom.
- The base of the vase should be reinforced with thick paper, into which the branches will be inserted.
- Leaves should also be cut out of colored paper. They should be glued to the stems.
- The branches need to be attached to the base with hot glue and left until completely dry.
- Once the paint on the pine cones has dried, you can glue them to the branches. This should also be done with hot glue.
The finished composition can also be decorated, embellished or supplemented with other flowers made of paper or cardboard.
Other compositions from cones
A composition of cones in the form of a Christmas tree is perfect for decorating a house or a festive corner where the Christmas mood reigns. On the eve of the winter holiday, you can make a simple tree that will perfectly fit into a modern interior in the Provence or Art Nouveau style.
This decoration does not necessarily have to be timed to coincide with the New Year. It will look good as a home decoration.
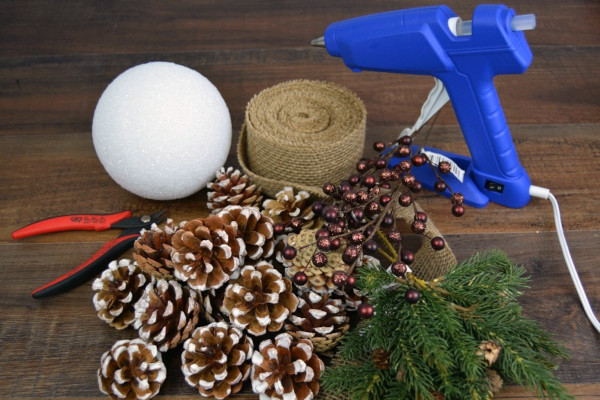
To make a Christmas tree you will need:
- foam ball;
- hot glue;
- sandpaper;
- acrylic paints;
- wire;
- ribbon;
- hairspray;
- glitter optional.
The craft is made in several stages:
- First, you need to paint the prepared cones and, if desired, add glitter to the tips of the "scales". To fix the glitter, you can use hairspray. It is also suitable for adding shine to dried paint.
- The foam ball needs to be sanded with sandpaper to increase adhesion to other materials.
- Next, you need to determine the top of the ball, and then make a hole for the ribbon. It needs to be tied in a knot and sunk into the hole with hot glue previously poured in.
- The cones need to be glued to the foam ball, starting from the bottom. The easiest way to do this is to visually divide the ball into rows.
- Closer to the top of the ball, the cones should be glued to the base without tilting them. This will form the height of the tree due to the top cones.
- For reliability, each row of cones can be wrapped with wire.
- The wire can be decorated by painting it brown.
This decoration can be placed on a shelf or hung on a Christmas tree by a ribbon, but you need to consider the weight of the product. To make the craft easier, you can decorate each cone with small multi-colored pompoms, gluing them to the base of the cones between the "scales".
Compositions using pine cones can become New Year's decorations for the home or crafts for kindergarten and school. They can also be used to make beautiful products that will serve as decoration for the home.
Pine cones always look noble and natural in the interior. And in crafts they can be combined with natural elements and decorated to match the interior style.
Video about cone compositions
5 beautiful crafts from pine cones: