Working on a craft develops creative thinking, promotes fine motor skills, and fosters perseverance and attention. Mouse made from a pine cone, this is one of the traditional themes intended for children's creativity.
What do you need for the job?
Cones that you collect with your own hands can be useful for creating various crafts. Children love to make various animals from natural materials, create fictional characters, and then play with the resulting characters.
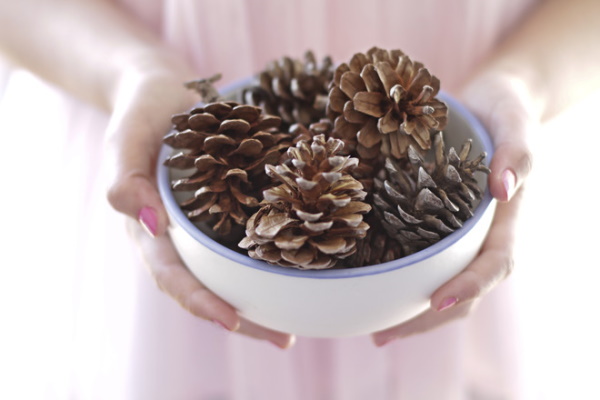
It is recommended to collect cones in the spring, but if necessary, this material can be used at any time of the year. The process of collecting and preparing cones for crafts has several features. Before use, the collected cones are cleaned of resin residues, and insects that may have remained inside the cavities are removed.
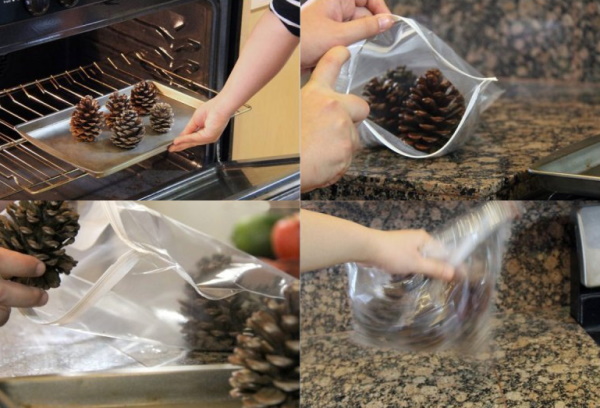
It should be taken into account that cones can be closed outside. When they get into a warm room, under the influence of high air temperature and humidity, they begin to open and change their structure. The preparation process depends on what type of cone is needed for the craft.
The material can be prepared in one of the following ways:
- If a closed pine cone is required for the craft, it is placed in a container with construction glue for 30-40 seconds. After that, the material is dried on a napkin and used to create the craft.
- To open the cone, prepare boiling water. The cone is boiled in water over medium heat for about half an hour. Then the cone is dried on a radiator, in a microwave or on a windowsill.
A pine cone mouse is a craft made from closed or open pine cones using various techniques.
The following materials and tools are required for the work:
- thick cardboard;
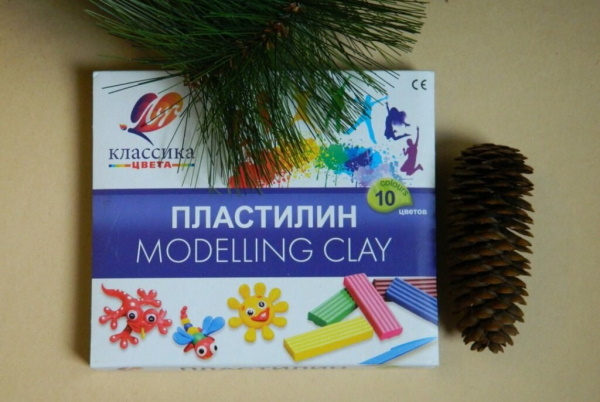
- paints and plasticine;
- scissors;
- glue;
- brushes;
- knife;
- cotton pads or cotton wool;
- scotch.
A pine cone mouse is a craft that is often made with children for the New Year to hang the toy on the Christmas tree. The mouse is one of the favorite cartoon and fairy-tale characters among children, so there are many ideas for creating this toy.
If the toy is to be hung on a Christmas tree, it is necessary to provide a special fastening. Ribbons or paper clips can be used as fastenings. A craft made from multi-colored cones looks more interesting. Special compositions are used for coloring.
| How to paint pine cones | Description of the method |
| Alkyd enamel | For work you will need a jar with enamel and wire. The wire is fixed on the top of the pine cone. The pine cone is held by the wire and dipped into the jar with enamel. The pine cone is carefully removed, allowing the paint to flow down freely. The pine cone is suspended by the wire over a newspaper or oilcloth and left until completely dry. |
| Gouache | The cones are placed on oilcloth. The edges are painted with a brush and gouache, creating a thick layer of paint. |
| With spray paint | The cones are hung over oilcloth and treated from all sides with an aerosol can. |


Before you start working with the cones, you need to make sure that all parts are dry. Cones painted with enamel may take 1-2 days to dry. Material painted with gouache or spray paint dries in 3-5 hours.
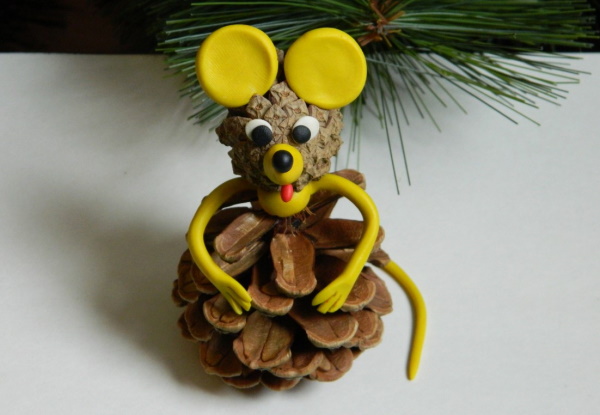
New Year's mouse
This option is suitable for working with preschool children.
When creating a craft, the following qualities are developed:
- perseverance;
- attention;
- creative thinking.
Working with plasticine, the child develops fine motor skills. This contributes to the simultaneous development of speaking skills.
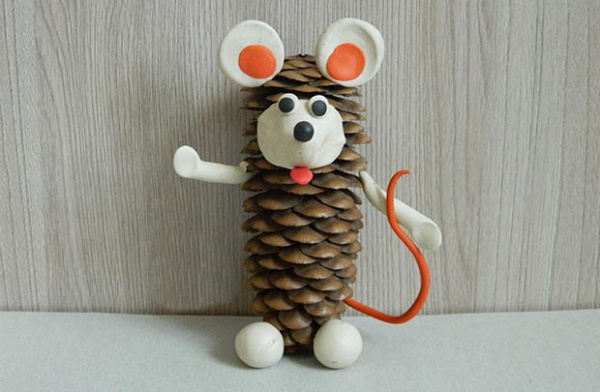
To work you will need:
- a cone of any shape;
- plasticine;
- modeling board;
- A set of plastic eyes for small toys.
The eyes can be made from buttons of a suitable size or cut out of cardboard.
Step by step instructions:
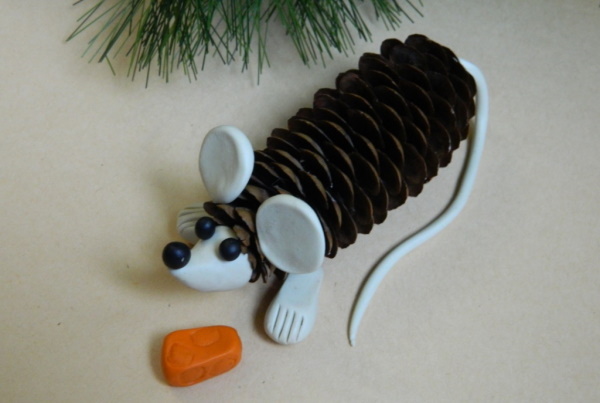
- Large ears are molded from white plasticine, and smaller inserts are made in the center from orange or pink plasticine.
- An elongated muzzle is molded from white plasticine.
- Separate 4 equal-sized pieces from a piece of white plasticine and form the paws. Make the upper paws long, and roll the lower paws into balls.
- The balls are placed on a prepared stand, and a pine cone is placed on them.
- The upper paws, muzzle, and ears are attached to the cone on both sides.
- Eyes are glued onto the face.
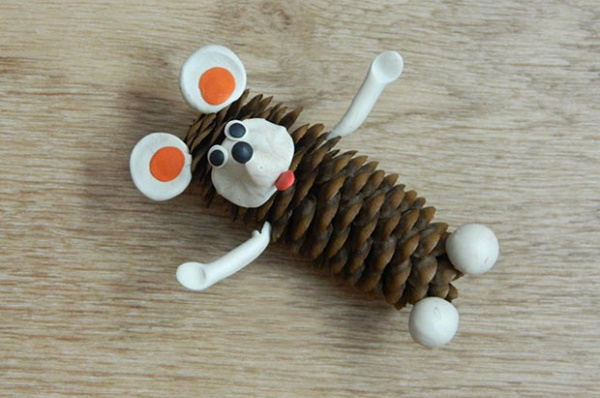
- The nose is made from black plasticine, and the tongue from red plasticine.
- A piece of twine is attached at the back to form a tail.
Hanging toy
Pine cones are great for making a hanging mouse craft for a Christmas tree. You will need felt and ribbon for fastening.
Step by step instructions:
- A triangle is cut out of felt fabric, folded and glued into a cone. This is the blank for the future mouse's muzzle.
- The cone is processed from the remains of garbage, installed horizontally on one of the sides. This is the blank of the mouse body.
- Bead eyes and a plasticine nose are glued to a felt cone using PVA glue. Ears are molded from plasticine and carefully attached to the felt.
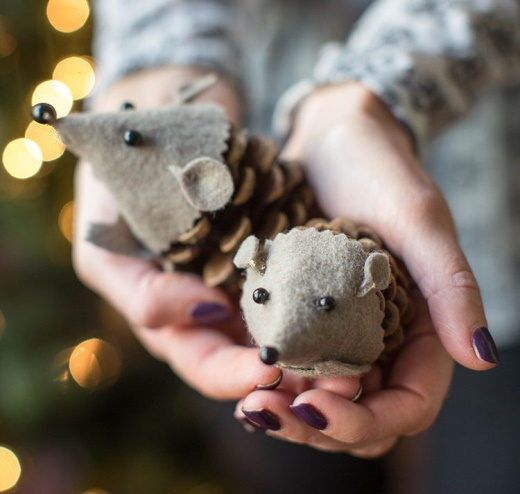
- The cone-shaped head is glued to the mouse's body using PVA glue.
- The tail is formed from twine or gray thread. The tail is attached to the back of the craft with glue.
- A red ribbon is attached to the mouse's body. To make sure it stays firmly in place, a hole is made in one of the cone segments with a drill or an awl, through which the ribbon is passed.
Other toy options
From cones collected independently, various toys for the Christmas tree are obtained. The material is suitable for making elements of New Year's decor, crafts for games. With its help, you can implement various creative ideas.
With an acorn
A pine cone mouse is a craft that can be made using several materials of different textures. The tactile sensations that arise during the work contribute to the development of the left hemisphere of the brain in children.
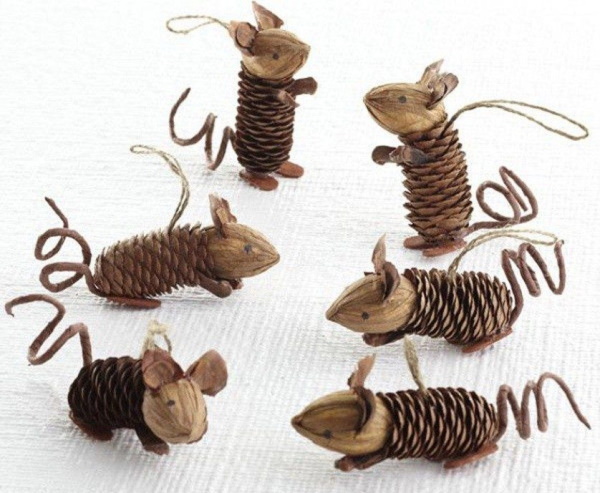
The child learns to find obvious differences in the structure of materials. For work you will need a small pine cone that stands firmly on the base, and an oblong acorn, from which you will make the mouse's muzzle.
Step by step instructions:
- The cone is cleaned of debris and dried.
- Plasticine paws in the shape of flattened ovals are attached to the base of the cone and placed on a stand.
- An acorn is attached to the top of the pine cone using plasticine.
- On the pointed end of the acorn, use a black felt-tip pen or marker to draw a nose and mustache.
- The eyes are formed from black plasticine and glued to the acorn on both sides of the muzzle.
- Using white or orange plasticine, create ears and attach them to both sides of the acorn.
- Using twine or thick threads, form a long tail and attach it to the back of the cone using a piece of plasticine.
A pine cone mouse is a craft that can be decorated with ribbons, beads, a bow or decorations made from scrap materials.
From pine cones
With the approach of the New Year celebration, it is customary for kindergartens and schools to make DIY crafts on the New Year theme. Pine cones are one of the most popular materials for creating New Year decor.
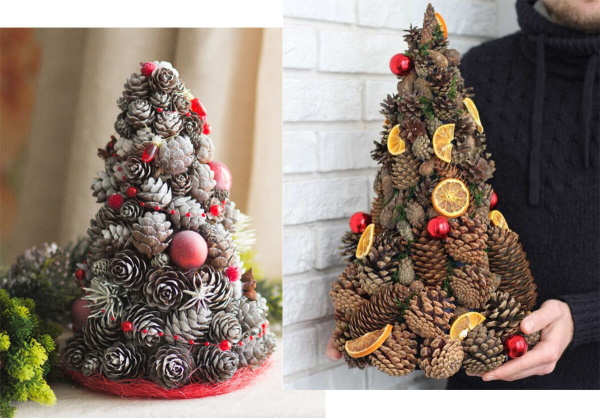
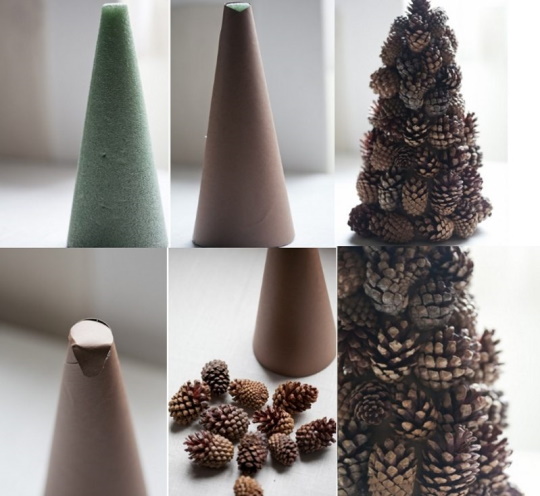
A Christmas tree made of cones will be made if the material is collected, dried and properly prepared for work. To create a Christmas tree, you will need from 50 to 200 cones of different sizes. For this craft, you do not need to select cones by shape. The tree can be of different sizes, it depends on the amount of prepared material.
Step by step instructions:
- A model of the future tree is cut out of thick cardboard. The size of the model depends on the number of cones collected and prepared.
- Using a glue gun, the cones are glued to the cardboard body, pressing each piece against the other piece so that there are no gaps between them.
- The top tier is made from small pine cones to form the top.
- After assembling the tree, wait for the glue to dry, then trim the protruding parts of the cones with a sharp knife.
- The tree is decorated with small tinsel, glitter, and an ornament is glued to the top.
- The ends of the cones are covered on all sides with silver or gold paint. It is best to use a special spray paint intended for children's creativity.
In addition to painting, the ends of the cones can be decorated with artificial snow. To do this, you will need PVA glue, a brush and cotton pads. The edges of the cones are covered with a thin layer of PVA glue, then the cotton wool is carefully distributed without waiting for the glue to dry.
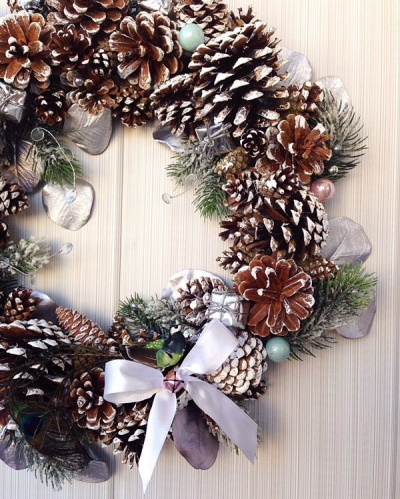
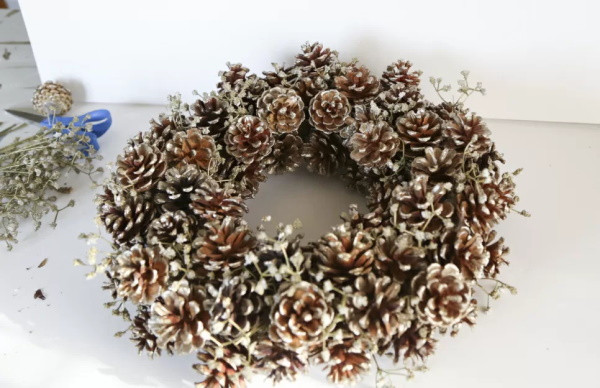
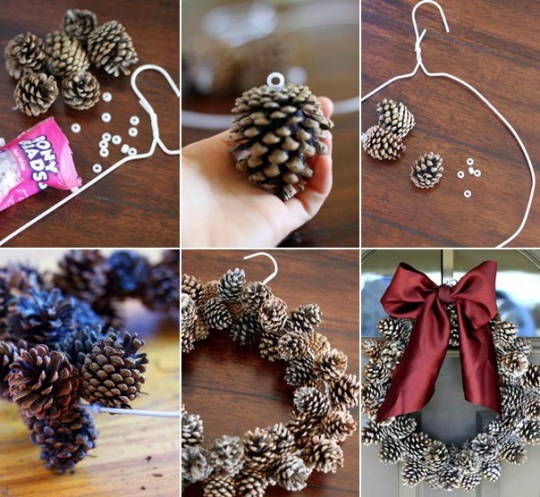
Christmas wreath
To make a Christmas wreath, you will need additional materials. The wreath can be decorated in any way you can. A child can be asked to make a small wreath or work with an adult on a large decorative element that can be hung on a wall or door.
Materials for making a wreath:
- cones;
- wire;
- ribbons;
- pine branches;
- paints and brushes;
- cardboard;
- glue.
The preparatory stage of the work is the creation of the wreath structure on which the main elements will be located.
It is made of thick cardboard that can hold its shape. To make the structure strong, you can glue 2 cardboard circles on top of each other.
The wreath circle can be made from plywood, foam or wire. The circle is given the correct shape, then assembly begins.
The second preparatory stage is the processing of the cones. They are cleaned of debris, dried, and then painted. The cones are laid out on oilcloth and painted using an aerosol can.
To create a New Year's wreath, light blue shades, silver or gold paints are most often chosen. If the wreath consists of several rows of cones, you can combine the festive classic colors: red and green.
Step-by-step assembly instructions:
- Each cone is attached to the base using glue, observing the order of the colors.
- After filling the circle, they begin decorating: tie satin ribbons through equal segments. Small decorative threads are woven inside the cones, snowflakes, bells, and glitter are attached.
- A mount is made in the center of the upper arc so that it is possible to hang the structure on a wall or door.
The New Year's wreath can be decorated with an electric garland.
Gnomes
To create small gnomes you will need pine cones and small foam balls. The gnome caps are made of felt. This material is easy to work with and holds its shape well after assembly.
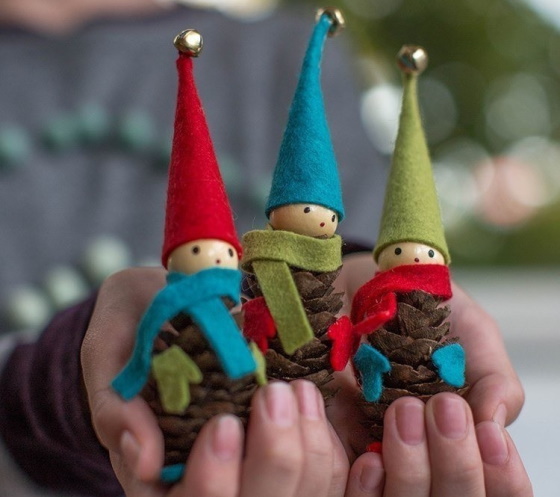
Step by step instructions:
- The cone is placed on the base.
- The foam ball is glued to the top of the pine cone using PVA glue.
- Using a bright marker or felt-tip pen, draw eyes, a mouth, and a nose on the balloon.
- A triangle is cut out of felt taking into account the size of the foam ball.
- A cap is sewn from a felt pattern using threads.
- The cap is attached to the gnome's head.
- A strip several centimeters long is cut out of felt or felt of a different color.
- The strip is wrapped around the top of the pine cone, this is the gnome's scarf.
- Cut out 2 mittens from the felt scraps. Attach them with glue to both sides of the cone.
- To complete the image, make 2 semicircles from felt and glue them to the base of the cone, imitating the presence of multi-colored shoes.

The cap can be additionally decorated with beads, glitter, rhinestones, tassels or pompoms made from threads. To make the craft interesting, the gnomes are placed on a stand, decorations are created from small cones, pine branches and needles are added.
To hang the gnomes on the tree, simply attach a loop of thread of a suitable color to the base of the cap.
Garland
To make a garland of pine cones, you need to paint them with gold spray paint. The basis of the garland can be twine or thick thread twisted several times.
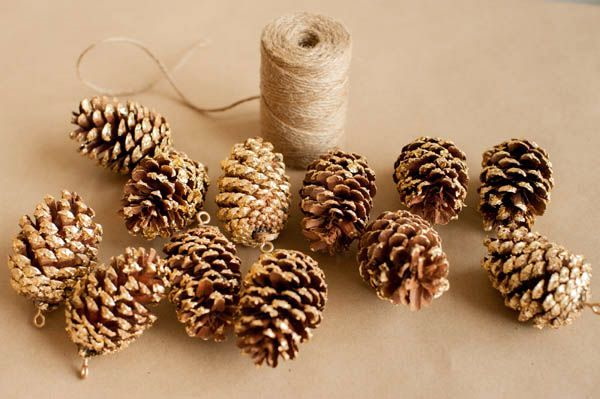
Step by step instructions:
- From the skein of thread, cut off as much material as is needed to create the garland.
- The twine is laid out on the work surface, and with the help of additional devices, the places where the cones will be attached are marked.
- A piece of wire or a loop made of twine is attached to the base of each cone using glue.
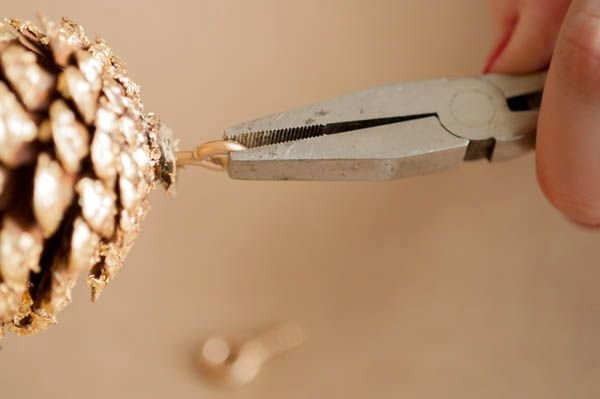
- The cone with the fastening is placed on the twine at equal intervals.
- Additional decorations are placed between the cones, such as small acorns painted with gold paint, stars cut out of felt, decorative snowflakes made of shiny paper, and small bells.
- Each element is carefully reinforced.
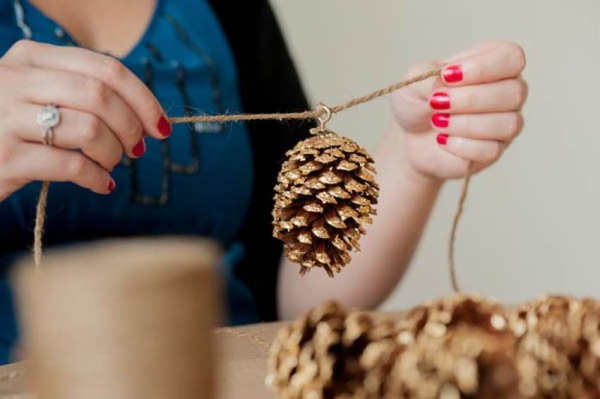
The garland can be hung on the wall, used to decorate windows, or combined with an electric garland.
Christmas tree toy
You can make a variety of figurines from cones to decorate your Christmas tree. If you add a red satin ribbon mount to the craft, the figurine will look great against the green needles.
Materials you will need to create a deer:
- red satin ribbon;
- scraps of felt or felt;
- eyes for crafts on an adhesive base;
- red pompom;
- glue;
- cones;
- gold tinsel on wire.
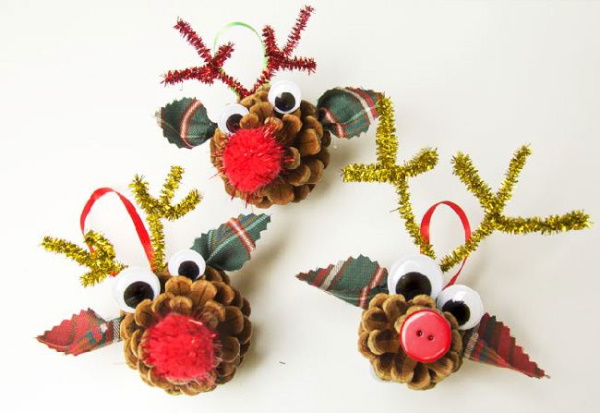
Instructions:
- A fastening for hanging the pine cone on the tree is made from satin ribbon and attached to the center of the pine cone.
- Deer antlers are formed from tinsel on wire and attached to a pine cone with glue.
- Cut out 2 ears from felt or felt and glue them to both sides of the cone using glue.
- Glue on the eyes with an adhesive base and the nose made from a red pompom one by one.
The deer can be decorated with glitter on top and beads can be glued to different sides of the body.
Snowman
To create a snowman, you will need a pine cone painted with white alkyd enamel or gouache. To make the snowman recognizable, the pine cone should be fully open. This will create the illusion of fluffiness.
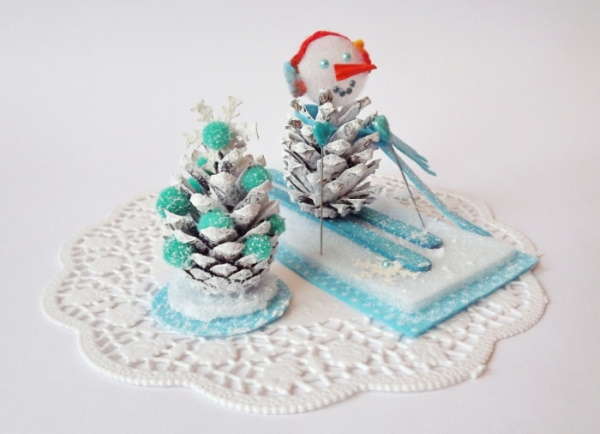
Step by step instructions:
- The open, white-painted cone is placed on the base.
- Cut a circle out of white cardboard and glue it to the top of the pine cone using PVA glue.
- On white cardboard, draw eyes with a blue marker.
- Make a carrot-shaped nose from a piece of orange plasticine and carefully glue it to the white cardboard circle in the center.
- Cotton pads are divided into small pieces and shaped into balls.
- The balls are glued to different parts of the cone using glue.
- A hat is formed from a white fluffy pompom and glued to cardboard.
A snowman's hat can be made from red felt. To do this, cut a triangle out of the material, connect it with threads to form a cone, and attach it to the top of the pine cone. A pompom for a felt hat is made from a cotton pad. To hang a snowman on a Christmas tree, simply glue a loop of decorative silver thread to the cardboard form.
Pine cones are a natural material from which you can create many different crafts. It is customary to make hanging toys for the Christmas tree, such as mice, deer, gnomes. Wreaths, candlesticks, garlands are made to decorate the interior.
Video about making a mouse from a pine cone
How to make a mouse from natural materials: