Funny mice are the heroes of many fairy tales and cartoons. Children will find it interesting mold them from plasticine. For example, you can create a character from your favorite fairy tale and give him some object in his paw. Such a work of art will be a good birthday present or interior decoration.
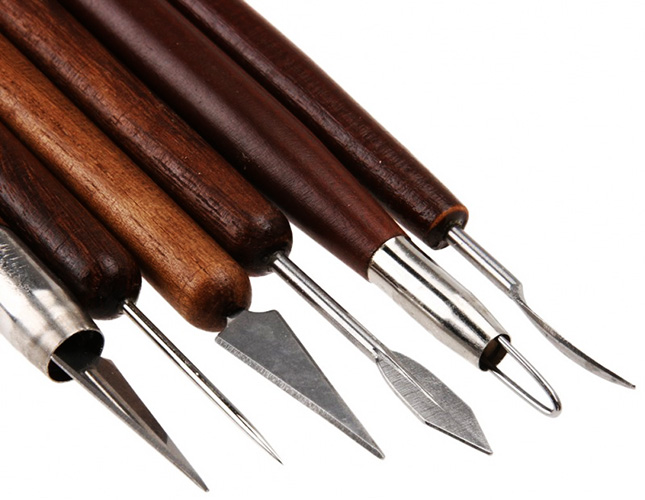
Materials for modeling
To mold a mouse, you will need several colors of plasticine. Their number depends on what kind of character the child is going to create. As a rule, mice are gray. However, nothing prevents you from creating a fairy-tale mouse with an unusual fur color, for example, red or blue.
You will also need plasticine to create objects that the mice will hold in their paws. Their color can also be different.
Additional items you will need for the work:
- stack – for cutting objects;
- toothpick – to give figures the desired shape;
- thick colored paper - as a background if you plan to make an applique;
- a flat smooth board – for rolling out plasticine. The main requirement for it is that the plasticine does not stick.
How to mold a mouse from plasticine step by step
A mouse made of plasticine step by step for children can be molded from gray plasticine. If you don't have any, then you need to mix white with black.
The stages of character creation are as follows:
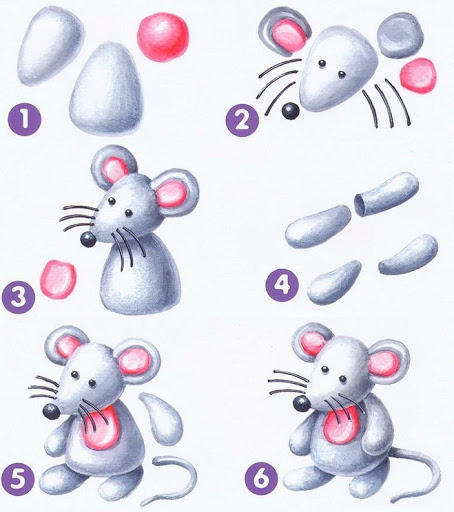
- Make the base of the body and head. To do this, roll 2 ovals of different sizes.
- Connect the ovals using a match. Smooth the joints with your fingers. The mouse's muzzle should be slightly pointed at the nose.
- Proceed to creating the remaining elements of the muzzle. Make the eyes. They can be made from 2 small balls, and each eye should have a pupil, represented by a small black ball.
- Make a mouse nose, which is also round. It is best to make it from a black piece of plasticine. It should be located at the peak of the muzzle.
- Shape the mouth with a plastic knife. Place round ears on both sides of the crown on the head.
- Start making the upper limbs. To do this, roll a pair of sausages of the same size from the main color plasticine. There should be fingers on one end of these blanks. They should be cut with a plastic knife. Attach the resulting paws to the upper part of the body.
- Make the lower limbs in a similar manner and then place them under the body.
- Make a long wavy tail for the mouse.
Application
The work on creating a mouse applique takes place in the following 7 stages:
| No. | Stage | Description |
| 1 | Sculpting the body | You can use a piece of plasticine of white, grey or blue colour. The stages will be as follows:
|
| 2 | Sculpting the head and ears | The stages of implementation are as follows:
|
| 3 | Making the muzzle parts | To create the nose you will need a small piece of black plasticine. The sequence of actions is as follows:
|
| 4 | Working on the elements of the muzzle | The mouse has 2 eyes, but since in this version it is presented in profile, only 1 of them will be visible. It is made of white and black plasticine. The eye itself will be white, the pupil will be black, which should be attached on top. |
| 5 | Making limbs | The stages of their creation are as follows:
|
| 6 | Creating a tail | First, roll a thin sausage out of the main color plasticine, and then form a mouse tail out of it. It is attached to the lower part of the body. |
| 7 | Mouse decoration | Here everything depends on imagination and individual experiments. For example, you can attach a bow to the ear or place luxurious beads between the head and the body. |
Heart-shaped mice
A plasticine mouse holding a heart in its front paws will look beautiful and attract children's attention.
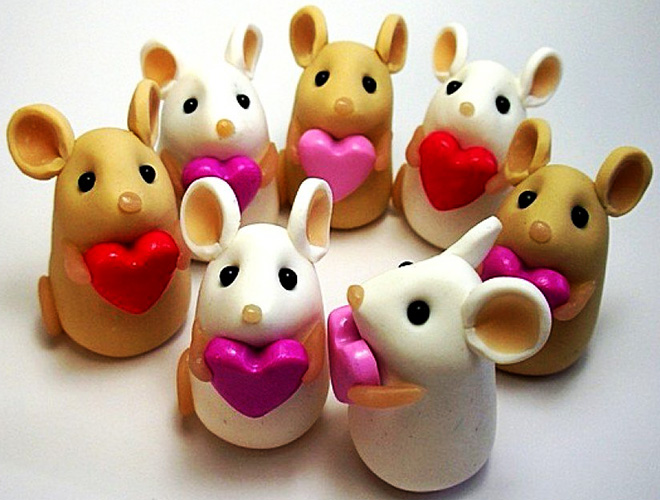
It is not difficult to sculpt such a figure, the main thing is to stick to the step-by-step plan.
For work you will need the following colors of plasticine:
- grey;
- red;
- black;
- white.
The production of the figure will be carried out in the following steps:
- Sculpt the head. It should have a teardrop shape.
Attach 2 white eyes to the front part and 1 black pupil to each of them. - Attach 2 small ears to the top of the head, each represented by a circle.
- Attach a small black ball, which will become the mouse's nose, to the sharpest part of the muzzle.
- Make the body using the same color as the head. It should be oval in shape. Use a match to securely connect the head to the body.
- Sculpt the mouse's limbs. To do this, form 4 short sausages. At the end of each of them there should be several fingers. To create them, use a stack.
- Using the same method, based on the use of a match, attach all 4 paws to the body. For this, you will need 4 matches.
- Make the mouse's tail. To do this, roll a long sausage. Then attach it to the lower part of the body.
- When the mouse is ready, place a heart in its upper paws. Make it from red plasticine.
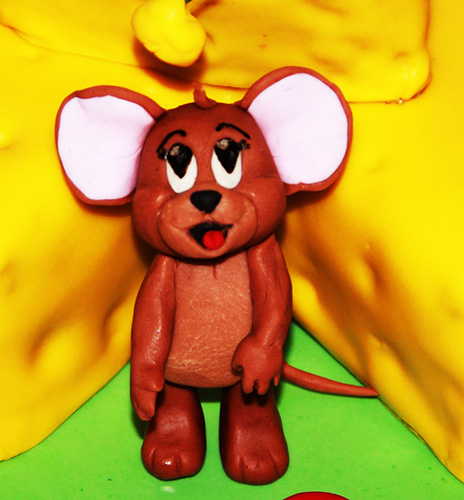
With cheese
To make a plasticine mouse sitting on a favorite treat - cheese, you need to prepare the following plasticine:
- grey;
- yellow;
- pink;
- orange;
- black;
- white.
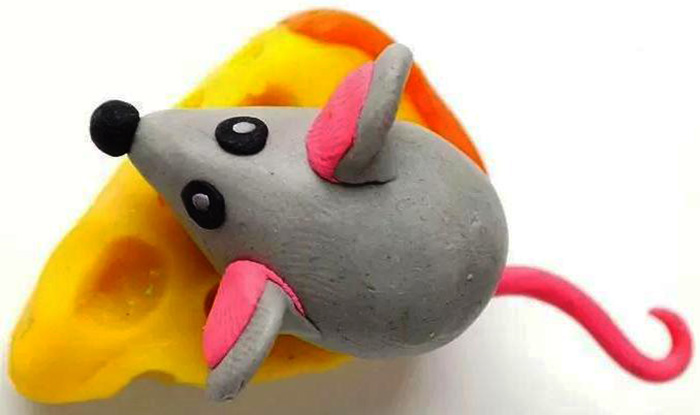
You will also need a metal tool with rounded ends.
A plasticine mouse for children step by step will be made as follows:
- Make the body from grey plasticine. At this stage it should have the shape of a drop.
- Proceed to modeling the ears. They are also gray. First form 2 identical balls, and then give each of them a flat teardrop shape.
- Fill the middle of each ear with pink. Attach the resulting elements to the head.
- Add eyes. They are made from black plasticine. The pupils should be white.
- Make a mouse nose out of black plasticine. It should be shaped like a ball.
- Attach the nose to the peak of the muzzle.
- Make the mouse's tail. You will need pink plasticine for this. It is rolled into a thin sausage, which should then be slightly bent.
- Attach the resulting tail to the back of the figure.
- Proceed to sculpting a piece of cheese. For this you will need yellow and orange plasticine.
- The main piece is molded from a yellow piece. It should have the shape of a triangle. The crust of the cheese, which plays the role of the base of the triangle, should be orange.
- Make characteristic holes in a piece of cheese. Any tool with rounded ends will come to the rescue.
- When the cheese is ready, place the mouse on it.
From plasticine and pine cones
To make a mouse, you can use not only plasticine, but also auxiliary objects, such as pine cones.
To work you will need:
- plasticine;
- rolling board;
- 1 pine cone;
- some autumn berries and leaves.
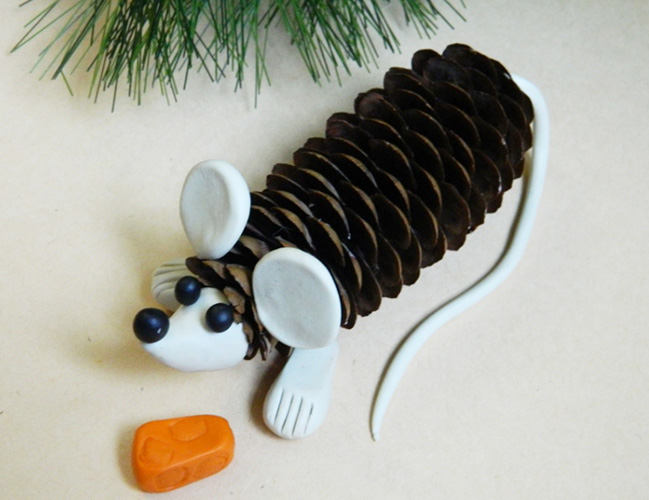
The stages of making the figure are as follows:
- Sculpt the limbs into 4 sausage shapes.
- The role of the body in this craft will be played by a pine cone, so attach the paws created in the previous step to it.
- Use a plastic knife to shape the paws.
- Proceed to creating the head elements. The ears are represented as two circles, the eyes as small black balls, the tongue as a red oval, and the tip of the nose as a brown drop.
- Make a tail. To do this, roll a piece of the desired color into a long sausage.
- The resulting tail is attached to the back of the body.
From plasticine and acorn
Another element that can be additionally used when sculpting a mouse from plasticine is an acorn. It, like a pine cone, can act as a body.
To make the craft beautiful, you can use white beads.
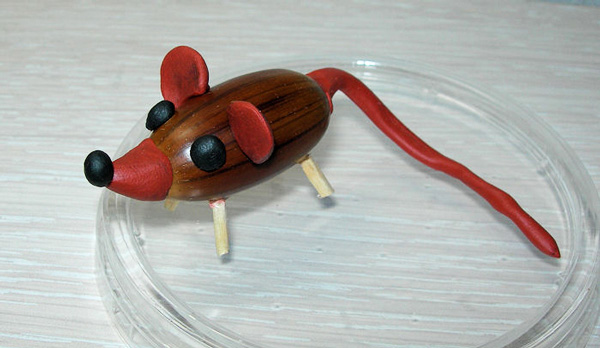
The stages are as follows:
- From the main color plasticine, mold the mouse's face, which should have an elongated teardrop shape.
- Having prepared 5 pieces of plasticine of the same size, make 4 limbs and 1 tail.
- All previously created elements are attached to the acorn.
- Create the basic elements of the muzzle. The ears will be represented by 2 flat cakes, the eyes by 2 circles with bead pupils, the nose by a black ball.
- Create a blush on the mouse's cheeks using pink circles.
- Glue beads onto 2 small black balls and attach them as eyes.
Jerry the mouse
Jerry is one of the most famous and funny cartoon characters. This mouse, who is forced to constantly hide from Tom the cat, can also be made from plasticine.
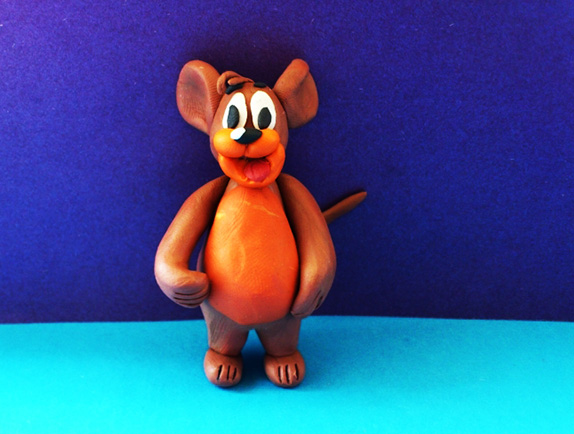
In this case, a plasticine mouse for children step by step is made as follows:
- Prepare a large piece of brown plasticine and cut it into several pieces. One of the pieces will become the head, another – the body, and 4 more pieces – the limbs. You will also need 2 pieces for the ears and 1 piece for the tail. In total, you should get 9 pieces of different sizes.
- Pull out the largest piece, then sharpen one of its ends. Cut the other end with a plastic knife. There should be a plump belly between them.
- Attach an orange flatbread to the front of the body.
- Make the lower limbs and attach them to the body. Cut out the toes at the ends of both paws using a knife.
- The same should be done with the upper limbs, only attach them in the shoulder area.
- Decorate the small ball that will serve as the head with orange plasticine, highlighting the muzzle. Attach a black circle with a small white highlight on top.
- Create the eyes. Each of them is represented by a flat white oval with a small black oval fixed to its surface, which plays the role of the pupil. At the same time, there should be a short black eyebrow above each eye.
- Create ears. To do this, roll 2 flat cakes. Don't forget to attach a fringe between the ears, molded from brown plasticine.
- Connect the head to the body.
- Jerry's tail is thin and long. It should be attached to the back of the body.
This is how everyone's favorite cartoon character is created.
Whatever task the child performs, modeling with plasticine has a positive effect on him. This activity helps develop fine motor skills and allows the young sculptor to realize his fantasies.
Sculpting a mouse from plasticine step by step is one of the easiest jobs, which is well suited for beginners and children.
Video about modeling a mouse from plasticine
Master class on modeling a white mouse from plasticine: