Owl pattern often used in knitting hats, mittens, scarves, sweaters and other items. Such a pattern will look great on almost any knitted clothing. The pattern and description of knitting such a rapport with knitting needles are quite simple, and even novice craftswomen can knit it.
Knitting Pattern Variations "Owl"
There are several variations of the Owl pattern, which differ in shape, size and some strokes. The peculiarity of knitting such a rapport is the method of crossing loops, using one extra knitting needle.
For knitting you can use different types of yarn, among which the following can be noted:
- wool yarn (the wool of sheep and other animals is used for its production);
- angora (the wool of angora rabbits is used as a material);
- cashmere yarn (for its production, the down of wild goats, living mainly in India, is used);
- vegetable yarn (the material for such yarn is obtained from the fibers of such plants as cotton, silk, flax);
The knitting pattern "owl", the diagram and description of which can be mastered in just a few minutes, is often used to decorate both children's and women's clothing.
Option 1
The pattern does not show edge loops. When casting on the initial loops, you need to cast on 2 more loops. The 1st and last loops of the row are edge loops. The 1st loop is always simply removed during knitting, and the last loop of each row is knitted as a purl.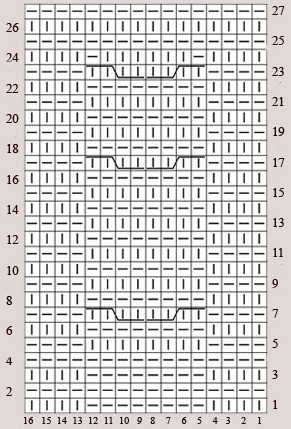
When knitting the pattern, it is necessary to cross the loops in rows 7, 17 and 23.
This process consists of the following steps:
- Slip 2 knit stitches onto an additional needle and place it behind the work.
- Knit 2 knit stitches in sequence, then 2 stitches from the additional needle.
- Slip the next 2 knit stitches onto a spare needle and place it at the front of the work.
- Knit 2 knit stitches in sequence, then 2 stitches from the additional needle.
Option 2
By changing the number and arrangement of the interlaced loops, you can slightly change the shape and size of the main strokes of the pattern. The edge loops are not shown in the rapport diagram.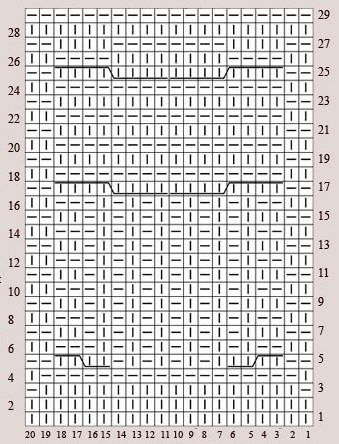
In this version of the pattern, the lower part of the owl looks more embossed.
You can use rice knitting to knit the belly. The pattern does not show the edge loops, so when casting on the initial loops, you need to cast on 2 more loops.
When knitting the pattern in the 5th row, it is necessary to cross the loops as follows:
- After the 2nd purl stitch, make 2 knit stitches and remove them onto an additional knitting needle, placing it behind the work.
- Make 2 knit stitches in sequence, then 2 stitches from the additional needle.
- Make 8 stitches, alternating knit and purl stitches.
- Make 2 knit stitches and slip them onto a spare needle, placing it in front of the work.
- Make 2 knit stitches in sequence, then 2 stitches from the additional needle.
When knitting the pattern in rows 17 and 25, it is necessary to cross the loops as follows:
- After the 2nd purl stitch, make 4 knit stitches and remove them onto an additional knitting needle, placing it behind the work.
- Make 4 knit stitches in a row, then 4 stitches from the additional needle.
- Make 4 knit stitches and slip them onto a spare needle, placing it in front of the work.
- Make 4 knit stitches in a row, then 4 stitches from the additional needle.
Option 3
The Owl knitting pattern can be changed by changing the number and method of casting on loops. By changing the number of loops in the base of the pattern, the rapport can be slightly expanded or narrowed. The diagram and description of such a pattern looks like this: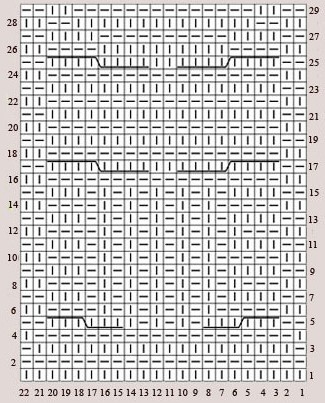
The pattern diagram does not show the edge loops, so when casting on the initial loops, you need to cast on 2 more loops.
When knitting the pattern in the 5th row, it is necessary to cross the loops as follows:
- After the 2nd purl stitch, make 3 knit stitches and remove them onto an additional knitting needle, placing it behind the work.
- Knit 3 knit stitches in sequence, then 3 stitches from the additional needle.
- Knit 6 stitches, alternating knit and purl stitches.
- Knit 3 stitches and slip them onto a spare needle, placing it in front of the work.
- Knit 3 knit stitches in sequence, then 3 stitches from the additional needle.
When knitting the pattern in rows 17 and 25, it is necessary to cross the loops as follows:
- After the 2nd purl stitch, knit 4 front stitches and remove them onto an additional knitting needle, placing it behind the work.
- Knit 4 stitches in sequence, then 4 stitches from the additional needle.
- Knit 2 front loops.
- Knit 4 stitches and slip them onto a spare needle, placing it in front of the work.
- Knit 4 stitches in sequence, then 4 stitches from the additional needle.
Conventional symbols on diagrams
When knitting the Owl pattern, loop crossing is often used. The following table shows the symbols for the elements used in the patterns of this pattern:
| Face loop | |
| Purl stitch | |
| 4 loops crossed to the right | |
| 4 loops crossed to the left | |
| 6 loops crossed to the right | |
| 6 loops crossed to the left | |
| 8 loops crossed to the right | |
| 8 loops crossed to the left |
Master classes on knitting items with an owl pattern on knitting needles
The "owl" knitting pattern, the diagram and description of which are quite simple, can be knitted from almost any yarn.
The different types of yarn that can be used for knitting are listed in the following table:
| Yarn type | Composition and properties | Usage |
| Woolen | Made from wool of sheep and other animals. Keeps warm, is moisture-resistant, and has a positive effect on blood circulation. | This yarn is often used for knitting sweaters, hats, scarves, socks and mittens. |
| Cotton | Made of cotton. In some cases, it may include various synthetic additives. Such yarn easily absorbs moisture and allows air to pass through well. | Most often, this yarn is used for knitting summer clothes (light capes, skirts, jumpers). |
| Silk | Made from fibre produced by the silkworm caterpillar, the yarn has a distinct shine and is very smooth and soft to the touch. | Used for knitting summer clothes (blouses, capes, lace items, skirts) and home items (pillowcases, curtains). |
| Synthetic | Consists of chemical synthesis components. Polyamide, acrylic, nylon, and capron are used as materials. Products made of synthetic yarn have increased resistance to mechanical impacts (for example, such products practically do not stretch after washing). | It is used for knitting summer clothes, various soft toys, and decorative items. |
| Mixed | It consists of synthetic, artificial and natural components. The advantages of such yarn are the use of the features of each type of yarn in one product. Clothes made of mixed yarn are pleasant to the touch and do not shrink after washing. | Used for knitting autumn items (blouses, skirts, jumpers, scarves, hats). |
Decorative pillowcase with a pattern "Owl"
This pillowcase is knitted with a purl stitch. In the process of knitting, 4 identical owl patterns are added, located in 2 rows. The pattern scheme is quite simple:
The width of the pillowcase depends on the size of the pillow for which it is knitted.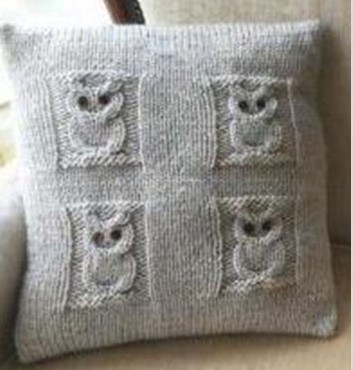
The knitting process consists of the following steps:
- Measure the width and height of the pillow, then cast on the required number of stitches corresponding to its width.
- Knit the front part of the pillowcase with the front surface, adding 4 patterns to the knitting. It is necessary to calculate the insertion of patterns so that on one side of the pillowcase there are 4 patterns located in 2 rows.
- Knit 2 back parts of the pillowcase of the appropriate width (the height of the 1st part should correspond to 3/4 of the height of the front part, and the height of the 2nd part - 1/4 of the height of the front part).
- Sew the back of the pillowcase to the front along the edges so that there is an opening on the back of the pillowcase to insert the pillow.
Scarf with owl pattern
The "owl" knitting pattern, the diagram and description of which can be used to knit a scarf, contains crossing of loops. To knit such a scarf, it is recommended to use knitting needles No. 4. The figure shows the diagram of the "owl" pattern, which is used when knitting a scarf with dimensions of 90 × 15 cm.
The process of knitting a product consists of the following steps:
- Cast on 24 stitches.
- Knit 8 rows in garter stitch, with the purl and front rows knitted with front loops.
- Knit the owl pattern according to the diagram.
- Knit 65 cm of scarf in garter stitch.
- Knit the owl pattern according to the diagram, but in the opposite direction.
- Knit 8 rows in garter stitch.
- Sew "tassels" on the corners of the product.
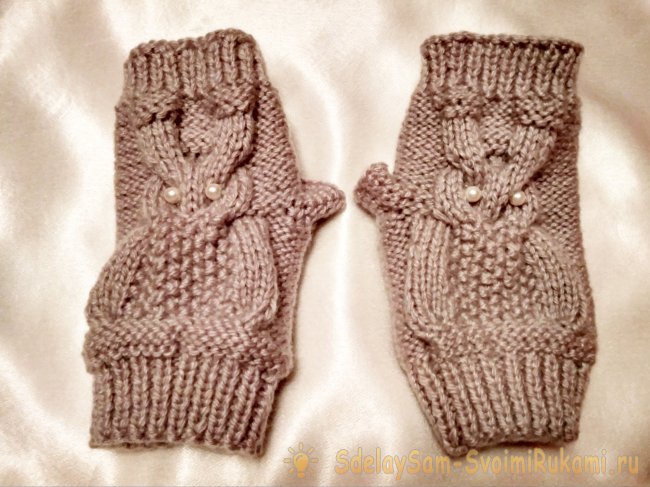
Mittens
You can knit winter mittens for your child from woolen children's yarn. The "Owl" pattern can decorate them with knitting needles. To ensure that the mittens stay firmly on your hands, special elastic bands are knitted at the base of the product using the same yarn.
The process of knitting such mittens consists of the following stages:
- Cast on 34 stitches using two needles held together.
- Pull out one needle and knit the cuff, alternating 2 knit stitches and 1 purl stitch. In odd columns, the knit stitches should cross to the left.
- Make 2 stitches crossed to the right and make a stitch on the main needle. These stitches should be knit stitches.
- Make 2 stitches crossed to the left and work the stitch on the main needle.
- Knit 18 columns and as many rows so that the height of the elastic band is 9 cm.
- Starting from the 1st column, perform 2 decreases.
- At the end of the row, knit 2 loops, joining them with the front part to the left. Knit 16 loops in this way.
- On an additional knitting needle, knit 15 front loops.
- Yarn over 1, then knit 2 stitches, then yarn over again, then knit the remaining 13 stitches.
- In the 7th column, knit 4 loops using the front method, and then 13 loops using the method from the previous paragraph.
- In the first column, make 2 decreases.
- In the 3rd row, make an increase for the finger.
- Knit 7 columns, then on the 2nd knitting needle make a yarn over and 4 stitches.
- Cast on 6 stitches on the main needle, then knit 4 stitches on the spare needle. This will form the thumb row.
- Knit the 2nd column using the same method, and in the 3rd row make a drawstring, securing 4 stitches.
- Increase 4 stitches on each needle.
- Knit 10 columns using the previous method.
- in the 14th column make 2 front loops.
- Cut the thread and then pull the tip of your finger tightly.
Mittens
For knitting mittens, you can use semi-woolen yarn (50% acrylic is allowed in the composition of the product).
The knitting process consists of the following steps:
- Cast on 36 stitches onto knitting needles, then add 2 edge stitches.
- Knit a rib pattern (1 front + 1 back) for 9 rows.
- Add 6 stitches to row 10.
- Knit 4 rows, with the front loops on the wrong side and the back loops on the front rows.
- In the center of the row, use 18 loops to knit the pattern, while the loops along the edges should be knitted with purl stitch.
- Knit 1 edge stitch, 12 purl stitches, 18 pattern stitches, 12 purl stitches, and then 1 more edge stitch.
- From the wrong side, cast on 5 loops for the thumb hole.
- Knit 4 rows with purl stitches, then knit 6 rows with an elastic band.
- Close all loops.
Hat on circular needles
The knitting pattern "owl", the diagram and description of which can be used when knitting a hat, looks like this:
This product uses #3 knitting needles.
The knitting process consists of the following steps:
- Cast on 72 stitches and knit 7 rows with a rib pattern (1 front + 1 back).
- Knit 3 rows of purl stitch, using knit stitches in the purl rows and purl stitches in the knit rows.
- Knit the owl pattern according to the above diagram, which is knitted in the space between the 5th and 20th loops. The remaining loops are knitted with a purl stitch.
- Knit 31 rows according to the pattern, then 3 additional rows in garter stitch.
- Close all the loops and sew on the tassels at the corners.
Sweater
The product consists of several parts (back, armhole, shoulders, front, armhole, fastener, neck, sleeves, fastener strip).
Back:
- Cast on 50 stitches and knit with a rib pattern as many rows as needed for a length of 14 cm.
- Close 2 loops and knit 2 more rows.
Armhole: - When the length of the work reaches 14 cm, close 2 loops at the beginning of 2 new rows.
- Knit 42 stitches.
Shoulders:
- When the length of the work reaches 11 cm, close 7 loops 2 times.
- In the next row, close 14 loops.
Before:
- Cast on 46 stitches and knit 10 stitches with a rib pattern, 26 stitches with a garter stitch, 10 stitches with a rib pattern.
- When you reach 3 cm, knit 10 loops with a bias elastic band.
Armhole and fastening:
- Upon reaching row 47, knit 8 loops with a rib pattern, 22 loops with a purl pattern, 8 loops with a rib pattern.
- When the armhole reaches 6 cm, knit 22 loops with a rib pattern, 12 loops with a garter stitch, 2 loops with a garter stitch.
Neck:
- When the armhole reaches 9 cm, close the row.
- When the neckline measures 11 cm, close 6 loops.
- Cast on 6 new stitches from the front side and knit the remaining rows with decreasing stitches.
Sleeves:
- Cast on 42 stitches and knit 10 rows with a rib pattern.
- Knit the number of rows that will correspond to 19 cm of the product.
- Close the loops.
Owl Pattern
The pattern diagram does not show edge loops.
When knitting the pattern, it is necessary to cross the loops in rows 7, 17 and 23.
This process consists of the following steps:
- Slip 2 knit stitches onto an additional needle and place it behind the work.
- Knit 2 knit stitches in sequence, then 2 stitches from the additional needle.
- Slip the next 2 knit stitches onto a spare needle and place it at the front of the work.
- Knit 2 knit stitches in sequence, then 2 stitches from the additional needle.
The fastening strip is knitted in garter stitch.
To assemble the sweater, you need to sew the shoulder seams, sew the sleeves to the armholes, then sew all the other parts of the sweater, sew the "Owl" pattern to the front of the sweater, and also sew 2 buttons in the eye area of the owl pattern.
The "Owl" pattern is often used when knitting hats, scarves and sweaters. The diagram and description of such a pattern easily fits into the overall design of the product. You can diversify the pattern using buttons or beads of different colors. By changing the number of rows and the number of crossed loops in the pattern, you can change the overall shape and expressiveness of the pattern. The "Owl" pattern is also great for decorating various decorative items.
Video about the owl pattern
Owl pattern knitting needles: