Comfortable robe with buttons is a universal type of home clothing. To sew the product, you will need a simple pattern, minimal sewing skills and 1-2 hours of time. Having chosen the style of the outfit, you should consider its purpose and then select the fabric.
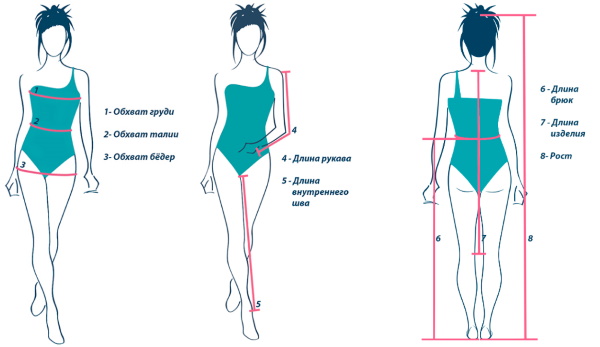
Taking measurements
You can draw a pattern for a robe on paper or rip apart an old item that fits well on your figure, then transfer all the contours onto a sheet of paper.
To build a template yourself, you need to take the following measurements:
| Name | Reduction | How to measure |
| Chest circumference | Og | Horizontally across the most convex parts of the shoulder blades and chest, passing the area under the arms. |
| Hip circumference | About | Horizontally, capturing the most protruding parts of the hips and buttocks, taking into account the bulge of the abdomen. |
| Front length to waist | Dpt | Along the front vertically, from the intersection of the shoulder and neck through the protruding areas to the waist. |
| Back length to waist | Dst | Similar to the previous point, only on the back. |
| Length from waist | Dot | From the string tied at the waist down vertically. |
| Sleeve length | Dr. | From the shoulder cap along the arm through the bent elbow, to the point where the sleeve will end. |
After taking measurements, you can choose the fabric.
Selection and calculation of fabric
A robe with buttons (a pattern will help to perfectly fit the product on the figure) is made from different fabrics.
This could be:
- bike;
- velours;
- plush;
- flannel;
- chintz;
- waffle fabric;
- calico;
- microfiber;
- atlas;
- silk;
- cotton;
- terry;
- bamboo cloth.
Material consumption depends on the following parameters:
- width of the fabric (varies from 90 to 170 cm);
- personal parameters;
- selected length;
- width of the product.
Experts recommend first making a pattern, then laying it out on the floor or a sheet and measuring the required amount of fabric. If the material has no pattern and its width is 150 cm, then one length will be enough, plus the length of the sleeve and 20 cm for allowances. In the case of asymmetrical patterns, you will need to dial another 1 length of the outfit.
For example, if the distance of the future product from the bottom to the top is 100 cm, then you need to have 180 cm of fabric (100 + 60 + 20). If the width of the material is 170 cm, then take 20 cm less, and if 90 cm, then dial 100 + 100 + 60 + 60 + 20 + 20 = 360 cm.
When calculating the material, human height is taken into account. Tall people will need more canvas than short and medium-height people.
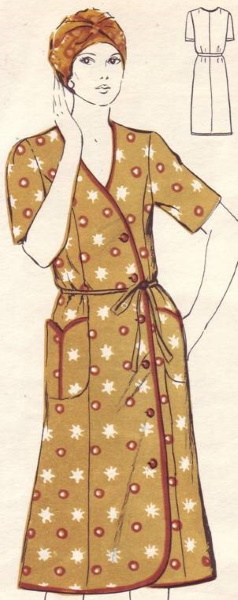
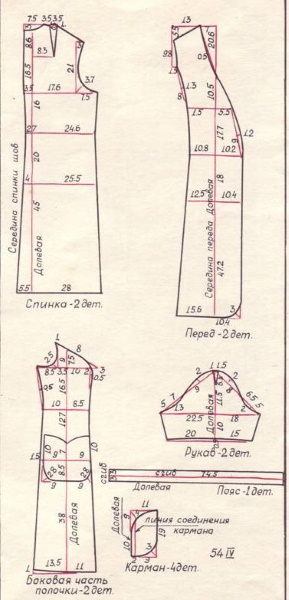
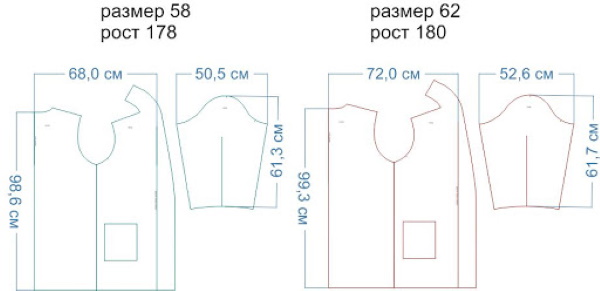
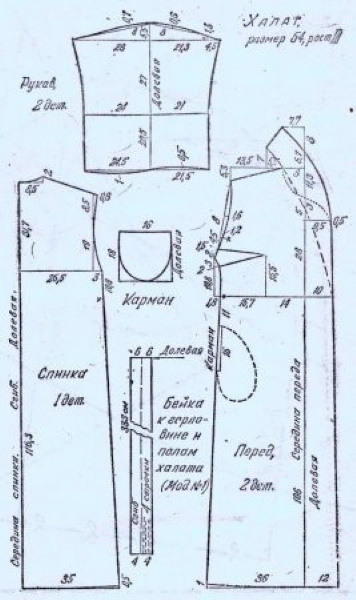
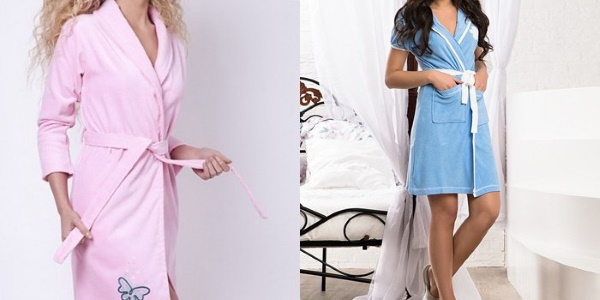
Women's robe
A robe with buttons (the pattern is presented for size 54, height IV) will suit a full woman. With a fabric width of 90 cm, 3.2 m will be required.
Technology of sewing the outfit:
- Sew relief seams on the shelves, iron and stitch with a zigzag stitch.
- Fold the front and back panels right sides together, stitch the edges along the shoulder, then process them with a zigzag stitch.
- Sew the sides of the product, iron the seams.
- Prepare a ready-made bias binding of a suitable shade and process the neck, wrap and bottom of the robe.
- Fold the sleeves in half, stitch the sides and sew into the armhole. Turn the bottom of the sewn-in parts twice and stitch.
- The upper part and the middle line of the pockets are processed with a roller, the parts are sewn together. Then, along all edges, except the upper border, fold 1 cm to the wrong side and sew the pockets to the shelf.
- Mark the loops, trim them and sew on the fittings.
- For the belt, you should cut a rectangle from the material, the length of which is equal to the waist circumference + 1 m for ties, if desired, you can cut it even longer. The width of the workpiece should correspond to the double width of the belt + 2 cm for allowances.
- The rectangular piece should be folded across with the right side facing inward. Next, sew the short edges, then the long ones, leaving an opening in the middle for turning. Turn the belt inside out with a pencil, straighten the corners, and sew the opening with blind stitches by hand.
- The model can be diversified with ruffles or flounces, and lace inserts can be added.
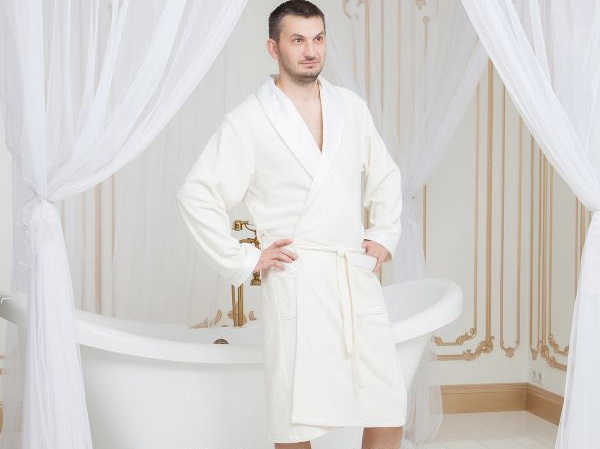
Male
To create a men's work robe with buttons, you will need the following materials:
- simple pattern;
- blended or cotton fabric;
- threads in tone;
- interlining;
- 6 flat buttons;
- tools and sewing machine.
Procedure:
- For the pattern, you can take an old men's shirt as a basis, rip it open or attach it to the fabric. The main thing is to choose the right size - the width of the front and back halves on the hip line should be 4-5 cm larger than your own half-girth of the hips, and the shoulder cut should be 1.5 cm longer.
- In addition, you need to lengthen the robe to the desired size.
- Fold the material in half with the right side facing inward, lay out the pattern pieces on top, taking into account that the grain line runs along the blanks, with the exception of the collar. Secure the paper with pins, trace and cut out, having previously marked the seam allowances.
- As a result, you need to prepare the following details:
| Name | Quantity, children |
| Back | 1 |
| Shelf | 2 |
| Cuff | |
| Patch pocket | |
| Half-belt | 1 |
| Collar | 2 |
| Sleeve | |
| Selection |
Next:
- Turn all sides of the pocket inside out and stitch the top line.
- Treat the half-belt and collar, previously glued with interlining.
- Sew pockets to the front halves and pin the strap to the back along the waist line.
- Sew the shoulder seams, sew the collar and sleeve into the armhole. Then stitch the sleeve with a continuous seam, as well as the side lines connecting the back and front panels.
- Finish the cuff and sew it to the bottom edge of the sleeve.
- Sew the facings to the front panels, turn them to the wrong side and sweep.
- Iron all seams and finish with an overlock.
- On the left shelf and cuffs, mark the loops and overcast them, then attach the fittings.
- Finally, hem the item using a sewing machine.
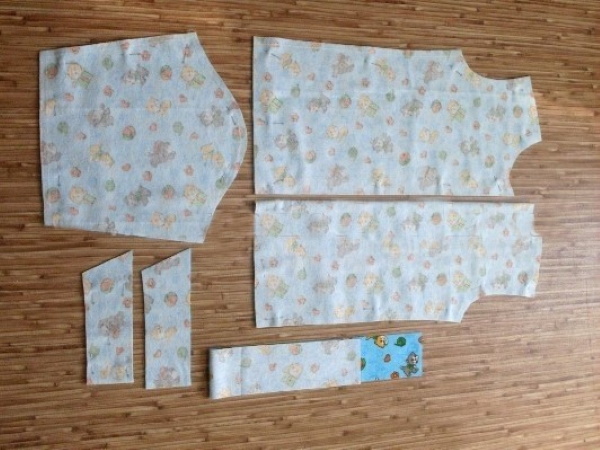
Children's robe
To create a warm robe for a girl aged 1.5 years, you will need:
- 60 cm of flannel or baize (width 1.5 m);
- a spool of thread in a suitable shade;
- pieces of non-woven fabric;
- 5 small buttons.
Design methodology:
- The basis of the product is any proven pattern (dress with shirt sleeves or a small shirt). You can take a suitable model from the magazine "Burda".
- Place the patterns on the material folded in half and trace the contours. Then add 1 cm for allowances.
- Pin the pieces together and cut them out with sharp scissors.
- As a result, you should get 2 pieces for the front, sleeve, collar, as well as 1 whole back and belt.
Children's robe with buttons. Pattern. - Glue the top collar piece with interlining, cut off excess pieces of adhesive fiber.
- Place both collar pieces together face to face and pin, then stitch with a 5-7 mm wide stitch. It is advisable to trim the allowances in the corners.
- Turn the parts inside out, straighten them out, fix the edging from the upper segment to the lower one and iron them. Stitch along the ends and the fly. Then baste the collar along the stitching edge.
- On the shelves, glue the one-piece 3 cm strips with interlining, then iron them inside out.
- Sew the shoulder edges of the front and back panels, iron the seams open.
- Sew the collar into the neckline, its ends should reach the middle of the slats, so that it is convenient to button the robe.
- Sew into open armholes of sleeves.
- Sew the side seams.
- Hem the bottom of the garment, first stitching the corners of the strip and turning them inside out.
- Hem the sleeves and then sew the bottom edges of the sleeves.
- For the belt, cut out an elongated rectangular piece, fold it in half lengthwise and iron it. Then turn the piece inside out, pin it and stitch it, leaving an opening for turning.
- Turn the sewn belt inside out and iron it, and make a finishing stitch around the perimeter.
- All internal seams should be finished with an overlock or zigzag stitch.
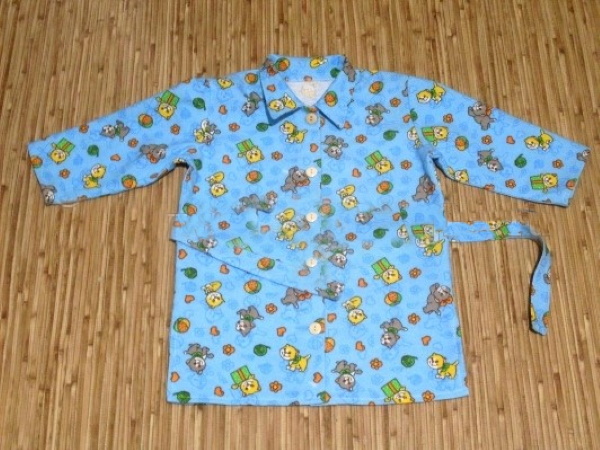
- Finally, make loops on the strip and sew on the fittings.
Bathrobe
A pattern for a buttoned bathrobe can be made from a terry sheet or waffle fabric. If the size of the terry blanket is 180x130 cm, then in this case the hip circumference should not be more than 110 cm, otherwise the product will not fit in width. The layout of the parts on the sheet:
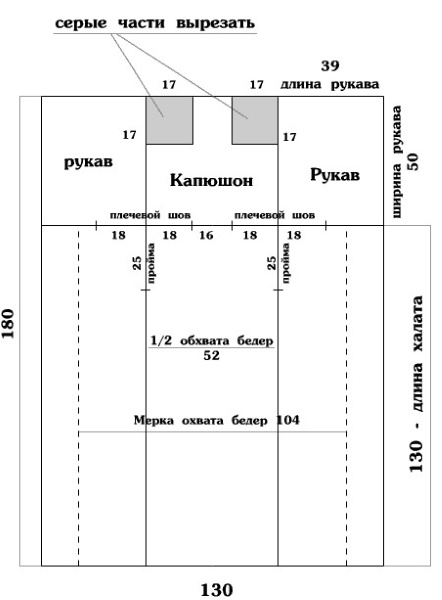
Procedure:
- Fold the fabric across and mark the central axial border.
- From it, in both directions, put aside ¼ of the hip circumference parameter. According to the provided drawing, mark the length of the item, as well as the sleeve dimensions.
- Cut the shoulder sections and armholes, then cut out 2 squares, 17x17 cm in size, they can be used for gussets or pockets. It is worth considering that there is no need to cut the fabric along the line, 16 cm long, this is the section where the hood joins the robe.
- Sew the sleeves into the armhole, then simultaneously stitch the shoulder and sleeve seams - they continue each other.
- Sew the corners of the hood, then sew its lower edge to the neck.
- The hems and bottom of the product can be finished with a zigzag stitch or edged with ribbon.
- If you make the robe long, you will have to use terry cloth, because the sheet will not be enough.
- The armhole is ½ of the sleeve width. Where the word "armhole" is indicated, a cut should be made.
- Mark and process the loops on one side, and sew on the buttons on the other.
- If desired, make a belt.
With set-in sleeves
To sew the product, you need to prepare the fabric (waffle fabric, terry cloth, velour), take measurements and make a pattern. Approximate diagram for making a robe with a set-in sleeve and a turn-down collar:
Technology of creating things:
- Fold the material along the grain line, then place the prepared template on it and mark off the allowances.
- Place the back panel to the fold and cut out as a single piece. Then form 2 fronts, sleeves and pockets, as well as 1 piping.
- Place darts on the front panel.
- Sweep the side edges of the front and back halves, then stitch them.
- Next, sew in the sleeves and stitch them along the open edge on the side, then fold the bottom of the piece over and machine stitch.
- Baste the piping and then sew it on with a machine.
- Turn up the edges of the pockets, place them on the front and stitch.
- Mark the location of the loops, process them, sew on the fittings
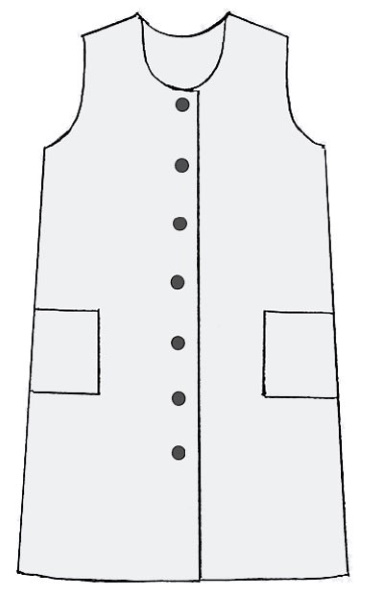
Buttoned sack robe
A robe with buttons (the pattern is available for beginner seamstresses) is created with a dropped armhole or without a sleeve in the form of a bag. You will need summer fabric or light plush material. The pattern (in a scale of 1 to 4) is presented for size 46, the length of the item is 102 cm. With a fabric width of 1.5 m, you will need 1.3 m. You will also need a ready-made roll of a suitable shade, 2.2 m long.
If you sew a baggy model with buttons, then on each front half you need to leave 3 cm for the lapels. When cutting, add allowances of 1 cm along the side, shoulder seam and bottom. The neck and armhole are hemmed with a roll.
Sewing technology:
- Sew the shoulder seams, process with a zigzag stitch and iron onto the front.
- Fold the roll in half and iron, leaving one edge narrower by 1 mm. Apply the edging to the neck, armhole and upper part of the pockets, then stitch.
- Iron the side and bottom edges of the pockets to the wrong side by 1 cm, without using such manipulations with the side sewn into the seam. Sew the blanks along the marked lines, carefully securing the upper corner.
- Sew the sides, finish with a zigzag stitch and iron to the back. Secure the top.
- Decorate the edges of the fastener and the bottom. Fold the strip 3 cm inward, then stitch, making fastenings at the bottom and top of the seam.
- On the right shelf, mark the loops and shape them.
- Sew the bottom of the product with a blind stitch.
- Sew on buttons.
How to sew without creating a pattern
The product can be sewn in 1 hour without a pattern.
Step-by-step creation method:
- Fold the fabric right sides together, place a loose-fitting, elongated T-shirt on top, and pin it to the base.
- Add 1.5 cm along the contour for seam processing.
- Also fold the free piece of fabric with the right side inward and attach the T-shirt from the side of the front where the neckline is deeper, while leaving 3 cm in the middle of the piece for the button placket.
- From the remaining material, cut out 2 lines equal to the length of the front panel for the facing.
- To trim the neckline, cut out 5 cm high pieces of interlining that repeat the shape of the neckline and glue them.
- Sew the back and front along the side and shoulder seams.
- Measure the armhole circumference with a centimeter. Then construct the sleeve. To do this, put down a segment equal to Dpr/3-5 cm. Draw a horizontal line from the resulting bottom point. From the top mark to the intersection with the drawn line, draw segments equal to Dpr/2 on both sides to get a triangle. Divide the left side into equal parts, put 1.5 cm up. Divide the right side similarly, then divide in half again. Put up a perpendicular 1 cm high from the upper dividing point. Measure 0.5 cm down from the bottom line. Draw the armhole along all the marked points. Draw a line equal to the length of the piece from the highest position down, then draw it completely. If desired, the workpiece can be narrowed at the bottom.
- Sew the sleeve into the garment and sew the side seams.
- Finish the strip with a facing, and trim the neckline with a cut-out bias binding.
- Hem the bottom and edges of the sleeves, sew on buttons.
- Cut out pockets of any shape, fold the top by 2-3 cm and hem the fold.
- Attach the pockets to the robe shelves, fold all edges by 1 cm and sew the details.
- Finally, iron all seams and finish the inner edges with a zigzag stitch.
Even beginner needlewomen can sew a cozy dressing gown with buttons without a pattern. Simple models and a step-by-step description of sewing technology will help to create a product from high-quality fabric suitable for comfortable home wear.
Video on making a buttoned robe
How to sew a robe for a woman: