One of the most important elements of a knitted product is the neck. This article will tell beginners how to knit it correctly and beautifully so that the appearance of the product is neat and symmetrical. Thanks to the advice, following the step-by-step instructions, you can create your first masterpiece from knitted loops.
Types of necklines in knitted items
Hand knitting in the modern world – this is a high-class skill. Having mastered the basic skills and techniques, a beginner can confidently realize his creative potential. Among the key skills, a special place belongs to the ability to knit a neckline that matches the model.
The most common necks are:
- Round neckline without piping, with simple or double piping or open stand-up collar.
- V-neck with piping.
- Rectangular bob cutout.
- Boat neck with a straight edge or with edge processing using stocking stitch, elastic, openwork pattern and other methods.
The choice of neck depends on the model and style. It is necessary to strictly follow the recommendations in the description of the execution technique or calculate your own knitting pattern for the neck before starting the process.
What necklines are best for women and men?
For light, summer knitwear for women, a boat neck is ideal. This is the easiest way, which does not require great skill. The boat neck is suitable for both winter mohair dresses and sweaters, and for demi-season products made of warm thin yarn. This type of neckline unfailingly emphasizes the femininity of a slight shoulder bend, emphasizing the collarbone line.
A round neck with a stand-up collar or a cowl collar is very common among the models of knitwear of the world's leading designers. Not a single fashion show is complete without presenting a model with such an element. Such a collar will warm you on a cold winter day or protect you from the cold wind in autumn.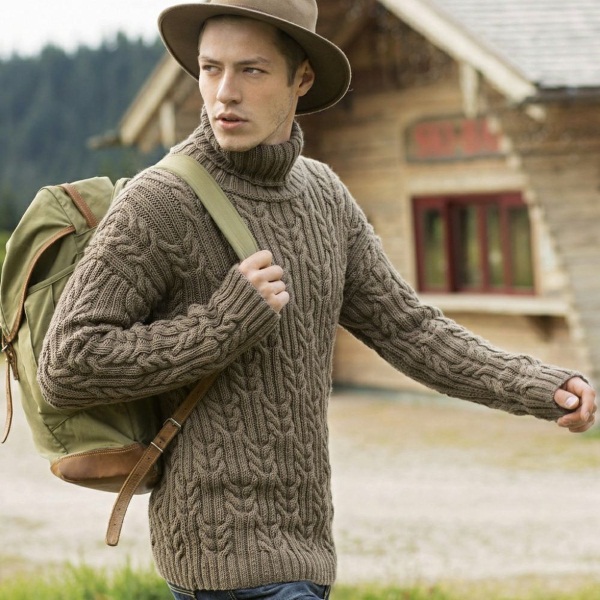
In men's wool jumpers, a shallow round neck is classic. This product is intended for both lovers of a free sporty style and for adherents of the office style under a shirt and tie.
V-neck is a popular neckline among smart casual style lovers. The neckline's finish and depth depend on the model and type of yarn chosen. This neckline makes the neck look longer and the silhouette slimmer. V-neck jumpers allow you to look presentable and quite democratic.
Calculation of loops
In order for a knitted sweater or pullover to look perfect, it is necessary to make precise calculations, which are made based on individual measurements.
Before you start knitting the product, it is recommended to make a pattern according to the measurements or have a finished product that fits the size. The first option is more preferable for beginners.
It is impossible to calculate loops without taking into account the knitting density, which depends on the thickness of the yarn, the thickness of the knitting needles and the individual knitting density of the craftswoman. To do this, knit a control sample and calculate the number of loops and rows in a 10x10 cm square after washing dry or after wet heat treatment of this sample.
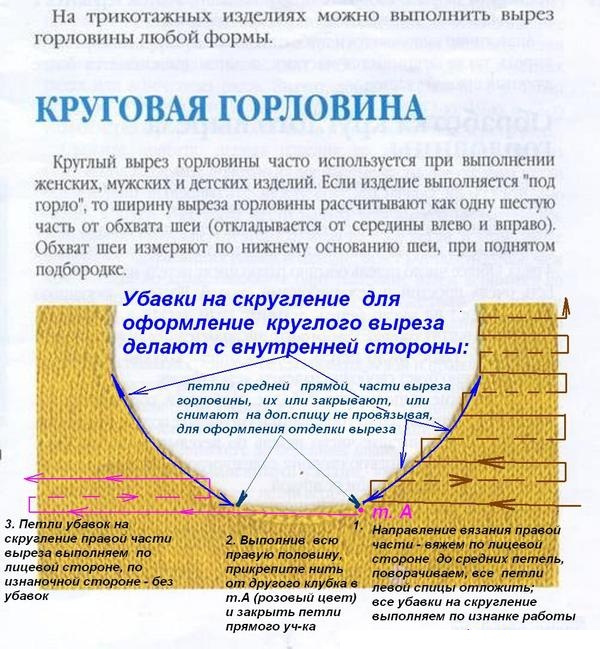
Round neckline
How to knit a neckline with knitting needles for beginners, step by step, is considered using the example of constructing calculations for a round neckline.
The knitting density is 17 loops per 28 rows.
- The width of the neck is 25 cm. It is necessary to calculate how many loops fit in 25 cm. To do this, multiply 25 cm by 1.7 sts (the number of loops in 1 cm of the sample):
25 x 1.7 = 42 sts.
- The 2 halves of the product are knitted separately: 42:2=21 sts.
- The depth of the neckline is 7 cm. You should calculate how many rows you need to knit to close all the loops of the neck: 7 x 2.8 = 20. So, you get 20 rows in front and back rows. Consequently, the closing of loops to form the neck occurs in 10 front rows.
- The bend for rounding the neck is conventionally divided into 4 sections: horizontal, gentle, inclined and vertical. 21 sts should be distributed among the sections as follows:
21:4 = 5 sts + 1 extra loop, which is better to add to 1 section.
Thus, section 1 is 6 p., section 2 is 5 p., section 3 is 5 p., section 4 is 5 p.
- The loops on 1 section are all closed at the same time.
- Loops of section 2 should be closed in 2 steps: close 3 sts, then close 2 sts.
- The loops of section 3 should be closed in 3 steps: close 2 sts, then close 2 sts, close 2 sts (1 st from this section together with 1 st, which belongs to section 4)
- Loops of section 4 should be closed in 4 steps: close 4 times 1 st.
The general pattern for knitting a round neck looks like this: you need to close: 1 time x 6 sts, 1 time x 3 sts, 4 times x 2 sts, 4 times x 1 st.
The other half of the neck is knitted in a similar manner.
V-neck
To create a V-neck, the number of front loops must be odd. The fabric loops are divided in half, and the middle central loop is marked with a marker or closed. This is the center of the V-neck placket.
To form a uniform and beautiful neckline bevel, it is necessary to calculate in which rows the loops should be closed. To do this, draw a line on the pattern parallel to the bottom line through the lower point of the neckline depth and lower the perpendicular from the extreme point of the shoulder bevel to the intersection with the line passing through the lower point of the neckline.
The next step is to measure the horizontal distance from the cutout point to the intersection of the lines and calculate from the control sample how many loops “fit” into this segment (for example, 30 sts). This number of loops must be reduced to knit a cape-shaped neckline.
It is important to calculate the distance at which to make decreases. To do this, measure the segment from the shoulder slope to the intersection with the horizontal line. For example, this distance is 30 cm and divide this value by the number of loops that was determined earlier: 30 cm: 30 sts. = 1 cm.
The number of rows in 1 cm is determined by the control sample or by the edge loops in the knitted fabric. For example, 4 rows in 1 cm. Therefore, decreases must be made in every 4th row.
Options for decorating a collar on sweaters with knitting needles, step-by-step instructions
How to knit a neck with knitting needles for beginners step by step and design the collar correctly depends on the chosen model of the product and the execution technique. There are many original options for designing the collar on sweaters.
Smooth edge
This is a classic type of collar treatment, which is ideal for creating children's knitwear.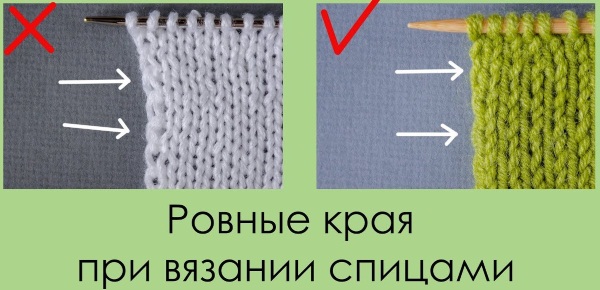
- From the loops of the neckline cast on in a circle, knit as many rows as required using the front surface, for example 9 rows with thin yarn.
- Row 10: all loops purl on the front side.
- Knit all stitches with the front surface for 9 rows.
- Close all loops without tightening the edge row.
- Fold the collar to the wrong side and carefully sew it with an overcast stitch, capturing the upper loops of the back loops of the main fabric.
Decorative small zigzags
Even novice needlewomen can decorate the collar of a sweater with small decorative zigzags.
- From the loops of the neckline cast on in a circle, knit as many rows as required using the front surface, for example 9 rows.
- The next row on the front side is knitted according to the pattern: *2 knit stitches together, yarn over* and so on until the end of the row.
- Purl row: knit all purl stitches. This forms a zigzag edge of the collar.
- Knit 9 rows in stockinette stitch. The loops remain on the working needle.
- From the wrong side, the loops are picked up along the cast-on edge onto an additional knitting needle.
- The collar is folded back to the wrong side along the zigzag edge and by knitting two loops together with the front loops from the main and additional knitting needles, an even, invisible seam is formed.
Binding the neck with knitting needles using piping
This method of tying the neck is considered the most common. It gives the effect of a one-piece knitted collar. To decorate the neck with a piping, you will need circular or stocking needles, preferably 1 size smaller.
- You need to cast on stitches from the row located under the edge row along the entire circumference of the neck opening to form a seamless, even edge.
- The collar is formed from the collected loops by knitting a 2x2 elastic band or another chosen pattern.
Separate piping in two ways
To beautifully decorate a knitted product, a separately knitted piping is often used. Such piping not only plays a decorative role, but also prevents the neck from stretching, as it is considered more durable. Usually, such piping is knitted with knitting needles one number smaller.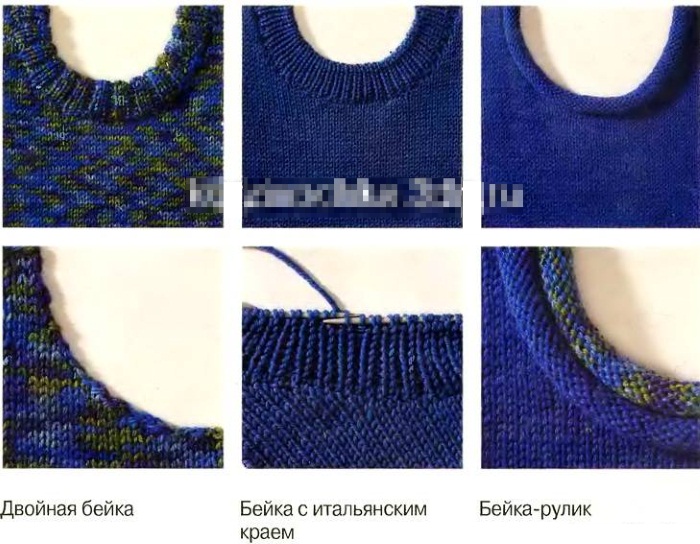
| Method 1 | Method 2 |
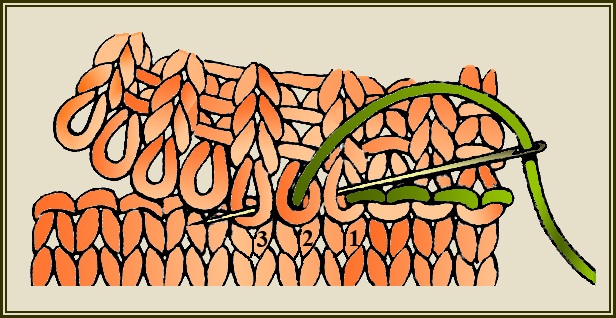
| 1. Cast on the required number of stitches and knit with the chosen pattern: 1x1 elastic or another type of elastic to a height of 2.5-5 cm. 2. For a smoother transition of the fabric to the collar, you should knit the last 2 rows of the piping with the pattern of the main fabric. 3. Knit 2 rows of the binding with an additional thread of a contrasting color: the front and back row. This is done so that the binding loops do not “run away” during the process of fastening. 4. Remove the knitting needle that was used to knit the piping and, using a sewing needle and regular thread, baste the piping to the fabric so that the loops of the strip coincide with the loops of the neckline by the 2nd or 3rd row of the neckline. 5. Join the piping with a blanket stitch along the neckline using a knitting or crochet needle:
| The distinctive feature of the 2nd method of sewing on a separate piping is the unique technique of performing the overlock stitch. The preparatory work is carried out as in the first method. To perform a blanket stitch you need: 1. Insert the needle from the front side to the back side through the 1st stitch of the binding and bring it out to the front side through the 3rd stitch of the binding, skipping the 2nd stitch. Pull the thread out on the front side. 2. Insert the needle from the front side to the back side through the 2nd stitch of the binding and bring the needle out through the 4th stitch. Pull the thread out on the front side. 3. Insert the needle from the front side to the back side through the 3rd stitch of the binding and bring the needle out through the 5th stitch. Pull the thread out on the front side. In this way, you should sew all the loops to the end of the row. |
Neckline with overlock stitch
The overlock stitch is used to join two pieces of fabric. The seam is neat and elastic, the product holds its shape well, the edge does not stretch or deform.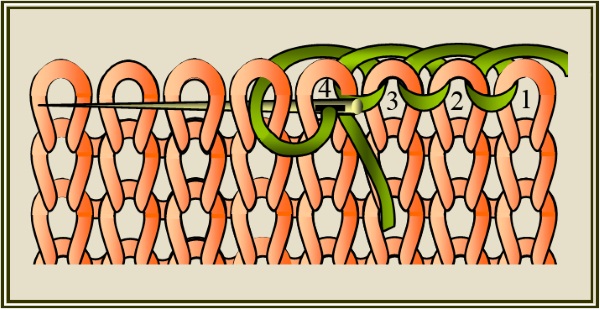
How to knit a neck with knitting needles for beginners is considered step by step using the example of processing with a blanket stitch:
- Before the shirring process, it is necessary to lay a path of loops around the neck using connecting posts in each loop 2 rows from the edge, using a hook. On the bevels, the hook is inserted diagonally, maintaining a smooth line parallel to the edge of the neck.
- The loops of the connecting posts must be collected on the knitting needle: lift the loop by the upper loop using the hook. Pick up the working thread, pull it through the loop of the connecting post, and place the new loop on the knitting needle. In this way, you need to go along the entire neck.
- Depending on the style and model of the product, 2-6 rows of stocking stitch are knitted with knitting needles 2 sizes smaller than those used for knitting the main fabric. The loops must be left on the knitting needle.
- From the back side, using a hook, loops are lifted from each connecting post - new loops are formed from the working thread, which are transferred to an additional knitting needle.
- You need to knit as many rows of garter stitch as you have knitted from the front side.
- To form the piping, two pieces of fabric are joined together with a loop-to-loop knit stitch.
Double binding
The round neckline in sportswear is often finished with a double piping with a 1x1 or 2x2 elastic band.
- It is necessary to pick up loops around the neck opening on circular or double-pointed needles and knit with the chosen pattern a height twice as large as the height of the collar-edging. Cut the working thread, leaving an end 3 times longer than the circumference of the neck opening.
- Knit 2 rows of knit stitches with waste yarn in a contrasting color and release the stitches from the knitting needle.
- Fold the binding in half to the right side and pin it to the edge of the neck.
- Connect the piping to the fabric using a blanket stitch, unraveling the auxiliary thread.
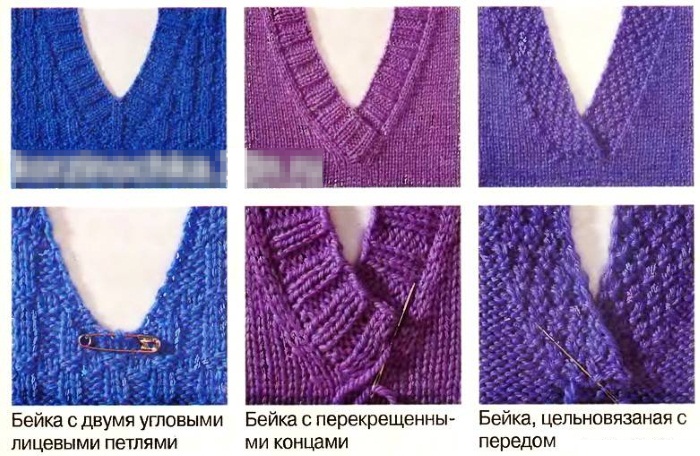
V-neck two ways
A V-shaped neckline can be designed in two ways. The first method results in a strictly U-shaped neckline. When designing the neckline in the second way, the bevels to the shoulder seams are vertical.
Method 1
Loops should be decreased in every 4th row: in the front row, an edge loop is knitted, then a loop according to the pattern, and the 3rd and 4th loops are knitted together with a left-leaning front loop on the front side and a right-leaning front loop on the back side.
Method 2
Loops should be decreased in each front row 6 times in a row, then in every 4th row 6-10 times depending on the depth of the neckline. 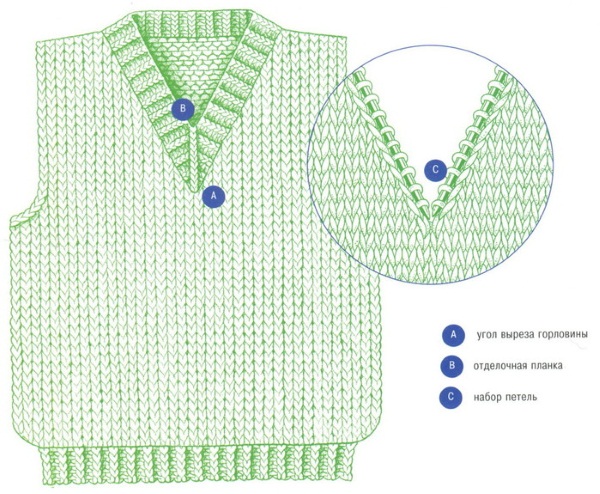 The remaining rows are knitted in straight stitch without decreasing.
Rectangular cutout
How to knit a rectangular "bob" neckline with knitting needles and design a figured neckline beautifully and neatly is presented step by step below. Beginners, as a rule, cope with this type of neckline without difficulty.
In summer lightweight models, both the front and the back are knitted with a rectangular neckline without a strip:
- To process the edge, loops from the front side of the fabric are picked up onto the knitting needle and the border of the selected pattern is knitted to a certain height.
- To form a beautiful strip, decreases are made in the corners of the neck. To do this, knit 3 loops together in each front row. As a rule, a double-sided pattern is chosen for this type of strip and it is knitted to a height of 2-4 cm.
With piping and Italian edge
How to knit a single, double or separate binding is shown in the article above. To decorate the placket, an Italian set of loops for an elastic neck edge is often used.
To cast on, use 1 knitting needle and yarn from a ball:
- The short end of the thread of the required length is placed in the left palm, the long end should be wrapped around the thumb and index finger and the thread should be clamped with 2-3 remaining fingers.
- Insert the knitting needle from above behind the thread on the thumb, grab the thread from the index finger and pull it through the loop on the thumb. This forms the first loop.
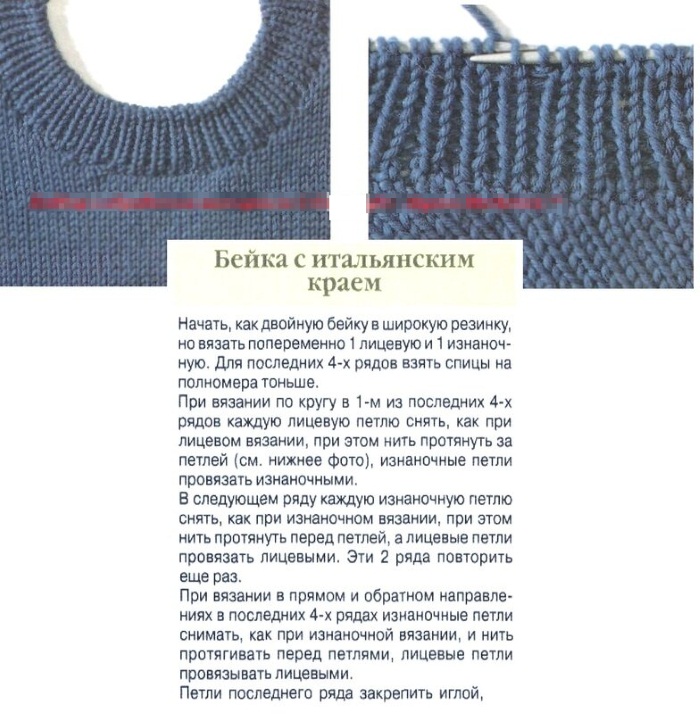
- One thread is pulled to the knitting needle from the index finger, the other from the thumb. First, you need to lift the thread from the index finger from the bottom up with the knitting needle, then grab the thread coming from the thumb from above and pull it out by the thread that is pulled to the index finger.
- Pick up the thread leading to the index finger, grab the thread from the index finger from above and pull it through the thread from the thumb, while the thread from the ball remains behind the knitting needle.
In this way, the required number of loops is collected. The last loop should be knitted in the usual way.
After the Italian cast on, 2 rows of hollow ribbing and a 1x1 rib pattern are usually knitted.
"Boat" treatment with elastic
How to knit a neckline with knitting needles for beginners step by step with the design of a boat neckline with an elastic band is considered using the example of knitting with shortened rows without breaking the thread.
The fabric must be divided into two equal parts, which are designed separately. The number of loops and rows of the neck is determined individually by the pattern. For example, the total number of front loops is 40 sts: 2 = 20 sts falls on the left and right parts of the product.
1st row: slip the knit stitch without knitting, 15 knit stitches, turn the needle to the wrong side, slip the 1st stitch as if to purl and pull the thread back: 2 loops will form on the needle, knit the remaining loops as if to purl until the end of the row.
Row 2: remove the knit stitch without knitting, 13 knit stitches, turn the needle to the wrong side, repeat all actions as in row 1.
Row 3: remove the kr. p. without knitting, 11 k. p., repeat all actions as in the 1st row and so on.
By applying the product to the pattern, you can determine how many shortened rows need to be knitted. The last front row should be knitted according to the pattern, with the double turn loops knitted together behind the front walls.
The second half of the boat neckline is formed by shortened rows according to the same principle, only from the wrong side. After turning the needle, remove the 1st st. as if it were a front st, behind the front wall, and throw the thread over yourself.
When knitting the last row from the wrong side, you need to pick up the double loops with a knitting needle and knit them together behind the back walls.
The final element of such a neckline can be a 1x1 or 2x2 elastic band, which can be knitted from open loops or raised loops from the edge after sewing the shoulder seams.
"Boat" in stocking stitch
The technique for creating a boat neck using stocking stitch is essentially no different from knitting a boat neck with an elastic band.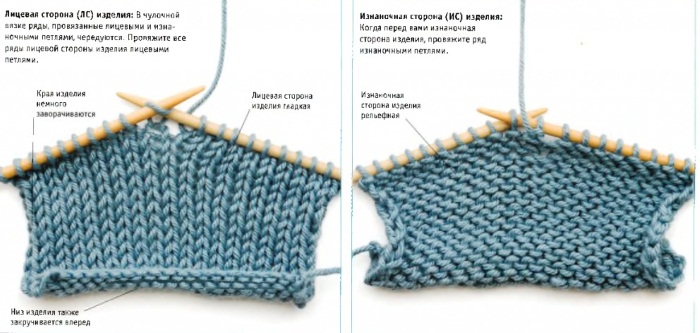
The only difference will be the last rows, which are knitted with stocking stitch, i.e. the front loops are knitted with front loops, the back loops with back loops. Such a collar can be raised to a height of 2-3 cm and the loops can be closed at the same time.
To prevent the edge of the neck from curling, you can finish knitting the “boat” with 1 row of single crochet stitches or “crayfish step” using a hook.
Rules for closing neck loops
Particular attention is paid to closing the neck loops, which creates a smooth, beautiful edge.
The basic rule to follow when shaping a neckline in any way is to use a method that allows the edge to remain elastic but does not stretch or deform the fabric. This can be a crochet, knitting needle or crochet closure.
A striking example of an elastic knitted edge is closing the loops of the neck with knitting needles. Step-by-step instructions for beginner needlewomen on how to design the edge of different collar styles are presented in the article.
Video about knitting a neck with knitting needles
MK on knitting the perfect neck with knitting needles: