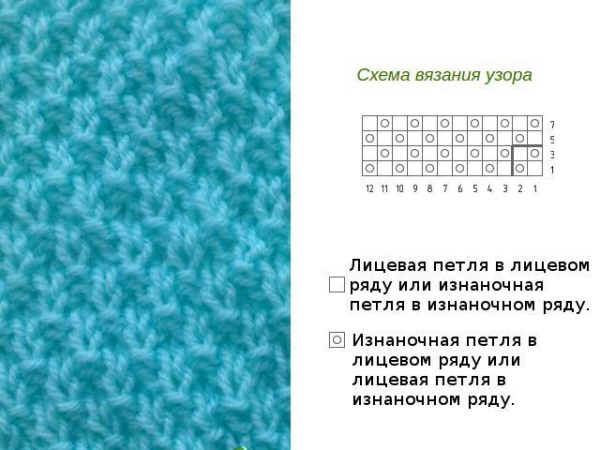
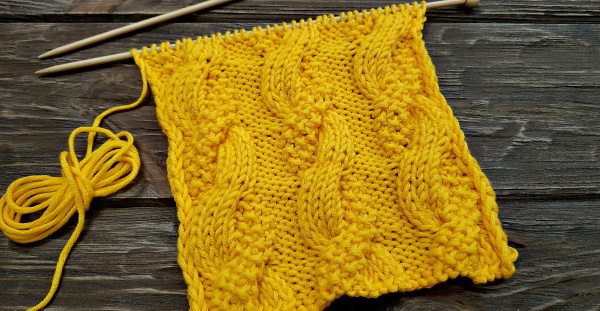
Neat pearl patterns on knitted items look minimalistic and not boring. The lines of such relief patterns are very pleasant to the eye and to the touch. The patterns, as well as the instructions for creating them, are understandable even for beginners. Descriptions of such knitting usually contain alternations of purl and face loops.
Types of pearl patterns
There are several methods of making pearl patterns, as shown in the following table:
| Types of ornaments | Peculiarities | What are they suitable for? |
| Rice or small pearl rice (putanka) | Double sided | Bedspreads, slippers; socks |
| Large pearl | More voluminous, double-sided; works well with voluminous braid designs. | Hats; snoods; blankets |
| Double confusion | All steps must be performed according to the drawing. | Create an attractive background for more complex designs |
| Elastic band with pearl scattering. | Refers to a type of patent patterns. | Warm and winter clothes |
Pearl ornament can be:
- double, it looks like a thick elastic band;
- with direct and reverse rows;
- elongated, with loops arranged in a checkerboard pattern;
- in the form of a one- or two-sided elastic band;
- made with arans or braids;
- two-color;
- large;
- small, it is also called rice.
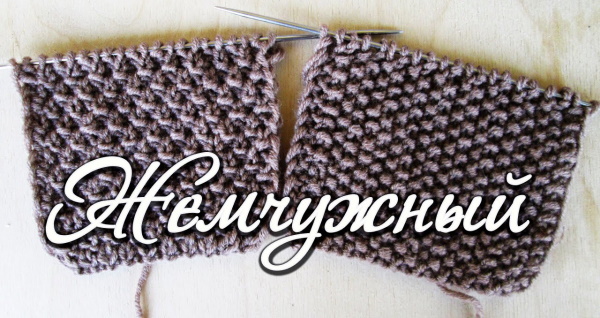
Pearl pattern small or rice
The instructions for knitting it are as follows:
- After casting on the required number of loops, in the 2nd row, until the very end, knit the front and back loops alternately.
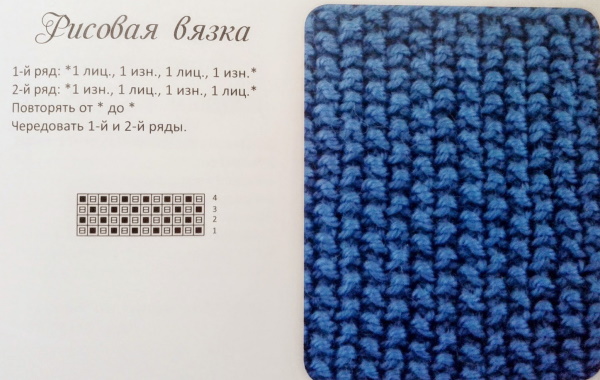
- After turning the knitting over, knit stitches are worked over purl stitches, and purl stitches are worked over knit stitches.
- Then everyone does it in mirror image.
Large pearl pattern
This elongated pattern with a distinct structure is made according to the description. After casting on the stitches, row 1 is knitted according to the pattern. The contents between the asterisks (*) are repeated until the end of the circle. This will be the so-called rapport.
The diagram of a large pearl pattern looks like this:
- initial loop that is removed, *front, back*;
- removable, *the front element is stitched over the front element, and the back element is stitched over the back element*;
- edge; *purl, front*;
- 1st loop is removed, *front, back*;
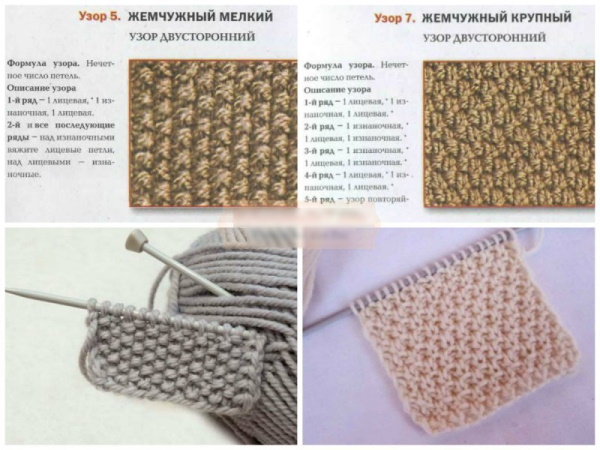
- In the following rows, repeat the pattern from the 1st circle.
Double
To create such a patent pattern, use threads of 2 colors and optimal knitting needles. The first 2 circles are made in one shade, and the next pair of rows - in another. Even circles will form the front side of the ornament, and odd ones - the back side.
The two-color pattern "double pearl" is knitted according to the instructions below:
- shade #1: edge, front, *element removed as purl, front*, finish row with purl;
- removable loop, front, *loop thrown over as a purl, front*;
- shade #2: edge, pair of front elements, *loop thrown over as if on the back, front*;
- edge, 2 knits, *1 slipped stitch as a purl, knit*;
- repeating the pattern rapport from the initial row, changing the shade, every 2 circles.
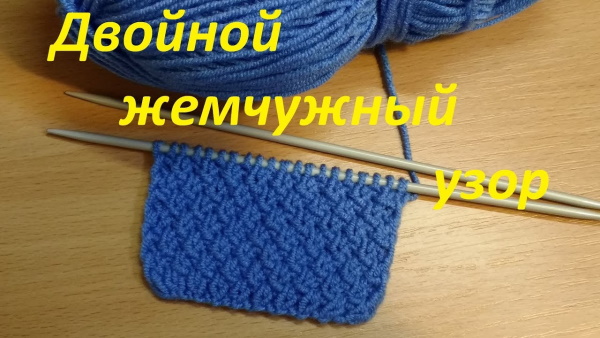
Monochrome double pearls are made as follows:
- A certain number of loops, including edge loops, are cast on onto the knitting needles.
- In the 1st row, front and back loops should alternate.
- In the next row, knit the front elements as front elements and knit the back elements as back elements.
- Row 3 should start with a purl stitch after removing the edge stitch. Then knit the front stitch. Continue this alternation until the end of the circle. When making double pearls, do not forget that in even circles, the elements are created according to the pattern.
The pearl knitting pattern (the description and diagram perfectly convey its simplicity and attractiveness) is good for creating adult and children's products. It also helps to knit various items for the home. Things with such an ornament turn out unusual and very feminine if they are intended for the fair sex.
Double rice is made by alternating front and back elements. It differs from other pearl patterns by adding rapport loops. Additional edge loops form even and neat edges of the product. The fabric with them does not deform, and the pattern is more accurate.
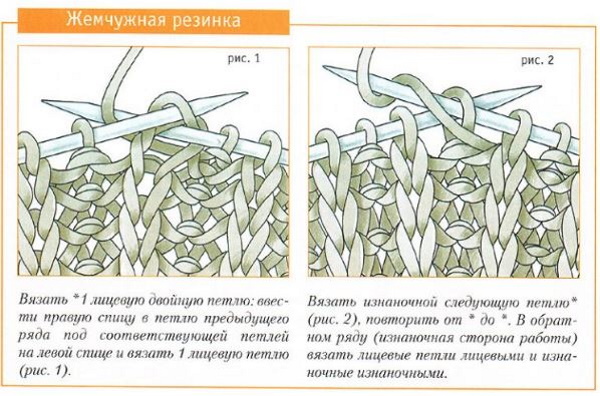
Pearl gum
For ease of counting the stitches, the fabric is knitted with a purl stitch. This method highlights the beginning of the pattern more clearly. This pattern is quite dense. It can even be used to create an elastic band when making a snood or scarf. Pearl elastic is created in several ways.
Pattern #1:
- 1 row: edge, *front, back*;
- Row 2 is knitted entirely with front elements;
- then repeat from rows 1 to 2.
Pattern #2:
- 1st circle: edge, *2 purl, front, front, purl, front*, 2 purl, edge;
- 2nd round: edge, 2 front, *3 back, 2 front*;
- alternating 1 and 2 rows.
Pattern #3:
- edge, *3 front, back, front*, 2 front, edge;
- edge, pair of purl, *front, purl, front, 2 purl*, edge;
- repeat the above points until the end of knitting.
Pattern #4:
- edge, *5 purl, front*, 4 purl, edge;
- edge, 4 front, *front, back, 4 front*;
- repeating rows.

Pattern No. 5 (also called pressed or patent):
- edge; *purl, front*;
- then knit the elastic according to the pattern, making the front loops double;
- The following rows are performed similarly to the 2 points described above.
Circular knitting
The pattern of small pearls in a circle is made as follows:
- 1st round: *front, back*, repeat contents in asterisks (*) to end of row.
- 2nd round: *purl, knit*, perform the pattern rapport to the last edge loop.
- The 3rd circle repeats the 1st.
- The 4th circle is similar to the 2nd.
- Knitting continues according to the above-described pattern, using alternating front and back loops in a checkerboard pattern.
The pearl pattern with knitting needles (description and diagram help to knit double-sided fabrics with a relief pattern) creates products that do not twist and perfectly retain their structure. Due to the simplicity of the ornament, knitting is quick and easy. Work on making products from yarn is performed with straight or circular knitting needles.
The pattern for a double or large pearl pattern using the circular method looks like this:
- *Front, back*, further repeat of the pattern (contents in the stars).
- *Purl, knit*, work until the end of the circle.
- Repeat point 2.
- Completion of point 1.
- Repeat point 1.
- Then perform points 2 through 5, alternating 2 circles of front and back loops in a checkerboard pattern.
Seamless fabrics in a circle, for example snoods, consist only of front rows.
Below is a diagram of how to create pearl elastic using the circular method:
- 1 row: alternating front and back elements;
- 2nd row: knit stitch, then yarn over and remove the next stitch without knitting, then repeat everything until the end of the strip;
- 3rd row: knit stitch, yarn over stitch, knit as a purl stitch;
- then perform rows 1 through 3 until the required length of the product is reached.
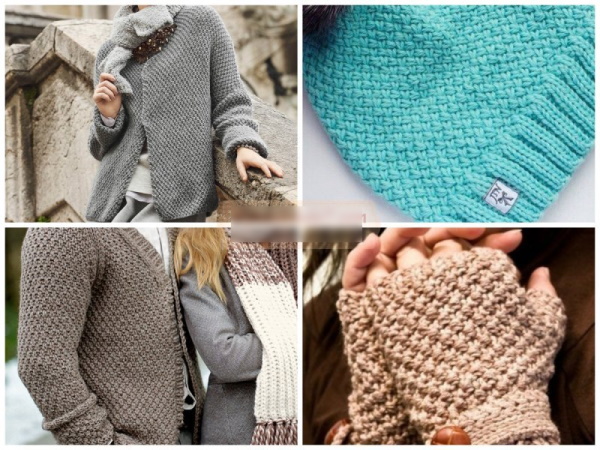
Using pearl pattern in products
Pearl patterns are used to decorate:
- men's products;
- things knitted from thick threads;
- scarves;
- the middle of the diamond-shaped designs;
- poncho;
- hats;
- vests;
- mittens;
- stoles;
- children's and adult sweaters;
- skirts;
- booties and slippers.
Dense double-sided pearl elastic is used for:
- hoods;
- snoods;
- scarves.
Pearl knitting is also suitable for filling and shading other ornaments. This pattern comes out voluminous and relief. And it looks quite attractive. Small rice looks advantageous with large braids. So, it is good to introduce the execution of the 1x1 tangle at the beginning of the product, and in the center knit a regular braid with transitions and facial loops. Blankets and snoods look great if they are made using large or small rice.
The tangle also looks good on:
- sleeveless jackets;
- pullovers;
- cardigans;
- adult and children's headwear;
- sweaters.
The pearl pattern with knitting needles (the description and the diagram for its creation allow you to experiment) looks great both on its own and together with other patterns. Such an ornament is often combined with garter stitch. This is especially relevant for decreasing loops when knitting.
Knitted pearl scatterings go well with:
- braids;
- mesh lace;
- purl or stockinette stitch;
- finishing the bottom of cardigans or coats.
The tangle is also good for knitting:
- planks;
- collars;
- pockets.
The "rice" pattern is suitable for creating autumn and winter items. Such items come out very beautiful and warm. Inexperienced needlewomen are recommended to start knitting a children's scarf using this working system. They will learn how to correctly alternate front and back loops so that the item turns out to be elastic enough.
Plaid
A cozy home bedspread 80x133 cm is made in the following way:
- On knitting needles marked 5, cast on the required number of loops, taking into account the edge elements;
- 1 strip is made with front loops;
- the next circle should consist of alternating purl and knit stitches;
- Row 3 is knitted with front loops;
- 4 strip is made similar to the 2nd;
- then the drawings alternate from 1 to 4 circles;
- the knitting density should consist of 17 elements per 25 stripes;
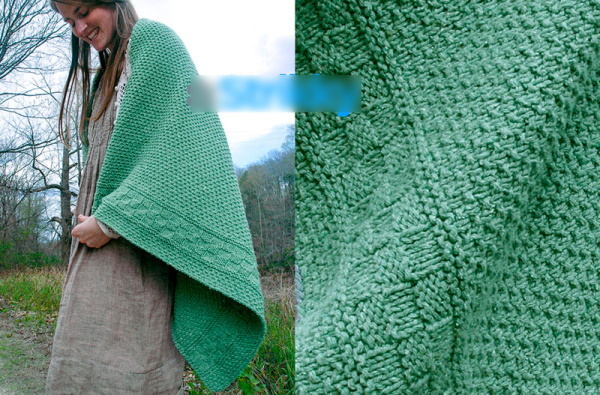
- For the presented blanket you will need 7 skeins of yarn.
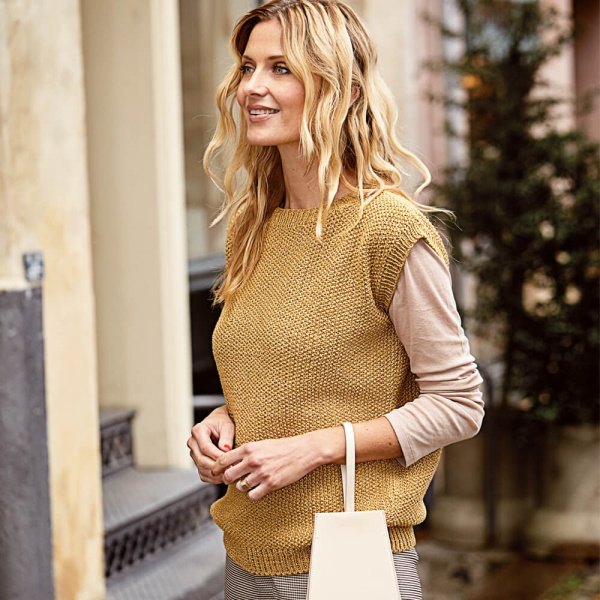
Sleeveless jacket
Demi-season vests are made from classic elastic and tangled yarn. For this, knitting needles No. 4 and 7 balls of thread are used.
When knitting women's and men's sleeveless jackets, follow the algorithm described below:
- Cast on 110 elements on straight knitting needles, including edge needles.
- Then the back of the product is formed, for which 1 row is knitted with a classic 1x1 elastic band. Its length should be 5 cm.
- Then they make a pattern called "rice". When alternating loops in every 10 stripes, they add 1 element. These loops are then also used in the pattern.
- The pattern is closed for the recesses on 2 sides, 4 elements each, until the product reaches a length of 37 cm.
- Then, in every 2 strips, close 2 elements once and 1 loop twice.
- When the armhole reaches a height of 7 cm, 1 element is added 2 times on 2 sides of the back in every 10th circle.
- When the notch reaches 18 cm in height, all loops are closed.
- Next, begin making the front part of the vest. The same number of elements are collected on the knitting tools as for the back and knitted in the same way. The execution continues until the front reaches a height of 50 cm.
- Then the middle 22 elements are closed to form the neck opening. Everything else is done separately.
- In order for the neckline to be round, from the inside of the fabric, in each even strip, knit the following number of elements: 5 - 1 time; 4 - 1 time; 3 - 1 time; 2 - 1 time; 1 - 6 times.
- At a length of 55 cm, the front part of the sleeveless jacket is closed.
The neck binding is made from 106 elements on circular knitting tools, with a rib. The notch strip is also knitted using a classic rib of 72 loops. The above algorithm for making a sleeveless jacket is suitable for sizes 36-38. The knitting density should be as follows: 10x10 cm.
The pearl knitting pattern (the description and diagram are available online for anyone interested) can look original as a background for braids and diamonds. For more uniform knitting of relief patterns, it is recommended to use smooth yarn. Products made in this way have a warming effect. But at the same time, with boucle knitting, lighter things for summer or spring can be created.
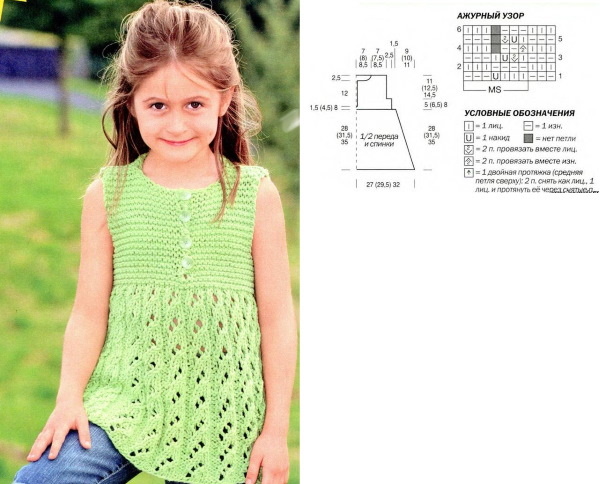
Sundress for a 2 year old girl
When making such a product, the “tangle” pattern is used.
To do this you will need:
- ornaments: double elastic 1x1 and pearls;
- knitting needles marked 4;
- 150 g acrylic threads.
To knit a children's sarafan, do the following:
- Cast on 101 stitches (including edge stitches) onto the knitting needles.
- Then the resulting elements are separated for knitting in order:
- 19 steps with the "tangle" pattern;
- 3 purl;
- tangle of 27 loops;
- 3 purl;
- 27 loops in a tangle;
- 3 purl;
- 19 steps of confusion.
- On the 31st strip of the fabric, the elements on the knitting needles begin to decrease: from 2 sides of each 12th row, 2 elements (a tangle and a purl), they are connected together in the form of a purl loop. This is done until there are 71 loops on the knitting needles.
- After the product reaches 29 cm in length, join the two sides together:
- 4 loops – 1 time;
- 2 loops in each 2 strips – 3 times;
- 1 loop from the edge – 2 times.
As soon as the sarafan is 50 cm long, work on it is completed by closing 8 elements on each upper part of 2 shelves. The front of the product is made similar to its back. After the armhole is 12 cm long, its middle 13 loops are closed, and the resulting 2 parts are knitted separately.
To round the front neck, first close 3 elements twice, and then 1 loop 2 times. At a length of 50 cm, 8 steps of each shoulder are completed. Then the finished parts of the children's sarafan are sewn according to the classic pattern (along the shoulders and sides).
Women's Long Sweater
To create the product, take the threads with suitable knitting needles and do the following in order:
- Cast on the required number of loops (including edge loops).
- 1 row is formed with face loops.
- On the 2nd strip, start creating a pearl elastic band. For a clearer pattern, the circles are duplicated.
- The armholes of the back and front parts of the pullover are made according to the classic pattern.
- The raglan is formed separately from the fabric.
- Then all the finished parts are connected in the necessary places.
There are many descriptions of items with pearl ornaments on Internet resources. Such things, created with knitting needles, have quite simple and clear patterns. In addition, such interweaving of threads, folding into attractive patterns, have been known to mankind for a very long time.
Coats for children up to one year
When making a children's coat, use circular knitting needles and 5 balls of merino wool.
To obtain an attractive, warm product, follow the following knitting algorithm:
- On the knitting needles, for the front parts and the back, in 2 additions, cast on 105 elements.
- Then the circles are made using the "tangled" pattern.
- At a length of 12 cm, create a strip with holes (2 front steps, yarn over, 2 front elements, yarn over), repeat the rapport indicated in brackets until the end of the circle.
- Then 1 cm strips are knitted using the “pearl” pattern.
- On a length of 13 cm, 53 elements are separated on the back, and on the front shelves - 26 loops for each.
- Next, 6 steps are filled in for each recess.
- Then, using a double thread, the sleeves are knitted from 31 elements. They are created using the "tangle" pattern.
- At a length of 3 cm, each side of knitting is increased by 1 loop. These actions are repeated every 2.5 cm.
- After 41 elements remain on the knitting tools, 3 steps are completed on 2 sides of the work.
- When the sleeves are ready, knit the yoke.
- The finished coat is sewn and equipped with fasteners or buttons.
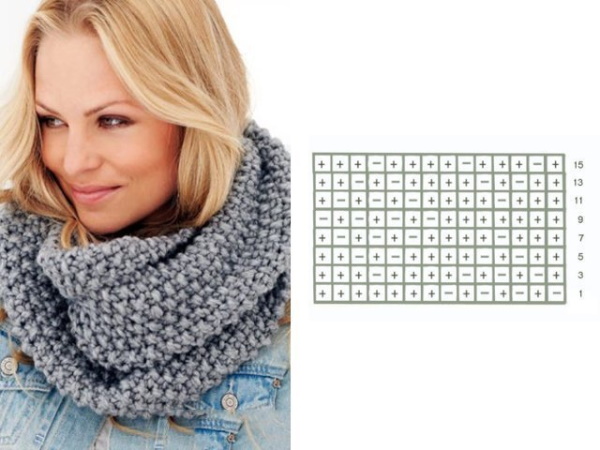
Circle scarf
To knit a snood, follow these steps:
- The working tools are equipped with the optimal number of elements (including edging ones).
- In 1 strip there should be alternating front and back loops.
- 2nd circle is knitted according to the pattern.
- Row 3 should repeat row 1, and row 4 should repeat row 2.

- The fabric is made to the required height. The product can be knitted not only with small but also with large rice. To do this, the elements alternate 2 through 2.
Shoes for home
To obtain slippers of size 35-37, the following scheme is suitable:
- Footwear like this in the form of slippers starts to be formed with 8 loops.
- Row 1 is performed with knit stitches.
- In the 2nd lane follows:
2 elements in the form of faces;
- thread throw;
- 4 facial steps;
- yarn over;
- 2 steps knit.
- After this, there will be 10 loops on the knitting needles.
- Then create 12 elements on the instruments:
- 4 facial;
- throw-in;
- 2 facial;
- throw-in;
- 4 steps of knit stitches.
- Next, knit 9 cm with a “small rice” pattern.
- Then, at the end of the next 2 strips, 9 new elements are added, and as a result there are already 30 loops on the needles.
- On a fabric length of 21 cm, 9 loops are made in the front circle, the product is turned over and a reverse row is created.
- Then the initial 21 loops are closed so that 9 elements remain on the tool. Several strips are knitted from them and closed.
- To assemble the slippers, after 8 steps from the toe, the thread is pulled through them, and then these loops are pulled together. Then the resulting products are sewn together.
The basic knitted pattern is considered to be a pearl ornament. Such patterns have several types and differ in descriptions and some nuances. They are very easy to do on knitting needles, which is proven by the patterns for creating these weaves. Products with them are distinguished by their density and good ability to hold their shape.
Video on creating a pearl pattern with knitting needles
How to make a pearl pattern with knitting needles: