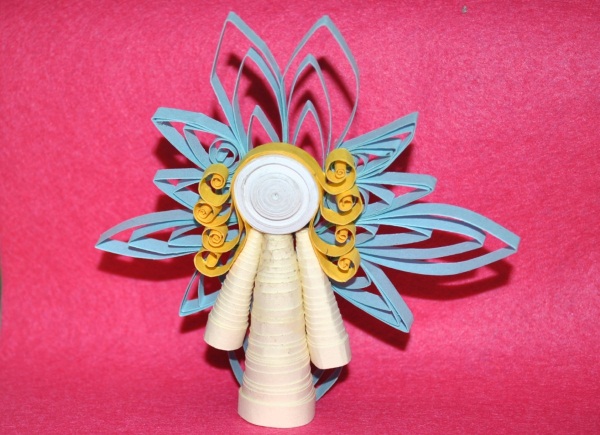
A type of handicraft, in the process of which flat and three-dimensional crafts are created from narrow strips of paper, is called quilling. It is quite easy for beginners to master it if you follow the basic instructions step by step, presented in the form of detailed descriptions, photos and videos.
Quilling: types and features of products
Quilling is useful for both children and adults. All the features and distinctive characteristics of this type of handicraft are presented in the following table.
| Children | Adults |
| Development of fine motor skills and imagination | Paper rolling calms the nervous system |
| Developing accuracy, perseverance and dexterity | Products made using the quilling technique are an original solution for interior decoration and a gift for loved ones and friends. |
| Formation of spatial thinking | Having achieved certain success in the art of paper rolling, you can make it a source of additional income |
| Availability and cost-effectiveness of materials used in the work | |
| Simplicity of execution of basic elements from which various compositions and figures are composed | |
Quilling for beginners (step-by-step with photo instructions makes the work easier) can be made using the following techniques:
- Hastings — laying out a mosaic panel on a flat base. It is used to decorate postcards, albums, boxes, and also to create paintings and portraits.
- Volumetric technology consists of creating three-dimensional figures (toys, souvenirs, interior items) from simple elements.
- Corrugated quilling — a technique for creating three-dimensional works that are stable and highly durable, which is achieved by using corrugated cardboard in the work.
- Contour (graphic) quilling — a type of paper plastic art based on working with paper strips that form the outline of a figure and its volume. Paper strips are not rolled into closed elements, but are bent, giving the necessary shape and fixing them on a plane at a right angle.
- Loop quilling — a paper-rolling technique, the main element of which is openwork loops created with a comb.
Materials and tools for work
A set of materials and tools for quilling can be purchased in specialized stores. But beginners can use improvised materials for work.
Paper
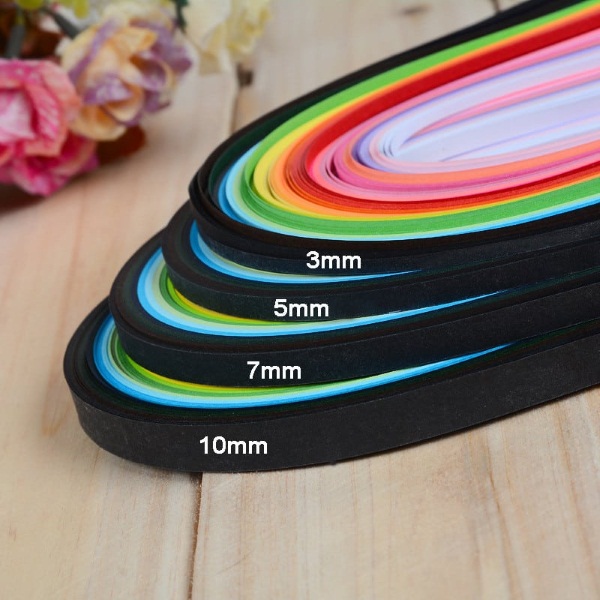
The main material for quilling is paper strips with a width of 0.3 to 1.5 cm. The final result depends on the quality and density of the source material. The standard density of paper for quilling is 120-140 mg/m2.
It is initially cut into strips of a certain width and length, which is usually 30 or 60 cm. On sale you can find sets consisting of multi-colored or single-color strips of the same length.
Beginning authors often use office colored paper, which has slightly lower density, but with a number of advantages:
- optimal ratio of cost and quantity of material obtained;
- availability, as it is sold in any stationery store;
- a variety of colors;
- the ability to prepare many strips of different thicknesses and lengths.
The cutting of paper sheets is done using a sharp stationery knife along pre-marked lines. To speed up the work, several sheets are connected with paper clips and placed on the tablet. Using a metal ruler as a limiter, the required amount of material is cut.
In addition to paper of various densities, the following materials are used to create crafts using the quilling technique:
- textured and corrugated cardboard;
- various types of paper for creativity;
- foil;
- film of varying degrees of transparency.
Twisting tool
The paper strips are twisted using a special tool, which is a metal rod that is inserted into a convenient wooden or metal handle. The European school of quilling uses a tool with a forked end. Eastern masters use a device similar to an awl.
Beginners should start with the European tool, as it is more convenient to work with. The end of the strip is inserted between the metal teeth, bent and rolled into a roll.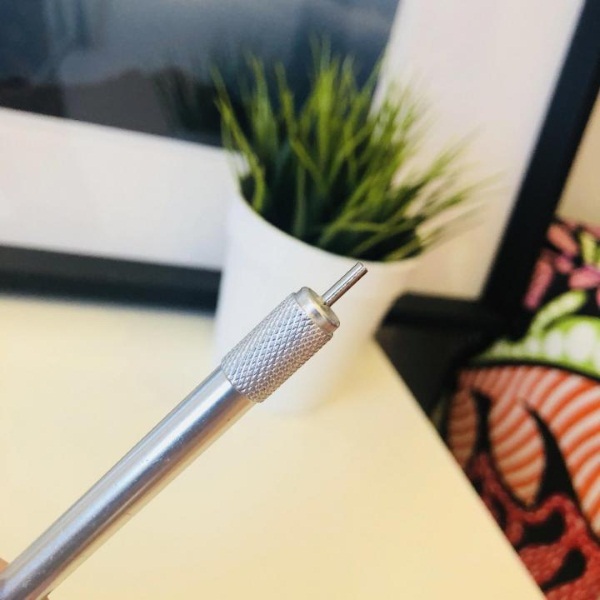
The working tool can be made independently from available materials.
There are several options for a homemade device:
- The end of a thin wooden skewer or toothpick is cut into 1-1.5 cm pieces using a sharp stationery knife.
- For children's creativity, you can make a safe tool from a used pen rod. Its metal part is cut off, and the remaining part is split with a stationery knife.
- A large needle is cut off with a pair of nippers, part of the eye and the sharp end. The resulting blank is inserted into the eraser at the end of a pencil and fixed with a drop of glue.
Auxiliary tools and materials
The following are used as auxiliary devices for creativity:
- PVA glue in a small jar with a thin spout. Also, a thin brush is used to apply glue to the parts.
- A stencil with round or shaped holes. It is used to make many elements of the same size.
- Tweezers with pointed ends are used for handling small parts.
- For work you will need scissors of several types. Small scissors with sharp ends for cutting fringe in children's creativity are replaced by a tool with rounded blades.
- Safety pins are essential for securing pieces in large compositions.
- The rubberized mat is used for cutting paper strips yourself.
- A sheet of cork or foam plastic will be needed for modeling compositions and gluing parts together.
- Metal ruler.
- Stationery knife.
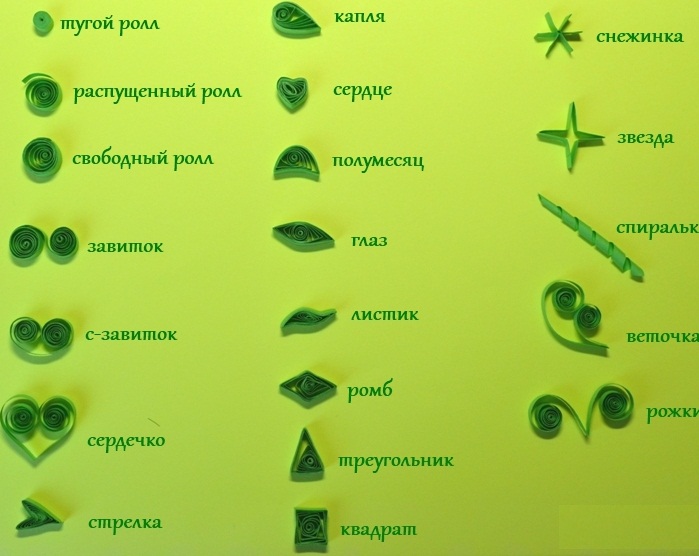
Basic quilling shapes and how to make them
Quilling is made from various small elements, which are divided into closed and open parts. For a step-by-step description, photographs are provided to help beginners do the work correctly.
Closed parts
In closed quilling elements, the end of the twisted strip is glued to the main part:
- Tight roll — the main part of quilling, on the basis of which all subsequent elements are formed. To make it, a paper strip is fixed in a twisting tool and tightly wound onto it.
 It is necessary to straighten the paper with your fingers during the process to prevent the formation of bulges. The free end of the twisted strip is glued to the roll without removing it from the tool.
 - The bagel is formed from a tight roll. The formed spiral, without gluing the end, is removed from the tool and slightly unraveled so that a hole is formed in the center. The remaining layers should be tightly distributed along the edges of the part. Carefully, using tweezers, glue both the inner and outer ends of the tape.
- Spiral donut is performed similarly to the previous part, but in the center there remains a loose, free spiral. Only the outer end of the strip is fixed with glue.
- Oval is made on the basis of a donut, twisted with the help of the handle of the working tool or a pencil. Having formed a donut and secured the end of the tape, the part is removed from the twisting device. By carefully pressing the ring with your fingers, it is given an oval shape.
- Free roll — a basic part, on the basis of which most of the main elements in quilling are made. The tightly twisted roll is removed from the tool and unraveled to the required size. After that, the end is glued and, if necessary, the internal layers of the part are adjusted with tweezers.
- Drop. The center of the free spiral is carefully pulled away from the center, and the opposite side is squeezed with two fingers.
- Manufacturing curved drop similar to the previous method, but the sharp side is shifted from the center, while simultaneously giving the part a bend.
- Petal is formed on the basis of a drop by making a small pinch on the rounded side of the part.
- Eye (petal). The free roll is compressed from both sides until sharp symmetrical angles are formed.
All quilling crafts are made from simple elements. Beginners are advised to study the weaving patterns of these elements - Curved petal. The base piece is lightly compressed to form an oval. Then its ends are pinched and folded in opposite directions.
Open Elements
In open elements, the end of the paper tape is not secured. Such details are used for additional decoration of products made using the quilling technique.
- Curl formed from a strip of paper rolled into a tight roll that naturally unravels.
- S-element. The tape is twisted from both ends into tight rolls directed in different directions.
- C-element. It is formed in the same way as the previous one, but the twisting occurs in one direction.
- V-element. The strip of paper is folded in half and rolled into tight rolls, making an outward movement.
- Heart. The ends of the strip folded in half are folded inwards. The contact parts can be secured with glue.
- Twig. The paper strip is folded randomly into two parts and twisted in one direction. The spirals can also twist in opposite directions.
Basic geometric elements
Many geometric shapes can be formed from twisted paper strips.
All of them are formed on the basis of a basic part - a free spiral (roll).
- Square, rhombus, rectangle. The roll of the required size is squeezed with fingers. If you press evenly on all sides, you will get a square. If you press harder on two opposite sides, you will get a rectangle.
- Trapezoid This will happen if, when forming a rectangle, the parallel sides are shifted relative to each other.
- Triangle. The loose roll is squeezed with three fingers to form a triangle. The shape of the triangle depends on the force of pressure.
- Semicircle. One side of the free spiral is straightened, while simultaneously sharpening the corners adjacent to it.
- Arrow. The base of the triangle in the middle is pressed into the element and the corners are sharpened.
The examples of elements given are the basis for creativity. By using your imagination, you can create many new forms that will make your quilling craft unique.
Flowers
Quilling for beginners step by step with photo instructions is mastered by creating simple compositions. Flowers are a common subject of many crafts. To make the first works, you should choose crafts from a small number of elements.
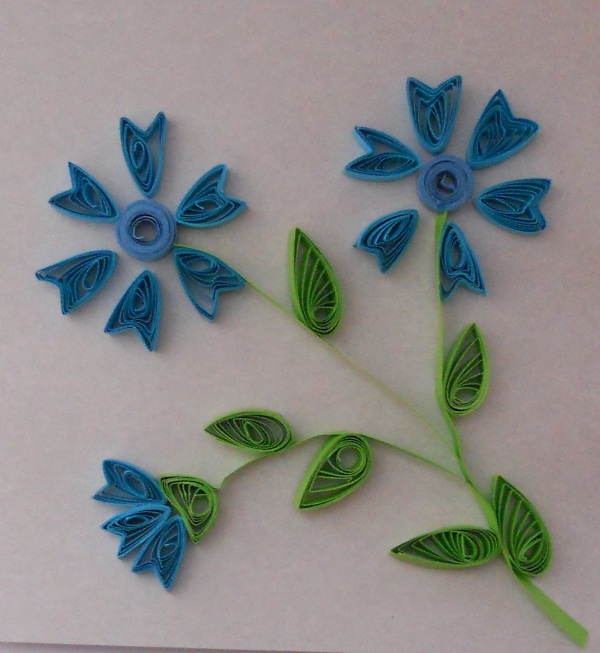
Cornflowers
To create a composition, the following elements are required:
- 15 blue arrow parts;
- 2 spiral donuts;
- 6 green drops;
- 1 green month;
- 3 strips of green paper, 5 mm wide;
- a sheet of pastel-colored cardboard.
Progress of work:
- Using a simple pencil, draw a sketch of a bouquet of two flowers and one bud on cardboard.
- The sketch is attached to the cork board using safety pins.
- The parts that make up the composition are laid out on the drawing. In order for all the parts to remain in their places, they are fixed with pins.
- The work is glued together starting with the flowers. Six arrow-petals are glued to the donut located in the middle at a small distance. At the same time, the flower is glued to the base.
- The concave part of the moon is covered with a small amount of glue and three arrows are attached.
- One edge of the paper strip is covered with glue and fixed to the appropriate place in the composition.
- The drop-shaped leaves are randomly distributed on the stems and glued on.
Dandelions
A small composition of dandelions can be used to decorate postcards, frames, boxes, or as a magnet.
Required elements:
- 3 yellow stripes 1.5 cm wide;
- 6 green eye-shaped elements;
- cardboard circle with a diameter of 3 cm.

Progress of work:
- Yellow paper strips are cut into small fringes, leaving 5 mm from the edge;
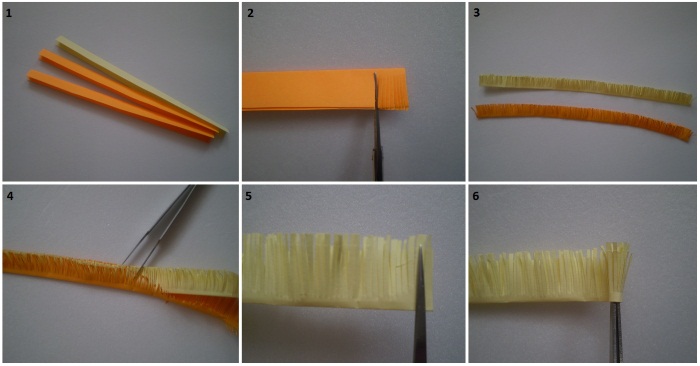
- The prepared strips are twisted into a tight roll using a tool.
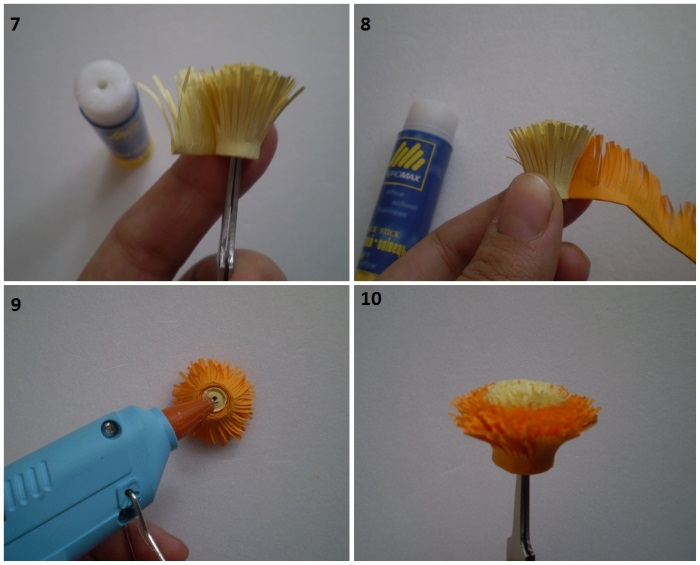
- The green eyes are used to form trefoils. The corners of two petals are glued together. The third element is glued between them. The second trefoil is also formed.
- Dandelion buds are glued to the center of the cardboard circle, leaving a small distance between them.
- Trefoils are glued to opposite sides.
Volumetric flowers
Flowers made using the quilling technique can be given volume. Such buds are used both as part of a larger composition and as an independent product.
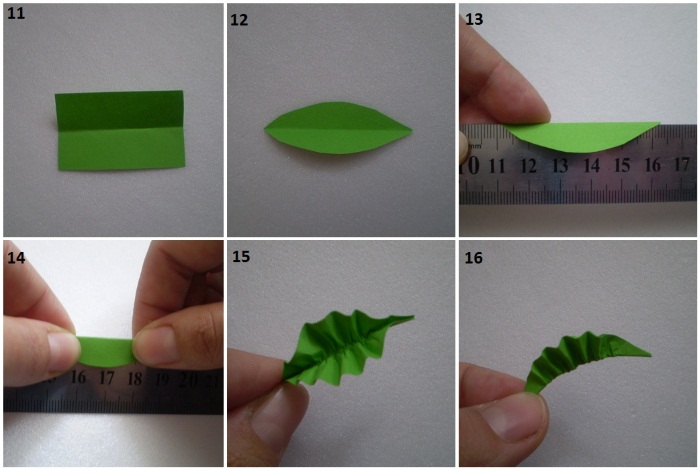
Simple rose
Paper rosebud is used to create various panels and paintings. The technique of its production is slightly different from traditional quilling.
Materials:
- paper circle with a diameter of 10 cm;
- green stripes 5 mm wide and 30 cm long;
- thin wooden skewer.
Progress of work:
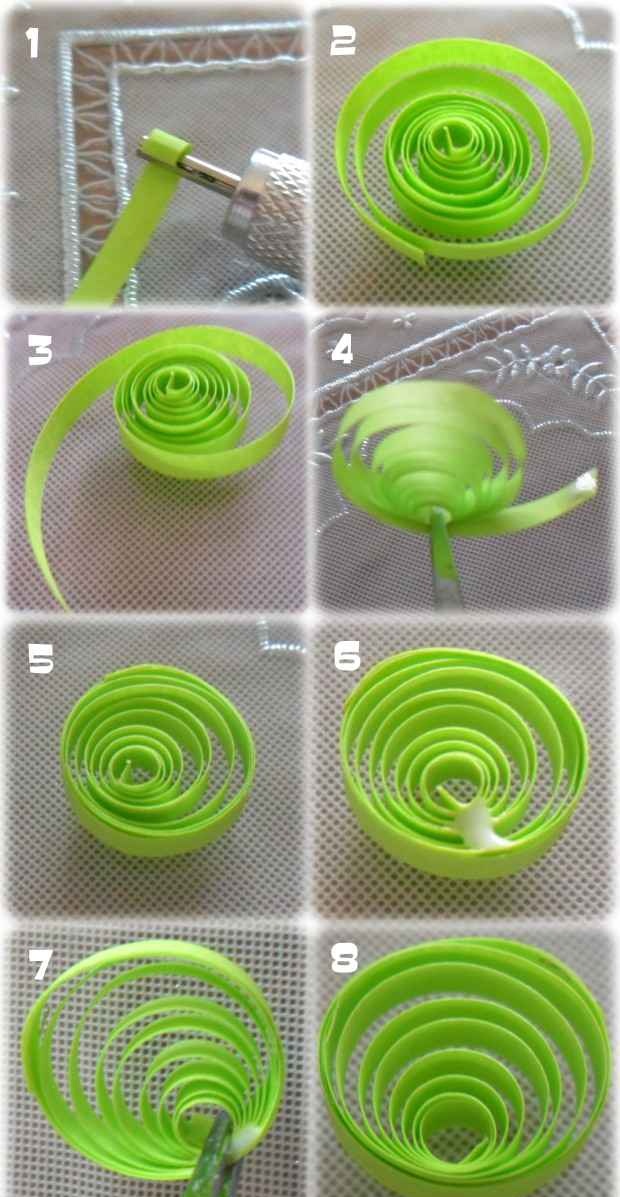
- Cut the circle into the shape of a flower and draw a wavy spiral inside, curling towards the center of the piece.
- Cut the workpiece along the marked line.
- Using a stick made from a green strip, a tight roll is rolled up, from which a convex cone is formed.
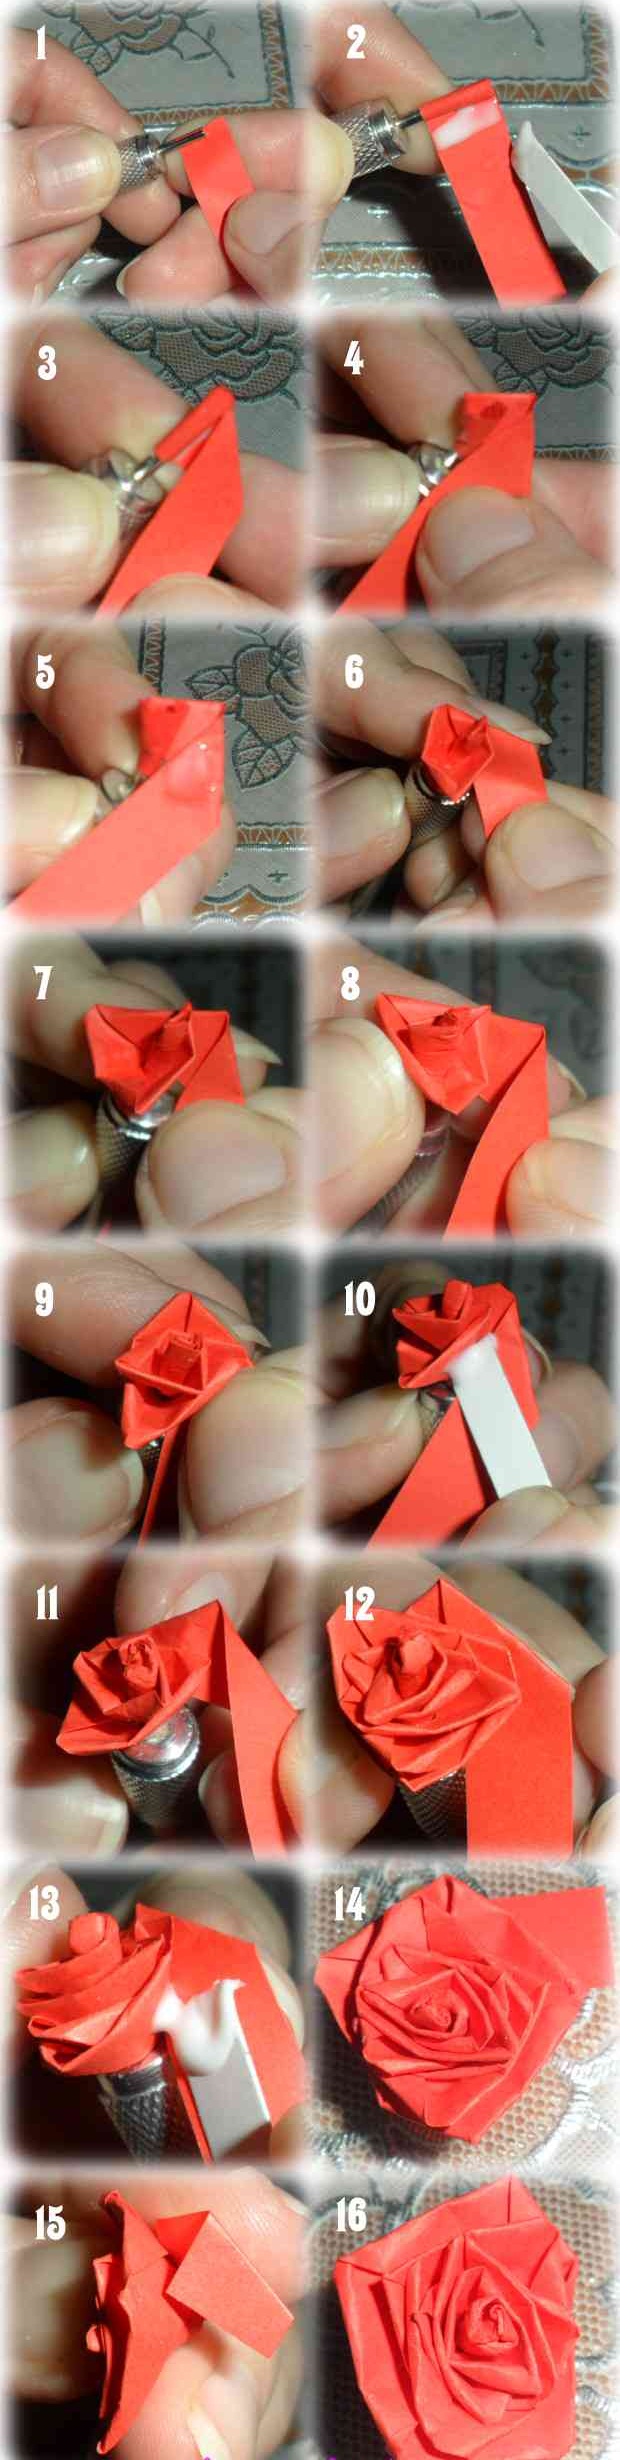
Rose Flower is a simple quilling craft for beginners - The end of the stick is covered with glue, which is used to fix the outer end of the workpiece. The lower edge of the paper tape is coated with glue and rolled into a tight roll.
- The concave part of the cone is coated with glue and placed on a stick, pressing it tightly against the bottom of the bud.
- A thin green ribbon is coated with glue and wrapped around a skewer.
Peony
A fluffy delicate flower made from simple modules decorates crafts. You can make a bouquet from them and place it in an elegant basket.
Materials:
- 20 stripes of pink color, 5 mm wide;
- 2-3 strips 2.5 cm wide.
Progress of work:
- Glue narrow strips in pairs. The joint size should not exceed 4 mm.
- The resulting blanks are twisted into tight spirals and, by pressing on the middle with a finger, a small bulge is made.
- The resulting parts are glued together in two rows of 5 pieces.
- The rows are connected by shifting them relative to each other so that the components of the upper row cover the seams of the lower tier.
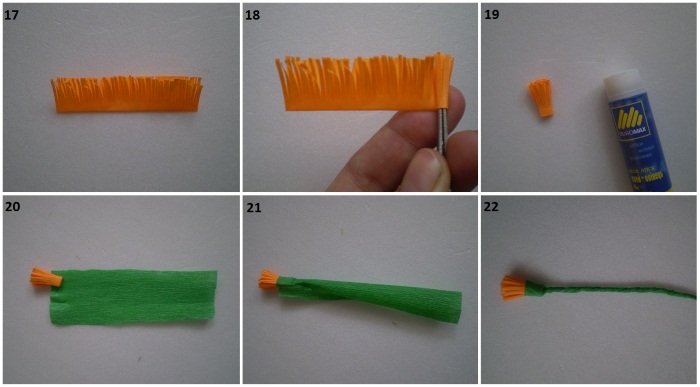
- The center of the flower is made from a wide ribbon, cut into a 1.5 cm high fringe. It is rolled into a tight roll and glued into the center of the workpiece.
Snowflakes
Quilling for beginners step by step with photos demonstrating the creative process clearly, for the New Year holidays can be done by children of senior preschool age. To work on openwork snowflakes, you need to draw or print a round template with 6 rays and put it in a transparent file.
Snowflake of tight rolls
To make a simple elegant snowflake, you need to prepare a large number of tight white spirals. For the first works, take simple patterns.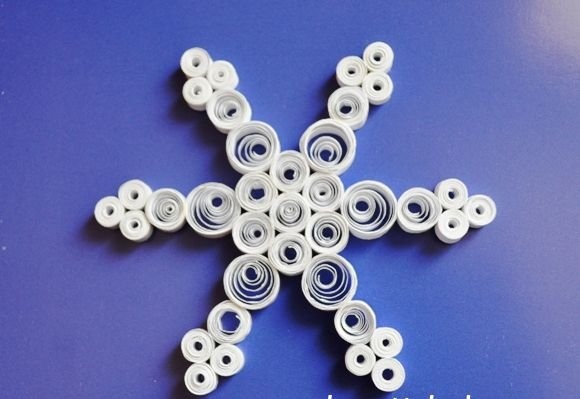
For example, the following:
- Place 3 rolls on each ray of the template and secure them with pins.
- Two pieces are attached to the top of the last circle so that there is a distance between them equal to the diameter of one roll.
- The next row of the beam repeats the previous level.
- The resulting fork is connected with one roll.
- Then 2 more spirals are laid out on the beam, between which 1 circle is glued on each side.
- According to the described scheme, 5 more rays are laid out.
- All parts are fastened with spirals located at the level of the 4th row.
Openwork snowflake
When starting work on an openwork snowflake, you need to draw or print a diagram and attach it to the file. Beginners should use diagrams consisting of 3-4 repeating modules.
Materials:
- 1 blue bagel;
- 12 tight blue spirals;
- 6 large blue drops;
- 6 large and 6 small white eyes;
- 6 V-elements in blue.
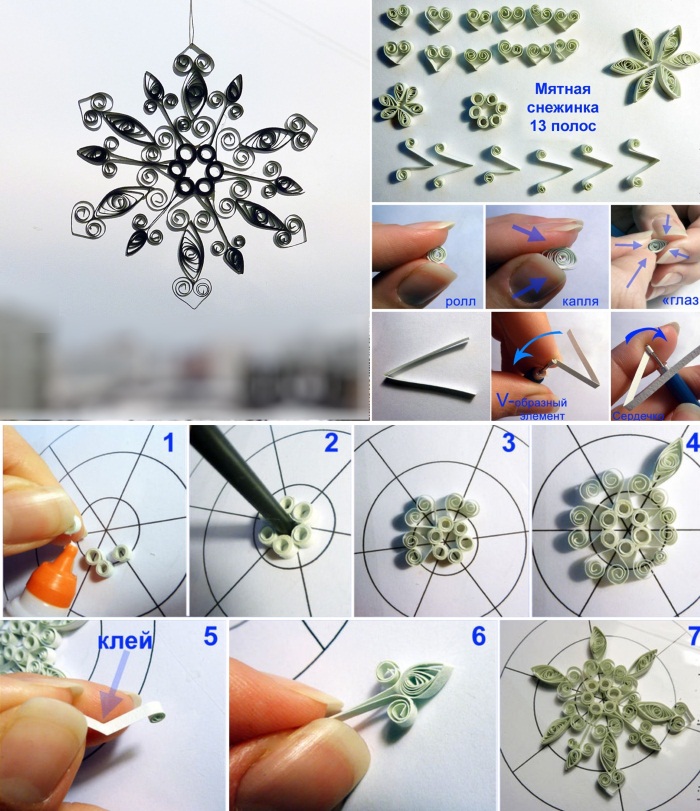
Progress of work:
- All the parts are distributed in the appropriate places according to the diagram and secured with pins.
- Glue together the central part of the figure, consisting of a donut and 6 drops.
- Large eyes are glued between the drops.
- The end of the beam is assembled separately and then connected to the base. The end of the V-element is glued. The middle eye is placed between the free ends. The end of the part is placed between the tight rolls and fastened together.
- The resulting part is glued to the top of the drop part.
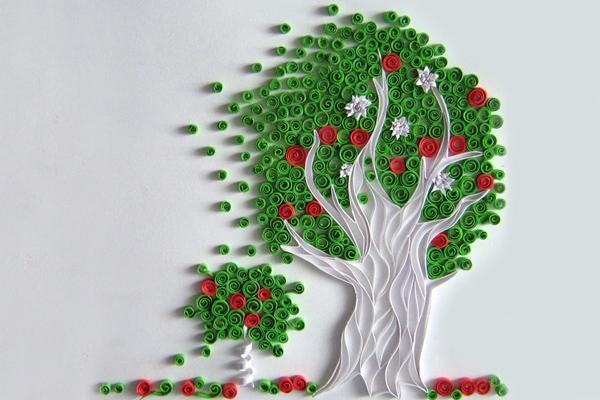
Trees
Quilling for beginners will help to realize many different ideas. Trees, made step by step with photos in the traditional technique or combining several directions, help to consolidate the basic techniques of work and master new techniques.
Birch
Materials:
- a stack of 5mm wide white paper strips;
- 50-60 regular and curved petals of green, yellow and orange colors;
- black marker.
Progress of work:
- The strips of white paper are folded into a stack, the edges are aligned and glued together.
- One side of the resulting blank is glued and connected to the base (sheet of cardboard).
- The upper part of the piece, consisting of separate strips, is carefully straightened out in the form of a thick crown and glued.
- Multi-colored petals are randomly distributed along the branches and glued.
- Using a marker, draw vertical black stripes on the table.
Oak
Any novice author can make a tree using traditional techniques.
Materials:
- brown and black eyes and curved petals;
- tight spirals of different diameters, green and dark green in color;
- cardboard base.

Progress of work:
- On the base, draw the silhouette of the trunk and branches with a simple pencil.
- The entire space of the drawing is filled with modules of brown and black colors.
- Using a pencil, sketch out the approximate volume of the crown.
- The crown is filled with spirals in a random order.
It is necessary to ensure that during the work process the parts are located at a minimum distance from each other.
Animals
Animals made using the quilling technique can be either flat appliques or three-dimensional functional toys.
Cat
An example of a simple applique in the quilling technique is the Learned Cat, which can be placed under an oak tree to create a beautiful illustration of a famous fairy tale.
Materials:
- black and gray elements of various shapes (eye, drop, free roll, triangle);
- toy or glued paper eyes, nose and tongue.
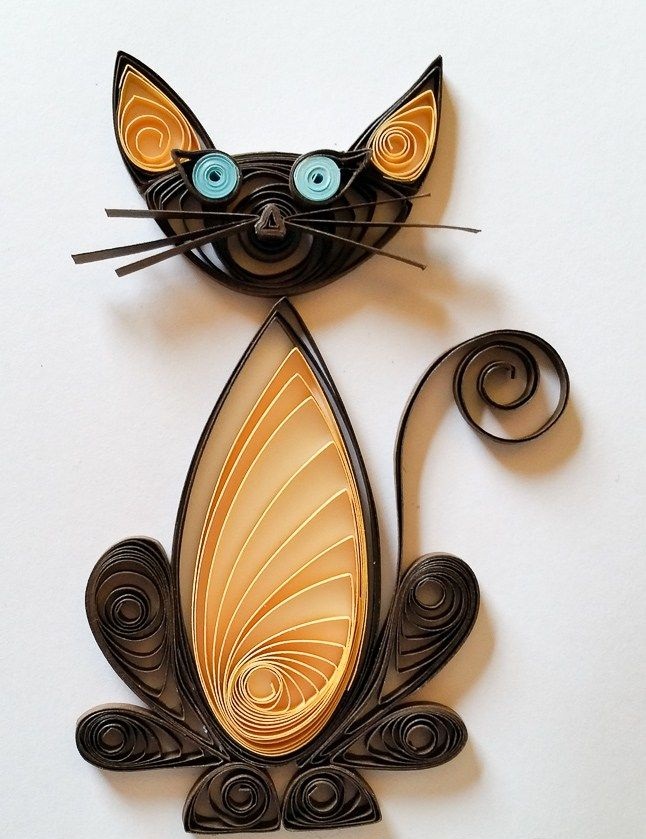
Progress of work:
- A sketch of a cat's figure is drawn on a piece of paper, placed in a file and placed on a cork board.
- The necessary parts are selected to fill the silhouette, securing them with pins.
- All the parts are connected sequentially, starting with the large components of the figure.
- Glue the eyes, nose and tongue onto the face.
Piglet
Beginners mastering quilling techniques can easily make a small toy. For example, a piglet - a symbol of the approaching New Year.
Materials:
- pink corrugated cardboard strips measuring 30*1 cm (36 pcs.), 30*0.5 cm (3 pcs.);
- red corrugated cardboard 4*1 cm (1 pc.), 30*1 cm (1 pc.).
- 4 rectangles of burgundy cardboard 0.5*0.5 cm;
- 2 plastic eyes.

Progress of work:
- Glue 2 strips, each of which consists of 15 strips 30*1 cm.
- Roll one long strip into a tight roll.
- Cut the pink and burgundy blanks measuring 30*1 cm in half and glue 2 multi-colored strips together.
- Roll each of them into a tight roll, starting from the dark part.
- Glue the resulting parts together, forming the pig's nostrils.
- The end of a long pink strip is glued to the nose and tightly twisted.
- After 6 turns, glue a 4*1 cm strip (mouth) to the turn under the nose and continue twisting the piece. Both circles should have the same diameter.
- The resulting blanks are bent into a high dome. The nose on the front one needs to be raised upwards.
- From the inside, both parts are coated with glue.
- 4 strips 30*1 cm are rolled into tight rolls and formed into cones of equal height.
- 2 strips 30*0.5 cm are rolled into a loose spiral and given the shape of ears (a concave triangle). The parts are given a small volume and coated with glue.
- The 30*0.5 strip is coated with glue, folded in half and wound onto a pencil, giving it the shape of a spiral. The end of the resulting tail is forked for attachment to the body.
- The body parts are glued together and their joints are masked with 30*1 cm tape.
- Using pins, mark the locations of the legs and secure them with glue.
- Glue the tail, ears and plastic eyes into place.
- V-shaped hooves are cut out from the rectangles and glued to the legs.
Postcards
Quilling cards for beginners consist of simple elements that are assembled into basic patterns.
Valentine's Day Card
Quilling (for beginners, step by step with photos, it is easier to make the details correctly) made in the form of a valentine will be an original gift for a dear person.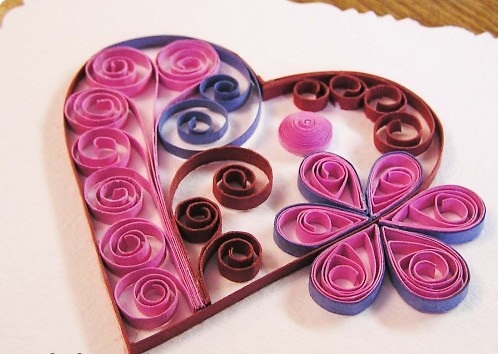
Materials:
- a sheet of thick white paper of A4 size;
- 20-30 red loose spirals with a diameter of 10 mm;
- 15 light pink and dark pink stripes 1.5*30 cm;
- the same number of strips 0.5*30 cm.
Progress of work:
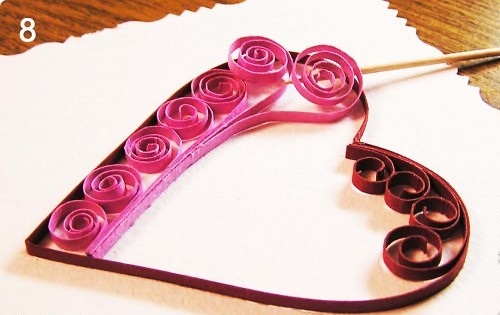
- A sheet of paper is folded in half along the long side.
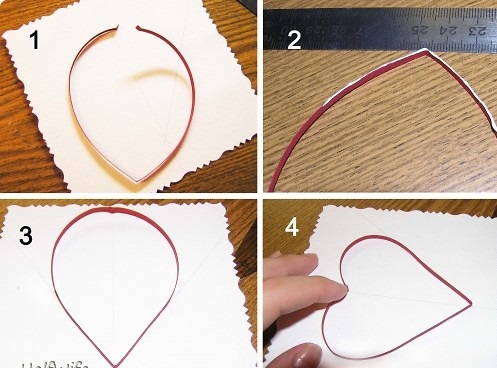
- Using a pencil, draw the silhouette of a heart, placing its top points on the fold line.
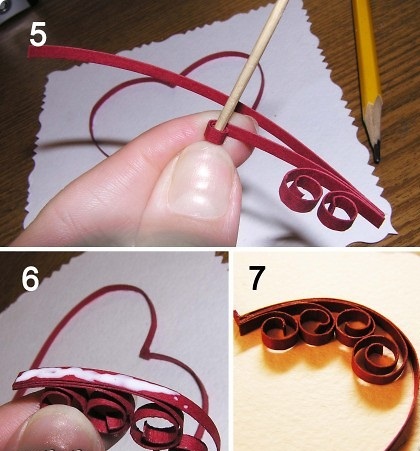
- The blank is cut out using curly scissors with wavy blades.
- Stepping back 5 mm from the edge of the figure, lay out a frame of free spirals.
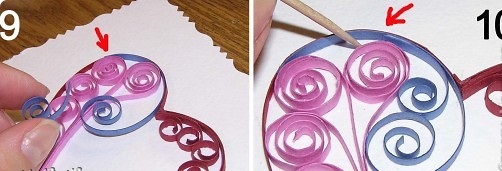
- Wide strips are cut into fine fringes 10 mm high.
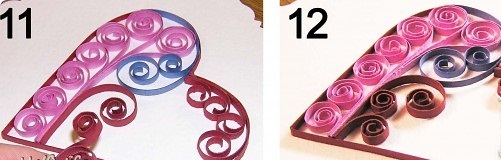
- Two-color ribbons consisting of wide fringe and narrow ribbon are glued together.
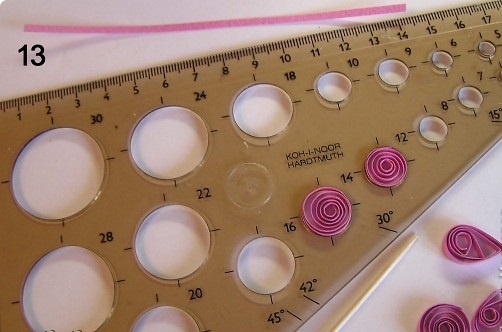
- Using the tool, roll a tight roll, starting with a narrow strip.
 Without removing from the device, the end of the fringe is secured. In a similar way, 30 multi-colored small flowers are formed.
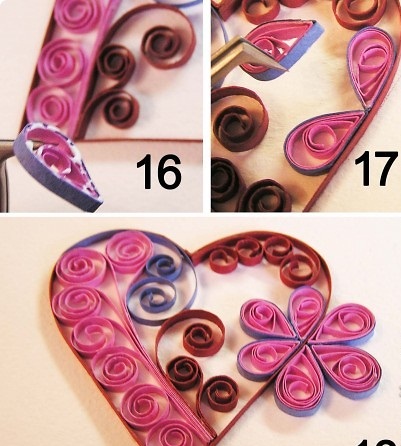

- The resulting flowers are glued in random order inside the frame, filling the entire space.
New Year's card
The traditional quilling technique is ideal for creating New Year's decor and decorating greeting cards.
To create a simple New Year's card you will need the following materials:
- a sheet of cardboard of white or any pastel color;
- 15 green drop-shaped elements;
- 5 brown drops;
- 10 pearl beads;
- stars made of shiny cardboard.
Progress of work:
- On a sheet of paper, draw a sketch of a triangular tree with a rectangular trunk.
- The sketch is placed on a cork board and a Christmas tree figure is formed. Its bottom row consists of five drops, located with the sharp part upwards. Each subsequent row is reduced by one detail.
- The trunk consists of two rows of elements. I attach one brown drop to the middle part of the lower tier of the crown on both sides. Three similar parts are placed in the next row. All the elements are glued together and the figure is allowed to dry.
- The cardboard sheet is folded in half. A Christmas tree figure is glued to the center of the front side.
- The crown of the tree is decorated with beads, and a shiny cardboard star is glued to the top.
- Several of the same stars are placed on the surface of the postcard.
Paintings
Pictures made using the quilling technique are a fascinating activity that is suitable for people of any age and level of training. The plot of such pictures can be devoted to various topics. With children, you can make a picture “Goldfish”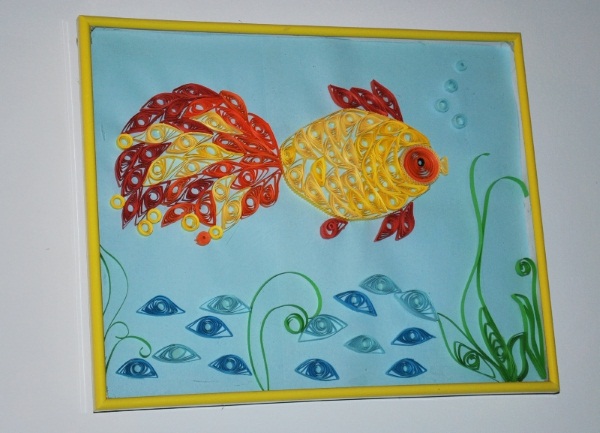
Materials:
- a sheet of blue cardboard of A4 format;
- blue and blue elements in the form of a curved eye;
- yellow semicircles and drops;
- orange, red, green curved petals and tight spirals.
Progress of work:
Composing pictures using the traditional quilling technique is similar to composing a mosaic.
- The entire surface of the cardboard sheet is filled with curved blue and light blue petals. The elements are spread as close to each other as possible. The prepared base is left to dry.
- On a separate sheet of paper, draw a sketch of a goldfish with a crown on its head. Place it on the working cork surface and use pins to form a figure from yellow, red and orange elements. The head is made from a large diameter free roll, slightly sharpening it on one side.
- Having assembled the figure, all its elements are carefully glued together.
- The green parts are used to form threads of algae.
- Individual elements of the composition are fixed on a blue background.
Interesting ideas for interior
Quilling for beginners is not limited to decorative crafts.
This technique allows you to create functional interior items:
- candlesticks;
- boxes;
- photo frames;
- candy girls;
- baskets;
- vases.
A small box for small items is a simple interior craft. It consists of tight rolls of different diameters, twisted from strips 0.5 cm wide. A polyethylene lid for jars can be used as a template.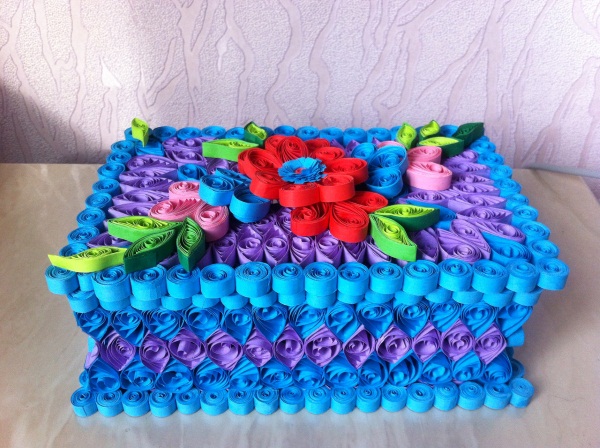
Progress of work:
- Several strips are glued together into a long strip, from which a tight roll is rolled with a diameter equal to the inner size of the template. This part is used as the bottom of the craft.
- One side of the bottom is well coated with glue and left to dry.
- The walls of the box are made using a template. Details of two contrasting colors are laid out along the inner diameter of the template, forming the first ring.
- The parts of the second ring are laid with an offset, placing the middle of the roll at the junction of the elements of the previous row.
- Five more levels are formed using the same principle. The wall of the box is left to dry.
- The lid is made by laying out the round elements in alternating rows of different colors. The lid is covered with glue and a row of elements is laid out on top of the second ring of the lid.
- The bottom and walls are connected using glue.
- The main part of the product and the lid are covered with aerosol varnish.
What else can be made from quilling?
Using the quilling technique, you can make original jewelry and accessories. Beginner craftsmen can easily make a small New Year's crown for a girl.
- The production of the crown begins with the creation of a sketch of the product, which consists of a rim and 5 identical segments.
- In accordance with the sketch, the required number of elements (drop, eye, s and v elements, loose spirals, tight rolls) are prepared. The color of the parts is selected in accordance with the author's idea.
- The child's head is measured and a ring template of the appropriate size is made.
- Using a template, form a rim consisting of free spirals, which are laid out in three rows. The inner part is glued for reliability.
- According to the sketch, five segments are formed and glued on one side.
- After all the components have dried, assembly begins. The segments are glued together in a fan shape, securing them with paper clips while they dry.
- The rim and the top are connected with glue and secured with pins.
- The dried product is covered with varnish, after which the fixing pins are removed.
Quilling is interesting for both beginners and those who have been into handicrafts for a long time. Beginners should rely on step-by-step instructions and photos of products.
Article formatting: Vladimir the Great
Video about quilling crafts
Basic elements of quilling: