Surveys were conducted in handicraft magazines, during which it was found that snowflakes occupy a leading position as New Year's decorations. Crocheted items are especially popular because, in addition to decoration, they can be functional. To create such a snowflake, you need a special pattern and description for it.
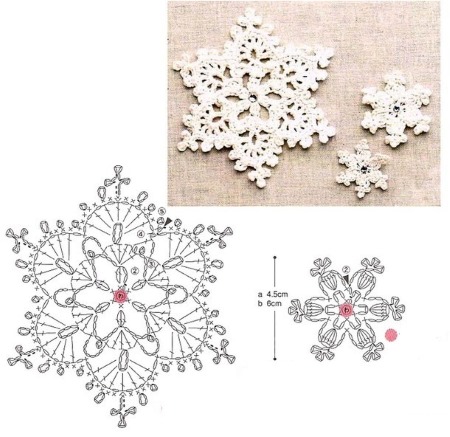
Little snowflake crochet for Christmas tree
To decorate the New Year tree, you can knit several simple but beautiful snowflakes, using the same pattern.
Step by step instructions:
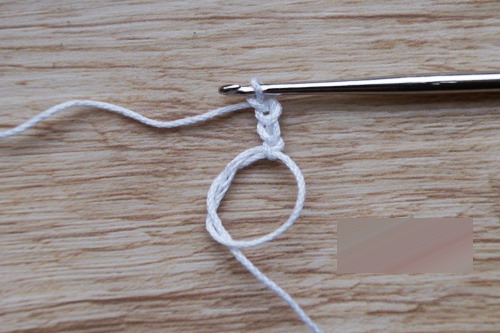
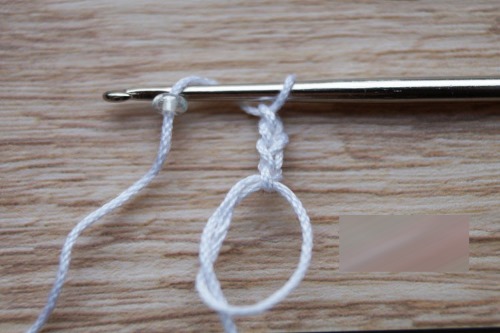
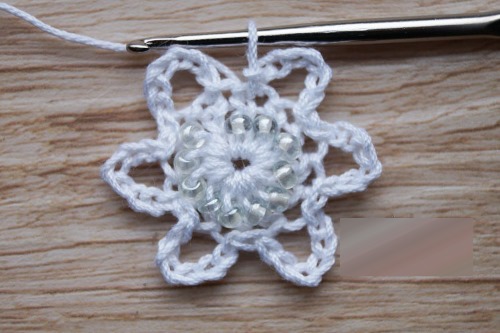
- You need to make the first loop with a knot.
- Make 2 air loops through it.
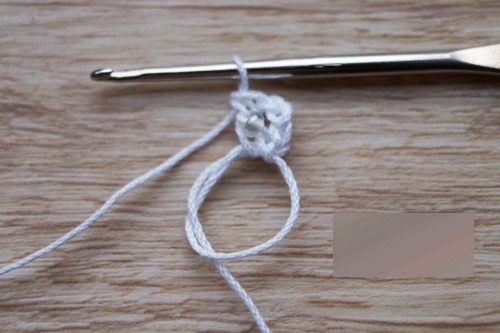
- You need to make 11 stitches with a throw through the first ring.
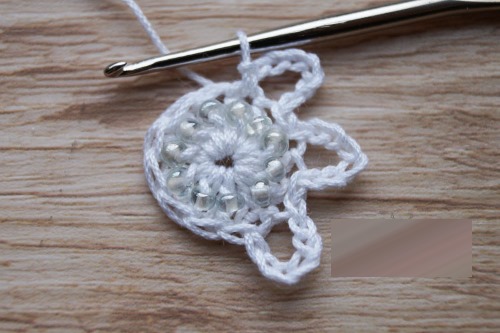
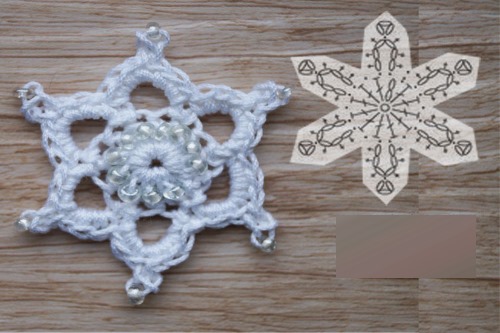
- The ring is tightened, the columns are connected in a circle using a chain stitch. The base of the small snowflake is ready. Now you need to add a few rays. They will resemble a star in shape. You need to design 6 such ends in a similar way.
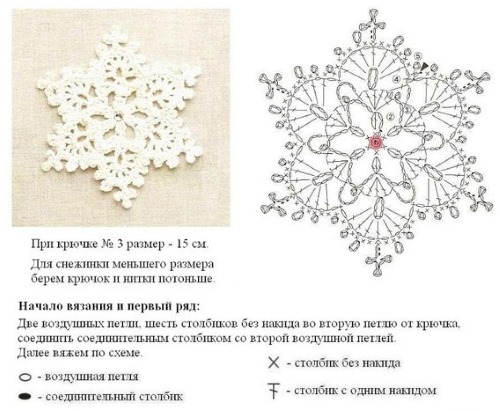
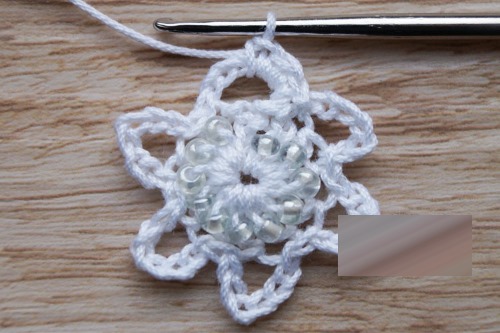
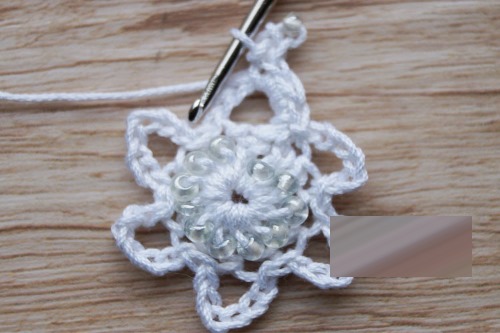
- After connecting, 3 air loops are made.
- Then the same amount is collected again.
- Now you need to go down to the last loop made in step 5 and insert the hook into it. This technique is called "pico". It is necessary to create a small loop at the end of the beam.
- After the picot, 3 new air loops are collected.
- On a round base, one column is skipped and a hook is inserted. The beam and the circle are connected.
- To finish knitting the ends of the snowflake, repeat steps 5 through 9.
When 6 rays are ready, knitting is completed with a connecting column. The thread is passed through it again, a loop is pulled out, the length of which is enough to hang the snowflake on a branch of the tree. The loop is fixed with a knot, the excess thread is cut off. It remains to steam the product with an iron and the New Year's decoration can be considered ready.
This work takes about 4 minutes. Therefore, you can quickly make several snowflakes at once to decorate the New Year tree, make a garland or sew them to the edges of the tablecloth.
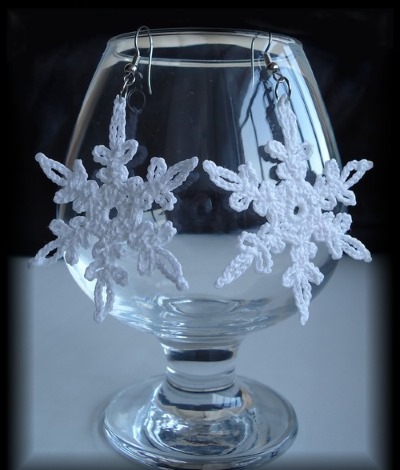
For earrings
Crocheting snowflakes, the patterns for which are presented below, will not take much time, but will require accuracy. To create crocheted decorations, you need thin threads and a hook of number 1 or 2.
Option #1:
- Make 6 air loops, closing them into a ring.
- After the connecting column, 4 air loops are collected, the final, 5th, becomes the connecting one. This is the rise to the second row.
- 2 air loops are knitted, the 3rd becomes a column with one yarn over, which will be connected to the bottom line of knitting.
- Point #3 is duplicated. Air loops, column with yarn over, loops.
- The lower and upper lines will be connected by a column with 2 yarn overs. Then knit an alternation of 2 air loops and columns with one yarn over, 2 times. After every 2 columns with 1 yarn over, a column with 2 yarn overs follows through 2 air loops. As a result, in the second line there should be 6 columns with 1 yarn over and 2 columns with two.
- To start knitting the 3rd row, you will need to make 9 air loops.
- Now they are wrapped in a ring and a column with 1 yarn over is knitted, which should connect the 2nd and 3rd lines. The hook is inserted into the place where the 2nd line connects.
- You need to knit 3 more of these columns without skipping loops in the 2nd row.
- One lower loop is skipped, a column with a yarn over is knitted, a loop is skipped again and new columns are started. You need to make 4 columns with 1 yarn over.
- Cast on 6 air loops.
- The hook is inserted into the loop where the last column was knitted and a new one is knitted. They should come out from one point.
- 3 columns are added with throwing.
- Again, skip 1 bottom loop, knit a column with a yarn over, skip a loop, and then a column again.
- Now you need to repeat steps 8 through 9 until the ring of the 3rd row is closed.
- The 4th row begins where the 2nd began. In the loops where there are 9 air columns, you need to count from the beginning of the 3rd and insert the hook into it.
- Make 1 air loop, then a half-column.
- The next one is a half-column with a throw.
- Now knit a column with 1 yarn over.
- Next comes a column with 2 throws.
- Make 3 air loops. Do not skip anything at the bottom.
- Again a column with 2 throws, with 1, a half column with a throw, a simple half column.
- Make 2 chain stitches and a 2 yarn over column that will join to the bottom yarn over column.
- Again, a chain stitch is made and a column with 2 yarns overs, coming out from the same point as the previous one. From this point, 2 more of the same elements come out, alternating through a chain stitch. In the middle, you can make a small arc of chain stitches to mark the place for attaching the fastener.
- Now knit 2 air loops.
- Repeat steps 17 through 24 until the row is complete.
- The final stage of knitting will be the connecting column.
All that remains is to steam or starch the snowflake and attach a clasp in the form of a thin hook. One snowflake earring is ready, the second one is knitted according to the same pattern.
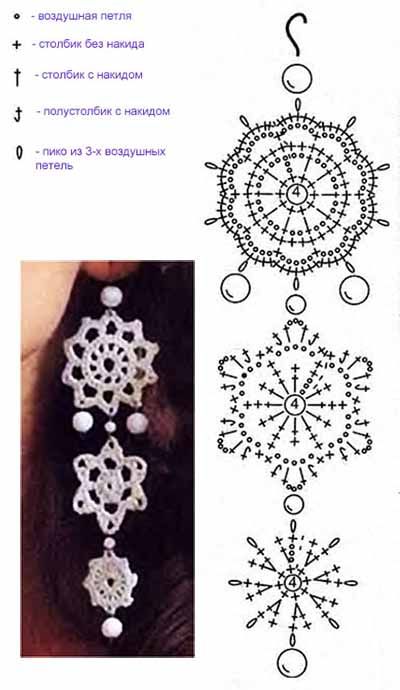
Option No. 2 - you can make hanging earrings. To do this, you will need to knit 2 snowflakes according to 1 pattern and 2 according to the description from the previous heading. You need to connect them together using a connecting column. The larger snowflake should be on top, the small one below.
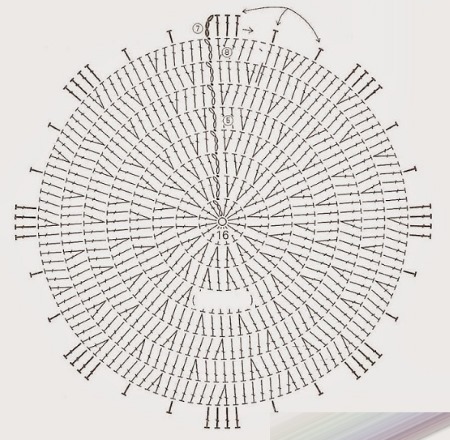
Hexagonal
How to crochet a snowflake with 6 corners:
- A ring with a knot is made.
- Then 3 air stitches are collected.
- 2 yarn over stitches are knitted through the ring.
- An arch is made from 3 air loops.
- Again, 2 columns with a yarn over are knitted. In the 1st row there should be 6 arcs and 11 columns with a yarn over. When the row is ready. The ring is tightened, the row is finished with a connecting column.
- The 2nd row begins with 1 air loop. Now 2 crossed columns with a yarn over are knitted, between which you need to make 5 air loops, without skipping the lower loop.
- After the second column, an arch of 4 air loops is knitted. 3 loops of the bottom row should remain skipped under it.
- Again, 2 crossed stitches are knitted with a yarn over, with a loop between them.
- Steps 6 through 8 are repeated until the row is complete.
- The 3rd row begins with a set of 3 air loops and knitting a column with 2 yarn overs coming out from one point.
- Knit 2 air loops.
- Now you need to insert the hook into the 2nd loop of the lower arch and knit crossed columns with a yarn over there. They should occupy the 2nd and 3rd arched loop, that is, be in the middle.
- You need to make 2 air loops again.
- At the bottom, 2 loops are skipped. 2 columns with yarn overs are cut in, which enter the top point of the small air arc.
- Knit 3 new air loops.
- Again, you need to make 2 columns with a yarn over, which will come out of the same loop where the previous ones come out.
- Steps 10 through 15 are repeated until the row is complete.
- The 4th row begins with 2 crossed columns, over which you need to make an arch of 5 air loops, wrapping it into a ring.
- Next, 3 air loops are knitted, which also take the shape of a ring.
- Two new air loops are collected and the crossed column is knitted again. This continues until the end of the row.
The crocheted hexagonal snowflake is obtained as shown in the diagram.
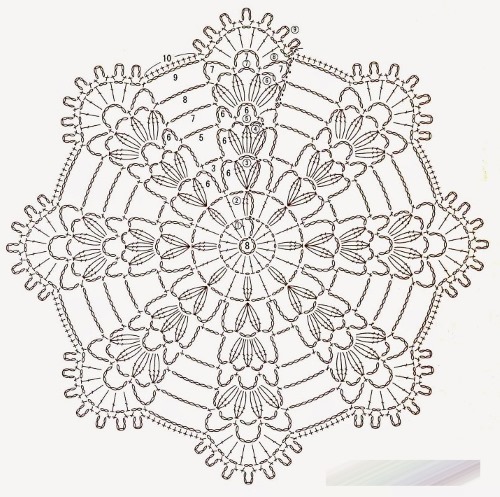
Openwork
To knit an openwork snowflake, you need:
- Make a ring with a knot and make 3 air loops.
- Make 11 stitches with a yarn over through the ring, replacing them every 1 air loop.
- Finish the row with a slip stitch.
- The 2nd row begins with a set of 5 air loops. From them you need to form an arch by inserting the hook into the air loop of the bottom row.
- It is necessary to make 12 arcs in this way, until the completion of the 2nd row.
- The 3rd row starts with 3 connecting columns that rise to the top of the first arch. From here you need to make 5 air loops and make an arch. It will be attached in the middle of the lower arch, that is, on the 3rd loop from its beginning.
- 12 arcs are knitted in a circle with a similar connection. They should be staggered in relation to the bottom line.
- When knitting the 4th row, it is necessary to knit arcs of 6 loops. All connections remain identical to the previous point.
- The next row is knitted with arches of 8 loops and the last row as well. But after each of the 4 loops you need to pick up 3 more and wrap them into a ring. Then continue knitting and connecting the arcs. In other words, on the last row above each arch there should be a small loop.
The result is a simple, beautiful snowflake with an openwork pattern.
Volumetric
Crochet snowflakes, the patterns of which are described below, are considered to be of medium difficulty level. Here, snowflakes are given volume, which will become even more magnificent if you take thick yarn and a thin hook.
Step by step instructions:
- A tightening loop is made and 5 loops are cast on.
- A column with a throw is made through this ring.
- Alternate 2 chain stitches and 1 column with a yarn over until the end of the row. You should have 6 columns.
- The sliding loop is tightened. A normal connection is made.
- Now work a single crochet, then 3 double crochets with 1 yarn over and a regular crochet. The crochet should go under the line at the bottom. Continue until the row is complete.
- The 3rd line starts with a connecting loop, after which 3 air loops are collected.
- They need to be placed behind the resulting petals, making a connecting column between them. This action needs to be repeated 5 times, each time picking up new loops.
- The 4th row is knitted under the formed arch. First, a column without a yarn over is made, then a simple loop, and then a column with a yarn over. Then another loop is knitted, 3 columns with 2 yarn overs, alternating through an air loop, and again a column with 1 yarn over and without it. The entire line must be processed in this way.
- The 5th row begins with a connecting loop. Then 8 air loops are collected, inserted into the center of the petal obtained when knitting the 4th row.
- 3 air loops are collected and wrapped in a picot.
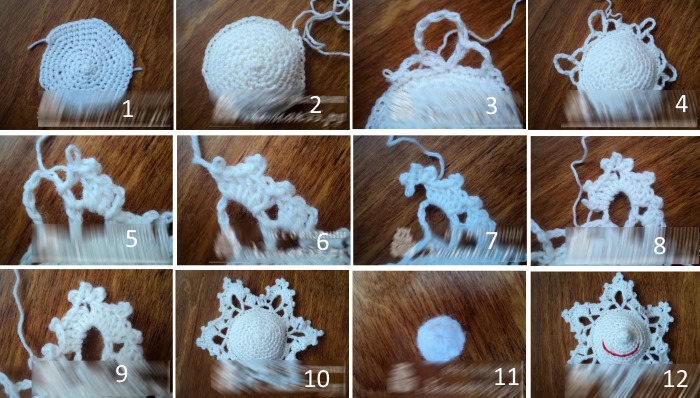
- Then you need to make a picot of 5 loops, and after that of 3. This will be the top corner of the snowflake.
- A slip stitch is knitted. The hook is inserted into the point where the first picot began.
- Again, 8 air loops are collected and the knitting of 3 picots on each top is repeated.
The snowflake gains volume due to the thickness of the threads and multi-layering. Its center will protrude outward.
Two-tone
To make a snowflake in 2 colors, you will need blue and purple yarn:
- First you need to make a ring with a knot, make 3 loops from a blue thread.
- Knitting the 1st row should begin with 2 columns with a yarn over, after which a thread of 3 air loops is made.
- The yarn over columns and the arc are knitted again. There will be 6 arcs in total.
- The second row begins with a connecting column and knitting 3 columns with a yarn over through the arc. 5 new loops are collected and 3 columns with a yarn over are knitted. Repeat the actions until the end of the line.
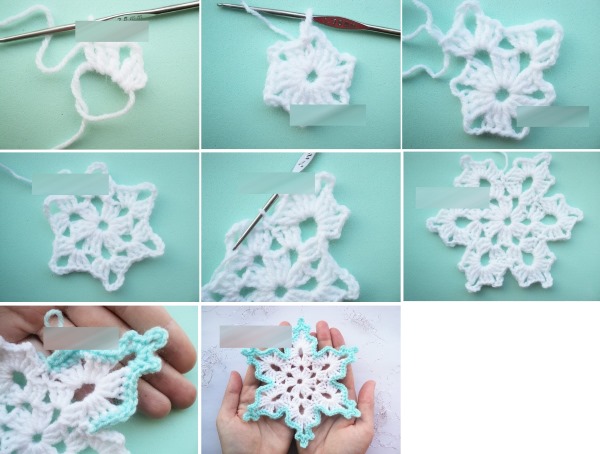
- A new row begins with knitting arcs with 3 loops and 2 columns with a yarn over.
- You need to create a long arc of 5 air loops. Then make 3 columns with a yarn over, alternating with 3 air loops.
- All rays of the snowflake are processed in this way. At the end, the thread is tightened with a knot, the excess is cut off.
- Now you will need a purple thread. Twist the loop with the knot and insert the hook where the blue thread ends.
- The snowflake is tied along the edge with columns without throwing. Reaching the top point of the beam, you need to make 3 air loops, wrap them in a picot and continue tying.
The two-color snowflake is ready.
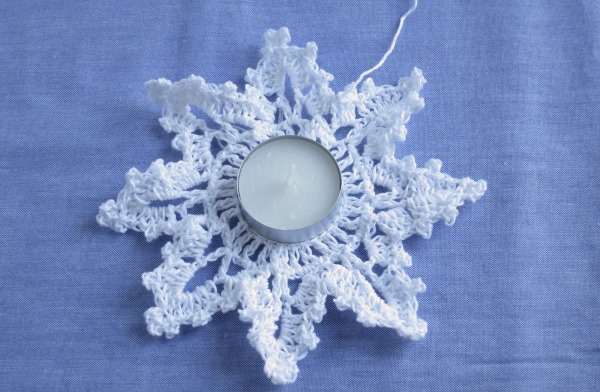
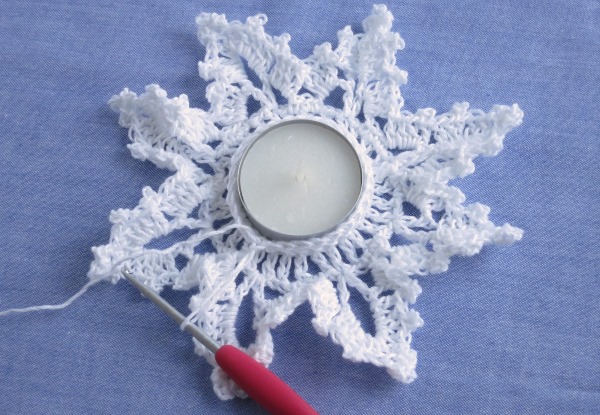
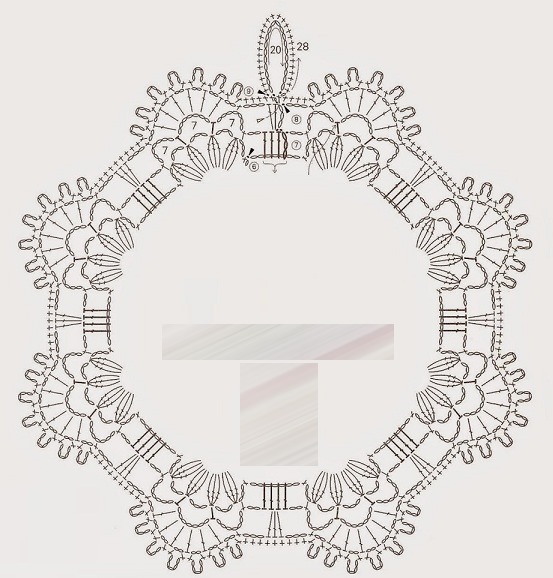
Snowflake Candlestick and Snowflake Stand
Crocheting snowflakes, the patterns of which are presented below, should begin with measuring the diameter of the candle sleeve. If you plan to knit a candlestick, then first of all, the candle is tied with regular columns without throwing. When knitting a stand, the place of the candlestick can be replaced with a pattern of alternating columns with throwing and air arcs.
Step by step description of snowflake candlestick:
- When the sleeve is tied, you can start creating the pattern. From the center to the base of the snowflake, you need to make 2 loop increases to expand the circle. The candle is tied in a circle with columns with 2 throws.
- The 2nd row is knitted with single crochet stitches.
- The 3rd and 4th rows should be knitted with crossed columns with 1 yarn over.

- Next, start creating the 5th line. First, make 3 crossed columns. Then pick up 3 air loops. Skip 3 loops from the bottom and knit a column with 2 yarn overs. Pick up 9 air loops, then knit a column with 2 yarn overs again, inserting the hook into the same loop from which the previous column came out. This is how you need to finish this line.
- A new row begins with a connecting loop, after which 3 air loops are collected.
- Each ray of the snowflake is tied with columns with 2 yarns. First, 4 columns are knitted. 1 loop is skipped from the bottom. I collect 3 new ones and insert them into the picot.
- Next, knit 3 columns and the same picot.
- One of the 3 new columns starts in the same place as the previous one. This time you need to make 3 picots, each of which has 3 air loops.
- The second part of the beam is finished by performing the reverse actions from point 7 to 5. You need to tie all the beams of the snowflake.
The snowflake candlestick is ready. It remains to starch it. To maintain the correct shape. If a hot stand was made according to this scheme, then after each wash the starching process will need to be repeated.
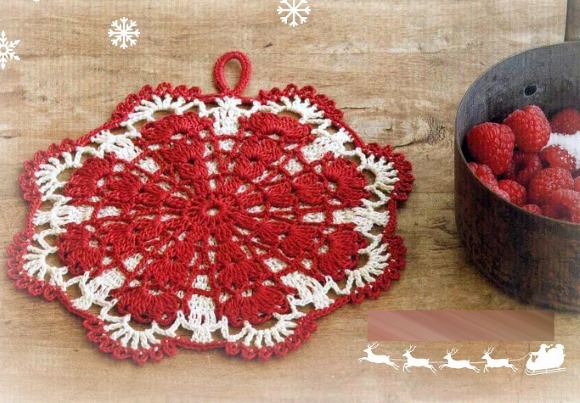
Snowflake shaped potholder
To knit a snowflake potholder, you will need thick yarn in 2 colors and a suitable hook.
Procedure:
- Make a slip stitch, make 3 chain stitches.
- Finish the row by alternating 3 dc and a 4 ch arch.
- Tighten the slip loop, connect the 1st row.
- 2nd row start with connecting columns leading to the beginning of the arc. Make 4 columns through it with 2 yarn overs.
- Make 6 air loops and the next arch. Repeat the actions until the end of the row.
- In the 3rd row, repeat step #5, adding 1 new column and 2 air loops.
- In the 4th row, you need to knit 6 columns with 2 yarn overs through the arch. Through the first 3 columns, you need to make an arch of 6 air loops. Finish the entire row in this way.
- The last row is knitted around the edges of the snowflake using single crochet stitches.
- Now you need to change the color of the thread and tie the entire snowflake with columns with 1 yarn over. You need to tie 3 such rows. In the last one. At the top of one of the 6 rays of the snowflake, you need to make an arch of 12 air loops. This will be a loop for hanging the grab on the hook.
The final step is to iron the potholder.
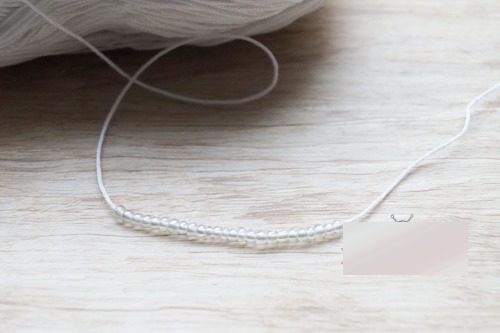
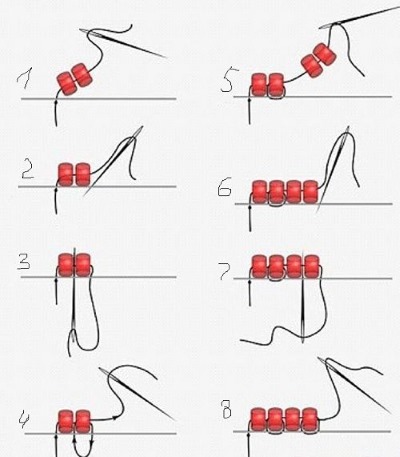
How to decorate snowflakes with beads
Decorating knitted snowflakes with beads or seed beads can be done in 3 ways.
Option #1
During the knitting process, beads will act as a lift to the next row.
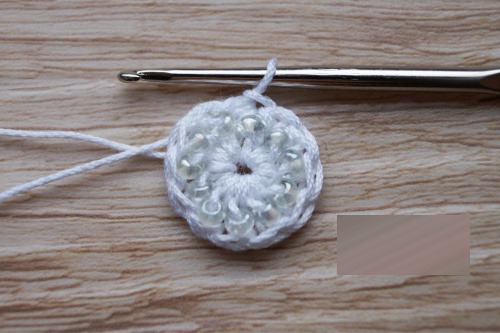
As an example, below is a fragment of the description of the snowflake pattern with beads:
- Make 12 chain stitches and place them into the ring.
- Create a chain stitch, then work 11 single crochet stitches through the center.
- Finish the row with a slip stitch, which should be pulled longer than usual.
- Thread a pearl-colored bead onto the loop. Hook the thread and make 1 chain stitch.
How to knit a snowflake with beads:
- Place the required number of beads on the thread and make a ring.
- Make columns without yarn overs, passing the thread between the beads.
- When knitting each new row, replace the air loops in the arches with the same number of beads.
This method of decoration is considered one of the most reliable. The beads become part of the finished snowflake and the probability of losing the decoration is reduced to zero.
Option #2
The second way to decorate snowflakes with beads is to sew them onto the product.
How to do it correctly:
- Select a thread that matches the color of the product.
- Using a thin needle, place the required number of beads on the thread and make a stitch.
- The needle must be inserted into the hole in the loop, placing the connection behind it.
If you need to add one small bead in certain places, it is better to use the 3rd method.
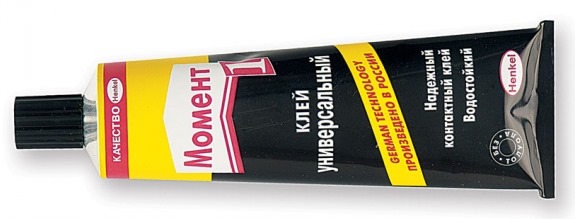
Option #3
Individual beads can be glued using hot glue or Moment:
- A small drop of glue is applied to a specific area.
- The beads are carefully applied with tweezers.
- The bead must be fixed until the glue is completely dry.
It is most convenient to start decorating snowflakes after starching.
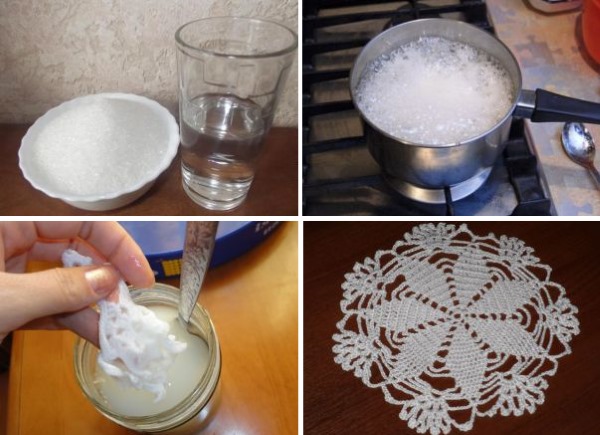
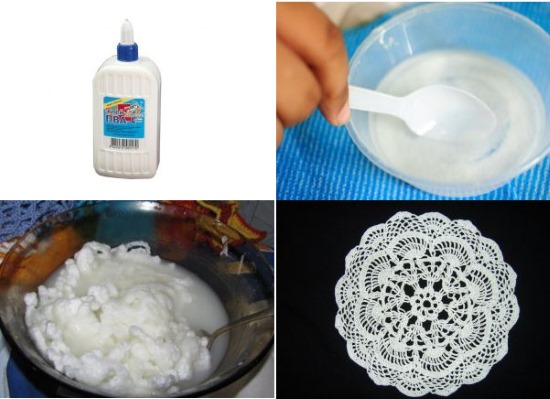
How to Starch Snowflakes
Crocheting snowflakes, the patterns of which were presented above, is completed with a special procedure that helps the product keep the correct shape.
How to properly starch knitted snowflakes:
- Dissolve 1 tbsp. potato or rice starch in 500 ml of warm water.
- Place the container in a water bath. Stir until the mixture begins to thicken.
- Remove the solution from heat and cool to 40 degrees.
- Dip the product so that it is completely saturated with the mixture.
- Remove and squeeze the snowflake, then straighten it out and leave it to dry on the table surface.
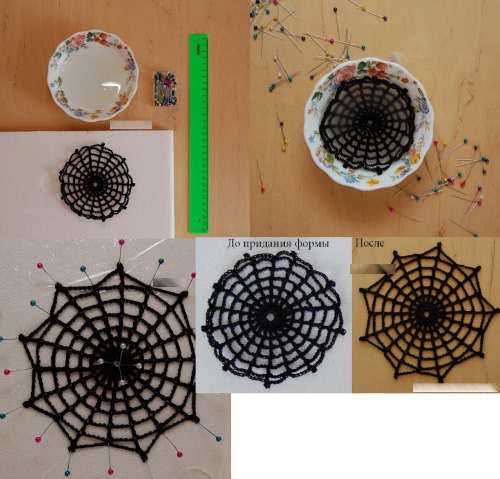
There are several other ways to add hardness to the product. If the snowflake was knitted from colored yarn, the starch particles will remain visible. The table below lists the ingredients for strengthening mixtures that are suitable for white or colored snowflakes.
| Whites | Salt, starch, PVA glue, milk |
| Colored | Sugar, gelatin, egg white, chemical special agents |
If the snowflake is shaped from thin threads with an openwork pattern, then it is straightened out on a cork board, securing the pattern with pins.
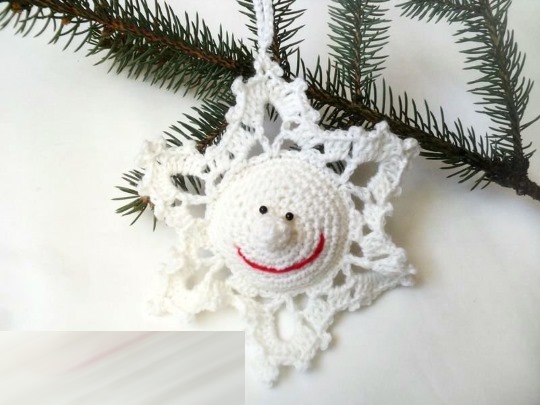
Due to their unusual appearance, versatile functionality and practicality, crocheted snowflakes are popular. It is impossible to break the products or hurt yourself on them. Such decorations are suitable for families with small children. In addition to these advantages, scientists have proven that knitting such patterns according to patterns calms the nerves.
Article formatting:Natalie Podolskaya
Video about knitting snowflakes
Crochet snowflakes - patterns in this video: