A knitting pattern helps to represent a drawing in the form of certain graphic symbols. It is very important to know how loops are designated when knitting with knitting needles on patterns in order to understand how to knit a particular pattern. In addition, pattern compilers can make mistakes, so correct reading of diagrams allows you to detect possible errors.
How to read knitting patterns
The basis of the patterns in the schemes is the repetition of rows vertically and horizontally. The pattern that will decorate the finished product depends on how the rows are repeated.
The knitting pattern consists of cells, each of which has 1 loop. The cells arranged horizontally make up 1 row. Using this row, you can calculate how many loops you need to cast on. The number of rows that make up the pattern is determined by the repeating cells vertically.
The designation of loops when knitting with knitting needles on the charts is presented directly next to the chart itself. The pattern is read from the lower cells, knitting is done in the upward and left direction. For this reason, when reading the knitting chart, you should read the symbols on the chart from the lower corner on the right side of the chart. Row 1 is read from right to left and is called the front row. It should be knitted from the front side of the product.
After knitting this row, you need to turn the work to the wrong side to knit the next row. It will be considered a purl and, accordingly, will be knitted from the wrong side. The way to read the 2nd row is different from how the 1st row is read: the purl rows are read from left to right. The rows on the wrong side of the work are also considered even, while the rows on the right side are odd. All even rows are read from left to right, and odd ones - from right to left.
The vertical columns of numbers printed near the graphic diagram indicate the row numbers. They are most often on the right side of the diagram. However, in Japanese magazines, the rows may be numbered on the left. Another system of arranging the row numbers is where the odd row numbers are on the right and the even row numbers are on the left.
The numbers placed horizontally are the stitch numbers in a row. They are often located at the bottom of the chart. In Japanese knitting chart magazines, stitches may be numbered from left to right.
The designation of loops when knitting with knitting needles on the diagrams is distributed by cells: one cell - one loop. All symbols presented on the diagram show the front side of the product. The diagram usually shows the full pattern, so you can see all the loops that need to be knitted. However, the authors of magazines have different designations of loops, so it is important to read the designations located next to the diagram before starting knitting.
Before you start knitting, you should study the list of symbols, since there is no single list with loop symbols. In some magazines, authors may provide illustrations of how to knit certain loops in a product. In particular, this practice is common in Japanese magazines.
In a large part of the diagrams, the edge loops (the 1st and last loops in a row) are not shown. Although they are not shown in the graphic diagram, they can be seen in the legend.
Some patterns do not show even rows; this means that only the front rows are shown. Even, back rows, must be knitted according to the pattern. There are also patterns where you can see the words "no loop". Graphically, it can be indicated by an empty cell. When knitting according to a pattern with empty cells, you should not pay attention to these places, they must simply be skipped. Approaching such a cell, you must knit the next cell, not paying attention to the skip.
The following example shows a case of a pattern in which only rows with front loops are printed.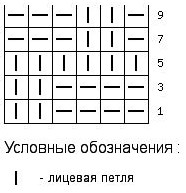
According to this pattern, row 1 should be knitted according to the pattern presented. It is necessary to remove the edge loop, knit 4 purl loops, and 2 - face loops. It is necessary to turn the work to the wrong side, remove the edge loop, 2 purl and 4 face loops. The row ends with an edge loop. Row 3 is knitted according to the same pattern.
In row all loops are front loops, and in row 6 – back loops. In row 7 you should remove the edge loop, knit 1 back loop, 2 front loops, 3 back loops, and finish it with an edge loop. In row 8, the loops are knitted according to the following pattern: edge loop, 3 front loops, 2 back loops, 1 front loop, edge loop.
To avoid difficulties when reading the pattern, you can put a ruler on it. To highlight the row where the needlewoman stopped, you can place something square on the pattern, for example, a sheet of paper or a map. By placing a ruler above the line of the pattern, you can see what has already been knitted.
Patterns can be described in several ways:
- Textual listing of methods for knitting loops in rows.
- Graphic representation of the pattern.
The disadvantage of the text method is that the needlewoman does not have the opportunity to get a visual representation of the pattern. The text method is also inconvenient because the description of large patterns will be quite cumbersome.
Thus, a text description of even a small scheme can take up more than one line, while the scheme will not take up much space on a magazine page. It is also much easier to perceive.
The concept of rapport
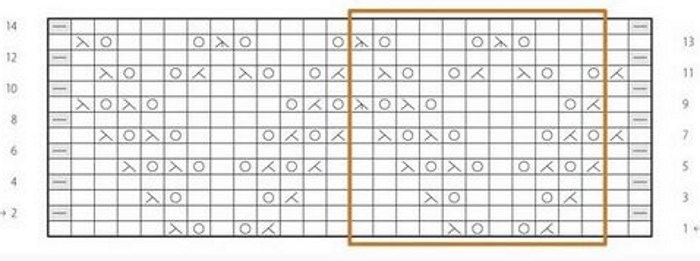
The designation of loops when knitting with knitting needles on the patterns is associated with such a term as rapport. This concept denotes an element that consists of a certain number of rows and loops. Rapport is a part of the pattern that should be repeated to knit the product completely. There are several ways to highlight a separate rapport on the pattern. It can be highlighted with a figure of a contrasting color, as in the picture below, or indicated by arrows. They are located under the lowest rows of the pattern.
The patterns on which the rapport has been highlighted should be knitted as follows:
- Knit stitches until pattern repeats.
- Repeat the rapport the required number of times.
- Knit stitches after the pattern rapport.
In the picture below, the pattern repeat that makes up the pattern is highlighted in orange.
If the rapport on the chart is not highlighted in any way, the entire chart is considered a rapport, so after the last loop is knitted, you should return to the beginning of the chart.
Rapport can be divided into 2 types:
- Horizontal – a certain number of repetitions of one fragment of the pattern in width. In the designations to the scheme, it is signed as "rapport". In some cases, only the boundaries of the rapport may be indicated. In such schemes, you should independently count the number of loops that make up 1 rapport.
- Vertical – allows you to count the number of rows in height.
Conventional designations of loops on knitting patterns
Designation of loops when knitting with knitting needles on the diagrams helps to knit both simple and complex patterns. In some magazines with diagrams, graphic diagrams are accompanied by text descriptions. Lines with text will allow beginner needlewomen to understand how to knit this or that loop.
Those who are just starting to knit need to remember the designations of the main loops: purl and front. The front loop can be designated by a vertical line, and the back loop - by a horizontal one. When knitting a front loop, the working thread is behind the work. To knit a front loop, you need to pass the right knitting needle from left to right into the loop that is on the left knitting needle. Grab the thread from the index finger, pass it through the loop, throw the formed loop onto the right knitting needle.
When knitting a row on the wrong side, the thread should be placed in front of the product. To form a purl loop, insert the right knitting needle into the loop from right to left and wrap the needle with thread. The loop should be pulled through the loop located on the left knitting needle. The formed new loop should be thrown onto the right knitting needle.
Another popular type of stitch is the yarn over. In many patterns, it can be indicated by a circle. To make a yarn over, you need to throw the yarn over the right knitting needle before knitting the next stitch in the front row. This step will help form an additional stitch. Then, in the back row, the yarn over is knitted as a purl stitch.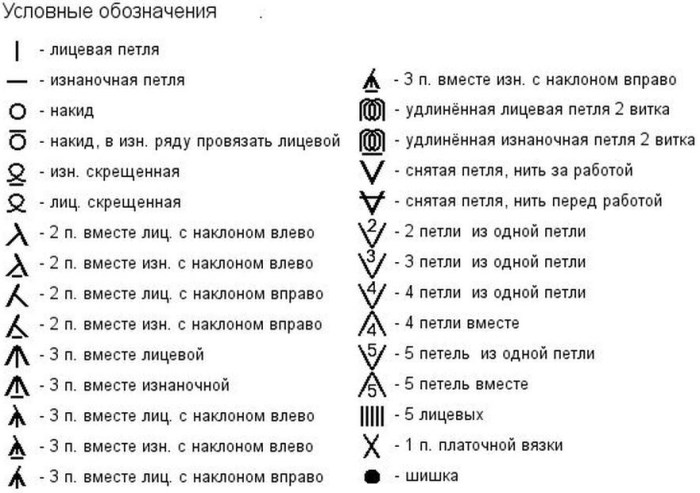
Also widespread are:
- Crossed front loop;
- Crossed purl stitch.
To form new patterns, the sequence of loops can be changed. To display this on the chart, separate symbols were invented. Both front and back loops can be shifted to the right and left. To depict front loops shifted to the right in the cells, a diagonal line is printed on the chart, going from the left to the right corner of the cell. In the opposite direction, a line is drawn, demonstrating the shift of loops to the left.
To demonstrate the shift of purl loops to the left and right sides, chart designers introduce small lines. Thus, a purl loop shifted to the right side is depicted using a diagonal line directed to the right and a small line that is drawn on the lower edge of the cell on the right side. The difference in the image of a loop shifted to the left is that the line is printed on the lower edge of the cell on the left. The diagonal line is directed to the left side.
The table below shows the designations of some loops found in knitting magazines.
| Graphic symbol of a loop | Purpose of the loop | How to knit a loop? |
| 2 loops together knitwise with a right tilt | Knit 2 loops as if they were knits through the front walls. The right needle should be inserted from left to right into loop 2, and then into loop 1. As a result, loop 2 will be above loop 1 and tilted to the right. | |
| 2 purl stitches with a left tilt | Knit 2 purl stitches together, hooking them under the back walls. To make knitting easier, first turn the stitches over. Insert the right knitting needle into 2 stitches from the back side from left to right, transfer them to the right knitting needle, then move them to the left knitting needle and knit 2 purl stitches. | |
| Closing the loops | The easiest way to close the loops is to knit 2 loops, knit with the transfer of the knitted loop to the left knitting needle. | |
| 3 loops leaving the central loop in the middle | From the side of the 2nd loop, throw 2 loops from the left knitting needle to the right one, without knitting the working thread. Knit the 3rd loop as a face. After inserting the left knitting needle into the removed loops on the right knitting needle, throw these loops onto the 3rd knitted loop in the direction from right to left. Pull out the loop. | |
| Knitting 3 loops from one | This combination can be knitted in several ways:
| |
| Slip the front loop without knitting | Slip the front stitch without knitting. | |
| Pulling the loop through the second one towards the right | Pull the loops through the second one towards the right. | |
| Braid of 4 loops | One of the most popular patterns among needlewomen. It can be made in 2 versions: with a left tilt and with a right tilt. When knitting with a right tilt, you must follow these instructions:
When knitting a braid with a left tilt, you need to:
|
In the text descriptions of the pattern, also placed in magazines, there are abbreviations related to the knitting process.
Beginning needlewomen should remember the following abbreviations:
- P. – loop;
- R. – row;
- Lic. – front;
- Purl – purl;
- Aux. – auxiliary;
- Corresponding – corresponding;
- Next – next.
A knitting pattern helps needlewomen understand how to knit a pattern on a future product. When knitting, it is necessary to correctly decipher all graphic symbols of loops on the patterns to avoid mistakes in the pattern.
Video about symbols in diagrams
What are the symbols used in knitting: