Before knitting the product, you should read knitting symbols knitting needles. They are attached to all items of clothing and decor, and it is very important to decipher them correctly. Tables with loop designations are not only printed in specialized magazines, but also posted on the Internet.
Conventional symbols for knitting
To knit any piece of clothing or decorative item, you must first study the patterns that accompany them. The symbols associated with knitting are graphic symbols.
Since a large number of patterns were created, the craftswomen created a system of icons that are accepted all over the world. They help to decipher the pattern and understand how to knit this or that thing. The pattern of the product is made up of cells, each of which is a separate loop in the finished thing. The patterns are accompanied not only by cells, but also by abbreviations.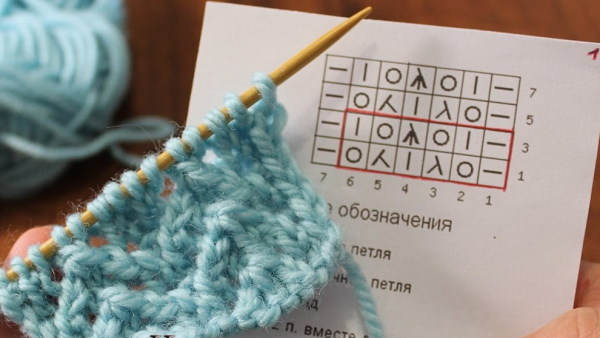
The most common abbreviations are:
- p. = row;
- p. = loop;
- purl = back;
- persons = front;
- purl = back;
- corresponding = appropriate;
- auxiliary = auxiliary;
- next = next
It is important to remember that any patterns are read from the bottom up, and the rows should be read alternating the direction: the first row - from right to left, the second - from left to right, and so on. If some vertical lines in the pattern are highlighted in bold, this means that there is a rapport between them and it should be repeated. A rapport in knitting is a certain number of loops and rows. Loops are counted by width, and an even number of rows is counted by height.
Basic, basic loops
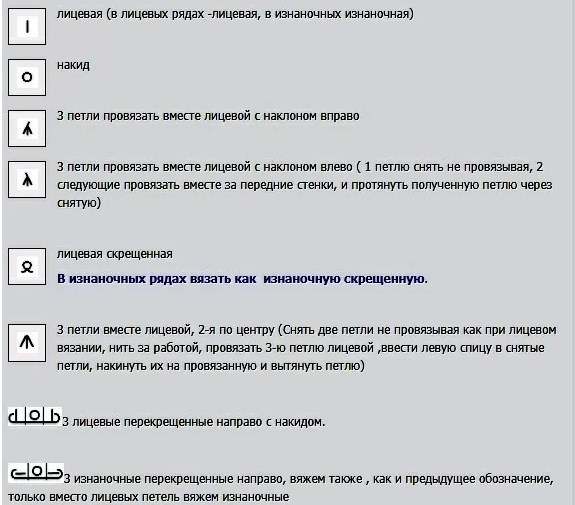
Conventional symbols for knitting begin with the main types of loops: front, back, yarn over. The loop has 2 walls - front and back. Wall 1 is located in front of the needle, and wall 2 is located behind the needle. The essence of all patterns of varying complexity is the alternation and combination of these 3 elements.
On the diagram, the designation of the loops may look like this: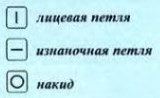
Each of the loops mentioned above is used in certain parts of knitting. Thus, the most common is the front loop, and the back loop is used to emphasize individual parts or to knit the back side of an object. The front loop can be slightly modified: crossed, several knitted loops at the same time, stretched or dropped are distinguished. Yarn over is used if it is necessary to add several loops or knit an openwork pattern.
In stocking and garter knitting, the front loop is most often used. This type of loop also helps to create complex patterns. On the diagram, the loop can be indicated by a line or an empty cell. Horizontal lines on the diagram are the back loop.
The symbol for a purl stitch on the diagram resembles their appearance in a finished product. A yarn over, in turn, is not a full-fledged loop, it is a thread thrown onto a knitting needle, which will subsequently become a loop. The symbol representing a yarn over on the diagram is a circle. This type of loop helps to narrow or widen the product.
Some modifications and complications of the 3 basic loops are presented in the table below:
| Loop designation | Transcript |
| The principle of knitting a loop is similar to that used when knitting a regular front loop. The difference between these two knitting elements is that the right needle is inserted behind the front wall from right to left. | |
| The loop is knitted behind the back wall. It can also be formed by re-slipping the loop, changing the walls, and knitting it as a regular loop. | |
| Knit 2 regular knit stitches with a rightward tilt: insert the needle into the 2nd and 1st stitches, and starting with the 2nd stitch, knit both of them together. | |
| 2 purl stitches are knitted in the same way as 2 front stitches with a rightward tilt. | |
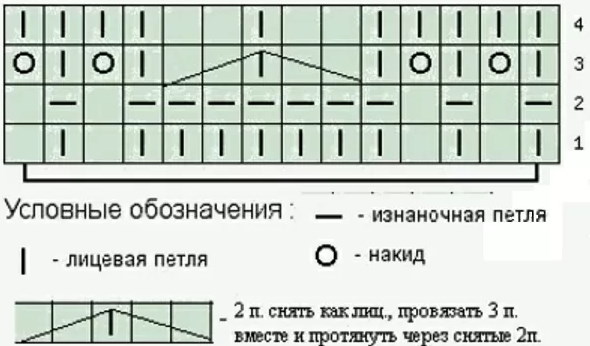
| 2 loops are not knitted as when forming face loops. 3 loop is face. The left needle is inserted into 2 removed loops. These 2 loops are thrown over the 3 loop, which is then pulled out. | |
| Remove 1 stitch using the right needle. Knit stitches 2 and 3. The 3rd stitch should be in front of the 2nd stitch. Place the removed 1 stitch on top of it. | |
| The yarn over can be done in the following ways: by moving the needle away from the needleworker or by moving it towards the needleworker. The most popular way of yarning over is from the needleworker. | |
| Knit a front loop, do not drop the loop from the previous row, make a yarn over, pull out 2 front loops. | |
| Add a knit stitch from the previous row, knit the 2nd stitch of the current row. This symbol on the diagram helps to avoid holes in the fabric. |
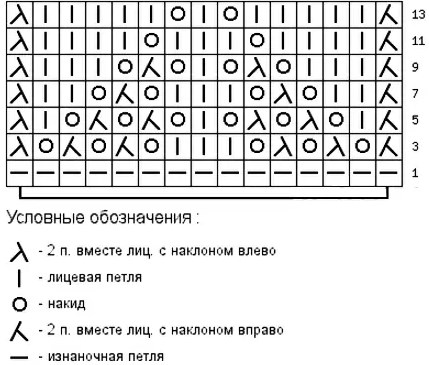
Loops for knitting openwork patterns
Openwork patterns allow you to give the product a neat appearance. Both a beginner and an experienced craftswoman can knit such a pattern. We can highlight several of the most common openwork patterns depending on their complexity.
Using a wavy pattern, you can knit a blanket, bedspread, stoles and shawls. When knitting, you can get a wavy edge by following the following pattern:

Beginner needlewomen will be able to knit shawls, snoods, using such an openwork pattern as horizontal waves. This pattern uses the third type of basic loops - yarn over. The pattern below shows the front loops, the pattern itself in the front and back rows is knitted with purl loops. Other loops in the back row should be designed according to the pattern below. After knitting the back loops, you should knit the yarn overs.
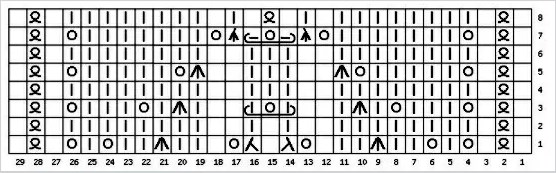
A more complex pattern is a path of leaves. The pattern is found in sweaters, pullovers or along the edge of a blanket. Empty cells in the pattern are purl stitches in the front rows, and front stitches in the back rows. A yarn over and 3 stitches knitted together with a right or left tilt also help create the pattern. A crossed front stitch is knitted in the front rows, and a crossed back stitch is knitted in the back rows. 3 stitches together with a front stitch, knitting 2 in the center.
Openwork waves are used to create children's clothing, women's tops and vests. The pattern diagram should be read from right to left, the front rows are knitted with front loops. Purl rows are knitted according to the diagram below.
A replacement for mesh crocheting is an openwork pattern made of thin yarn with knitting needles. The pattern diagram is quite simple and clear, so even beginners will be able to understand it. Empty cells on the diagram are the absence of loops.
 A simple and popular Japanese pattern – Japanese lace – has a rich history and has long been used in Japan. This pattern is knitted on knitting needles. The pattern is knitted according to a scheme in which the purl rows are shown from the front side.
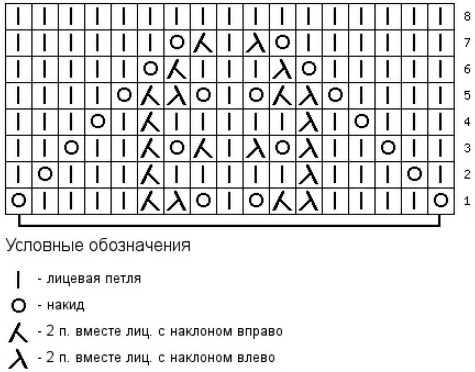
A more complex openwork pattern is mohair leaves made of thin yarn. The diagram shows both front and back rows. Empty cells on the diagram mean that there is no loop in that place.
 A pattern suitable for experienced craftswomen - elongated loops. It gives the finished product airiness, which allows you to knit both summer sweaters and warm scarves. To avoid mistakes, you should carefully follow the knitting pattern.

Other designations
Conventional symbols for knitting allow you to decipher patterns of varying levels of complexity. Thus, by alternating and changing the front loops, you can knit a pattern in the form of cones. It is designated as follows:

From 1 loop knit 3 (front - yarn over - front), turn the product to the wrong side, knit 3 purl loops, turn the work again, knit 3 front loops with each other so that the 2nd loop is located on top. This type of pattern can be knitted from a larger number of loops, for example, from 5. The loops can be with different slopes, with the front surface.
Loops can be moved to the right or left during knitting. Thus, a front loop moved to the left on the front surface can be graphically indicated as follows:
![]()
A front loop thrown in the other direction – to the right – is indicated by this symbol:
![]()
Insert the needle into loop 2 without knitting 1. This loop is knitted as a front loop, and loop 1 is not removed during knitting. Then insert the right needle into loop 1 and knit it as a front loop.
Knitting symbols help to represent many knitting elements in the form of icons. Thus, knitting patterns can show a strand of 3 loops with a left or right tilt. The central loop is located behind the other 2. The icons associated with this element are presented below:
![]() (a cord of loops with a left tilt; the central loop is behind)
(a cord of loops with a left tilt; the central loop is behind)
![]()
(tourniquet tilted to the right; central - behind)
The number of loops that make up a harness can vary – it can be formed by 3, 4, 5, or 8 loops. The symbols can be combined. Thus, a combined harness of 5 loops is designated by the following symbol:
![]()
The loops in the pattern should be changed in the following order:
- Using an additional needle, slip the purl stitch, knit the front stitch crossed, do not knit the purl stitch, but move it to the right needle.
- Remove the central loop, moving it to the right knitting needle, the crossed front loop - to the additional knitting needle. Also do not knit the purl loop, move it to the right knitting needle.
- Slip the front needle from the additional needle to the left one.
- Transfer 3 purl stitches to the left knitting needle. Form the following combination from them: yarn over, 3 knit stitches connected to each other (2 stitches over the rest), yarn over. The combined cord is completed with a knitted crossed knit stitch.
Conventional designations for oriental journals
The advantage of Japanese knitting magazines is the presence of detailed descriptions and patterns. To understand the patterns for models from Japanese magazines, you need to know some features. Thus, a schematic image of the product will allow the reader to understand what part of the garment is being demonstrated. For example, the neckline on the front of the sweater will be longer than on the back. If the item is knitted in a circle, it is depicted as round in the picture.
The knitting direction is shown by arrows. If you knit the main part of the product first and add the binding after that, the arrow on the fabric in the diagram will point upwards. On the binding, the arrow will point in the opposite direction. The name of the part of the product can be read in the center of the diagram. To understand what the size of the finished product will be, you should refer to the text on the side of the diagram. It contains the dimensions in centimeters for the length and width of the item, the number of loops and rows.
Sections with patterns are marked with Latin letters, for example, A, B. The name of the pattern can be found in the text located in the middle of the piece of fabric. Patterns in magazines from Japan also contain a purl row, but it differs in that its loops are depicted as they will look on the front side.
Decoding patterns is more complicated, since when knitting rows it is very important to keep track of which row the craftswoman is on in the knitting process. So, if the process has reached the purl row, the loops should be read differently, as they would look from the wrong side. Thus, the knitting pattern in a Japanese magazine may look like the picture below.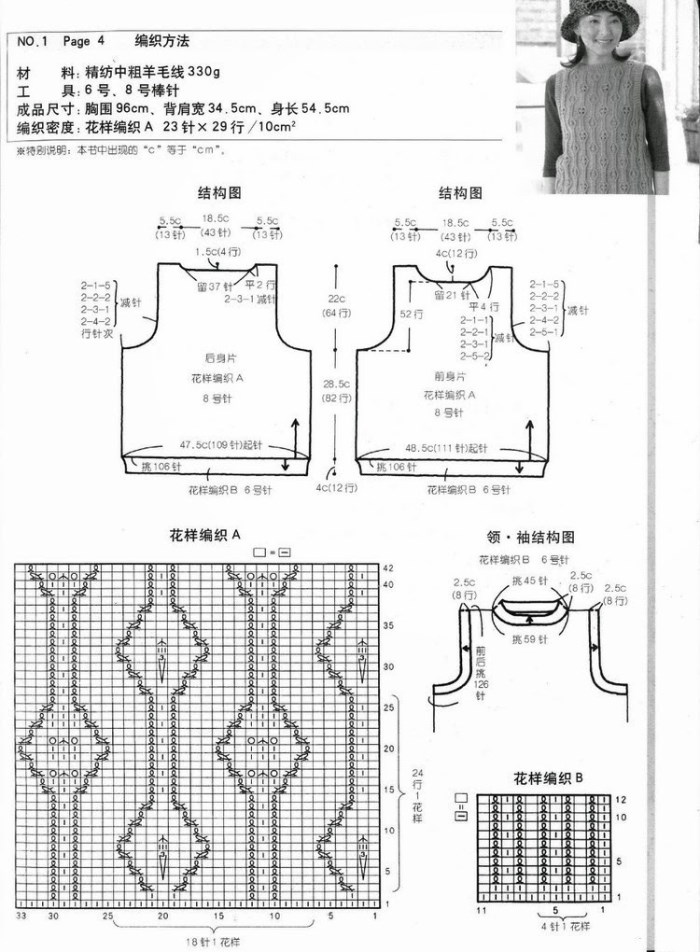
The designations of the main loops (front, back, yarn over) remain the same as on Russian-language resources.
Symbols from German magazines
The knitting symbols in German magazines are partly different from those presented in Asian or Russian-language magazines. For example, a knit stitch is indicated on the diagrams by an empty cell, and a yarn over by a circle. In German knitting magazines, the pattern is described as follows:
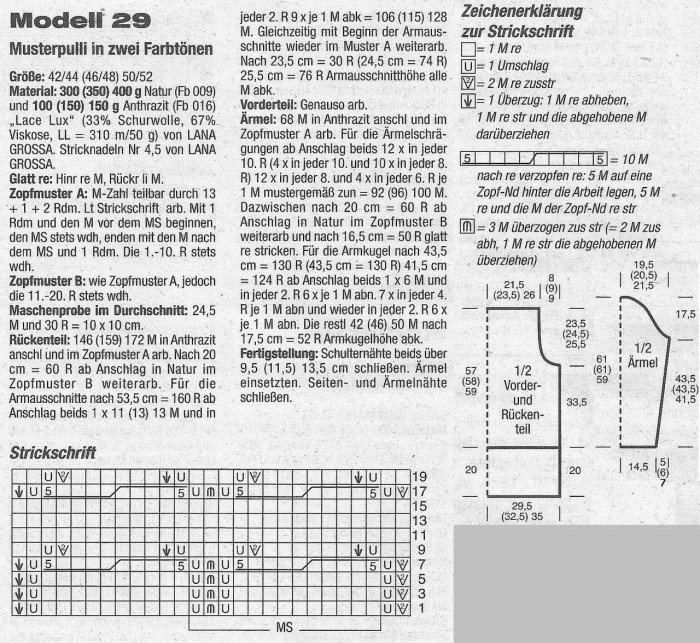
In addition to the knitting pattern, the dimensions of the future item, yarn consumption, and a description of the knitting process for both the back and front of the garment are presented. Individual parts of the item are schematically depicted, all images are signed, so the craftswoman will be able to figure out which part of the item is depicted.
According to this pattern, the front loop is indicated by an empty cell, the yarn over designation resembles a horseshoe. The pattern is formed by crossed loops and knitted together front loops. Not all rows in the pattern are numbered - you can see only odd numbers.
If the product is knitted in a circle, it will be depicted as round, oval. An example of a cape that is knitted in a circle is shown in the image below. Also, for the convenience of readers, the approximate size of the future item, the most suitable yarn, knitting needles are given, the process of assembling the cape is described. All the details are signed, and all the measurements of the garment are also indicated on the schematic drawing. Before starting knitting, it is recommended to make a sample to calculate the knitting density and the number of loops.
It should be noted that in addition to the main types of loops, garter stitch is used in this work. Also, the pattern of the finished product is formed by loops knitted together, yarn over.
Deciphering knitting patterns
Beginners should remember that not all magazines decipher knitting patterns in the same way. To avoid mistakes, always pay attention to the symbols attached to all products. When reading, remember that the front rows are odd, the back rows are numbered with even numbers. If the pattern is more complex, the back rows are written. In this situation, you should strictly follow the knitting pattern and not deviate from it.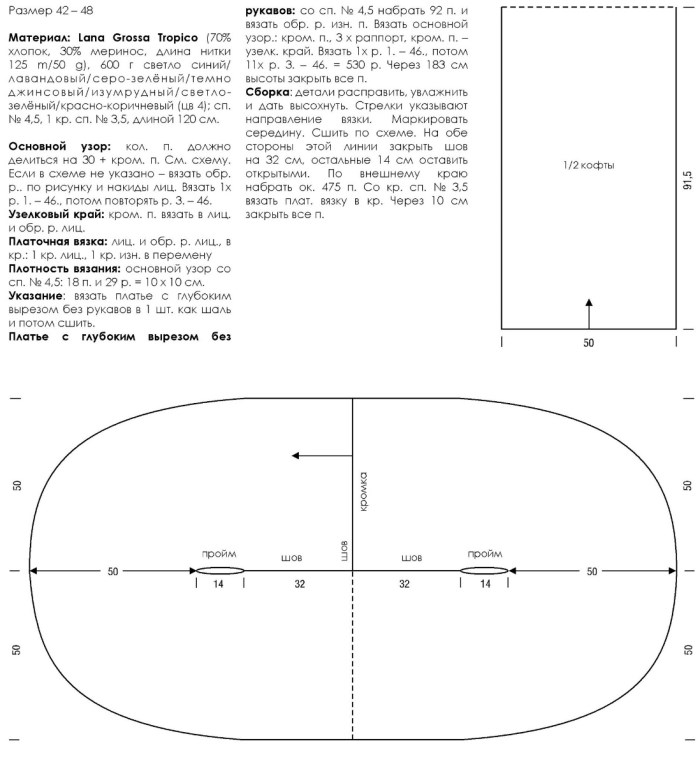
The cells that are arranged horizontally are the rows. The cells that are arranged vertically are the number of rows that make up the pattern.
The number of loops of the rapport (part of the product pattern) is also given in all the schemes. To highlight it graphically, the creators of knitting schemes mark it with arrows or highlight it with a frame. The rapport can be repeated several times. The designation of one rapport on the scheme is the Latin letters MS. In order for the pattern to be symmetrical in the end, it is recommended to cast on several loops that were not taken into account in the rapport.
Despite the fact that all designations are divided into text and graphic, graphic signs are currently used most often. Since text descriptions take up a large number of pages, it is more convenient and faster to present loops in graphic form. To trace the connection of rows, it is more convenient to follow the rows by the pattern.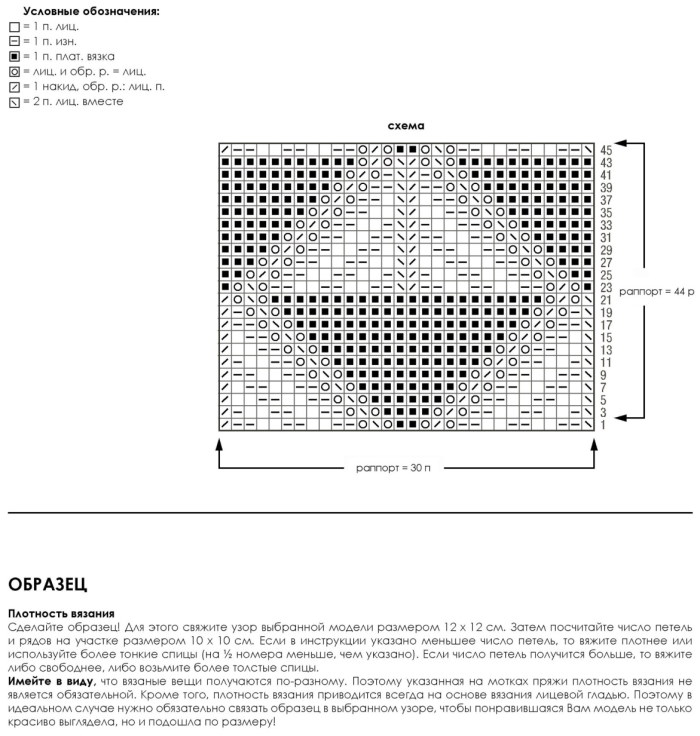
Text descriptions are used only in cases where the pattern is simple enough and does not contain a large number of loops. For example, garter stitch can be described in just 1 sentence – p. (rows) knit with face loops. If the work requires garter stitch, this means that all rows must be knitted with face loops.
Another advantage of graphic images is that they can be understood even by those who do not know a foreign language. Knitting patterns are also posted in foreign magazines, so that craftswomen who do not know foreign languages, the authors of the patterns also post graphic images, not just text.
The main principle when reading the patterns is to understand that the main element of the pattern is the cells in which the symbols are located. 1 cell – 1 loop. The numbers that are located along the edges of the image are the row numbers; they indicate the direction of knitting. In some works, the purl rows are not written down, there is only an indication that the loops in the purl rows are knitted according to the pattern. These words mean that a purl loop should be knitted over the purl loop.
Edge loops are rarely indicated, however, if they are necessary when knitting, they are indicated by the sign "+". This type of loop is not included in the pattern rapport. The edge loop is knitted every 1 row. It serves to make the edges of the product more even. If you do not knit these loops, the edges will be sloppy, the loops will be elongated. To better present the appearance of the product, magazines may print photographs of finished patterns.
Symbols attached to knitted items allow you to quickly figure out how many loops make up a pattern, and which loops need to be knitted to create an unusual item of clothing with your own hands.
Video about knitting symbols
What are the symbols used in knitting:
Thank you very much! Everything is so clear. I found an interesting and complex pattern and only with icons in the description. Now I will try to figure it out. Thanks to your description, I hope everything will work out!