Knitting used in creation soft toys, canvases, clothing elements or interior design, is divided into types depending on the tools and techniques used. The most popular is knitting with knitting needles or a hook, the use of forks and a knitting machine is also common.
The patterns and techniques of this craft are written down in special diagrams, for the ease of understanding of which the instructions include symbols. Having studied this terminology, you can begin to reproduce simple knitting patterns, create your own products and even master complex diagrams.
Crochet Symbols
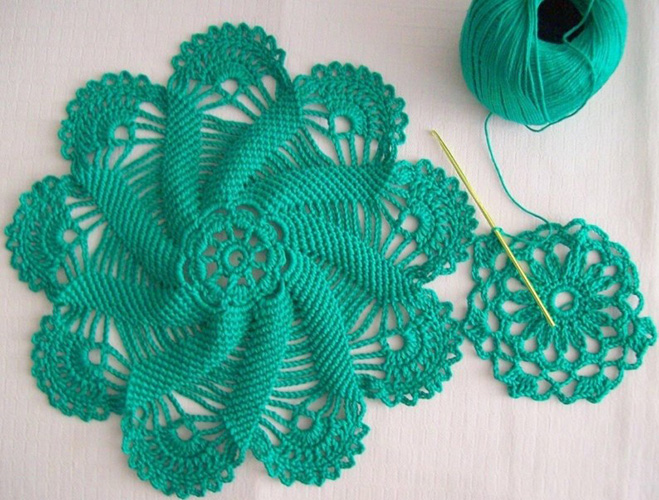
Crocheted items are distinguished by a special weave that is slightly stretchable and has a high density. Using a hook allows you to work not only with woolen but also cotton threads.
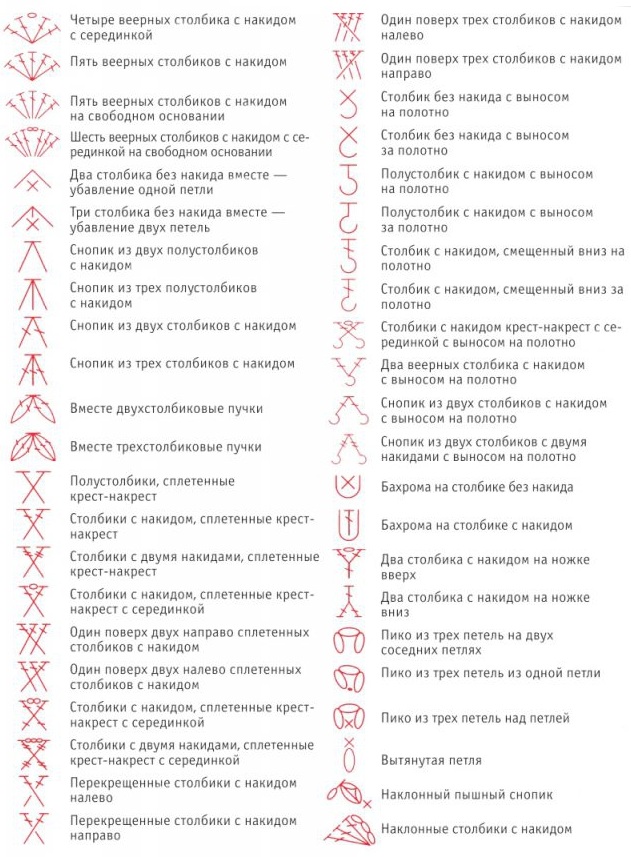
Knitting symbols are symbols that define a knitting method.
Duplicate and similar values are determined by the context of the instructions:
| Symbol | Meaning |
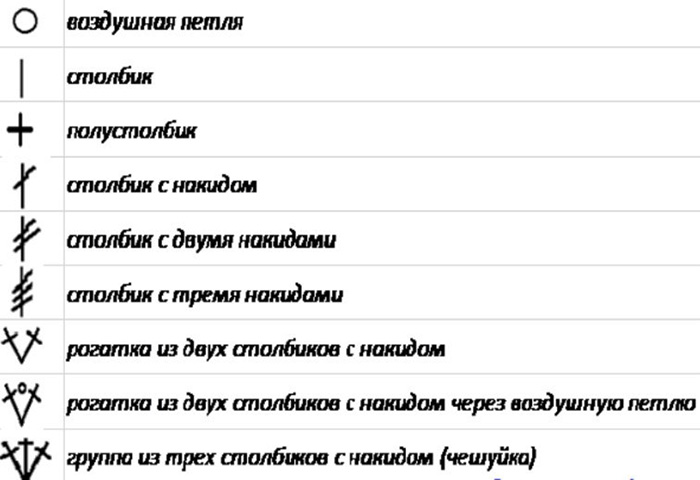
| Hollow horizontal ellipse or circle | Air loop |
| A small ellipse with 5 connecting lines going down | Rose from one loop and half-columns |
| Letter X | Single crochet |
| Letter X with a curved line on top | Decorative edge-braiding or edge-braiding in reverse, can also be designated by a crab step (another designation for it is a straight cross with a curving line on top). |
| A small ellipse with 5 downward-facing lines curving towards each other but not connecting. | Rose from half columns on a free base |
| Letter T | Half double crochet |
| Solid horizontal ellipse or circle | Tight loop |
| A small ellipse with 5 connecting lines going down with lightning bolts in the middle of each of them | Rose from one loop and columns with 2 yarns |
| Letter X with a small circle on top with 2 bends in different directions from its base | Twisted column |
| A small ellipse with 5 downward, non-connecting lines, crossed out at an angle in the middle of each of them. | Rose from double crochets on a free base |
| A short horizontal line with a small vertical ellipse at the bottom, from the base of which two lines curve outward and towards each other with one straight vertical line in the middle. | A voluminous bun on a loose base with a double top |
| The letter T with a slanted line through the middle. | Double crochet |
| Letter X with a short horizontal line below | Slip stitch or single crochet with edge |
| A small ellipse with 5 unconnected lines going down with lightning bolts in the middle of each of them | Rose from columns with 2 yarns on a free base |
| Letter T with 2 slanted strikethroughs in the middle | Double crochet stitch |
| A small ellipse with 5 connecting lines going down, crossed out at an angle in the middle of each of them. | Rose from double crochet stitches from one loop inside out or rose from double crochet stitches from one loop |
| A downward angle made of two lines with an X just above the angle | 2 single crochets from one loop – increase one loop |
| Letter T with 3 slanted strikethroughs in the middle | Column with 3 yarns |
| A short horizontal line with 5 curved lines going down from its center, not connecting to each other, the central one of which is straight, and lightning bolts in the middle of each of the lines. | Bundle of 5 double crochets on a loose base |
| A downward angle made of two lines with an X above the angle and a short vertical line from the angle upwards | 3 single crochets from one loop – increase 2 loops |
| The letter T, underlined by a short line. | Half double crochet with edge |
| A short horizontal line with three lines coming out from its center and connecting, the central one of which is straight. | A lush bun from one loop |
| Letter V with short horizontal lines at the upper ends | 2 fan half columns |
| Underlined letter T with the middle crossed out at an angle | Double crochet with edge |
| A short horizontal line with a small vertical ellipse at the bottom, transitioning into a larger vertical ellipse below with a vertical line dividing it. | A voluminous bun with a double top from one loop |
| Letter V with a vertical line from the bottom corner and short horizontal lines on all 3 of its top ends | 3 fan half double crochets |
| A short horizontal line with 3 connecting lines coming down from its center, the central one of which is straight, and with slanted strikethroughs in the middle of each of the 3 lower lines. | Bundle of 3 double crochets from one loop |
| A short horizontal line with three non-connecting lines extending downwards from its center, the central one of which is straight. | A voluminous bun on a loose base |
| A short horizontal line with three non-connecting lines extending downwards from its centre, the central one being straight, and with slanted strikethroughs in the middle of each of the three lower lines. | Bundle of 3 double crochets on a loose base |
| Letter V with short horizontal lines at the top ends and slanted strikethroughs in the middle of both side lines | 2 fan stitches with yarn over |
| A short horizontal line with 5 lines curving downwards from its center and connecting to each other, the central one of which is straight, and with slanted strikethroughs in the middle of each line. | Bundle of 5 double crochet stitches from one loop |
| A semblance of the letter Ш made of 3 straight, non-connecting lines with close bases and short horizontal lines at the upper ends. The side lines deviate upward and outward, all 3 lines have slanted strikethroughs in the middle. | 3 fan stitches with a free base |
| The letter V with short horizontal lines at the top ends, slanted strikethroughs in the middle of each side line, and a small circle in the middle at the top. | 2 fan stitches with a center |
| A semblance of the letter Ш from 3 straight lines going upwards from a common base with short horizontal lines at the upper ends. The side lines deviate upwards and outwards, all 3 lines have cross-outs at an angle in the middle. | 3 fan stitches with yarn over |
| A short horizontal line with 5 lines curving downwards from its center and not connecting to each other, the central one of which is straight, and with slanted strikethroughs in the middle of each line. | Bundle of 5 double crochets on a loose base |
| The letter V with a vertical line from the bottom corner, short horizontal lines at all 3 of its top ends, and slanted strikethroughs in the middle of each of the 3 lines. | 3 fan stitches with yarn over |
| An upward angle of 2 lines with an X at an angle | 2 single crochets together – decrease one stitch |
| The letter V with short horizontal lines at the top ends, slanted strikethroughs in the middle of each side line, and 3 small circles in the middle at the top. | 2 fan stitches with a center |
| A short horizontal line with 5 lines curving downwards from its center and connecting to each other, the central one being straight, and lightning bolts in the middle of each line. | Bundle of 5 double crochet stitches from one loop |
| An upward angle of 2 lines with an X at an angle and a small vertical line coming down from the angle, not reaching the X. | 3 single crochets together – decrease 2 stitches |
| 4 lines going up from one base, deviating from the base outwards. Each of the lines has a short horizontal line at the top and a cross-out at an angle in the middle. | 4 fan stitches with yarn over |
| A short horizontal line with 2 longer lines going down and on the sides | Sheaf of 2 half double crochets |
| 3 lines going up and to the right with short horizontal lines at the top ends and slanted strikethroughs just below the top ends. They are crossed by a line going down from the left with a short horizontal line at the top and a slanted strikethrough in the middle. | 1 over 3 double crochet to the left |
| A short horizontal line with a vertical line coming down from the center, ending in a circular curve of a right-facing hook. | Relief purl stitch |
| A short horizontal line with 2 lines going down and on the sides, longer with slanted strikethroughs in the middle | Sheaf of 2 double crochet stitches |
| A short horizontal line with a vertical line coming down from the center, ending in a circular curve of a left-facing hook. | Embossed front post |
| Letter X with a left-facing hook coming out of the bottom right end | Single crochet with carry-over beyond the canvas |
| 4 lines directed from one base upwards and to the sides with endings of short horizontal lines at the top, slanted strikethroughs in the middle and a small circle in the center at the top. | 4 fan stitches with a center |
| Letter X with a hook pointing right coming out of the bottom left end | Single crochet with carry-over beyond the canvas |
| 5 straight lines coming from close bases upwards and outwards, ending in short horizontal lines at the top and slanted strikethroughs in the middle. The central line is directed straight up. | 5 fan stitches with a free base |
| A short horizontal line with 3 lines going down and longer lines on the sides, the central one of which is directed straight down. | Sheaf of 3 half double crochets |
| A short horizontal line with a vertical line running down from the center with a slanted strikethrough in the middle, ending in a circular curve of a left-facing hook. | Relief Front Column with Yarn |
| 6 lines going up and out from close bases (3 lines in each direction) with short horizontal lines at the upper ends, slanted cross-outs in the middle and 2 small circles in the top center. | 6 fan stitches with a center on a free base |
| A short horizontal line with a vertical line running down from the center with a slanted strike through the middle, ending in a circular curve of a right-facing hook. | Relief purl double crochet |
| The letter X has short horizontal lines at the top ends, slanted strikethroughs in the middle of the lines of its upper half, and two left-facing hooks coming out of the bottom ends. There is a small circle at the top in the middle. | Double crochet stitches crosswise with the middle with the extension to the canvas |
| A short horizontal line with 3 lines going down and longer lines on the sides, the central one of which is directed straight down. These 3 lower lines have slanted strikethroughs in the middle. | Sheaf of 3 double crochet stitches |
| A V with a left-facing hook from the bottom base, short horizontal lines at the top ends, and slanted strikethroughs in the middle of the side lines. | 2 fan columns with a yarn over with a transfer to the canvas |
| Letter X with short horizontal lines at the upper ends | Half-columns, woven crosswise. |
| A short horizontal line with two downward and narrowed ellipses on the sides, like small leaves. There are slanted strikethroughs on the sides of each leaf. | Together two-column bundles |
| A short horizontal line with two longer lines going down the sides and crossed out in the middle, each ending in a left-facing hook. | A sheaf of 2 double crochets with an extension to the canvas |
| The letter X with short horizontal lines at the upper ends and slanted strikethroughs in the middle of the lines of its upper half | Criss-cross woven double crochet stitches |
| A short horizontal line with two downward and sideways narrowed ellipses like small leaves, separated by straight lines along. There are slanted strikethroughs on the sides of each leaf and in the middle of the lines dividing them. | Together three-column bundles |
| A short horizontal line with two longer lines going down the sides and crossed out twice in the middle, each ending in a left-facing hook. | A sheaf of 2 columns with 2 yarns with an extension to the canvas |
| The letter X with short horizontal lines at the upper ends and double slanted strikethroughs in the middle of the lines of its upper half | Crosswise woven double crochet stitches |
| The letter Y with slanted strikethroughs in the middle of each of its 3 lines and short horizontal lines at the top ends. There is a small circle in the middle at the top. | 2 double crochet stitches on the leg up |
| Letter U with an X in the middle | Fringe on a single crochet |
| The letter X has short horizontal lines at the top ends, slanted strikethroughs in the middle of the lines of its upper half, and a small circle in the center at the top. | Crosswise woven double crochet stitches with a center |
| An upside-down Y with slanted strikethroughs in the middle of each of its 3 lines and a short horizontal line at the top | 2 double crochets on the leg down |
| A slightly elongated U with a T inside that is crossed out at an angle in the middle. | Fringe on a double crochet |
| 2 vertical ellipses pointing upwards and slightly outwards, supporting the same horizontal ellipse on top. | Picot of 3 loops on 2 adjacent loops |
| 2 lines pointing up to the right, crossed by a line pointing up to the left. All 3 lines are straight and have short horizontal lines at the top ends and slanted strikethroughs just below them. | 1 over 2 right woven double crochets |
| The letter X with horizontal lines at the top ends, slanted strikethroughs in the middle of each of its 4 lines, and 2 small circles at the top center. | Crosswise woven double crochet stitches with a center |
| 2 vertical ellipses directed upwards and slightly outwards, supporting the same horizontal ellipse from above. In the middle of the bases of the side ellipses there is a point. | Picot of 3 loops from one loop |
| 2 lines pointing upwards to the left, crossed by a line pointing upwards to the right. All 3 lines are straight and have short horizontal lines at the top ends and slanted strikethroughs just below them. | 1 over 2 left woven double crochets |
| 2 vertical ellipses directed upwards and slightly outwards, supporting the same horizontal ellipse from above. In the middle of the bases of the side ellipses is the letter X. | Picot of 3 loops over the loop |
| The letter X with horizontal lines at the top ends, double slanted strikethroughs in the middle of each of its 4 lines, and 3 small circles at the top center. | Crosswise woven double crochet stitches with a center |
| Narrow vertical ellipse with an X on top | Extended loop |
| 3 lines directed from one base to the left and upwards with a small interval of the angle of inclination. Each line has a short line at the upper end and is crossed out at an angle in the middle. Next to the upper line on the right are 3 small circles, forming a small bend upwards and to the right. | Slanting Columns with Yarn |
| The letter X has short horizontal lines at the top ends and slanted strikethroughs in the middle of the lines of its upper half. The area where the line crosses the letter to the top to the right is not fully visible, which makes this line appear distant. | Crossed double crochet to the left |
| An elongated ellipse tilted to the left, ending with a short line at the top. On its lower edge is a small circle. Slightly to the right of the lower edge of the ellipse is the letter X. The ellipse is divided along a straight line, from the ends of which to the center of its right side there are two lines curved toward each other. | A lush, slanted sheaf |
| The letter X has short horizontal lines at the top ends and slanted strikethroughs in the middle of the lines of its upper half. The area where the line crosses the top left is not fully visible, which makes this line appear distant. | Crossed double crochets to the right |
| A small solid triangle pointing downwards | Connecting post |
| A hollow small triangle with its apex pointing upwards | Crayfish step |
| A vertical elongated ellipse with pointed ends | Lush column |
| Letter T with a slanted line through the middle and 1, 2 or 3 circles below. | Column on a chain stitch |
| Stars | Rapport |
| Fat point | Getting Started |
| 5 lines bending towards each other and not connecting, coming up from one base, the central one of which is straight. The bends of the lines outwards and closer to their end inwards form a kind of basket, which is crossed by a hoop slightly curved downwards. To the left above the basket is an arrow coming out of it, directed downwards to the right, to the right is a small and curved upwards arc. | Popcorn or Corn Kernels Pattern |
How to read diagrams correctly
Crochet symbols may be accompanied by specific abbreviations and definitions.
Some of the popular terms and abbreviations found in knitting tutorials include:
| Definition | Meaning |
| semist. | Half-column |
| vp or vzd. p. | Air loop |
| Art. s. n. | Double crochet |
| r. | Row |
| p. | Depending on the context, a loop, lift or increase, meaning 2 sts in 1 st. |
| persons. | Facial |
| sbn | Single crochet |
| from *to* | The pattern is repeated (rapport) until the end of the row |
| y. | Decrease - 1 st is made from 2 sts of the previous row |
| at work | Thread from the wrong side |
| before work | Thread on the front side |
| conn. st. | Connecting post |
| Art. with 2 or more n. | Column with 2 or more yarns |
| marker | A pin, contrasting thread, or similar marking flag that is inserted into specific areas of a knitting pattern. |
| kr | Circular row |
| s.p. | Connecting loop |
| v.p.p. | Air lifting loop |
| prev. | Previous |
| track. | Next |
| out. | Purl |
| sx. | Scheme |
To read knitting patterns correctly, you will need to follow these recommendations:
- In the knitting instructions by rows, the odd rows start on the right and the even rows on the left. The rows are counted and read from the bottom up.
- The beginning of circular knitting patterns is located in the center, they are read in circular rows from the middle of the pattern to its edge and counterclockwise. To increase the radius of work in circular knitting, lifting loops are used. For products of this type, there is also a "circle rule", which consists in the fact that the number of columns added in rows should be equal to the number of columns of the 1st row. The evenness of the knitting depends on this.
- The instructions may contain requirements for the hook. These tools vary in size and are divided by numbers corresponding to the diameter of the hooks in millimeters. The hook, in turn, is selected depending on the diameter of the thread.
- Knitting elements, indicated by vertical ellipses of 3 or more lines coming out of the upper horizontal segment, are knitted together from one loop.
- Fan-like symbols mean that the elements in question have as many loops as there are lines in the fan. This applies to fan-shaped symbols of 2 or more lines pointing up or down.
- Symbols with hooks “hanging” from below mean that this element is taken out of the canvas.
Crochet stitch conventions include the methods of attaching the posts, which are the stitches on the legs. The way they are connected to the stitches of the previous row determines the type of pattern.
There are 5 methods of fastening used in crocheting:
| Technique | Description |
| In the leg | The tool is not passed through the walls of its loop, but through the foot of the column. This method prevents the row from shifting in relation to the previous row, which all other methods lead to a small degree. |
| Into the loop or through both half loops | The tool is passed through both walls of the loop of the previous row. |
| Arch | The passage of the hook between the columns, the arch, and the space between them are called. |
| Behind the front wall of the loop | The hook is led behind the wall of the loop closest to the knitter |
| Behind the back wall of the loop | The hook is led behind the loop wall that is farthest from the knitter |
Types of loops and their symbols
The basis of any knitting is its 1st row, consisting of a chain of ch. It is not recommended to knit the chain tightly, otherwise the product will shrink. The main components of knitting using a hook are columns with or without a yarn over and ch, the other elements are derivatives of these components.
Combinations of columns and air loops form patterns that decorate the products.
To correctly use knitting patterns, you should know what the symbols mean.
Air loops
To create a chain stitch, indicated by a hollow ball or ellipse, you will need to pass the hook through the 1st stitch, fix the thread with it and pull it through this stitch upwards. Chain stitches are the basis of knitting, in addition to the initial set, they serve to add height to the edge of the fabric.
Tight loop
In modern knitting, a tight or chain stitch is called a slip stitch and is indicated by a solid triangle with its apex pointing downwards.
To create a tight loop, you need to hook the top of the loop of the previous row, throw the thread over it and bring it out together with the tool through the newly created loop, as well as the loop on the tool.
Single crochet
This type of stitch, referred to in the instructions as sc, is made by passing the tool through the loop of the 1st ch chain, then pulling the loop out, grabbing the working yarn, and simultaneously knitting both loops on the tool. The single crochet is designated by the letter X.
Knitting under the front and back arch
This technique of knitting for both half loops is performed using the “into loop” technique, which consists of passing the tool behind each of the 2 walls of the loop of the previous row.
Double crochet
The double crochet, designated by the letter T crossed out in the middle, is formed by yarning over the tool, passing it through the chain loop, pulling the newly formed loop and knitting 3 loops on the tool in pairs twice. Previously, the double crochet was called a simple column.
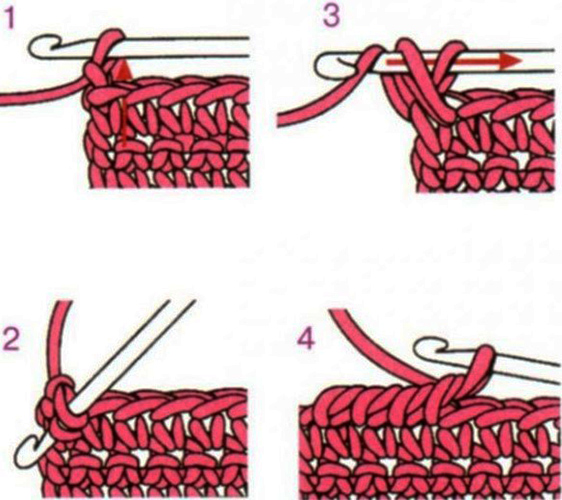
Embossed columns
The symbols (in crochet) for relief type columns are images of curved (hook pointing to the left) or concave (hook pointing to the right) hooks under vertical lines with a short horizontal top end.
These symbols mean front stitches, which are made before the work, and back stitches, which are made behind the work, respectively.
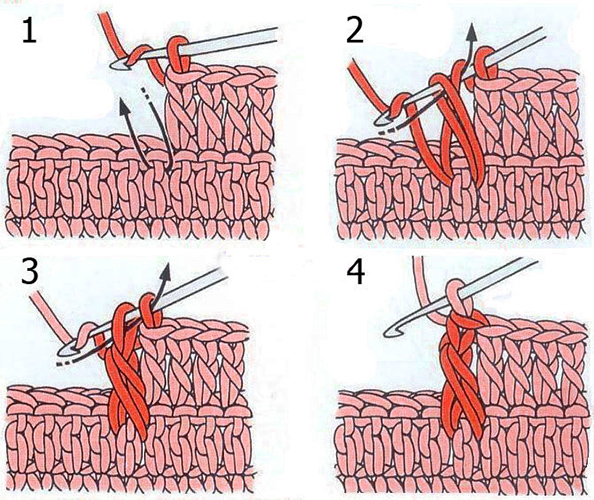
Step by step process for creating a face column:
- First, knit the 1st row from simple double crochets, then instead of the 1st column of the next row, make 3 ch and turn the knitting.
- Next, make a yarn over and pass the tool behind the 2nd dc of the previous row. The dc should be positioned on top of the tool.
- At the final stage, grab the working thread, pull out the loop and knit it like a regular dc.
The front relief columns will look like concave columns from the back side. If you use only such columns in each row, the work will look the same on both sides.
Step by step process for creating a purl stitch:
- First, knit the 1st row from simple double crochets, then make 3 ch instead of the 1st column of the next row and turn the knitting.
- Next, make a yarn over and pass the tool around the 2nd dc of the previous row. The dc should be located under the tool.
- At the last stage of forming the column, grab the working thread, pull the loop to the wrong side of the fabric and knit it like a regular dc.
The reverse columns of the relief type will look like the front ones from the back. Using different combinations of convex and concave columns allows you to create elastic bands to your taste.
Column on a chain stitch
The leg for such columns can be formed from any number of loops. The column on the ch, designated by the letter T crossed out in the middle, is more often present in foreign manuals. It is also called an air column or a high column with a yarn over on the leg.
Step by step process of creating a column on a chain loop:
- First, tie a chain of ch and perform 4 ch.
- The working thread is placed on the tool.
- The hook is passed through the loop, the thread is caught with it and pulled out through the loop. There should be 3 loops on the tool.
- After this, the working thread is captured and passed through one loop on the tool, which will be the foot of the column. There should still be 3 loops left on the tool.
- Next, grab the working thread, passing it through the loop on the tool and the yarn over, and leaving 2 loops on the tool.
- The working thread is grabbed again and passed through 2 loops, leaving 1 loop on the tool.
Pico
This is the name for 3-4 VP, closed in a chain. This component gives knitting a decorative look and can have different shapes, densities and sizes. Pico is used to process the edges of finished items, lace and fabrics. It is knitted with beads, beads or simple yarn.
Step by step process of creating a picot:
- First, knit 3 sc and make a set of 3 ch, then close them into a ring using sp from the 1st ch.
- The alternation of 3 sc and picot continues until the end of the row.
Another option for creating a classic picot is that in the process of knitting the sp. the tool is passed through the last sc. Following this instruction, you can create a picot from 5 or more ch.
Connecting post
The slip stitch created in the form of a tight loop is also called a half-double crochet. Another variant of its designation is an upward-facing arc.
Half double crochet
Half double crochets are looser to work with than single crochets. Half double crochets are also used as a transition between different types of crochets. These half double crochets are created by yarning over the tool and then passing the tool through the chain loop, then pulling out a new loop and knitting 3 loops on the tool.
Crayfish step
This simple and productive method of edging a product is suitable for decorating clothes, hats and bedding. The crab step, indicated by a short curving line above the cross, can be knitted with either the same yarn as the one used in the product being processed or with a contrasting yarn.
This technique is distinguished by the fact that its common version is knitted from left to right. You can start decorating from any part of the fabric being processed.
Step by step process for creating a crayfish walk:
- The pattern begins with performing sc.
- The tool is moved away from you under each of the 2 walls of the loop of the previous column at the edge of the work.
- Next, you will need to grab the working thread and pull it out. This should create 2 loops on the tool.
- Both of these loops are knitted at the same time.
- Points 2 through 4 are repeated.
Lush column
In knitting instructions, these components are also present under the names of puffs or poufs. Puffy columns refer to clusters made with a crochet hook with a common base and top. Types of puffy columns differ depending on the number of components that affect the volume of the column, and the method of their execution.
The process of creating the simplest lush column of 3 elements (the columns of the lush category are separated by at least one ch due to their volume):
- The yarn over and the extended loop are made into one loop (there are 7 loops on the instrument, 6 of which are new), the working thread is captured and a column is created, passing it through all the loops. One loop remains on the instrument.
- To secure the column, you will need to grab the working thread again and create a ch.
Popcorn
The corn grain pattern, also known as a cone or a bun, gives the knitting relief and volume.
One way to make popcorn:
- First, you need to make 5 dc into 1 base loop.
- The work is turned over to the wrong side.
- The tool is passed through the top of the 1st st. with n., pulling out the working thread.
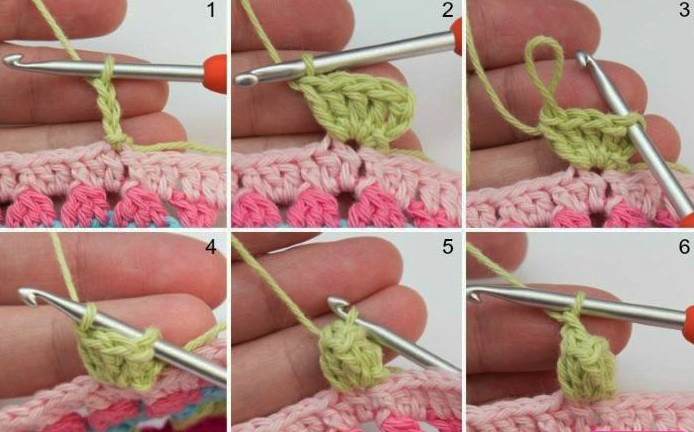
- The popcorn is finished by creating a connecting loop.
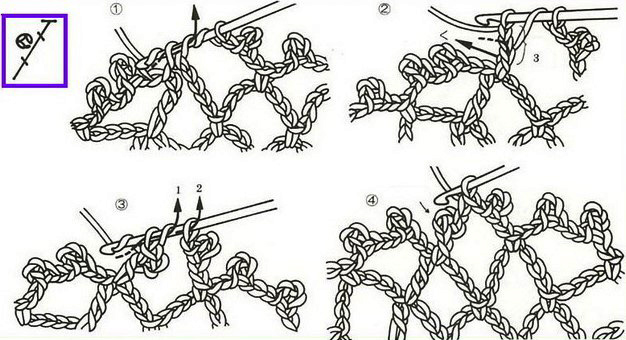
Arrows on diagrams
Crochet symbols do not always include the meaning of the arrows in the instructions. This symbol is usually present in non-geometric pattern guides, indicating the starting point and direction of work.
If there are letters HB next to the arrow, this means that the rows are to be knitted after the chain of ch has been formed. An arrow placed at the edge of the middle level of the knitting pattern may indicate whether the upper or lower half of the work should be done first.
The stitches with an arrow at the bottom indicate which stitch they should be knitted into. The arched arrows on the pattern instructions mean that you should knit not through the stitches, but around the stitches they encircle. This method is used in purl and knit. The arched arrows on the pattern components instructions indicate the direction of knitting.
Rapport
To indicate the repetition of any element or their combination, in knitting patterns these components are enclosed in stars or rectangular brackets of a rapport, also called a motif. The components of the pattern are duplicated a specified number of times or repeated until the length of the row established by the pattern is formed.
Knitting is an ancient art, which, according to some sources, existed even during the time of Troy.
For centuries, the rules and techniques of knitting were passed down orally, but in the modern world, learning this craft is made easier by the availability of the Internet and diagrams, which do not always include the necessary explanations.
To read crochet instructions correctly, you need to understand the symbols. It should be noted that the symbols for the same definitions may differ or have additional options depending on the version of the symbol system and its territorial affiliation.
Video about crochet symbols
How to read crochet patterns: