Hand-made flowers are very popular among their lovers. You can make various crafts from colored paper both yourself and with children. Items made with your own hands are considered the best gift and are used in various fields of activity.
Properties and qualities of foamiran
Colored paper has many varieties. Having learned to make flowers with their own hands, craftsmen begin to focus on new types of material appearing in this area. Foamiran is one of them (foam, fom, from the English Foam - foam). Its properties and qualities are presented in the table.
| Positive | Negative |
| Non-toxic – it is a completely safe material, it is allowed to use it to make crafts with children and not worry about safety measures. Sometimes foamiran masters smell the smell when opening the packages. However, this is the uniqueness of foamiran storage. After an hour, the smell disappears and the resulting products do not smell at all. | Afraid of strong heating. If heated strongly and stretched more than 15%, the material may become deformed and become unsuitable for further use. |
| Foamiran has memory - when heated, the foam becomes plastic, is easily modified, and even with slight stretching it comes into the desired shape.
He “remembers” this position and remains in it. | It can tear. If you pull the foamiran too hard or catch it, you can damage it. |
| Not susceptible to moisture – the resulting items can be wet and this will not affect the condition of the foamiran. | |
| Foam is velvety because it has a porous structure. Even the slightest pressure from something sharp leaves marks on it.
Thanks to this property, the material is cut without difficulty and no sharp edges remain along the cut line. | |
| A wide range of colors. In addition to all the basic colors, there are also many shades.
Foam is easy to paint. All kinds of paints are suitable for this. | |
| You can glue it. A glue gun works well, making the process quick and convenient. You can use strong-fix glue. But in this case, the resulting item will dry for a day. |
Materials and tools needed to make flowers from foamiran
The foamiran master's kit consists of:
- scissors (regular and curly);
- hole punch (shaped);
- stationery knife;
- toothpicks;
- nippers/pliers;
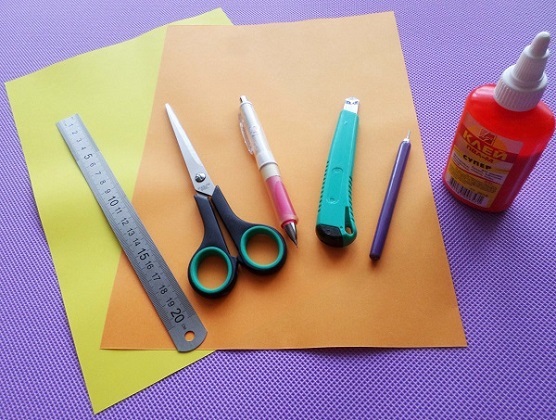
- iron;
- cardboard/paper for cutting out templates;
- bun, stack;
- pastels/oil/acrylic paints;
- mold/weiner;
- wires of various thicknesses;
- brushes and sponges;
- glue gun and super glue.
How to make different flowers from foamiran using origami technique. Step-by-step instructions and diagrams
Flowers made from colored paper are often used as a decorative element.
 They are used to decorate halls for celebrations, used as props for staged photographs. Even hair accessories (for example: combs, hairpins, hair clips) can be decorated with such flowers.
Do-it-yourself colored paper flowers are the best decoration for gift attributes: they can decorate gift packaging, handmade cards. Do-it-yourself colored paper flowers are often used as an independent gift when they are decorated in whole bouquets or baskets.
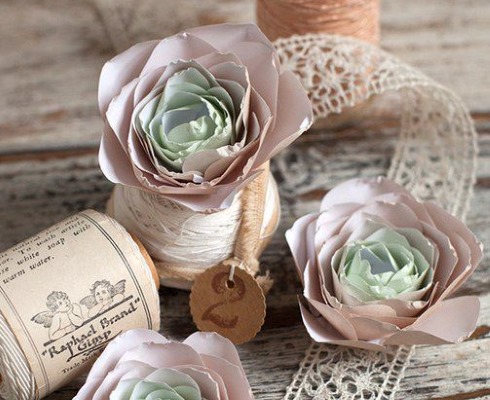
Flowers made of foam become as if alive with the slightest change in the angle of lighting, allowing you to make a true bouquet with your own hands, which will last a long time. Foamiran or plastic suede is an innovative material used in all kinds of handicrafts.
It is a rubbery fabric with a porous texture, flexible and retaining the desired shape for a long time. Below are step-by-step instructions for making some types of flowers from this type of colored paper.
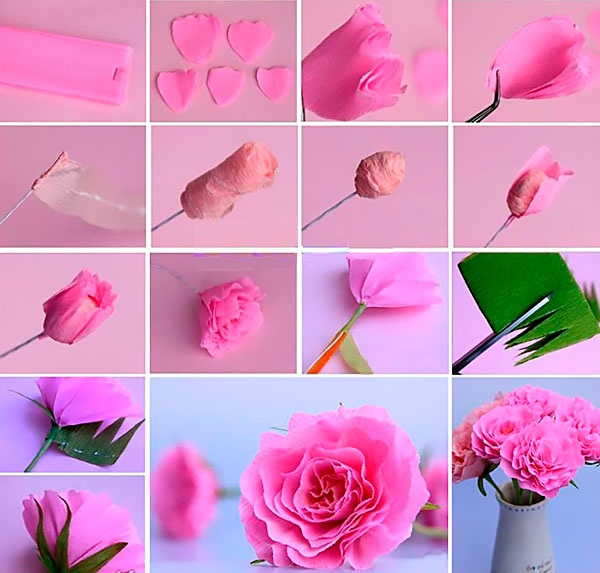
Rose
Making a rose petal:
- a petal is cut out of paper (it can be printed or drawn independently), and with a toothpick you need to trace its contour and cut it out. The number of petals is determined by the desired size of the rose. You will need 15-25 pieces;
- the iron is heated a little and the petals are pressed to it with the sole until they fall off, taking a convex shape. Before it cools down, you need to stretch it slightly, tuck it in and wait. This is how the petals are given their shape;
- then the flower texture is made with a mold and finished with a toothpick;
- To make the petal look realistic, you can tint it a little. The bottom - a darker color, and the top - a lighter shade.
Flower collection:
- the base for assembly is best made from polystyrene foam in the form of a ball or from cotton wool;
- To form a rosebud, the base should be tightly glued with 3-4 petals, and then you need to glue 1 petal at a time with an offset of half a petal.
The flower stalk can be made by tightly wrapping several cotton pads with thread. Cut out 5 elongated templates from green foam and shape them into a drop shape using heat and stretching. Glue the flower stalks to the base of the rose at the end.
Making leaves and stem:
- You need to make a sheet template and cut out the blank, then fold it in half twice and twist it.
- The stem is made of wire and wrapped in green satin material or foamiran.
Aster
Stages of flower creation:
- A pattern for the aster is not needed, as it is made from fringe.
- You need to cut strips from yellow foam with dimensions of 2x50 cm, 4x50 cm, 6x50 cm.
- The resulting strips are placed on a sheet of ordinary paper and ironed through it on both sides. Then they need to be allowed to cool.
- The strips need to be cut into small fringes.
- The fringe is wound and glued onto the wire, thus creating a flower. The first strip is glued at a certain level, the second strip is glued lower, and so on until the end.
- A circle with a diameter of 5-6 cm is cut out of olive foam and a sepal is formed.
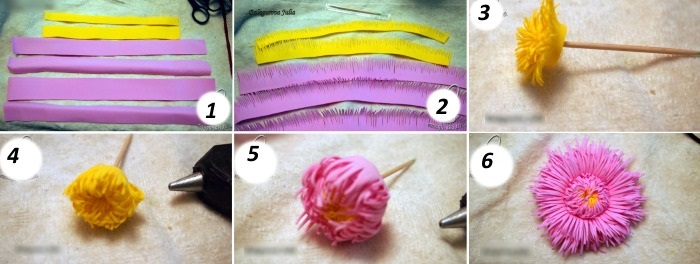
- The sepal needs to be ironed.
- The sepal needs to be glued.
- Leaves for asters are made from olive foam and cut out. They can be processed on a mold.
- The stem of the flower can be made from a cocktail straw, a napkin or foamiran. The stem is treated with tape and at the same time the leaves are attached to it.
Carnation
You need to trace the blanks with a toothpick on a sheet of white foamiran. Then you need to cut out the blanks with curly scissors.
Step by step execution:
- You need to find the middle of each piece. To do this, you need to fold them in half, then in half again. It is advisable to immediately pierce the intersection with a toothpick so that it is easier to find the middle when assembling the flower.
- The blanks are divided into petals. To do this, each blank must be cut through every 2-3 teeth, not reaching the middle (approximately 0.5 cm).
- The petals need to be shaped. To do this, the pattern is placed against a heated iron for a few seconds, folded and twisted between the fingers, then opened.
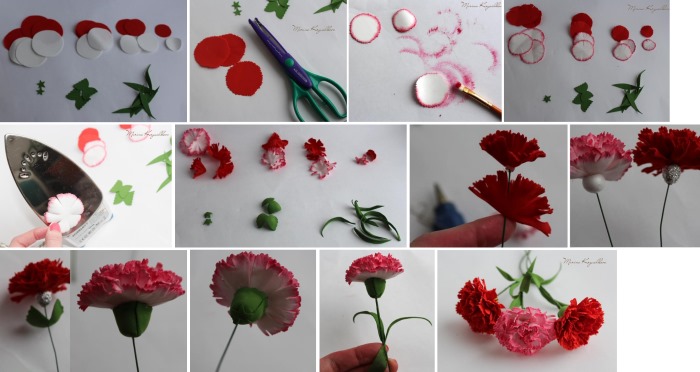
- The first layer of petals is strung on a toothpick, glue is applied to its edge and then the petal is glued well and fixed. All the petals are collected in this way in ascending order.
- Next, a blank for the sepal is taken.
- The workpiece is outlined with a toothpick and cut out with regular scissors; a hole is also made in the middle with a toothpick.
- To form a sepal, take a piece of foil, twist it lengthwise and then crosswise and make a base from it. It is important to choose the correct height of the base (so that the sepal covers it).
- The sepal blank is placed on the iron for a few seconds and heated up.
- Then, using your finger, make a small indentation in the middle of the workpiece, and its ends need to be stretched on all sides.
- Next, the blank is put on a toothpick and attached to the base of the sepal on all sides so that the foil base is not visible.
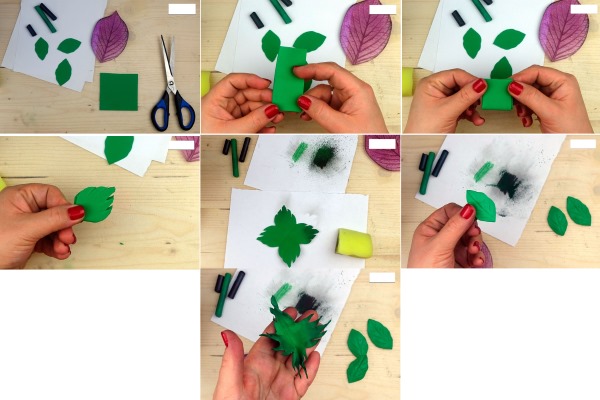
Anemone
Stages of flower creation:
- The petal blank on the pink foam is outlined with a toothpick 10 times, the leaf on the green material is outlined 1 time. From the dark purple foam, 2 strips of 1x15 cm and 1.5x20 cm are cut and cut into a fringe, not approaching the edge by 3-4 mm.
- From a smaller strip you need to cut out a trapezoid (sides 0.7 cm and 1 cm).
- To tint the sheet, dark green paint is applied to the corner of the sponge and stroked from the center to the edge of the piece.
- The tinting of the petals and fringe on the stripes is done according to the same scheme with purple paint.
- The iron needs to be heated a little and the petal should be placed against it for a few seconds, then immediately folded like an accordion, twisting the edges.
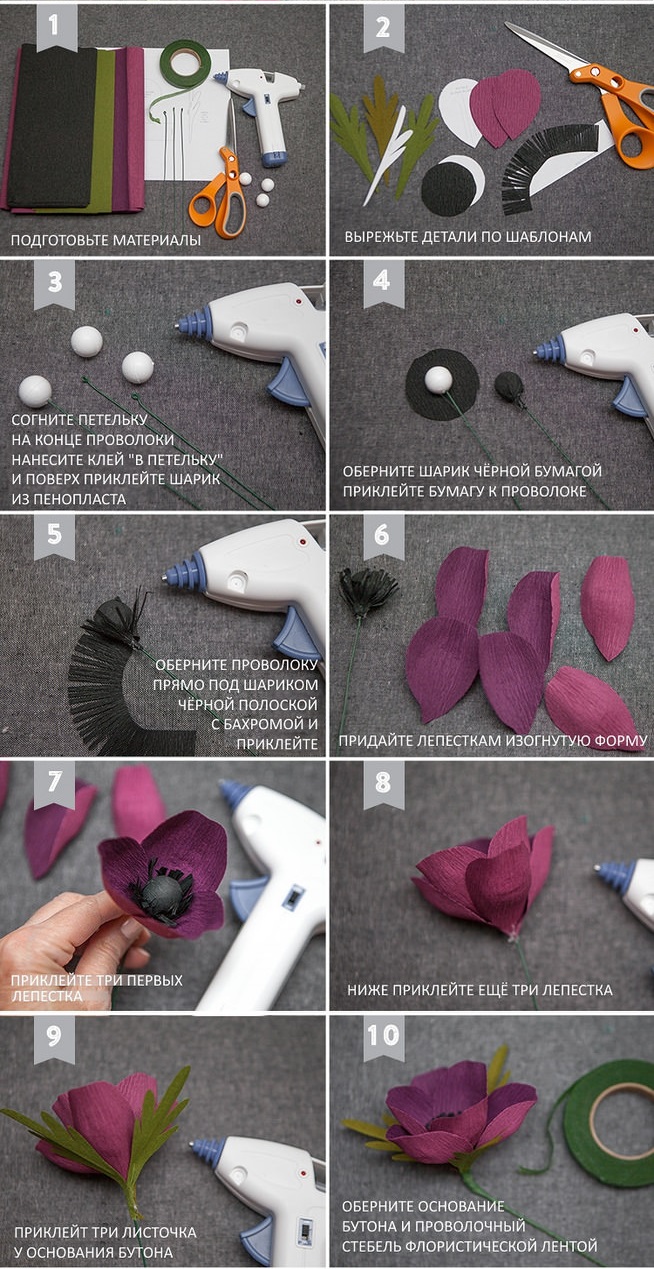
- Use your fingers to stretch the middle to form a “boat”.
- Using a toothpick, apply veins to the sheet and then press it against the iron until it begins to bend.
- The purple fringe needs to be heated with an iron and then twisted between your fingers.
- The end of the wire must be bent into a loop and clamped.
- Glue is applied to the wide edge of the fringe and a tight roll is rolled up. The resulting middle is pasted over with a strip of stamens, for this 3-4 turns are made around the middle.
- You need to put a drop of glue on the edge of one petal and then glue it in the middle. Then 4 more pieces.
- The other 5 petals need to be glued in row #2 between the petals of row #1.
- On the back side, wire is glued using glue.
- A square (sides 3.5 cm) is cut out of green foam. Then its edges are trimmed to make a circle. Five cuts are made on it, not reaching the center, and petals are cut out.
- The leaves need to be rolled between your fingers, pierced in the middle, put on a wire and attached to the flower.
- All wires must be wrapped with tape.
- The leaf is attached to the stem.
Iris
Stages of flower creation:
- You can download the petals and leaves of this flower from the Internet or draw them yourself.
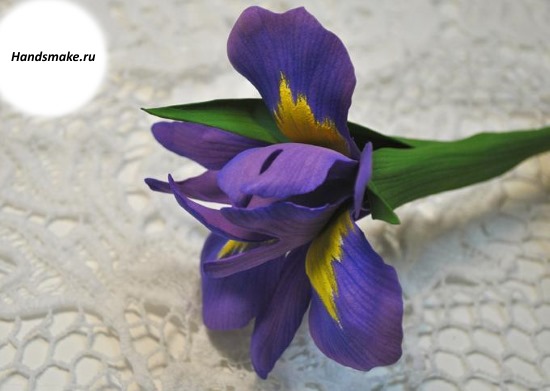
- You need to trace the blanks on the foamiran with a toothpick and cut them out (you will need 9 petals in total).
- Veins can be applied using a toothpick.
- To tint the petals you will need ultramarine paint and a sponge.
- Next, you need to create a relief for the petal; to do this, its edges are cut out in a snake-like pattern.
- Then white paint is applied to the petal.
- After the first layer has dried, yellow paint is applied.
- The petals need to be shaped. To do this, they need to be pressed against the iron (mode 2) until veins appear. Volume is given to it by squeezing from the reverse side. The heated stem of the petal needs to be bent in half and do the same with all the remaining parts.
- 2 petals are connected by bending the stem towards each other.
- The resulting 3 parts of the iris need to be combined.
- The three remaining petals are glued between the previous ones.
- The stem is secured with tape and leaves are glued to it.
Bell
Stages of flower creation:
- You need to cut out the parts for the bell:
- Part No. 1: light blue, 3.5 cm in diameter, 15 pieces.
- Part No. 2: blue, 3.5 cm in diameter, 14 pieces.
- Detail No. 3: green strip, 1x6 cm in size, 5-6 pieces.
- Part No. 4: white strip, 1.5 x 19 cm in size, 1 piece.
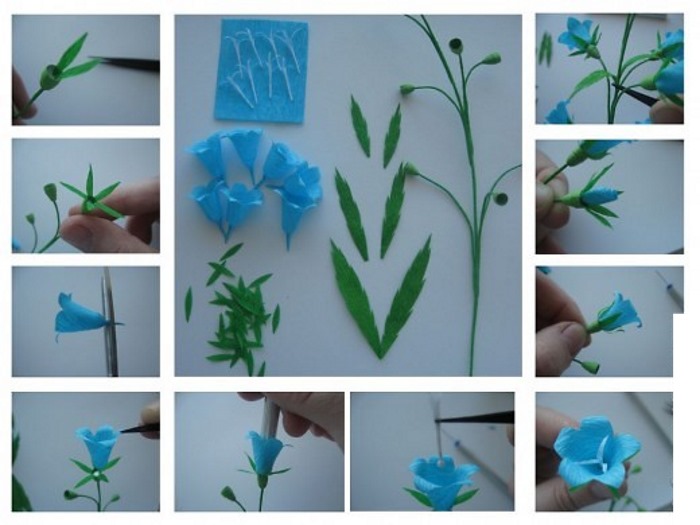
- Circles for bells (five-petal) are cut out of blue and light blue foam. A fence for stamens needs to be cut out of white material. Leaves from green, their top needs to be slightly rounded.
- From small squares, you need to cut out circles with zigzag edges for the sepals. All the teeth need to be cut, not reaching the middle by 0.5 cm.
- Then you need to apply the circles to the iron, each petal separately.
- Next, you need to heat the center of the petal circle on the iron and process it with a sponge. After that, the end of all the petals in turn must be heated and clamped with a lighter.
- Flower assembly. The wire needs to be divided into 7-8 cm pieces and hooks made along the upper edge. The white strip needs to be glued over the wire. You will get 3-4 fences.
- Using a toothpick, make a hole in the middle of the petal circle and insert the stamen, but do not attach it yet.
- The sepals need to be heated on an iron and holes made in them.
- Using 1 drop of hot glue, 3 parts are connected at once: flower, stamens and sepals.
- The flower leaves are heated with an iron, and the texture is applied to them with a toothpick (2 stripes).
- All the resulting flowers need to be glued to the stem at different levels. The stem is wrapped with tape. Leaves are attached at the bottom.
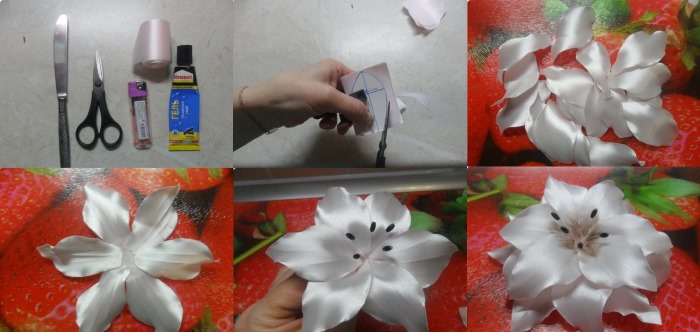
Lily
Stages of flower creation:
- On cardboard you need to draw a petal and cut it out. From white foam, cut them out according to the blanks 6 pcs.
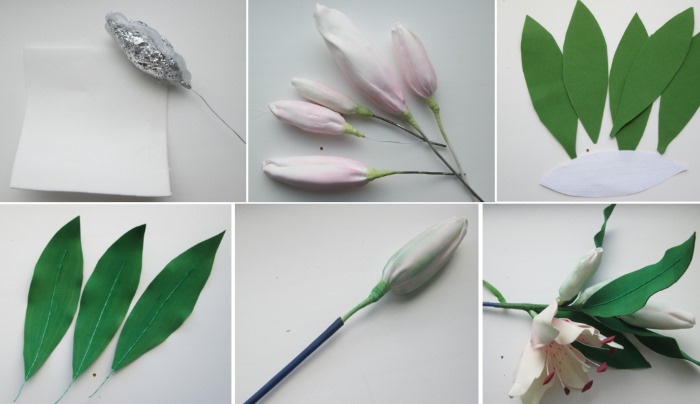
- The flower can be tinted in different shades (in this case, pink, purple, green and yellow will be used).
- The reverse side of the petal is tinted pink.
- The front side is tinted with a pink shade with the addition of purple. Then a green shade is applied, and on top of it yellow.
- You need to heat the petals on an iron and use a toothpick to make veins along them.
- The petal's waviness is given by heating its edge with an iron.
- You can give the flower a natural look by applying dots to each petal with a brown marker.
- The stamens are made from wire and covered with foamiran; you can paint them with paints.
- The leaves are cut out of foam in the required quantity and heated on an iron to give them texture.
- Stamens and row #1 of three petals are glued to the pistil.
- The remaining leaves are glued in subsequent rows in a checkerboard pattern.
- At the end, the leaves are glued on.
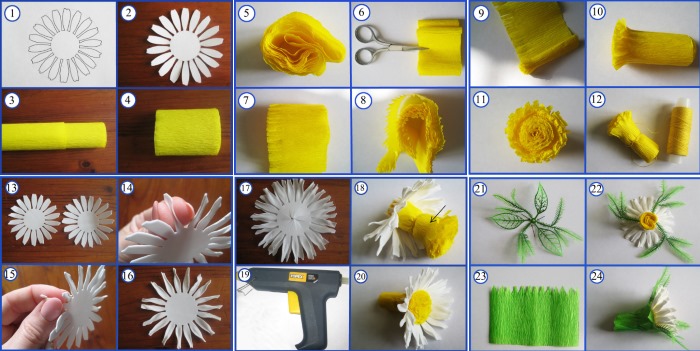
Chamomile
Stages of flower creation:
- On a piece of paper you need to draw a petal and cut it out.
- The template is applied to the white foamiran and traced with a toothpick. There should be 25 petals.
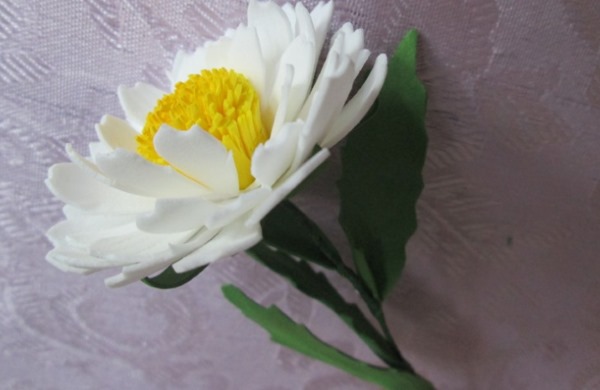
- To make the center of the flower, you need to cut a strip out of yellow foam and cut it into a fine fringe.
- Now, using super glue or a hot glue gun, twist the strip inward and secure the uncut edge with glue so that it does not unravel. Using scissors, trim off the excess, leaving a little less fringe on the side.
- The workpiece is brought to the fire (using a lighter) for a short period of time so that it does not turn black. You need to wait until the material cools down and inflate the middle to add volume.
- The iron is turned on to 2, and each petal must be placed against it in turn.
- When the sheet starts to curl, it needs to be applied to the mold.
- A circle is drawn on green foamiran with a toothpick. It is necessary to make cuts along its edges at a distance of 0.5 cm and the edges of the resulting squares are cut off to obtain triangular leaves.
- The resulting sepal is applied to the iron and after it heats up, you need to remove it and pull the middle so that it becomes convex.
- The first 7 petals are glued with a small distance between them, then the second and third rows are attached between them.
- The sepal is glued to the resulting flower using a hot glue gun.
Flowers from foamiran and other materials. Master classes for beginners with step-by-step description
Lily
Stages of flower creation:
- A petal is drawn on cardboard and cut out.
- The cutting is applied to white foam, outlined and cut out. There should be 6 petals in total.
- They need to be tinted on both sides. Colors can be used as desired.
- Then the petals need to be heated on an iron and veins applied with a toothpick.
- To give them a wavy look, their edges are heated with an iron.
- Using a brown marker, apply dots to all the petals.
- The stamens are glued to the wire.
- Three leaves are cut out of green foam and given texture by heating them with an iron.
- The stamens and row 1, consisting of three petals, are glued to the pistil, then rows 2 and 3 are attached in a checkerboard pattern.
- At the end, the leaves are glued on.
Lily made of satin fabric:
- A lily petal template measuring 7x4 cm is cut out of paper.
- Using these blanks, 9 petals are cut out of satin fabric.
- Use a lighter to singe the edges of all the petals and stretch them slightly.
- Next, veins are made on them with a hot blunt knife. The backing is made from fabric folded several times. After that, veins are applied on both sides.
- A circle is cut out of the fabric on which the flower assembly process will take place.
- To keep the flower in shape, apply a little glue to the base of the second and third rows of petals.
- Then the stamens are made. To do this, the end of the fishing line needs to be coated with glue and dipped into the micro beads.
Poppy
Stages of creating a flower from foamiran:
- Petals are drawn on cardboard and cut out.
- To give them relief, you can twist them by rolling them between your fingers and fold them like an accordion.
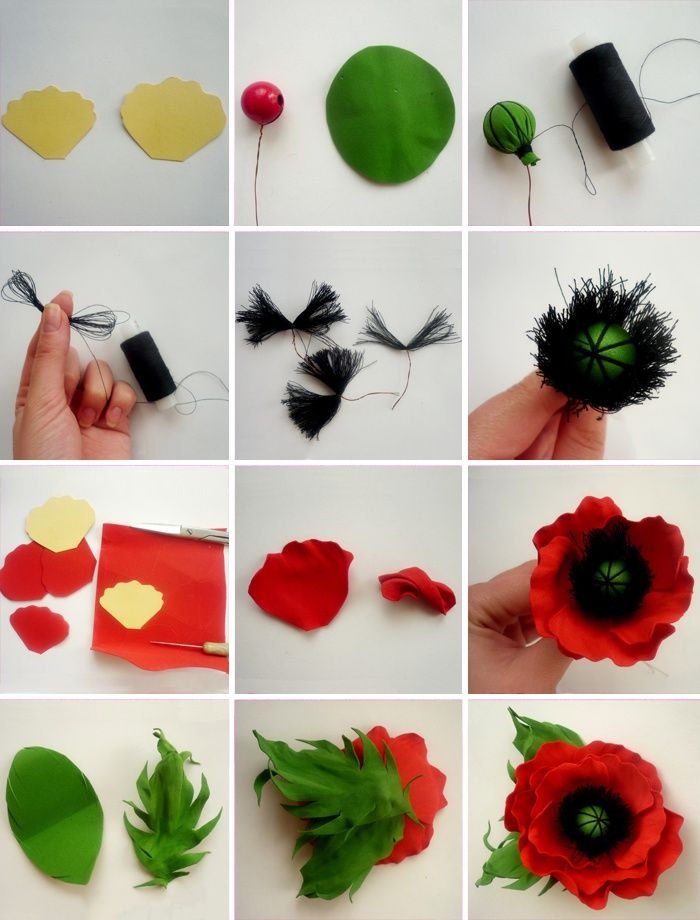
- A circle is cut out of green foam.
- To make a stem, you need to insert a bead into the wire and secure it by twisting it.
- The circle is heated with an iron and a bead is wrapped in it. The edges are attached to the wire around the circle.
- The resulting ball needs to be wrapped with black threads.
- Now the red poppy petals need to be attached to the stem. Two rows will be enough to make the flower lush.
- Leaves are cut out of green foam, cut along their edges, and then they are twisted between the fingers for realism.
- The wire is cut and the leaves are glued on.
Poppy made from corrugated paper in red, black and green shades:
- Templates of petals are cut out of red paper and their upper edge is stretched. A total of 6 pieces are needed. The petals need to be crumpled and wrinkled. With manicure scissors, 2-3 cuts should be made along the edges of each petal.
- A square is cut out of black paper and cut along the folds, leaving about 1 cm from the edge. These will be the stamens. Then they need to be twisted into small tubes.
- A rectangle is cut out of green paper and twisted once in the middle.
- You need to hide some kind of ball inside.
- A stem is made from wire, then the stamens are attached to the middle with thread.
- The petals are also attached with threads.
Chamomile
Stages of creating a flower from foamiran:
- Four circles of different diameters are cut out of white foam.
- Using scissors, make the shape of petals around the circumference and cut them.
- The ends are heated with an iron to give them shape.
- A strip is cut out of yellow foam and cuts are made along its entire length to create a fringe. Then it is coated with glue and twisted.
- The middle is attached to the wire.
- The petal blanks are strung on the stem. You need to start with a small circle, greasing it with glue.
- To make the sepal, a circle is cut out of green foam and cut into it. It will be the last row in the flower.
Paper chamomile:
- You need to cut a circle out of a sheet of paper and cut it on 4 sides.
- Next, each quarter of the circle must again be cut into 5-6 parts.
- The cut out petals need to be rounded.
- To make the petals look more realistic, use a seam ripper to make pressed-in stripes on one side of the petal. They need to be drawn from the edge to the central part, so that the petal curls. The ripper also makes a pressed-in middle. It is cut out of yellow paper.
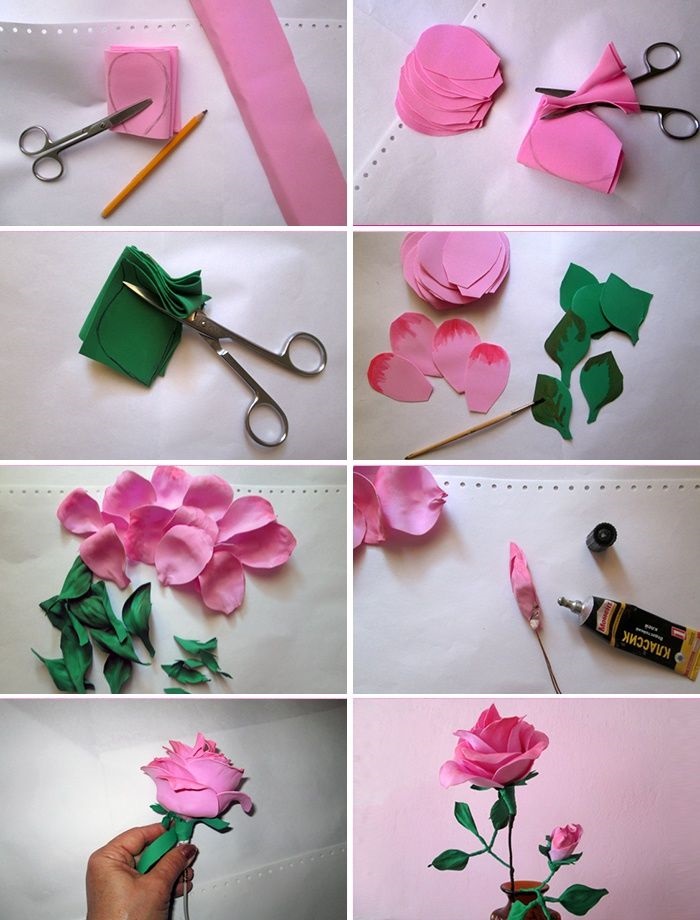
Rose
Stages of creating a flower from foamiran:
- From pink foam, cut out 2 types of petals of different sizes but the same shape. A total of 10 pcs.
- One by one, they need to be applied to the iron and the edges stretched with it.
- You need to make a small ball out of foil and attach it to the wire.
- Petals are glued to it, forming a rose.
- Then leaves are made from green foam and attached to the stem.
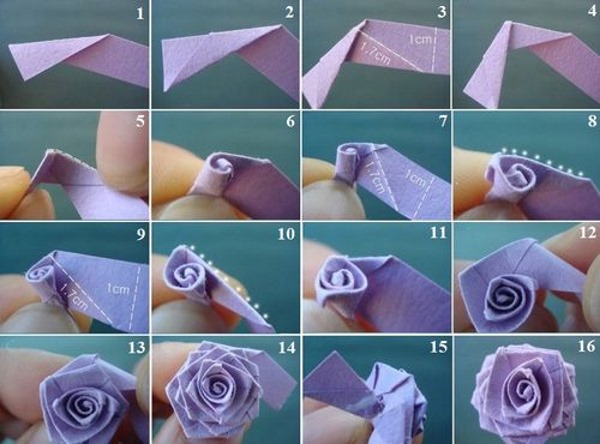
Rose from a napkin:
- Along one edge of the napkin, a strip 5 cm wide is folded back. It must be grasped with two fingers and the napkin must be pinched between them.
- The remaining width of the napkin should be wrapped around your fingers to form a tube.
- At 1/3 of its height from the top, you need to start twisting it so that you get a dense stem. Having reached the middle, the lower edge needs to be bent upwards to get a leaf.
- Next, the stem is twisted to the end.
- To prevent the rose from unraveling, it should be fixed with hairspray.
Ranunculus
Stages of flower creation:
- Petals of various sizes are cut out from foam in the desired quantity.
- A circle is formed from foil and attached to the wire.
- Using an iron, the petals are given a wavy appearance.
- Forming the flower: the petals are glued overlapping, starting with the smaller ones.
To create a Ranunculus from felt, you will need a set consisting of:
- felt;
- scissors;
- heat gun;
- wires;
- nippers.
32 circles of different sizes and 1 green leaf of irregular shape are cut out of felt. The flower assembly begins with the central petal. A hole is pierced in the middle, a wire is inserted there and glue is added.
Then the remaining petals are attached until the flower reaches the desired size and volume. A hole is made in the center of the green leaf, it is put on the wire. Then a drop of glue is added, it is fixed at the base.
Flower arrangements from foamiran
From colored paper, as can be seen from the above material, you can make a variety of crafts. Flowers made of paper can decorate any objects and rooms. With its help, you can create entire flower arrangements with your own hands. Such products from foam look especially beautiful.
Flowers made with this material can be used to create a composition in a pot, vase, on a hair band, comb, and even a hair clip.
Example: flower arrangement in a pot.
To create a composition, you will need a set consisting of:
- pot;
- foam;
- sisal;
- twine, tape;
- plastic ball;
- scissors;
- Moment glue, PVA glue, hot glue gun;
- decorative ornaments.
Stages of creating a flower arrangement:
- Using PVA glue, the pot is wrapped with twine and decorated with ribbon.
- Sisal is glued to the rim of the pot and a plastic ball is glued to the center. The result is the basis for the composition.
- Circles (2.5 cm in diameter) are cut out of foamiran (pink and white shades). These will be the petals.
- The next stage is the formation of roses.
- The circle is rolled into a tube and the edge is glued.
Next, the required number of parts are glued in a circle, with an offset of half a petal. - Then the required number of roses in the desired colors is made.
- They are glued to the base.
- Leaves are cut out of green foamiran and glued to the flowers.
- The resulting composition can be decorated with decorative items.
In a similar way, you can make paper flowers with your own hands and glue them to the hoop, decorating them with different objects. The result will be an impressive hair decoration.
Article formatting:Natalie Podolskaya
Video about making flowers from foamiran
How to make flowers from colored paper - foamiran, namely roses (master class for beginners):