A snood is a practical thing, warm and fashionable. Any mother with basic knitting skills can knit an ultra-fashionable, original and warm winter wardrobe item for her child. Among the most popular children's snoods are seamless items with decorative buttons and a turn-up.
What is a snood? What is its purpose?
This is the name of one of the variations of a knitted or cloth scarf. It is worn in winter, autumn, spring and in the off-season. A warm children's accessory, like the adult version, can be very short (like a high collar) and complemented by a cap or long, resembling a pipe.
The snood differs from a traditional scarf in that it has no ends, i.e. it is a closed circle. The purpose of the snood is to protect the head, the back of the head, and from the cold and wind.
How to choose the right yarn and knitting needles for knitting a children's scarf
Today, children's hats and accessories knitted from thick threads are popular. For example, from a fiber that includes wool (semi-wool) and acrylic threads. It is permissible to use two types of yarn of different textures, connected into one thread.
The classic option is not left without attention - natural cotton combined with pure wool. Wool yarn can irritate the delicate skin of a child, so semi-wool is often chosen for children's products.
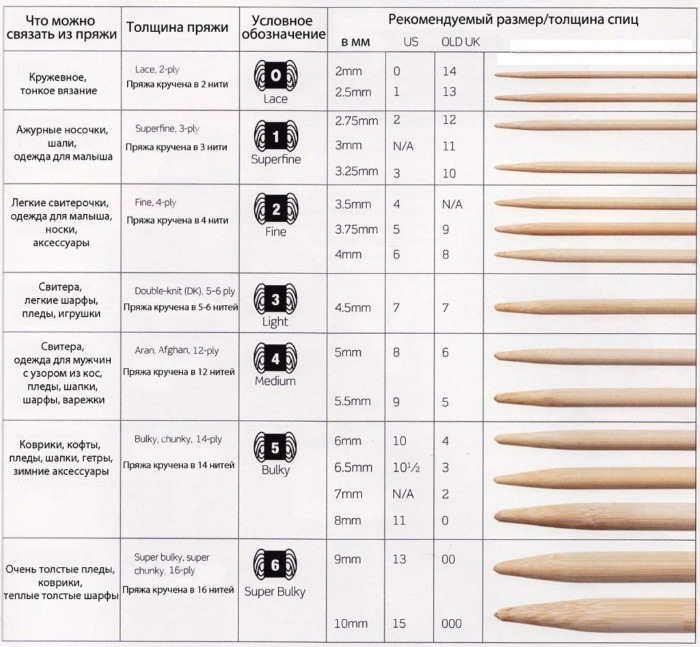
To calculate the thickness of the needles you will need for knitting, you need to have an idea of the weight of the skein and the length of the yarn. This information is usually indicated on the packaging tape that the yarn is wrapped with.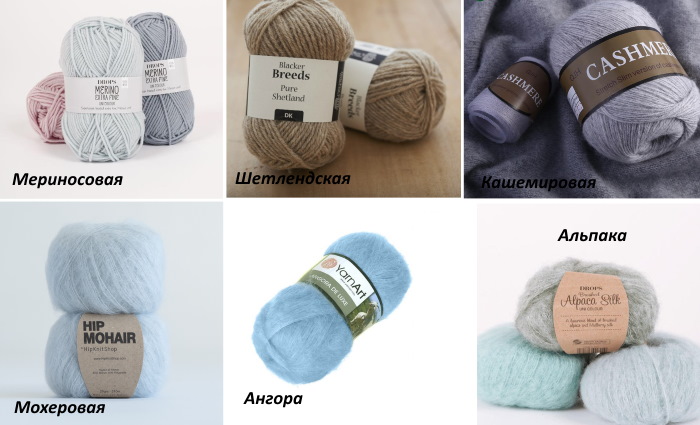
Table of correspondences between the thickness of knitting needles and the length of thread from a skein weighing 100 g:
| Width of needles | Length of thread |
| from 9 to 15 mm | up to 50 m |
| 6-8 mm | 100 m |
| 5-6 mm | 50 m |
| 4-5 mm | 200 m |
| 3–4.5 | 250–300 m |
| 2–3.5 mm | 350–400 m |
| 1.5–3 mm | 800 m |
If, for example, a snood is knitted for a child under 5 years old and a skein of semi-woolen thread weighing 100 g (thread length - 250 m) is selected for making this accessory, knitting needles of 3 mm thickness will be needed. This is provided that the knitting will be done in one thread or the knitting needles will be 4.5 mm thick if the snood is knitted in 2 threads.
It is also necessary to take into account the style of work. For example, when knitting tightly, choose thicker needles, and vice versa, when the loops are wide, thin needles will help to achieve the optimal result.You can knit a children's snood with knitting needles of any thickness and configuration.
The simplest and most affordable circular knitting needles are connected with a regular fishing line. The length of the entire structure is usually 80–100 cm. The optimal length of straight knitting needles suitable for knitting a snood for a child aged 5 to 10 years is 35 cm.
Each of the listed options has its drawbacks. Handicrafts strung on straight needles cannot be taken with you on a trip or tried on properly. The disadvantage of circular needles is the twisting of the line and the excessively sharp difference in thickness between the working tool and the line. The only exception is professional tools for craftsmen.
The material from which the knitter's tool is made is of great importance. For wool yarn, for example, metal knitting needles are ideal. The thread slides smoothly along their surface, and the loops are not distorted. For working with smooth or slippery yarn, it is worth getting bamboo knitting needles. They are also suitable for knitting openwork patterns.
Calculating the amount of yarn
To correctly calculate yarn consumption, it is necessary to measure the thickness of the thread. The thinner it is, the less yarn (by weight) will be needed for the work. Professionals, when making calculations, start from the metric number of the yarn - an indicator of the thickness of the thread, which is equal to the amount of yarn contained in 1 g.
To get this figure, the number defining the length of the thread packed in one skein (usually indicated in meters) must be divided by the weight of the skein. The higher the metric index, the thinner the thread and vice versa. If the yarn consists of several threads, its metric index on the label is indicated by a numerical fraction, where the numerator determines the thickness of the yarn, and the denominator - the number of threads.
Most craftswomen, in order to calculate the amount of yarn needed for the work, first knit a so-called "control sample". For example, a piece of fabric measuring 10x10 loops. Having calculated the area of the control sample, the needlewoman unravels it and measures the length of the thread used in the process of work.
Having determined the amount of yarn needed to knit 1 square cm of fabric, the resulting figure is multiplied by the number that determines the area of the future product to find out how much yarn is needed to make the item. To calculate the width of the future item, the figure that implies the head circumference is multiplied by the number of loops per 1 cm.
The amount of yarn required is also affected by the quality and composition of the thread: the fluffier it is, the less of it will be needed; the looser the twist of the yarn, consisting of several threads, the less amount will be needed for the work.
Another important factor is the size of the product itself and the parameters of the main pattern. To make openwork items, you need less thread than for items decorated with "braids", "bumps" and other convex elements.
Types of patterns, diagrams, description
Among the many patterns, there are several that even beginners in knitting can handle. It is better for them to start with the basics, for example, with garter stitch or pearl knitting.
More complex knitting patterns include the “Braid” and “Butterfly” patterns.
Step by step instructions for knitting baby snoods
Even a novice craftswoman can figure out how to knit a children's snood with knitting needles without taking measurements (for example, when the snood is knitted as a gift).
To avoid making mistakes in calculations, it is enough to know:
- if the snood is intended for a 4-6 year old child, its optimal width is 15 cm;
- a wider product (18 cm) is suitable for an older child - from 7 to 9 years old;
- the width of the product for 10-12 year old children is 20 cm;
- For children aged 12 and older, the snood may be widened to 22 cm.
Strict snood for a boy
You can knit a children's snood with knitting needles for a boy from semi-woolen thread or viscose yarn with a small admixture of wool. The upper and lower ends of the snood are designed in the form of a Polish or regular 1x1 elastic band.

Job Description:
- The lower part of the product is knitted with an elastic band. Its length can vary from 2 to 5 cm;
- The next 2–5 cm are stockinette stitch;
- The next section of 2–5 cm is knitted with purl fabric;
- Points “1”, “2” and “3” are repeated the required number of times.
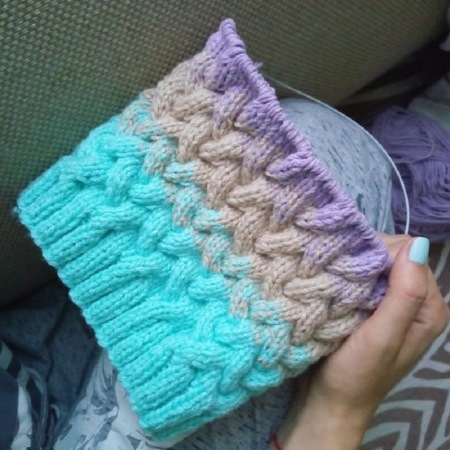
Snood for girls with a braid pattern
The work is done with an additional 3rd knitting needle or a gypsy needle. The basic knitting pattern is quite simple: having knitted 2 loops purlwise, the needlewoman knits 8 loops knitwise, and then - 2 more purlwise.
The specified sequence is followed to the end of the row and applies to all odd rows, except for the 7th, 13th, 19th, 25th, 31st, 37th rows, and so on. In the purl rows, each loop is knitted as it lies. In the 7th, 13th, 19th rows, "braids" are formed.
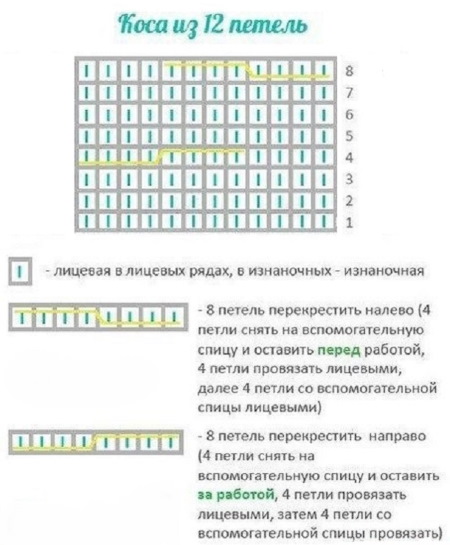
Description of the rapport:
- After the edge stitch, knit 2 purl stitches;
- 4 of the 8 front stitches are transferred to an additional knitting needle. If during the formation of the very first "braid" the additional knitting needle was in the position in front of the work (or vice versa, behind the work), all subsequent "braids" should be formed in the same way;
- The remaining 4 loops on the left knitting needle are knitted;
- The loops transferred to the additional knitting needle are returned to the left one and knitted as front loops;
- The rapport ends with 2 purl stitches.
Children's snood with a pattern "Butterflies" on buttons
The pattern is formed by pulling together the threads formed by transferring loops from one knitting needle to another without knitting. The width and height of one rapport is 10 loops per 10 rows. It is desirable that the number of loops that make up the main pattern (edge loops are not counted) be a multiple of 10. If this is not possible, loops that “do not fit” into the main pattern are evenly distributed along the edges.
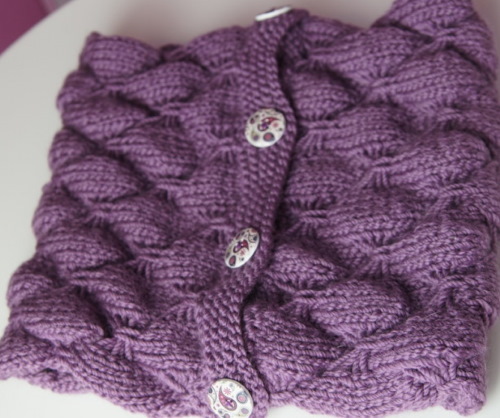
The front rows (1–9) are knitted as follows: the first 5 loops after the edge are transferred to the right knitting needle as is (they are not knitted). The next 5 loops are knitted. All the back rows, except for the 10th, 20th, and so on, are knitted as purl. The “butterflies” are formed in the 10th and subsequent rows, multiples of “10”.
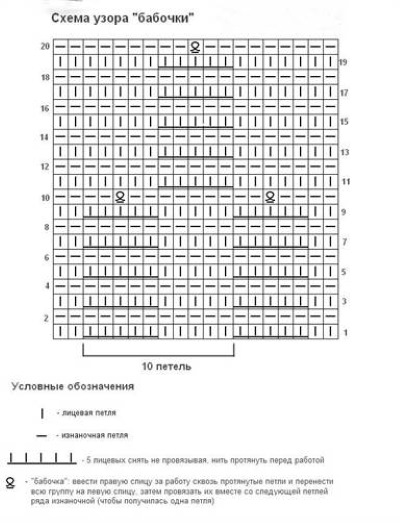
Description of the "butterfly" pattern:
- The edge loop is removed, the 1st and 2nd are knitted as purl;
- Knitting is turned. Now the right and left needles have changed places. The right needle is passed from the bottom up under the freely stretched threads that have formed in those places where the loops were not knitted. These threads must be “girdled” with the working thread. As a result, a long loop is formed on the right needle. Knitting is turned again. 2 loops are knitted together purlwise;
- 7 loops are knitted purlwise, after which the pattern is repeated.
Snood for girls with a lapel
To make this item, yarn like Lion Brand (acrylic with 20% wool admixture) is used. The needlewoman will need additional accessories - 4 buttons and 4 snaps.
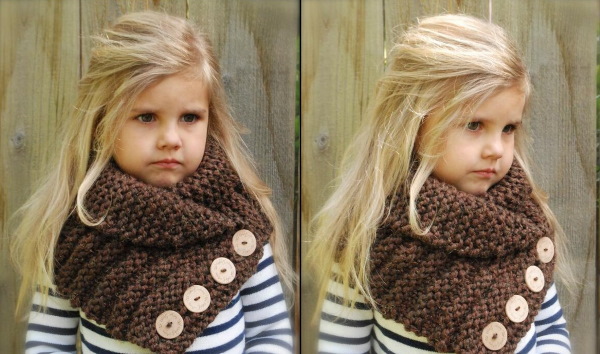
Step by step knitting:
- The first 9 rows are knitted in garter stitch (all stitches in even and odd rows are knitted).
- The loops of the 10th, 11th, 12th, 13th and 14th rows are knitted inside out. In the 11th and 13th rows, both edges of the product are widened by 1 loop.
- Rows 15–28 are knitted in the same way as 1–14. The work continues until the width of the snood increases by 1.5 times, after which they begin to design the lapel, the total height of which is 16 rows. The lapel can be knitted with an elastic band or with a garter stitch.
- Then continue working, observing the mirror sequence - remove the added loops and finish the work in a garter style - with facial loops. Having finished knitting, decorate the snood with buttons and sew on hidden snaps.
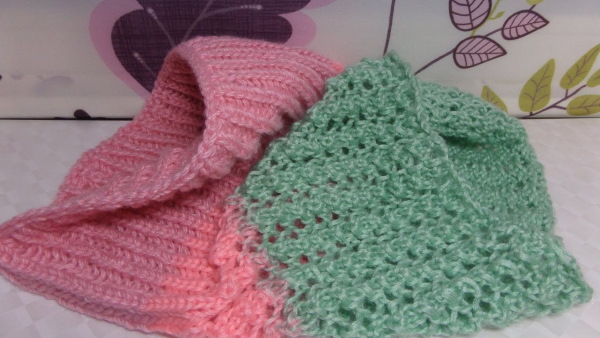
Openwork children's snood knitted
To make such a snood you will need thin semi-woolen yarn. The 2nd and all inner rows of the product are knitted purlwise.
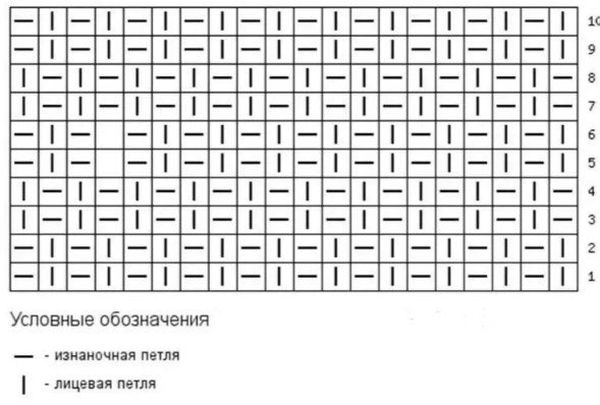
The 1st, 3rd and 5th rows are knitted according to the pattern:

Loop symbols:
- "Pluses" mark the edges;
- "black squares" mark the front ones;
- "circle" - yarn over;
- "triangle" with a left tilt - one front loop is knitted from two front loops;
- "triangle" with a tilt to the right - one loop is removed, the next front loop is knitted and threaded into the removed, previous loop;
- “horseshoe” - the loop is slipped as if it were not knitted, the next 2 are knitted and passed through the slipped loop;
- The numbers indicate the rows.
Having knitted the pattern according to the diagram, everything is repeated from the beginning.
Children's snood with pearl pattern
Knitting a children's snood is easy if you start with simple patterns, for example, with a pearl one.
Description of work for the first row: 1 front, 1 back, and so on. The second and all subsequent rows are knitted as follows: a back loop is knitted over the front loop, and a front loop is knitted over the back loop. Both circular and straight knitting needles are used to knit the pearl pattern.
Garter stitch snood for a child
The technology for making a pattern with straight knitting needles is as follows:
- The 1st edge loop is removed without knitting;
- The 2nd and subsequent loops are knitted through the front part (the one that is closer to the knitter);
- The last edge loop is knitted purlwise.
When knitting with circular needles, one row (it doesn’t matter whether it’s even or odd) is knitted, and the other is purl-knitted.
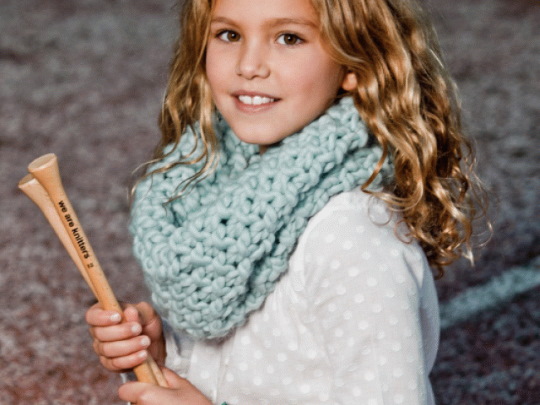
Snood made of very thick yarn
For this type of knitting you will need bulky threads, for example, a skein of acrylic yarn 100 m long and weighing 170 g with an admixture of wool (20%).
When working with very thick yarn, it is important not to make a mistake in the calculations, so Even experienced needlewomen start by knitting a control piece:
- Cast on 20 stitches using 9mm thick knitting needles and knit 10 rows;
- Determine how many loops there are per 10 cm.
To make this model, you will need one decorative button with a diameter of 20 mm and 3 snaps. The width of the future snood is 22 cm, the recommended height is 66 cm. Knitting consists only of face loops. The decoration for the snood is a decorative button. Snaps are used as hidden fasteners.
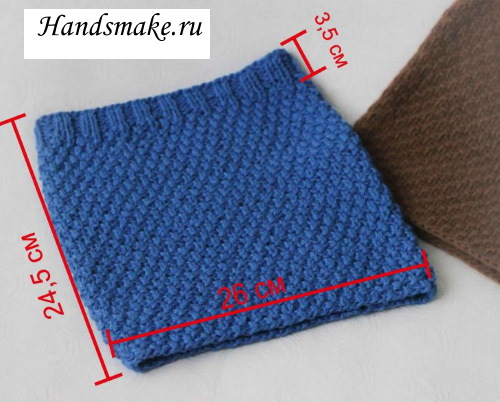
Snood clamp for children
To make this model you will need circular knitting needles 3.5–4 mm wide and 2 skeins of Baby Wool wool yarn (the length of the thread in each skein is 200 m, the weight of one skein is 50 g). The width of the finished product is 52 cm, the recommended height is 24.5 cm.
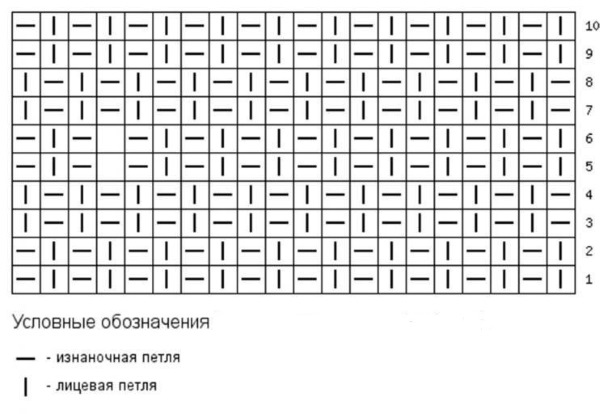
Step by step knitting:
- Row 1 is knitted as a 1x1 elastic band - front loops alternate with back loops.
- In the 2nd row, knit the purl stitches as front stitches, and knit the front stitches as back stitches.
- In the 3rd row, knit stitches are knitted as knit stitches, and purl stitches are purl stitches.
- The 4th and all even rows are knitted like the 2nd.
- The 5th and all odd rows are knitted like the 1st row.
The resulting pattern is called "tangle". The last 7 rows are knitted with a 1x1 elastic band, after which the loops are closed.
The garter stitch, "tangle" and "pearl" patterns are often chosen by beginning needlewomen who have set a goal to make a hat or scarf for a child with their own hands. You can knit such a children's snood with both circular and straight knitting needles.
Video about knitting snoods
How to knit a children's snood with knitting needles: