A ballerina is a rather complex drawing for children, as it requires depicting a human figure. This article covers several master classes – from the simplest, which use construction using elementary geometric figures, to more complex ones – with shading, layering, and shadows.
Simple drawing
The ballerina (the drawing for children in this master class is done in a simple version) will have a cartoonish appearance - a face with big eyes, and the pose chosen is simple - she will stand on her toes with her arms spread out to the side.
This type of drawing can be done with younger children, as it is difficult for them to achieve correct lines and proportions, as well as to show the expressiveness of more complex poses.
For this work you will need colored pencils and paper:
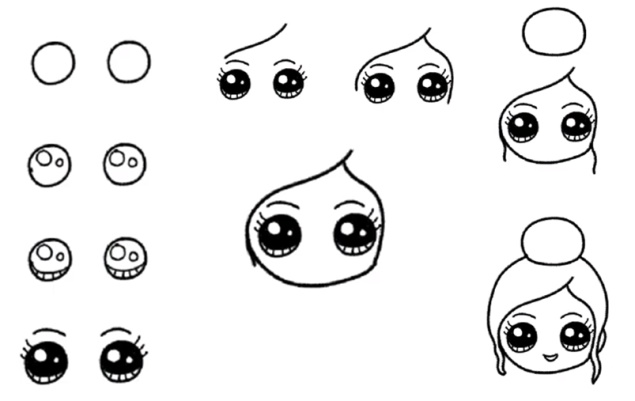
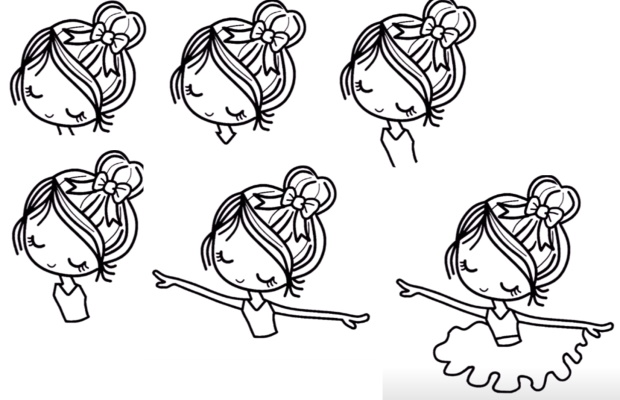
- Draw 2 circles in the middle of the sheet – the ballerina’s eyes.
- Inside them add 2 circles - one bigger, one smaller. They should be on the left side (the ballerina looks to the left) or on the right side (then the gaze will be directed to the right).
- At the bottom of the eyes, you can add eyelids in the form of arcs drawn inside, and depict eyelashes with short lines. To simplify the drawing, you can skip this step.
- Paint the inner surface of the eyes with black, leaving the previously drawn highlights, add 3 eyelashes on top and eyebrows in the form of arches.
- Draw the hair lines with smooth curves, as shown in the pictures below.
- Draw a chin line at the bottom. To get a face like a LOL doll, draw this line close to the eyes. A large head in such characters is associated with childish spontaneity and kindness, so round shapes are used to depict dolls.
- Draw curls on the left and right, and a knot of hair in the shape of an oval on top.
- Add semicircles on the sides to outline the contours of the head, draw a small arc on the right – the ear, and depict the mouth in a simple way – in the form of a crescent.
- Draw ribbon loops on the hair knot.
- Draw the neck as two short segments, and draw two descending lines from them – the shoulders.
- Draw the ballerina's thin arms and show the fingers in a simplified form - in the form of a "fork".

- Draw the ballerina's body as shown in the picture below. It can be drawn a little narrower, made tighter. Show the neckline of the dress as a semicircle.
- Draw a triangular ballerina's tutu. Draw several wavy lines on it to show the multi-layered nature of the skirt.
- Draw the ballerina's legs as vertical stripes that taper to a point at the tips.
- Draw the pointe shoe ribbons in the form of intersecting stripes.
- Draw 2 symmetrical lines (corset) on the chest, and a heart between them.
- Color the ballerina as shown below or using your own colors. It is recommended to choose soft shades so that the dancer's image is light and airy. To add volume to the hair, draw with a darker pencil.
Ballerina in a tutu with hearts
Ballerina (drawing for children without coloring) in this example will be done only with graphite pencils. The child will be able to master the technique of shading and creating shadows.
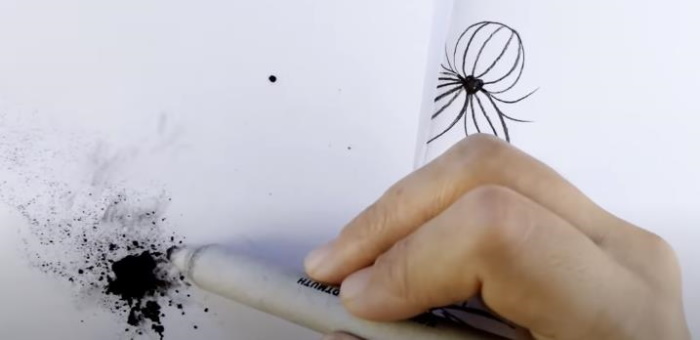
Despite the fact that the drawing is not so bright, it is possible to convey the volume of objects, the play of shadows and highlights quite fully, since the human eye distinguishes more than 100 shades of gray. The painting will be done in a different technique - graphite powder.
For work you will need a very soft graphite pencil 8B or 9B. You can use a colored black pencil from the set instead. You will also need an eraser, sandpaper (or a knife) and a shading stump. The latter can be purchased factory-made (Blending stump) or made yourself from tightly twisted paper.
The process of creating such an illustration is as follows:
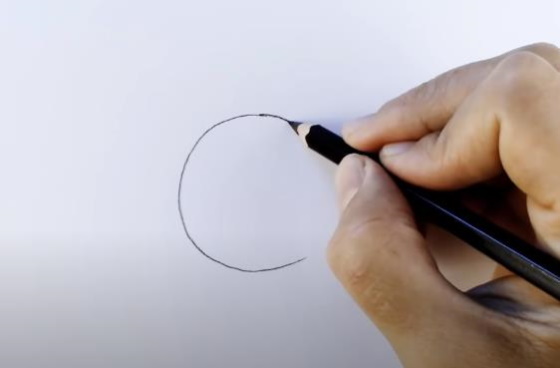
- In the upper half of the sheet, draw a large circle – the ballerina’s head.
- Add a smaller circle on top – this will be a hair knot.
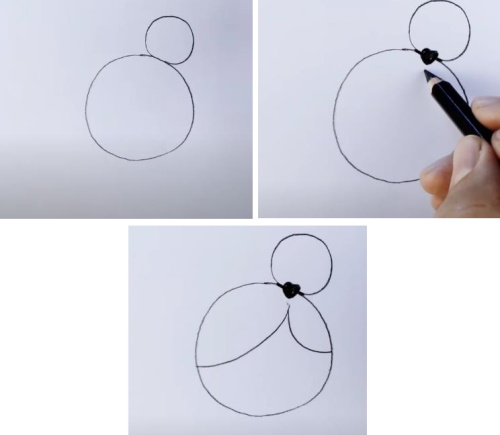
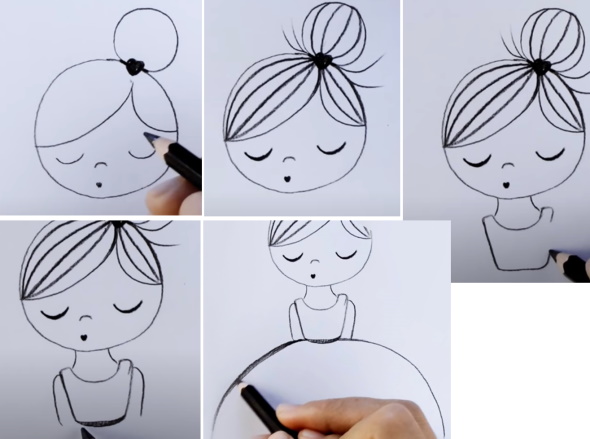
- At the point of contact of these two circles, draw a small black heart and highlight the ribbon with a dark color.
- Draw the hairline with two arcs.
- Show the eyes as two small arcs curved upwards, the nose also as an arc, and the mouth as a tiny heart.
- Draw a few more arcs inside the head contour, which will make the ballerina’s hairstyle more prominent; also draw a pair of “hairs” from the knot to the left and right.
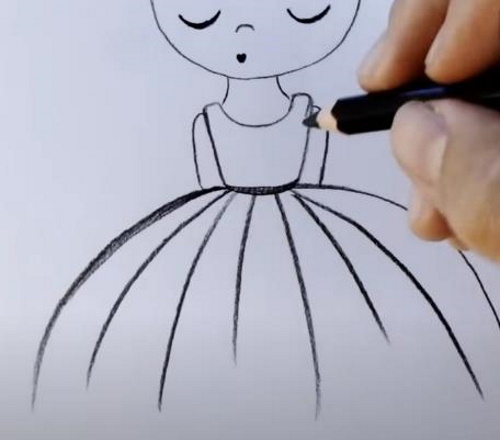
- Draw 2 lines down – the ballerina’s neck, and draw the upper part of the dress in the form of a trapezoid.
- The arms are depicted as two lines reaching the waist. In the drawing, they will be drawn back, behind the dancer's back.
- Draw a fluffy ballerina's tutu with two arcs diverging from the waist.

- Draw a few more arcs going down on the tutu. They will make it look more like a real full skirt.
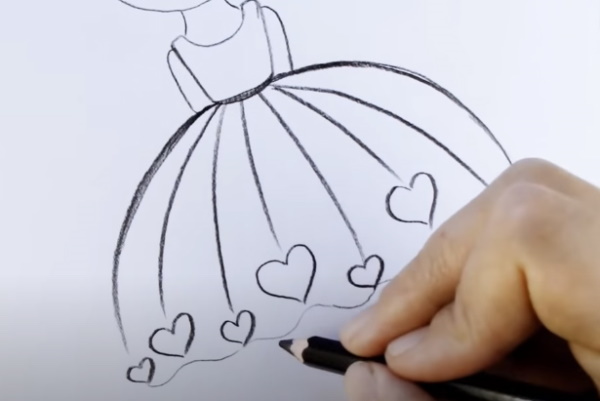
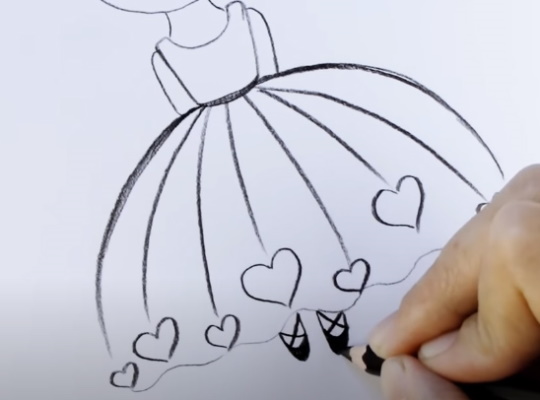
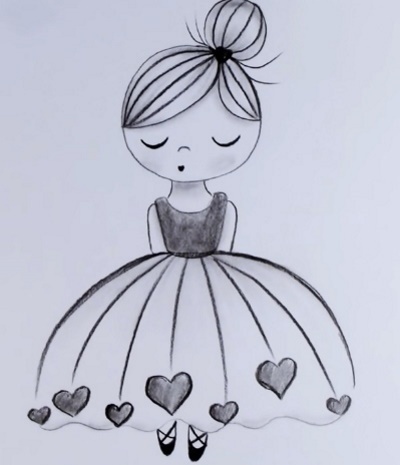
- At the end of these arcs, draw hearts of different sizes, and draw a wavy line at the bottom – the bottom edge of the ballet tutu.
- Draw the legs as two oval shapes and color the pointe shoes as shown below.
- Paint the ballerina's body and hearts without pressing too hard.
- Clean the tip of the pencil on sandpaper. This can also be done with a knife or blade. If the child is small, an adult should help him.
- Using a blender, apply graphite powder to the hair in the corners of the contours and rub in.
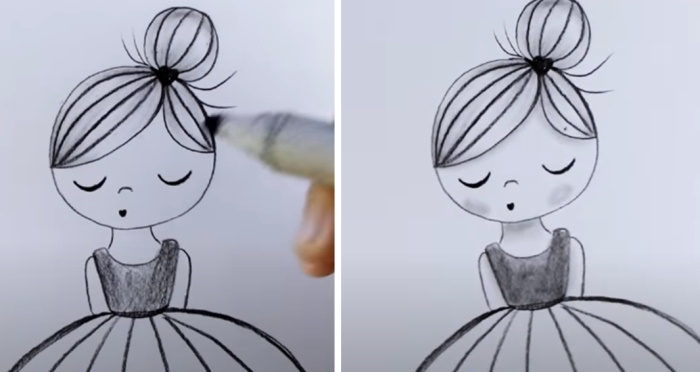
- Use a blending tool to go over the ballerina's face, body, neck and arms, creating shadows in the drawing. Draw a "blush" on the cheeks.
- Also blend the folds on the pack and its bottom edge.
This technique can also be used when working with colored pencils. For this, it is better to choose watercolor pencils, as their lead is softer than that of regular pencils and is better shaded. Flowers can be depicted along the edge of the skirt instead of hearts.
Dancing ballerina in a pink tutu
The ballerina in this picture also has a cartoonish look. This example is a bit more difficult to complete, as it requires greater expressiveness and plasticity of the figure. This option can be offered to children of primary school age.
To complete the drawing, you will need colored pencils and paper. You can sketch the outlines first using a simple graphite pencil, as it can be easily corrected with an eraser.
The step-by-step process of drawing such a picture is as follows:
- Draw part of the oval – the lower outline of the face. The ballerina will look down.
- Draw another wavy outline at the top right – the hairline and eyes in the form of concave arcs, just like in the previous example.
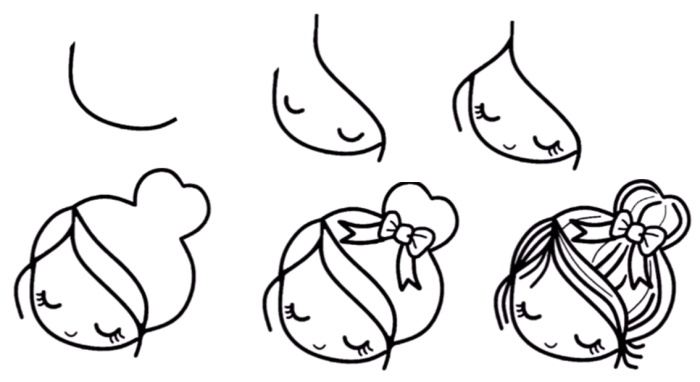
- Use small arcs to depict the mouth, eyelashes and add a second wave of hair on the left.
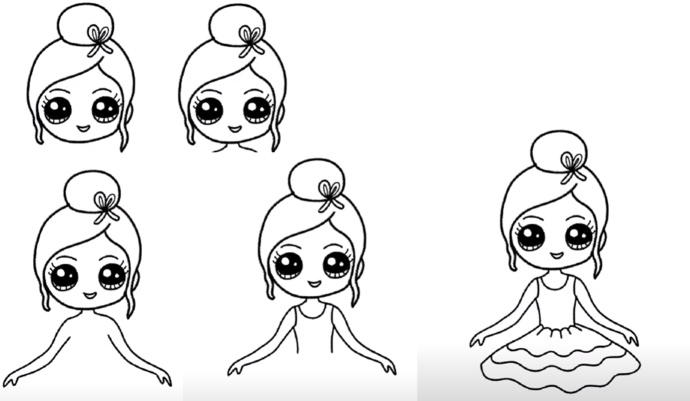
- Complete the contour of the head, rounding it with smooth lines. Add a knot in the shape of a heart on top. Draw the bangs in the form of a “wave”.
- Make a bow with hanging ribbons under the hair knot (it’s easier to start drawing from the bow knot).
- Add thick and thin lines on the hair parallel to the outer contours and hairs on the forehead and temples. The ballerina's hairstyle will acquire a more elegant look.
- Draw the neck using two parallel inclined lines.
- Use a triangle to show the neckline of the dress.
- Draw cutouts for the arms in the form of triangles and make a thin body with two parallel segments.
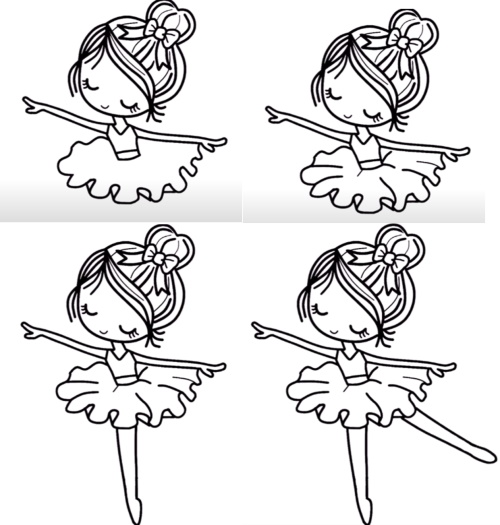
- Show the waistline on the dress.
- The ballerina's arms should be depicted on one line - the left one is raised up, and the right one is lowered down. You can first draw this line with a graphite pencil along a ruler.
- Draw the ballet tutu as a wavy figure, with the "waves" at the bottom being more convex. Draw the belt.
- Add sections along the bottom contour of the pack towards the inside to show the folds.
- On the ballet tutu, draw several lines from the waist to the tops of the folds along the edge.
- Draw the first leg as 2 vertical lines tapering towards the bottom.
- Move the ballerina’s second leg to the right and also draw it in a simplified manner – with straight lines that are pointed at the end.
- Draw pointe shoes and ribbons from them on the tips of the feet, crosswise.
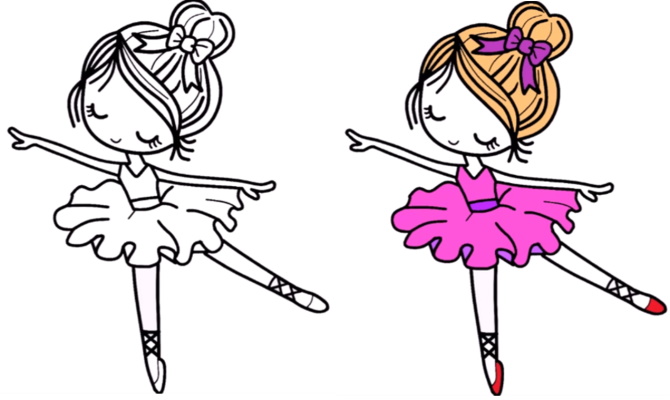
- Color the ballerina with colored pencils: hair - brown, dress - pink, and inner folds - a darker shade, bow - purple, and pointe shoes - red. You can choose other colors to taste.
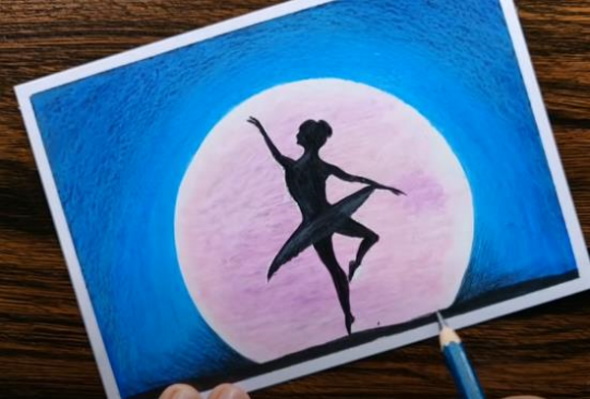
Ballerina against the moon
The ballerina (a drawing for children against the backdrop of the moon) in this master class is made using oil pastels, which can be purchased in the form of pencils in specialized craft stores.
The peculiarity of oil pastels is that they are produced in dry form, but when applied to paper, they allow you to achieve the same effects as when using oil paints. Such pigments can be shaded with a brush. At the same time, pastels are cheaper than oil paints.
Since oil pastels never dry completely, special fixatives are used to fix them. You can also apply several layers of hairspray. When drawing with a child, this material will allow you to acquire new skills and explore other materials besides traditional pencils.
For work you will also need paper sticky tape, black and simple graphite pencil, compass, white pencil and gel pen, shading or paper napkin, masking tape for artists (masking tape).
The drawing is done as follows:
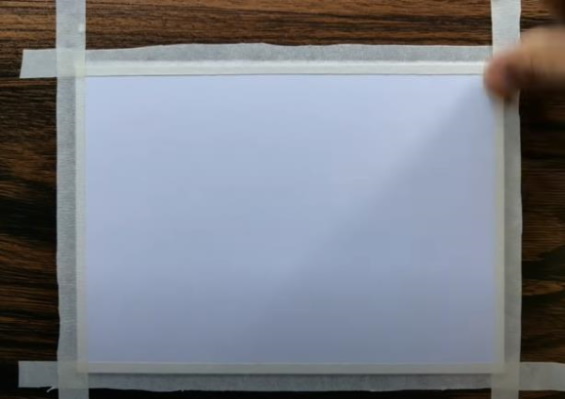
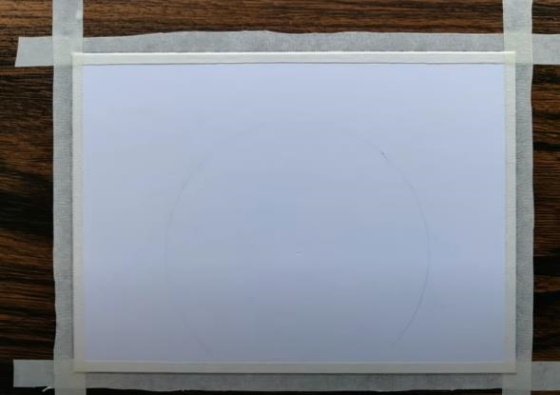
- Secure a sheet of paper to the table using sticky tape.
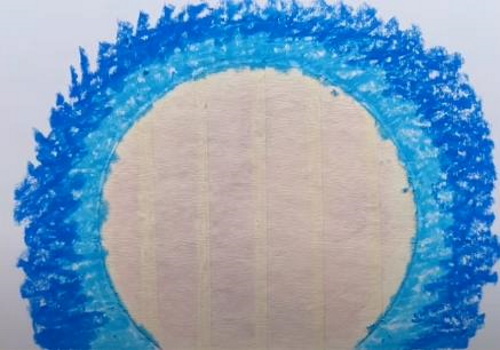
- Draw a circle with a compass just below the middle of the sheet.
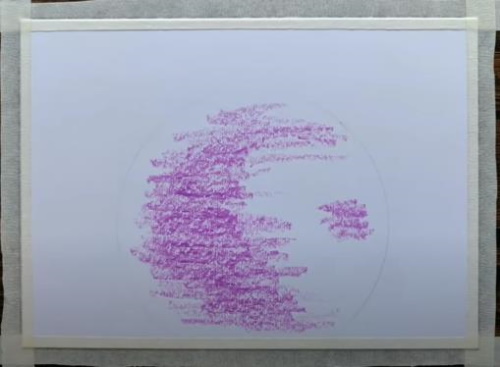
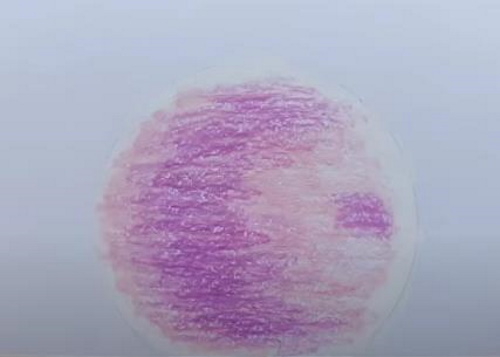
- Color part of the circle with a purple pastel pencil, as shown in the picture.
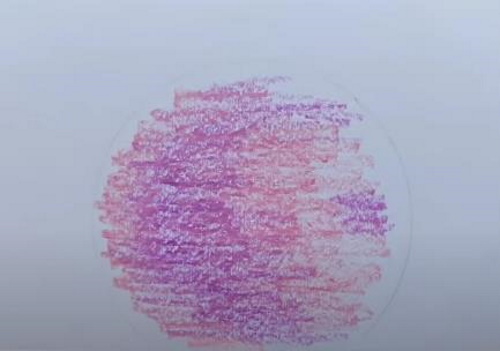
- Add strokes with a pink pencil.
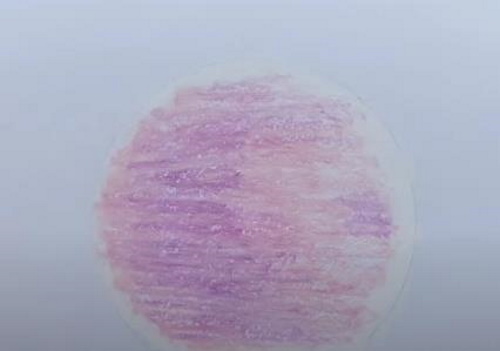
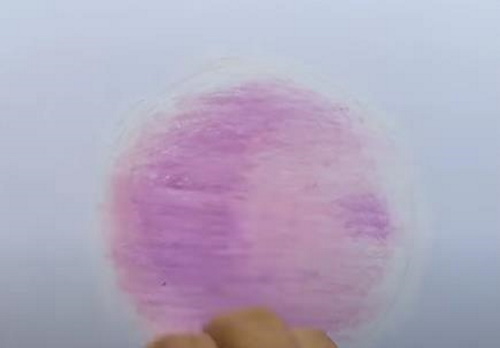
- Work the outline of the moon with white pastel.
- On the left, make the moon darker by adding strokes of purple pastel pencil.
- Use a blending stump or a piece of paper napkin to rub the pastel.
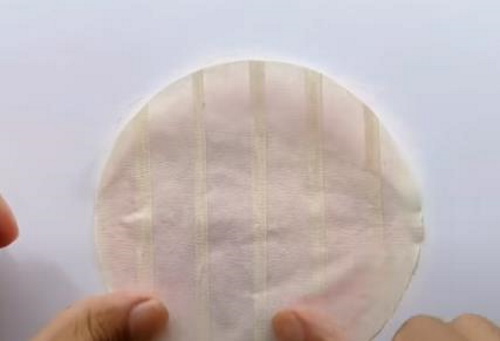
- Glue strips of masking tape overlapping each other and cut out a circle the size of the moon. Glue it to the drawing to protect it from the darker layers of pastel.
- For further work you will need 3 blue pencils of different shades (light blue, light blue and dark blue), as well as a black pencil. First, outline the moon with a light blue pencil, and then paint a strip about 2 cm wide around it.
- Make another stripe around it with a pencil of a darker shade.
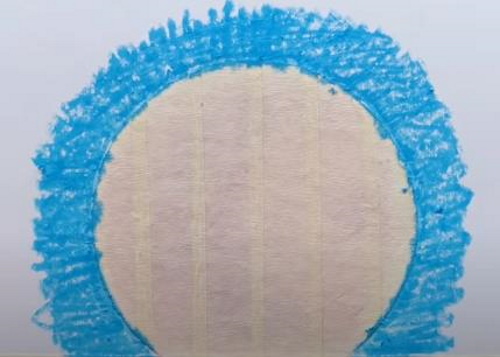
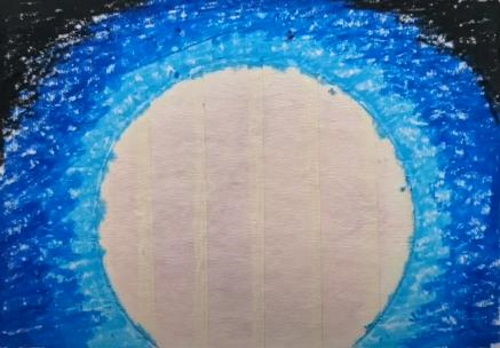
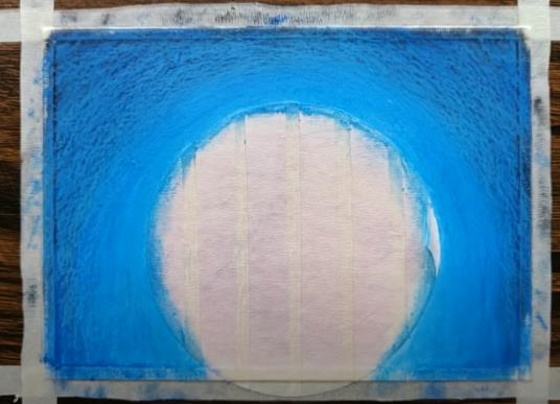
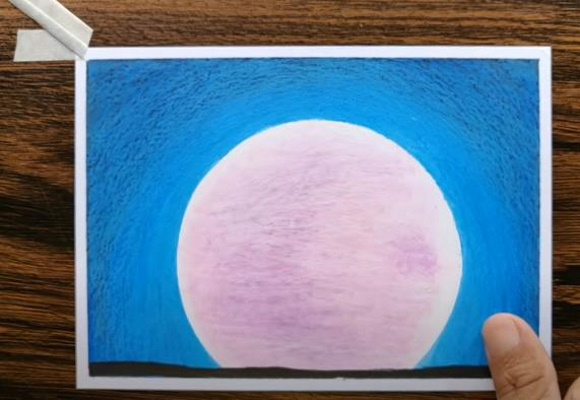
- Color the last outer circle with the darkest shade of blue, and the remaining space on the sheet with black.
- Rub these layers with a blending stump or a napkin to create a smooth transition between different shades, and then add strokes with a light blue pencil. Do the shading radially (along a circle).
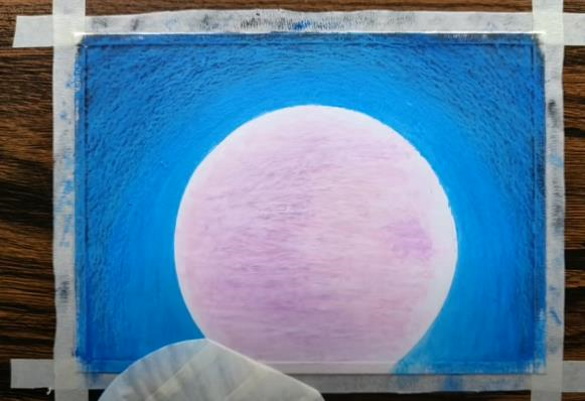
- Remove the protective circle.
- Using a black pencil, draw a horizontal line along the bottom edge of the design and remove the tape that was used to secure the design to the table.
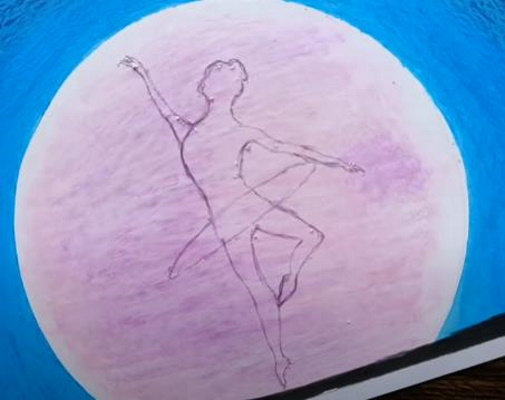
- Using a simple graphite pencil, without pressing too hard (otherwise the pastel will peel off), draw the outline of the ballerina.
- Color her figure with a black pencil (maximum softness 8-9B).
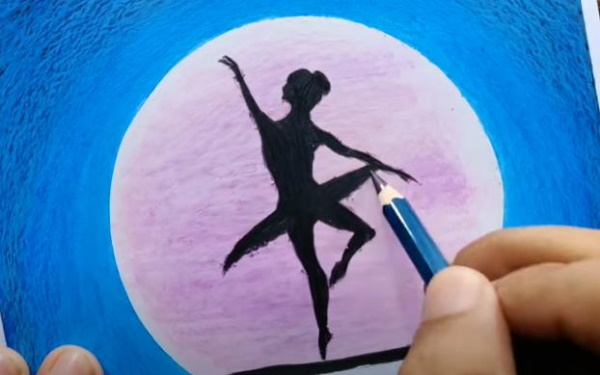
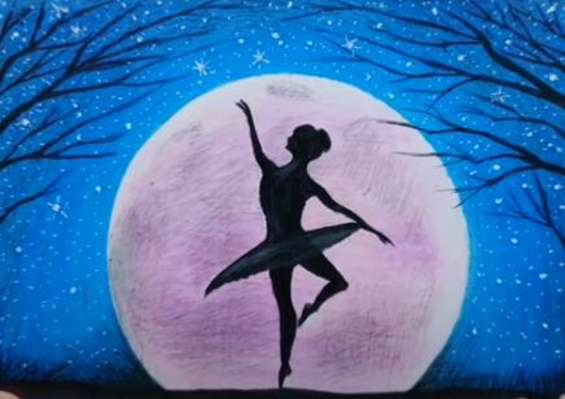
- Using a white pencil, make a few strokes as shown below to add volume to the dancer's figure.
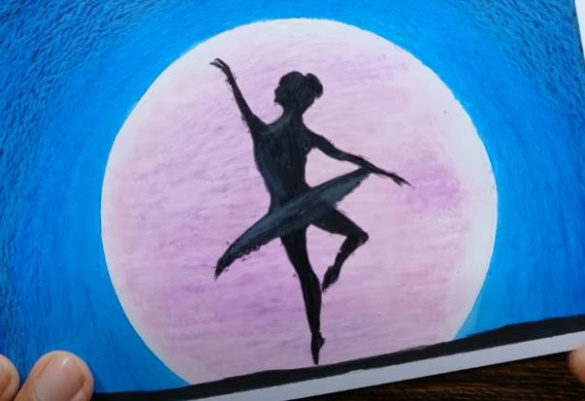
- Add some black strokes around the moon outline at the bottom of the drawing.
- Show the tree branches to the left and right of the dancer with curved lines using a black pencil, draw stars on a dark background with a white gel pen and shade the edges of the moon with a simple pencil. The illustration is ready.
Oil pastels allow you to create interesting drawings with a painting effect. They can be applied like regular pastels in several layers, but with too many layers the colors can become dirty. The more layers, the more the surface becomes similar to oil paints.
Most often, artists choose a more fleecy paper, as this allows for more layers of oil pastel, increasing the depth of the image. Smooth paper produces clearer lines, but it is impossible to achieve multi-layering on it.
Ballerina with umbrella
The ballerina (the drawing for children in this master class also features an unusual technique of execution) will be depicted in the illustration only in black and shades of gray.
To work you will need a graphite pencil of HB and 9B hardness, shading (you can do it yourself by folding the paper in several layers), a sheet of paper, a paper napkin, an eraser pencil, a ruler and a white gel pen.
The drawing is performed in the following sequence:
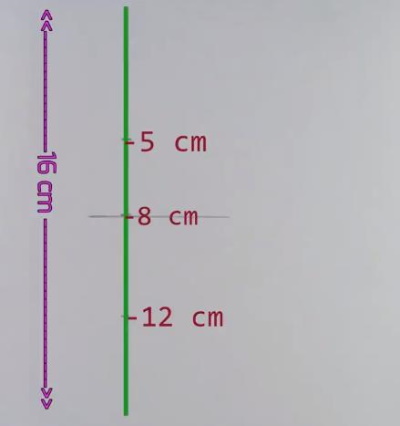
- Using a ruler, draw a vertical line at the left edge of the sheet. Mark 3 points on it, as shown below.
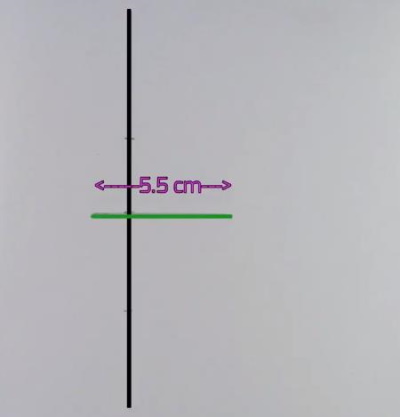
- Draw a horizontal segment 5.5 cm long. The length of the right part of the segment is 4 cm from the intersection with the vertical axis.
- Draw the outline of the umbrella on top, which is an arc on the outside. It should be positioned at an angle to the vertical (shifted to the right).
- Draw part of the umbrella handle. Its full length will be shown later.
- Draw the outline of the ballerina's head from the second marked point from the top.
- Draw one hand of the dancer raised to the umbrella, and draw its handle, curved at the bottom.
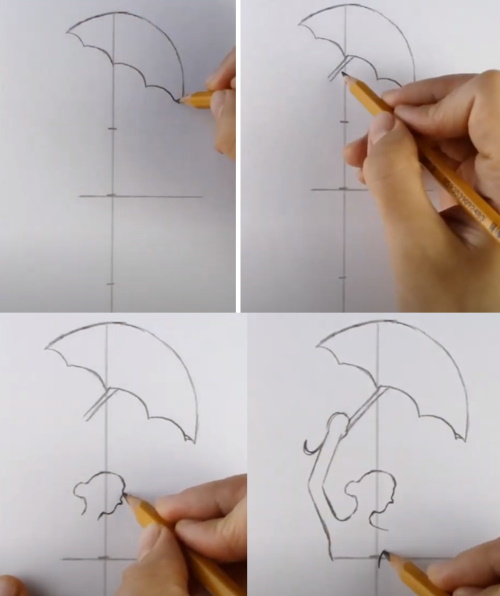
- Draw the second arm straight, extended to the right.
- Draw a ballet tutu as a rectangle, slightly tilted, with torn edges.
- The ballerina's legs should be made as shown in the picture. The knee of the right leg and the heel of the bent second leg should be at the level of the mark.
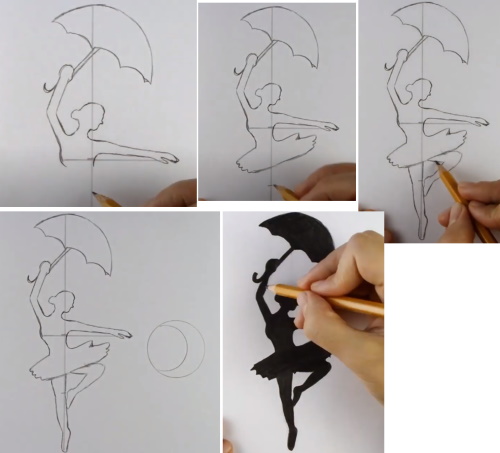
- On the right, draw a month from two circles. For this, you can use a compass or a stencil ruler with holes.
- Use a soft graphite pencil to color the outline of the ballerina.
- Sand the lead of this pencil with sandpaper or a knife and apply the powder around the moon. Rub it with a shading tool.
- Make a shading on the sheet as shown below.
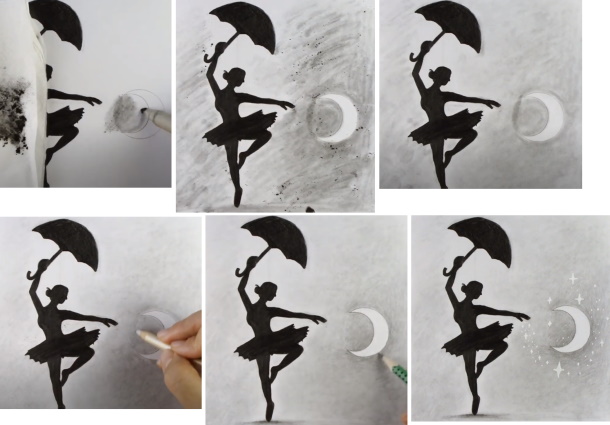
- Go over the hatching with a paper towel to get a smoother gradient.
- Use a pencil eraser to remove excess shading from a drawing. These erasers are sold in the form of regular pencils in art supply stores and stationery departments. The pencil's "lead" is rubber and allows you to erase small details.
- Draw the outline of the moon more clearly and make a shadow under the ballerina’s feet using a simple pencil.
- Use a white gel pen to draw stars near the moon in the form of dots and diamonds.
The advantage of this type of drawing is that you don’t need to work out the details of the ballerina’s figure and dress; you only need to draw its outline.
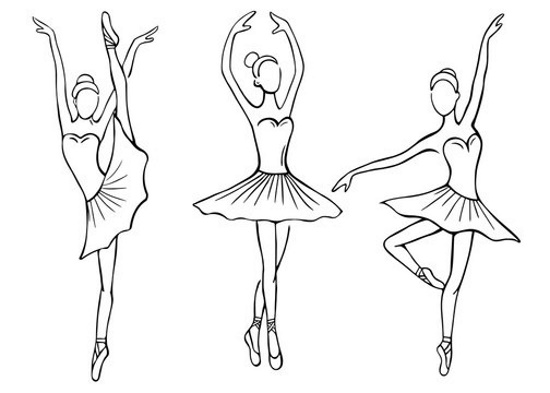
Ballerina illustrations are very expressive drawings. They can convey feminine beauty and the grace of ballet in different ways – in the form of simple strokes, which is convenient for younger children, or in the form of a detailed composition for older children.
You can suggest that they draw a ballerina with rose petals, in various positions, near a barre, or take an image from a popular production.
Video about drawing
Ballerina drawing for kids: