Thanks to the double edge loop, it is possible achieve an unusual 3D effectThis technique is also called a thickened side edge, which is suitable for dense patterns in the form of garter stitch knitting.
Due to the moderate elasticity of the element, the edge of the fabric will retain its shape, so edge loops are suitable for creating strips.
Necessary tools and materials
Knitting needles for double edge loops should be thicker than the thread material, approximately 2 times. For these purposes, it is necessary to take into account the tool number recommended by the manufacturer on the label. The number of knitting needles will correspond to the diameter in millimeters.
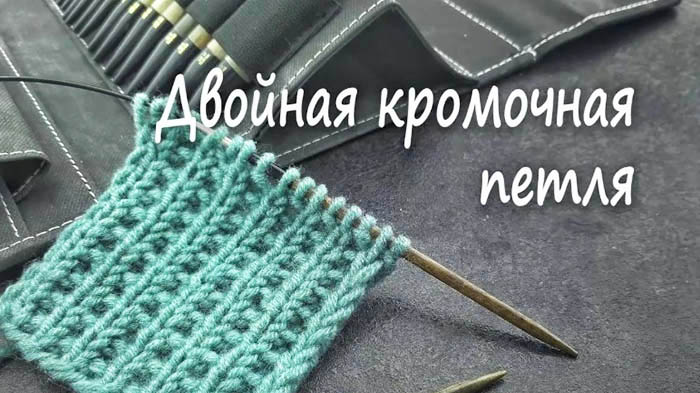
Table of correspondence of thread material with knitting tools:
| Needle size | Threads, length in 100 g |
| 1.5-3 | 800 m |
| 2-3.5 | 400 m |
| 3-4.5 | 300 m |
| 4-5 | 200 m |
| 5-6 | 150 m |
| 6-8 | 100 m |
| 9-15 | 50 meters or less |
If you have no knitting experience, you need to prepare 3 sets of short sock tools. Each set includes 5 knitting needles with numbers 3, 3.5 and 4. When trying to design double edge elements, the samples will be small, so this length of knitting needles will be enough. At the same time, short tools simplify the work.
For work it is permissible to take yarn from:
- acrylic;
- wool and acrylic blends;
- wool.
The thread material should be smooth and simple, so fluffy, fancy or cotton yarn will not work. When choosing such threads, the knitting process will be difficult. The thickness of the material should be medium, so there should be about 200-300 m per 100 g.
When learning to knit, it is advisable to prepare light-colored threads to see the loops well. This will not make your eyes too tired.
The kit includes double-edged tools that can be used by experienced knitters. Beginners will have stitches flying off such knitting needles.
To avoid such a situation, you need to additionally prepare special tips that have numbers according to the size of the knitting needles. However, some tips match several numbers of knitting tools.
Schemes with description of works for beginners
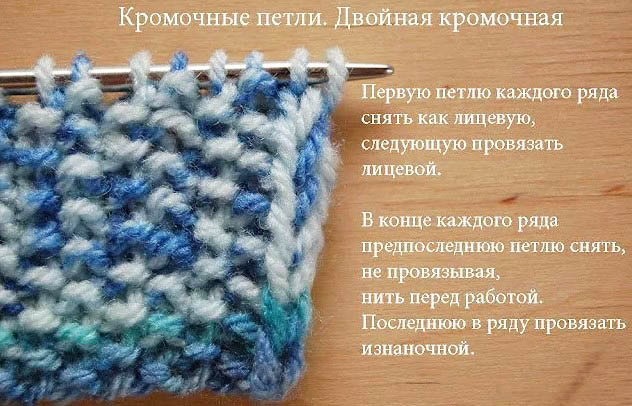
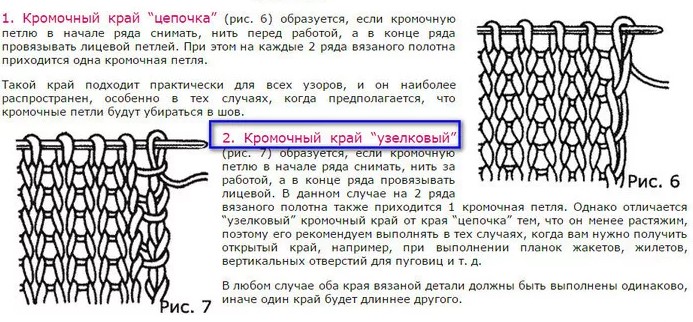
A double edge loop on the knitting needles allows you to give the product an even and neat edge. The edge elements are divided into the first stitch, from which the line begins, and the second, which completes the line. In this case, the edging of the fabric can be made as a chain or slightly convex in the form of columns consisting of knots.
There are 2 options for designing edge stitches:
- To obtain a smooth chain edging, the first edge or first element of the stitch should be designed as a face loop. The second edge or final element of the stitch does not need to be knitted.
- To obtain a knotted edge, the first edge element, from which the stitch begins, must be transferred to the second knitting tool without changes. The edge element should be made purl.
The classic way
A double edge loop on knitting needles, knitted in the classic way, helps to create a beautiful and neat edge.
Step-by-step description of the scheme:
- Initially, cast on the required number of loops. At the same time, there should be 1 edge loop on each edge of the line.
- 1 row consists of face stitches. In this row, transfer the initial 1st element to the working tool.
- 2 stitch make a front stitch and knit behind the front wall. In this case, insert the tool from left to right into the created stitch.
- Similarly, knit all the loops in the line to the last one. Make the penultimate element the front one, passing it behind the front wall.
- Make the last loop at the end of the line purl.
- Then turn the working blade.
- The new line should consist of purl loops. At the beginning of the line, transfer the 1st stitch to the working knitting needle.
- The yarn should be in front of the fabric. 2 loops should be thrown over without knitting.
- Until the penultimate element in the row, knit the loops according to the given pattern.
- Place the thread material directly in front of the fabric, removing the penultimate stitch without knitting.
- Make the last loop at the end of the line purl. Then turn the fabric over.
- The following new lines are designed in a similar manner.
For the edge of the elastic
To process the edge of the elastic band with double edge loops, you need to knit about 4 lines. After that, you can continue working using the front surface technique or a 1x1 elastic band.
Step by step instructions:
- Initially, cast on an even number of stitches. The end of the thread material needed to cast on stitches should be long so that you can make another stitch.
- To create a stitch, knit the thread material in 2 folds. This requires the main yarn with a long thread edge left for casting on stitches. The entire stitch, except for the edge loops, is knitted together with the front side in 2 elements. The number of stitches in the stitch should be reduced by 2 times. In this case, the loops on the knitting tool should be designed in 2 thread folds.
- The 2nd row consists of face stitches, so for knitting use only 1 main thread material. This row will be the front part of the fabric.
- In the 3rd row after the edge element, pass the working knitting tool under the drawstring from below between the edge and the next stitch. From under this drawstring, knit a front loop, then form 1 front element again. Alternate knitting 1 element from under the drawstring and creating 1 front stitch until the end of the row.
- After the 3rd row the number of loops should be restored.
- In 4 rows, knit 1 front and 1 back element in turn. Repeat alternating stitches until the end of the row.
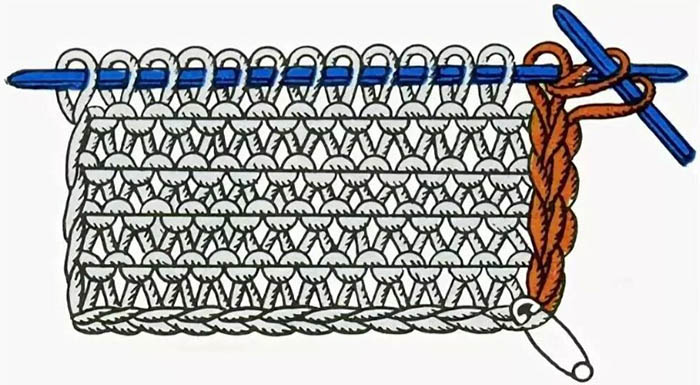
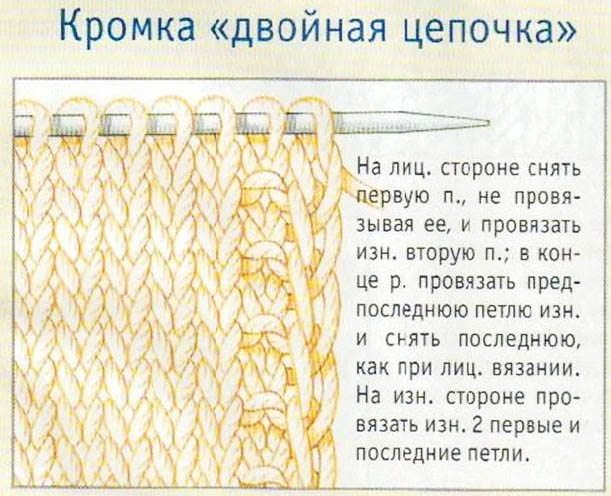
In the form of a chain
A double edge loop on the knitting needles is required to start and finish each line in the fabric. These elements must be performed clearly and correctly, because the final result with the appearance of the finished item will depend on this.
By making edge stitches in the form of a chain, the edge of the fabric will retain its shape without deformation. At the same time, the knitted edging will have a beautiful and unusual appearance.
Step-by-step description of the work:
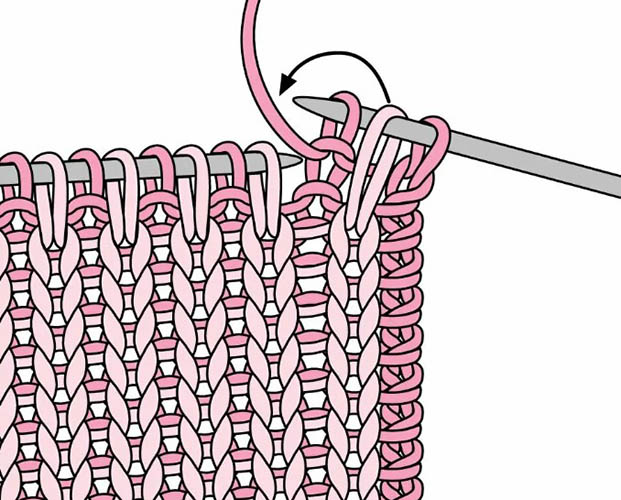
- Initially, dial the required number of elements. In this case, the beginning and end of the line should begin with 1 edge loop.
- At the beginning of the front line, transfer the first stitch to the working knitting tool without changes.
- Make the 2nd loop purl.
- Afterwards, knit the fabric according to the given pattern up to the 2 outer loops, which finish the line.
- Make a purl stitch at the end of the row before the last element.
- Without knitting, transfer the loop that ends the stitch to the working knitting tool.
- Unfold the canvas in front of you.
- The new line should consist of purl stitches. In this row, make the outer 2 loops at each end of the line purl. Make the remaining loops according to the given pattern.
- Turn the fabric over in front of you and continue knitting, alternating front and back stitches.
Secrets for Beginners
Some knitters make mistakes by knitting edge stitches haphazardly. This is due to the fact that they do not adhere to the rules for removing elements. As a result, the loops begin to twist when forming a new line. Because of this, the edges of the fabric parts acquire a twisted or skewed appearance.
However, it will be problematic to eliminate such deformations by washing and ironing. Even if you sew the elements of the product, the uneven edging will stick out.
To prevent such errors, it is necessary to strictly adhere to the order of knitting edge stitches in each row. When making a double-sided product, loops in the front rows must be thrown onto the working tool behind the front wall, and in the back rows - behind the back wall.
In this case, the ideal appearance of the edging of the created fabric will depend on the method of designing the edge stitches.
Secrets for Beginners:
- To obtain a smooth and beautiful product, all elements must be of the same size. During work, it is recommended to perform a yarn turn on the thicker part of the knitting tool, and not on the narrow end of the knitting needle. At the same time, do not pull the working material to tighten the loop after knitting. All elements should be tightly located on the tool, but at the same time should slide easily on the knitting needle.
- To add or subtract 1-2 stitches, this step should be done at the end of the line before the edge loop, at the beginning of the line - after this element. Due to this, you can correctly add or subtract loops without spoiling the edge of the pattern.
- It is advisable to initially make a sample, the size of which will be no less than 10x10 cm. Also, from a cardboard sheet, you need to make a stencil, in the middle of which a square window measuring 10 cm should be cut out. This template should be placed on the sample. This helps to easily count the number of loops with lines. You need to compare your own numbers with the pattern. If the knitted sample has more stitches than in the pattern of the product, the knitting should be tighter or you need to use tools 1 size smaller than the yarn. If there are fewer stitches in the sample, you need to take thicker knitting needles or knit freely.
- The presence of loose loops scattered all over the fabric indicates problems with tightening. The reason is related to improper stitch management on the tools before and after their design. During work, the loops on the left knitting needle should smoothly move to the edge of the tool. After knitting with the right knitting needle, these loops should also smoothly move to make room for new stitches. As a result, the same amount of thread material will be spent on each element. It is recommended to group the stitches near the edge of the left knitting tool. Due to this, the process will be easy and smooth. When removing elements from the tool, the loops should not be excessively tightened or stretched.
- It is necessary to constantly check the fabric for errors. This helps to quickly correct the situation, without unraveling most of the fabric. In this case, you need to periodically stop to check the work for ugly or incorrect stitches.
- The thread material must be held and pulled consistently. If the work has an uneven or unclear appearance, then there are uneven loops through the line. In this case, several elements will be larger in size. To create a smooth and beautiful canvas, it is recommended to hold the thread material in the same tension during the process of forming each new loop. To tighten and loosen the thread, it is permissible to place it between your fingers.
- The loops that begin and end the stitch should be tighter than the rest of the stitches. The working thread material should have the same tension at any stage of the work. At the same time, the edge should look the same on any side of the product.
- When choosing the optimal technique for decorating edge elements, it is necessary to adhere to the order of removing and knitting these loops until the creation of the entire product is completed.
- If the pattern does not contain information about increasing or decreasing in the back stitches, these techniques must be performed on the front side of the fabric.
- It is recommended to control the process with your fingers. This applies more to stitches that are located at a close distance from the edge of the knitting tool. If you do not do this, the loops will simply fly off and come undone. The middle finger is suitable for holding the first element at the beginning of the row. Before knitting, this stitch must be slightly pushed forward so that it slowly slides off the edge of the tool and allows you to grab a new loop with your finger.
When knitting double loops on knitting needles, it is possible to achieve a voluminous and relief edge. In this regard, edge elements are often used to create a collar, armhole, neckline, strap, scarf and other items.
Video about knitting