Visually, volumetric images look fascinating and very realistic. It is more convenient for beginners to create 3D drawings, focusing on the cells. This means that you don't have to have any talent for fine arts to create unusual and very creative images. Such illusionary works literally "break" the brain and make you look at objects from a completely different point of view. Learning how to create such masterpieces is very simple, the main thing is to understand the basics.
What is required for a three-dimensional image
To create unusual pictures, it is recommended to use the following materials and tools.
| Materials and tools | Peculiarities |
| Ballpoint or gel pen | Thanks to it, the image will be extremely clear and interesting. But it is difficult to erase, so it is better not to make mistakes in the process of drawing. |
| Simple pencil | If you plan to use a pencil, then preference should be given to tools of medium hardness. |
| Eraser | Allows you to correct defects or incorrect lines. If you plan to draw with a pen, you will need a special hard eraser that can erase ink. |
| Lined or squared notebook sheets | If you want to create a larger image, you can line a regular A4 sheet of paper. |
You can also use felt-tip pens or colored pencils. But three-dimensional drawings are very rarely created with paints, since it is very difficult to create clear lines with watercolors.
Drawing rules
3D drawings on cells can be created without adhering to any strict rules. But you need to follow several tips that will greatly simplify the task. For example, you need to understand where the light falls from and where the shadow should be on the image, since this is half the success. The lines on the plane should be located somewhat differently, and not as people usually draw, since the volumetric effect is achieved when a person looks at the image at a certain angle.
There are also other recommendations:
- It is important to understand that absolutely any image that a person sees on a digital screen (phone, TV, PC, etc.) consists of tiny squares - pixels. When they are correctly arranged, a realistic and three-dimensional picture is obtained. The smaller these squares are, the clearer and more realistic the image is. Therefore, any photo can be used as a basis for the picture and simply greatly enlarged so that the pixels are visible, and most importantly, their colors.
- If a novice artist has no experience creating such images, then it is worth starting with simpler, angular geometric shapes. Gradually, you can move on to more complex images and, eventually, learn to draw three-dimensional objects on a clean sheet of paper.
- It is much easier to draw black and white images. But, once you have gained experience, you can use more colors.
You also need to follow a certain sequence for creating such images:
- First, you should create a so-called sketch or draft of the drawing. It is a light sketch of the main elements and allows you to correctly determine the size and shape of the objects.
- After this, it is worth deciding where exactly the light will fall from in order to understand in which areas of the image there should be shadows and highlights, since without this it is simply impossible to get a three-dimensional picture.
- Next, you can begin to draw the image elements in more detail.
- Now you can move on to creating more distinct shadows. It is best to move from light to dark areas.
- After this, you need to work on the details better and shade the shadows well. Light areas can be highlighted with an eraser (if you are using a pencil for drawing).
The realism of the images directly depends on the chiaroscuro. In fact, these are the main components of such drawings. Therefore, the light source should be bright enough, which will allow you to create more interesting contrasts and at the same time transitions. To better understand how the shadow works, it is enough to stand in front of the mirror and try to direct the light at yourself from different angles. This way you can quickly learn to determine where exactly the lightest places of the future image and darkening will be.
If you decide to create transparent or glass objects, it is much more difficult to work with them. First of all, this is explained by a completely different arrangement of shadows. But even in this case, you can learn from a visual example. It is enough to take a glass of water and direct light at it. After that, you can fill it with liquid and see how the light and shadows change.
Beginner artists make one common mistake - they create a very clear border between the shadow and the highlight and other lightened areas. In fact, the border can really be sharp, but only at a certain position of the light source. Otherwise, such a sharp transition will not look harmonious. Also, everything depends on the shape of the object. For example, on a ball, the border should repeat its shape. If a cylinder is depicted, the border will be more angular.
Most often, the transition from dark to light is blurred. Clarity is only needed when a very bright, harsh light is directed at the object. The best way to understand shadows and highlights is on simple figures and then move on to more complex ones. And, of course, more practice is required.
How to Draw a Thin Ladder Leaning Against a Wall
3D drawings on cells can be made larger if you line the sheet. Therefore, you will first need a ruler and a pencil. The drawn squares can then be deleted to get a more effective image. In the case of drawing a simple staircase, you can immediately start on a clean sheet, since all the straight lines will be drawn using a ruler.
The drawing sequence is as follows:
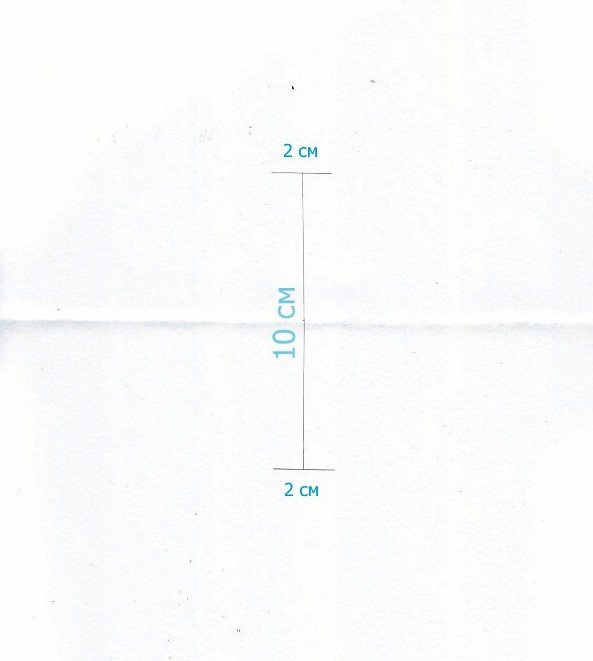
- First, you need to fold the sheet of paper in the middle and draw a thin vertical line 10 cm long in the center. You don't need to press hard on the pencil, as these are only guides that you will need to erase later anyway. Therefore, even if the drawing is done with a pen, such markings should be done with a simple pencil. The finished vertical line should be crossed at the edges by 2 short horizontal segments 2 cm long.
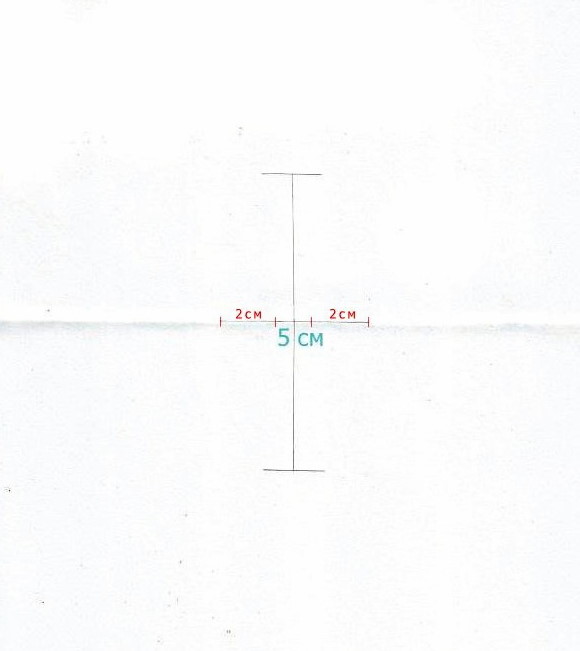
- In the next step, the long vertical line needs to be divided in the center by drawing another horizontal guide with a total length of 5 cm. cm falls in the center, and at the edges it remains to add another 2 cm.
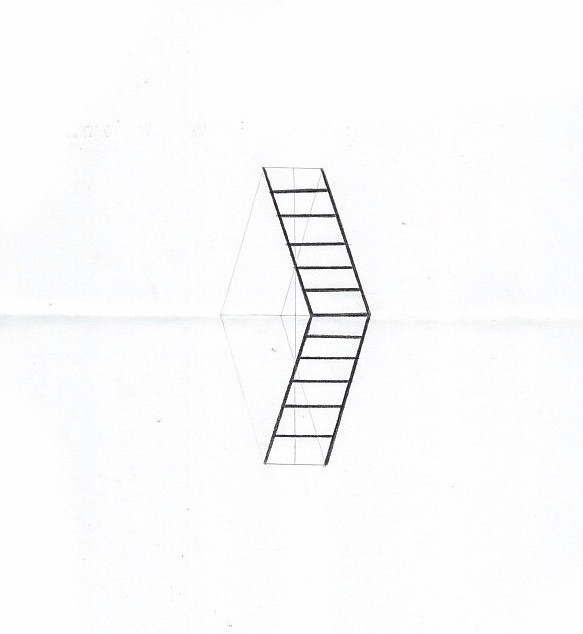
- Now you need to connect the lines using a ruler and a pencil, as shown in the image below.

- Now you can use a basic drawing tool, such as a pen or marker. With it, fill in the right side of the stairs, as shown below. On the left side, at this stage, you can begin to outline the shadows and remove unnecessary lines. It is important to ensure that the rungs on the stairs match.
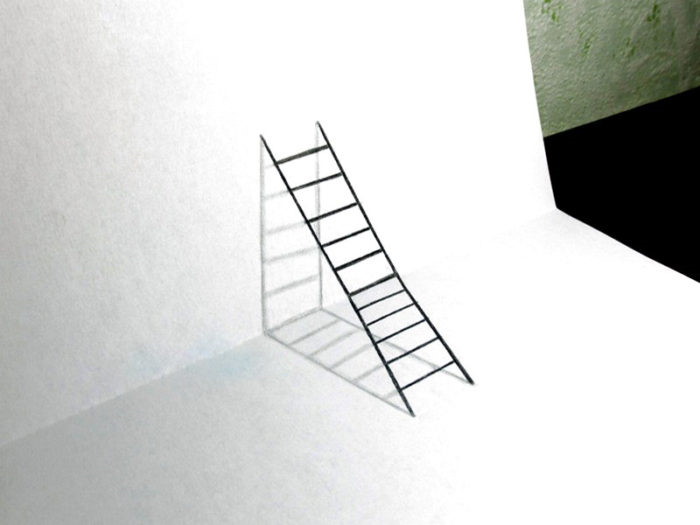
Everything is ready. Now it remains to mark the sheet of paper at an angle, bending it slightly. Do not forget about the shadows from the crossbars. Then the image will look as if the ladder rests on the wall, that is, one side of the sheet.
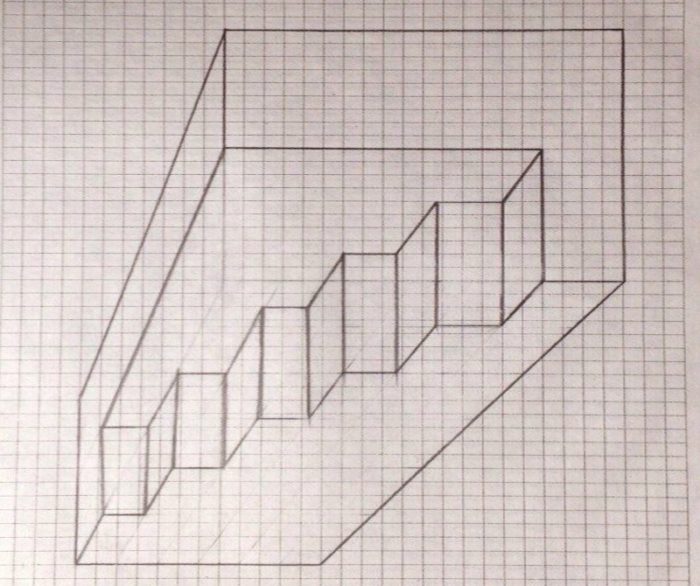
Another version of a 3D staircase
Beginners and young artists find it easier to work with simpler figures. The staircase is interesting in itself, because sometimes it is unclear whether it goes up or down. Therefore, artists often use this effect in their works. In this version, the drawing procedure looks completely different.
To create a 3D staircase, you need to:
- On a regular notebook sheet, draw a scale up to 20 cm on the side (1 cm = 2 cells). At 20 cm, you need to step back 4.5 cm from the scale and create a square measuring 10 by 9.5 cm. If everything is done correctly, then its lower edge will pass at the 10.5 cm mark. After this, stepping back from the 6 cm mark exactly 2 cells (1 cm), you need to draw two lines that run perpendicularly. Their length should be 6 cm each. The center of the lines should connect with the lower left corner of the first square, the rest must be connected as shown in the illustration below.
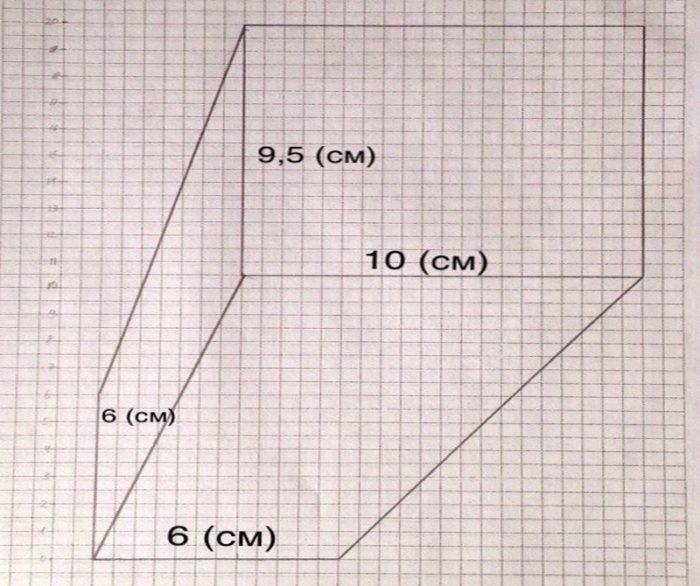
- The result is a beveled polygon. Inside it, you need to draw shorter parallel lines that repeat its shape. The length of one is 8 cm, and the other is 5 cm. On the very bottom line of the image, you need to mark 6 cm.
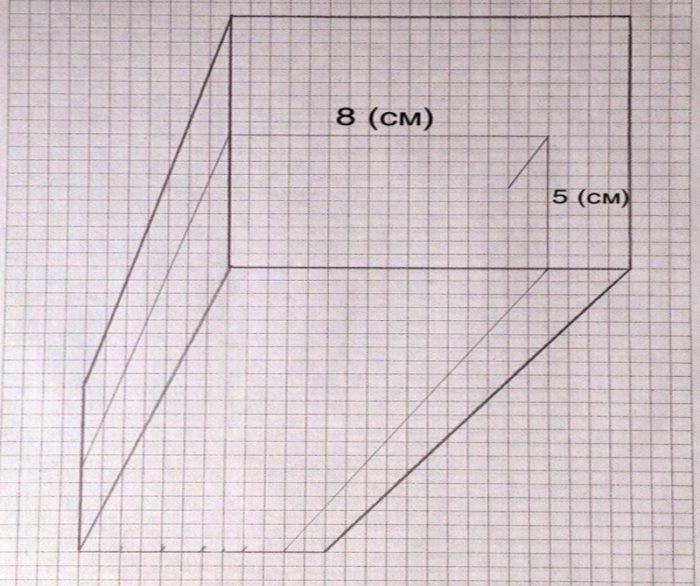
- At the next stage, you need to draw slightly diverging lines from the lower markings. They should reach the lower edge of the first drawn rectangle. You also need to add horizontal lines and gradually start connecting them, as shown in the picture. These will be steps that are already starting to look like three-dimensional ones.
- After this, you need to continue connecting the lines. It turns out that the ladders shift slightly to the left and go down.
- Next, you need to delete all the guides that were created earlier, leaving only the ladders themselves.
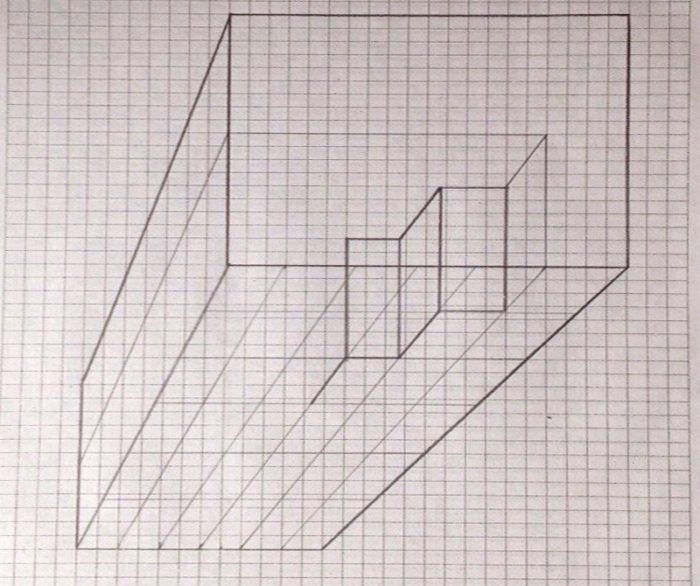
- It's time to add volume to the picture. To do this, you need to create shadows of varying intensity. The most intense shadows should be applied to the side of the wall, as well as to the side parts of the steps. It turns out that the light falls from above, which is logical, since the idea is to create a staircase going down. Lighter shadows should be applied to other walls. The upper parts of the steps should be left untouched, since most of the light falls on them.
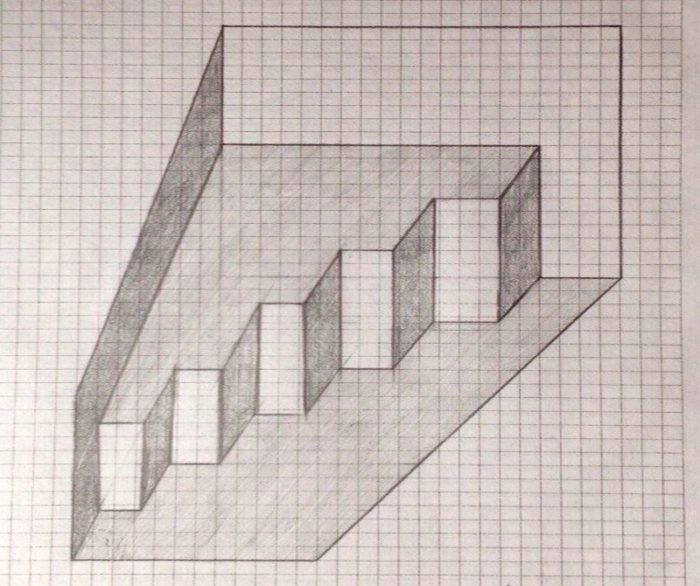
- A shadow needs to be added behind the outline of the figure. It should be angular, just like the main figure itself.
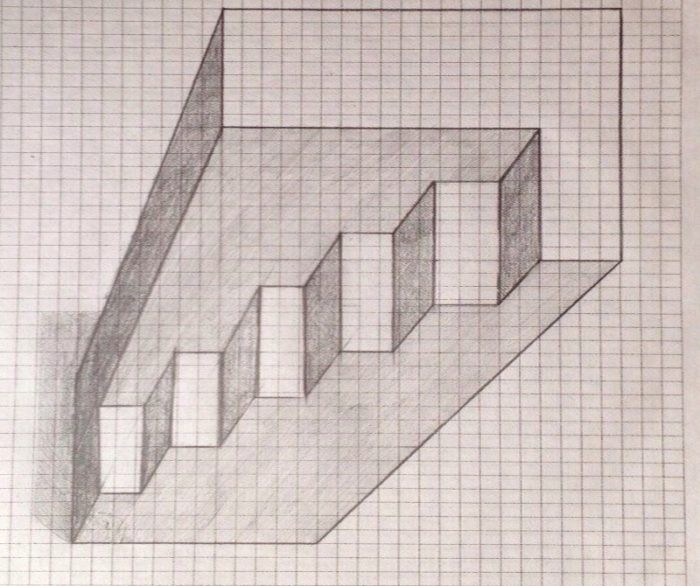
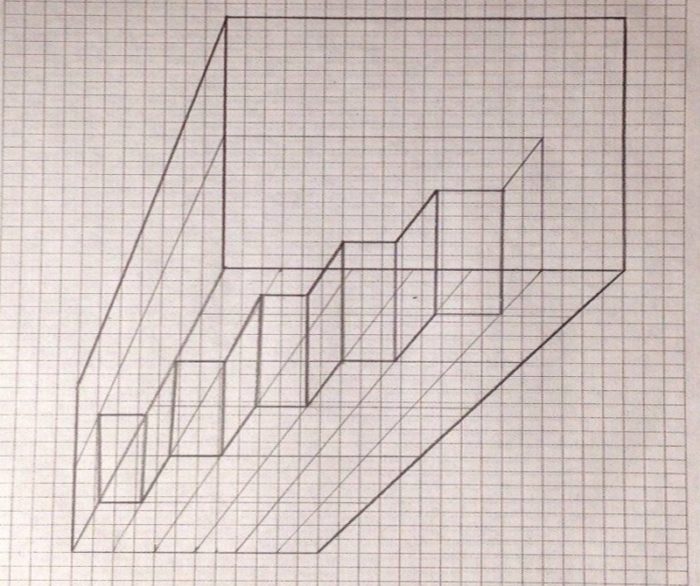
All that's left is to unfold the sheet a little and you can guess whether the stairs go down or up.
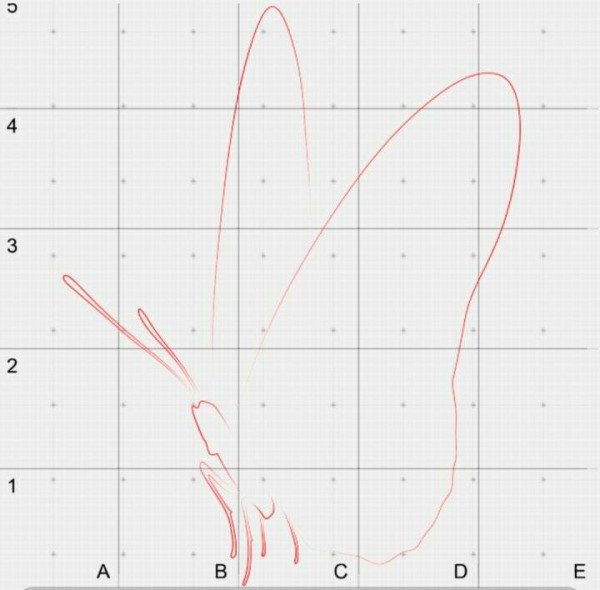
How to draw a volumetric butterfly
The 3D drawing of the stairs is quite simple and does not necessarily require drawing by cells. If you managed to cope with such a task, then you can move on to a more complex one. It is most convenient to draw a butterfly by large cells.
The sequence of actions is as follows:
- First, you need to line the sheet. It is best to use a fairly thick sheet of drawing pad.
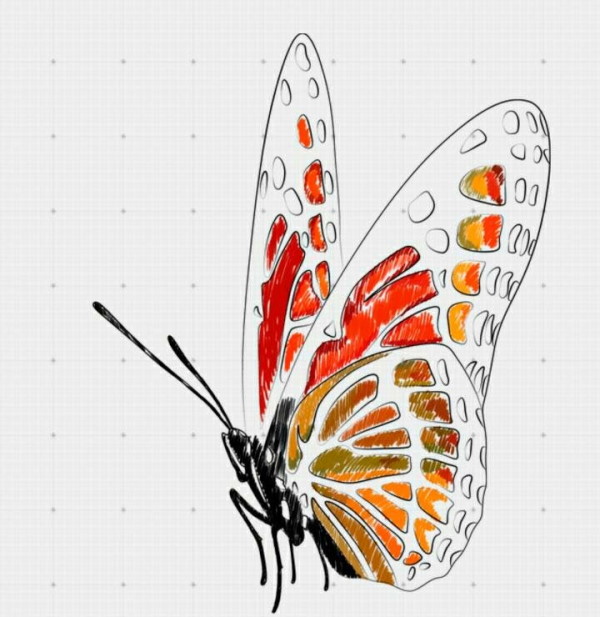
- Now you need to outline the light contours of the butterfly, create a sketch, barely pressing on the pencil or pen, if you already have drawing experience. At first glance, the drawing looks quite complicated, but if you focus on the numbered squares, you can draw all the elements in turn.
- After that, you can add a pattern to the insect's wings. First, you need to create larger parts of the image. The ornament can be anything. You can use a photo from the Internet as a basis or repeat as shown in this step-by-step instruction.
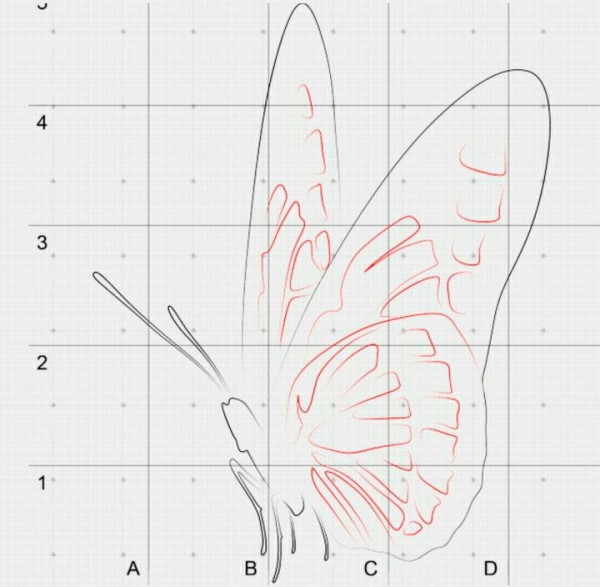
- At the next stage, it is worth adding small elements of the wing designs, adding the outlines of the abdomen.
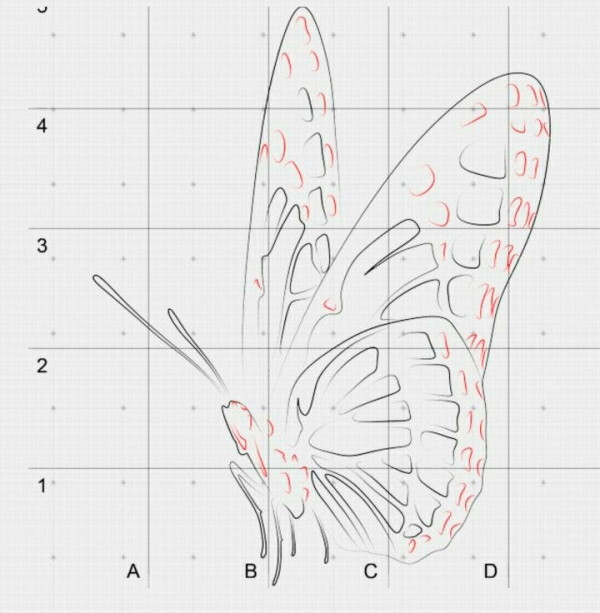
- Now it's time to move on to coloring. In this example, it's best to use multi-colored gel pens or colored markers. The butterfly should be bright enough, then it will look much more impressive.
- Next, you need to continue painting the drawing until the result is realistic. Extra lines, if any, also need to be removed.
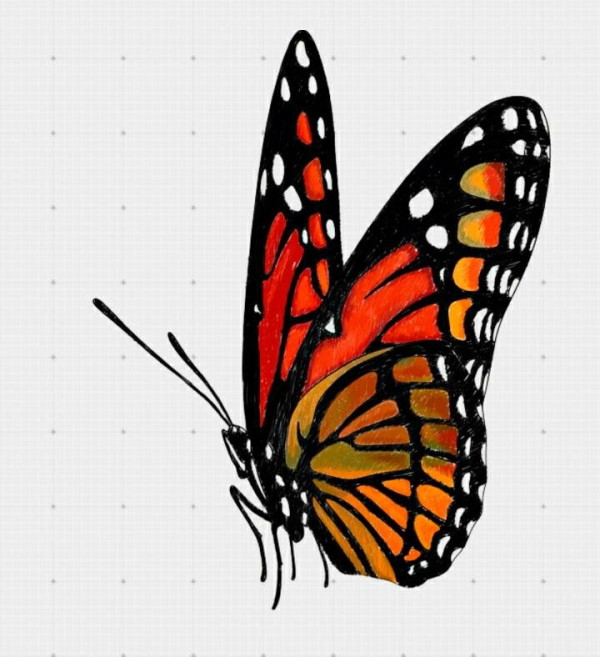
- The next step is to add a shadow. Thanks to this, the butterfly already looks voluminous, but that's not all. You need to even out the tone and move on to the final step.
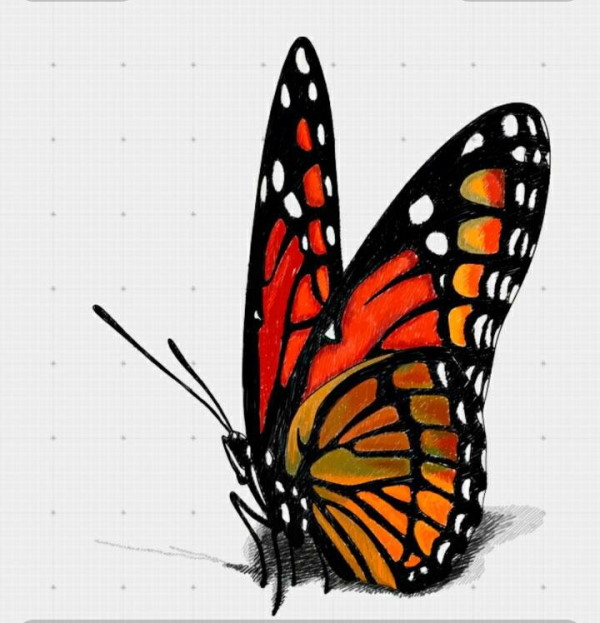
The top of the sheet needs to be cut off, cutting it along the contour of the butterfly. It turns out that the wings and antennae partially refuse in the air. If you look at such an image from different angles, then the effect is created that the beautiful insect is really sitting on the table.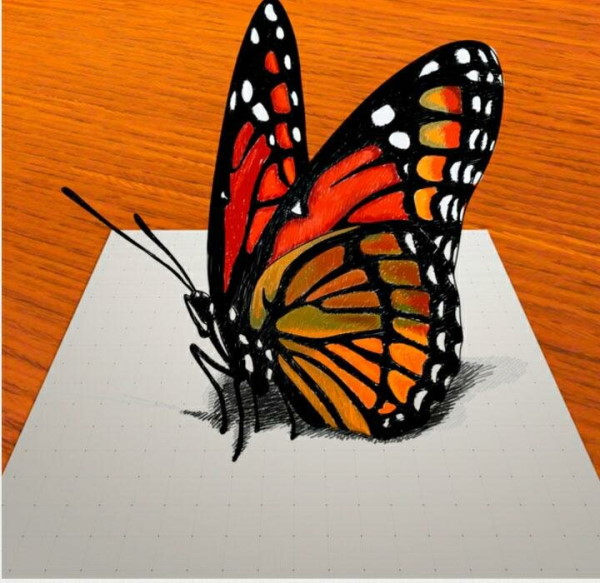
This result is achieved because the body of the insect is drawn at a special angle. The effect is also created by the shadow and, of course, the fact that the top part of the paper is cut off.
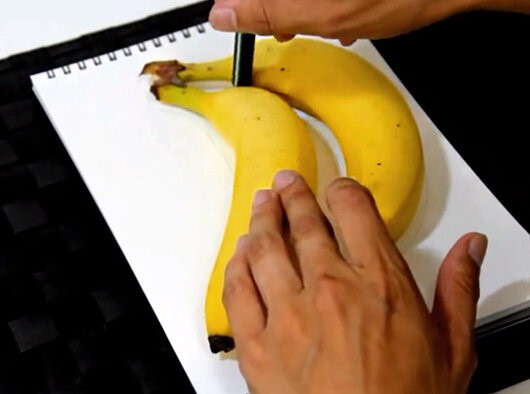
Draw volumetric bananas
3D drawings by cells can be created using another technique. It is very simple, and the finished result is simply amazing. To get a colorful and unusual image, you do not need any skills in fine art. Moreover, using this system, you can draw completely different objects. At the same time, you do not necessarily have to think about shadows, since the image looks truly three-dimensional. But if you add light and dark parts, the effect will be even more interesting.
To get an unusual image of bananas:
- First, you need to take one or more bananas and trace them. This is what children usually do when they are just learning to draw. You can also trace a hand, the effect will be exactly the same.
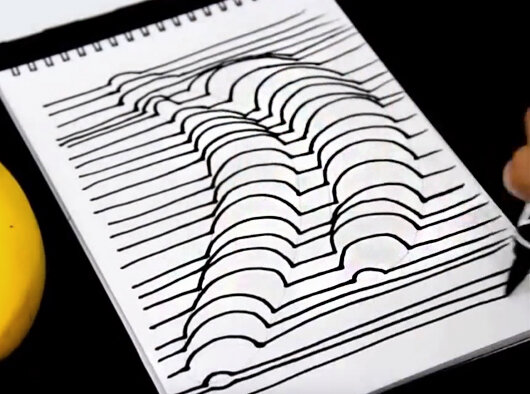
- The next step is to draw straight (as far as possible) parallel horizontal lines using a black marker or pen. In the place where the bananas are drawn, it is necessary to create peculiar arches. To make the lines straight, you can use a notebook sheet in a box or draw the guides yourself. At this stage, do not rush, because the straighter the lines are, the more convex the drawing will be.
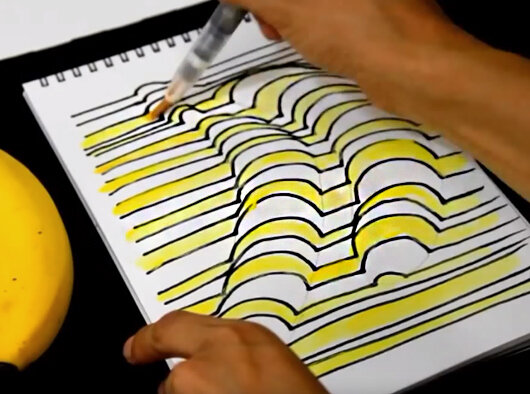
- After that, you need to take a yellow or any other color marker and paint over the stripes one by one. By the way, you can also use paints for such an image, since the clear contours are already drawn in black.
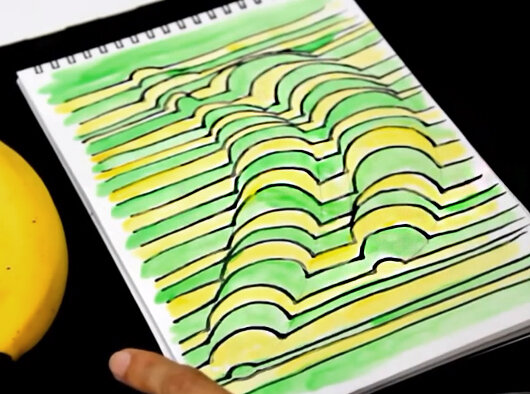
- The remaining lines need to be painted over with a different color. For example, a combination of yellow and green colors looks very impressive and fresh with yellow. But everything depends on the artist's imagination. It is especially interesting for children to create such visual illusions. Firstly, it is very simple. Secondly, you can do a lot of coloring.
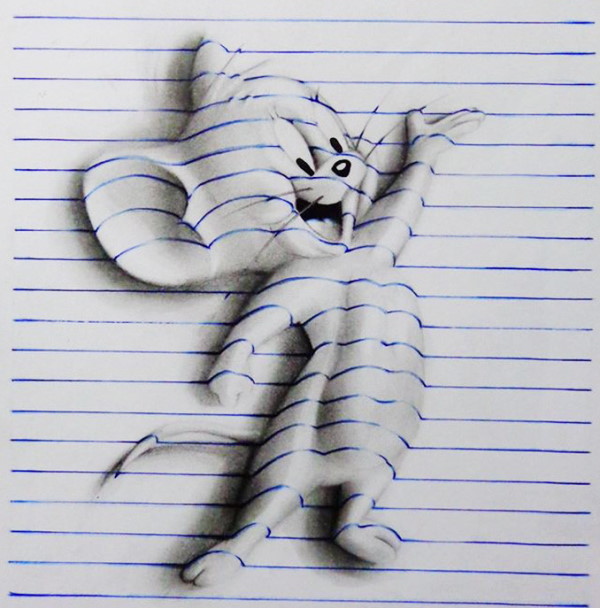
And if you first draw a full-fledged image with shadows and highlights, and then apply the same lines, the volumetric effect is enhanced so much that it seems as if it were a real mouse from a cartoon. The convenience is that you do not need to create an image at a certain angle or make it more elongated, as in the following example.
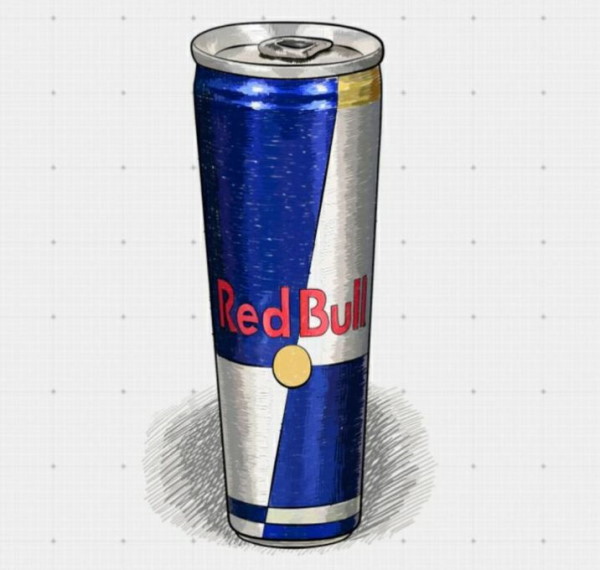
Volumetric tin can with a drink
3D drawings by cells are quite simple, so the child will be able to learn to draw more complex objects faster. For example, you can try to depict a can of lemonade or a popular energy drink.
To do this you need:
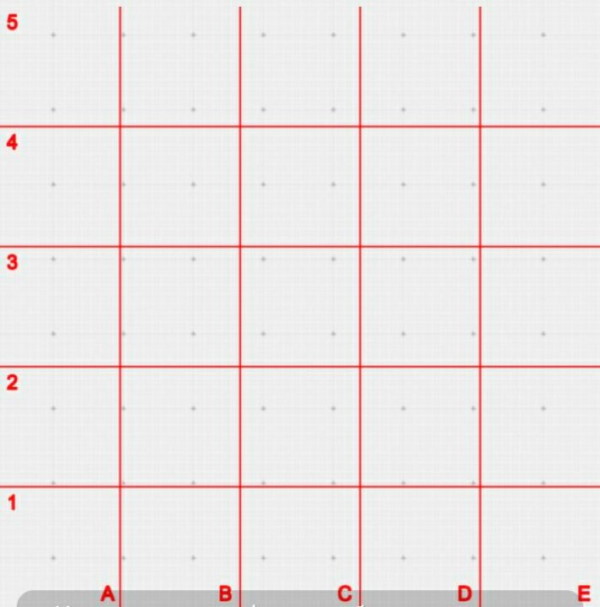
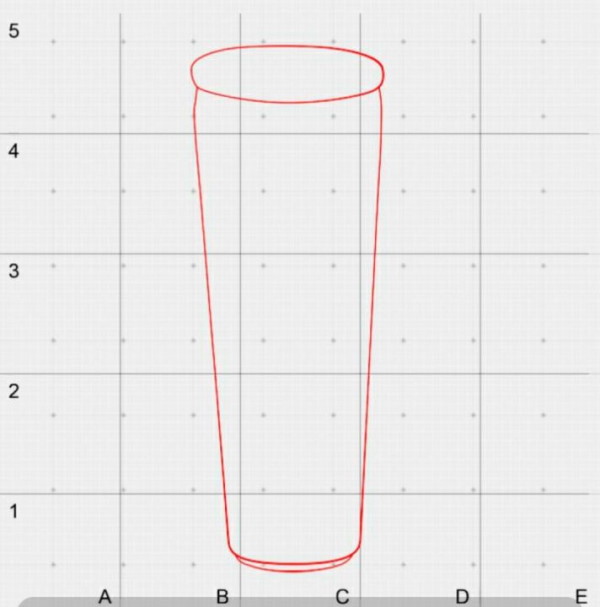
- First, you need to line up a sheet of paper into large squares and add numbers and letters to make it easier to navigate.
- After that, you need to draw the basic shape of the tin can. Since you want to get a volumetric result, you need to make the object wider as you move towards the top point. After that, you need to draw an oval at the top and round the bottom a little.
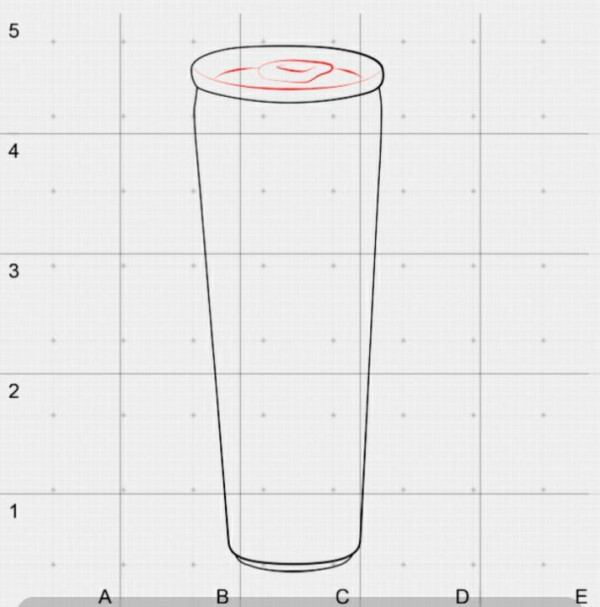
- Now you can add the can opener and draw a horizontal line to mark the top edge of the can.
- After that, you can put the name of the drink in the center. In this example, Red Bull is shown, but if you don’t want your child to be interested in energy drinks, you can choose something more neutral and find an image of the logo and name on the Internet.

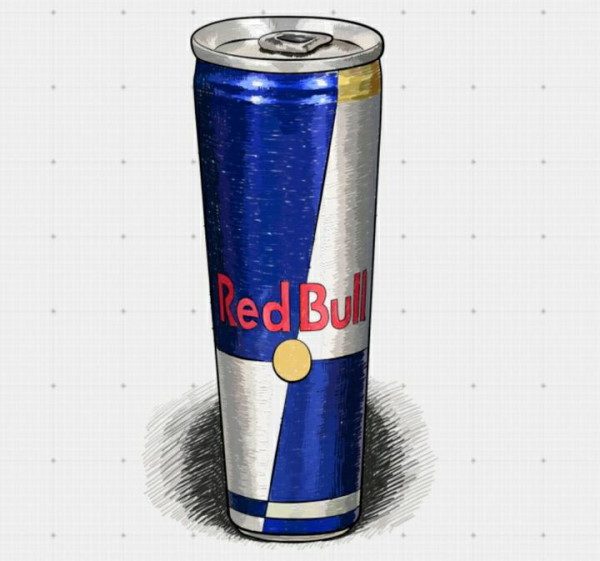
- Now it's time to move on to coloring. At this stage, you need to use casual shading in gray and blue. By making indentations, you can create highlights. Since the can is tin, it should be slightly shiny. But if it doesn't work out, it's okay, since drinks can be sold in matte containers.
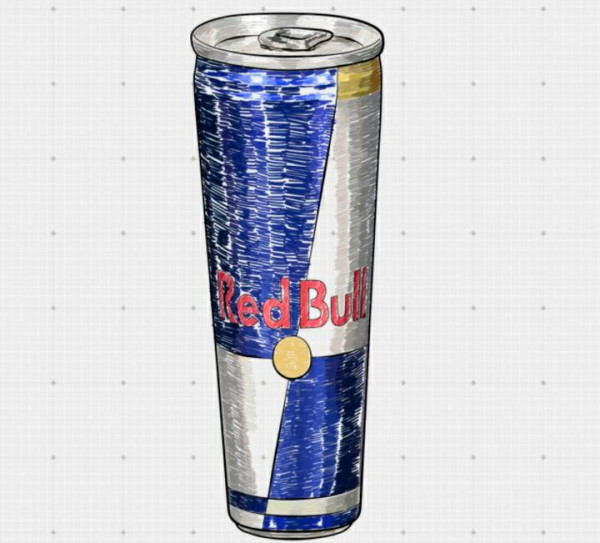
- After this, you need to continue painting the jar more densely. It is most convenient to use slotted pens, but markers or felt-tip pens will also work.
- It is necessary to continue shading the image until the colors become solid and saturated. At the same time, do not forget about the highlights if the surface is supposed to be shiny.
- If you are satisfied with the result, you can move on to creating a shadow. At the first stage, it is worth applying light shading to indicate the location of the shadow. In this case, the light falls on the object from the front and slightly above. Accordingly, the shadow should be behind the can. Since the shape of the image is round, the shading should be done accordingly.
- Closer to the jar itself, you need to strengthen the shadows. At this stage, they still look like rather rough shading, but they already add color to the image.
- After that, you need to continue darkening the shadows and making the shading more saturated. It is not necessary to achieve complete smoothing. On the contrary, it is worth leaving the shadows a little rough.
- Now the most interesting and simple part. The picture below shows the outline along which you need to cut out the upper part of the sheet. You can't leave an indent, otherwise you won't get a realistic effect. So it's better not to rush or you'll have to start all over again.
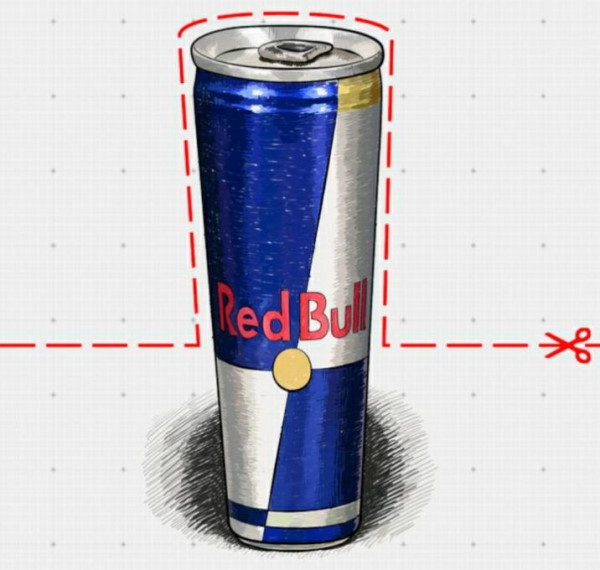
If you put such a drawing on the table, it will look three-dimensional. In this case, the same technique was used as when drawing a butterfly. The main condition that must be followed is that the image should be slightly smaller or narrower at the bottom. Then, when a person looks at it from different angles, a very realistic effect will be created.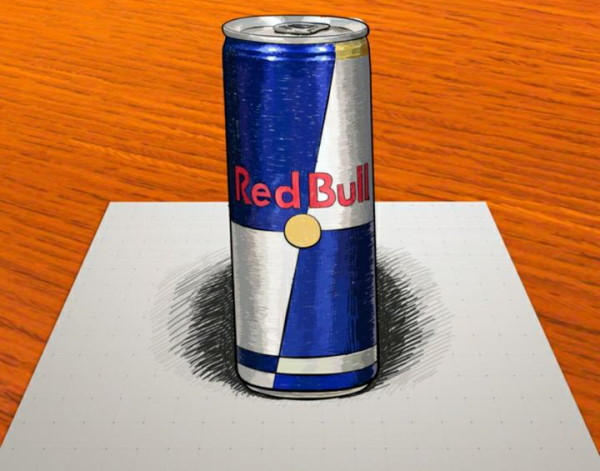
Accordingly, using this technique, you can create absolutely any drawing. The advantage of the method is that you can draw colored objects, which makes them more interesting. It is most convenient to color such drawings with colored gel pens. It is desirable that they are quite greasy and not dried out. Otherwise, the paper will scratch more and the drawing will have pressed lines. Felt-tip pens or markers are also suitable (only those that do not wet the paper too much, otherwise it will go in waves).
Also, for this technique, it is worth giving preference to thicker paper. Some even use white cardboard, but ordinary drawing album sheets will do.
Other ideas for volumetric images
If you use the idea of cutting out a piece of paper with a drawing on it, you can create simpler geometric shapes. In the example below, the 3D effect was achieved only thanks to the shadows and the fact that the picture was initially drawn slightly elongated. Thanks to the clearly defined contours, the picture is simple, but at the same time eye-catching.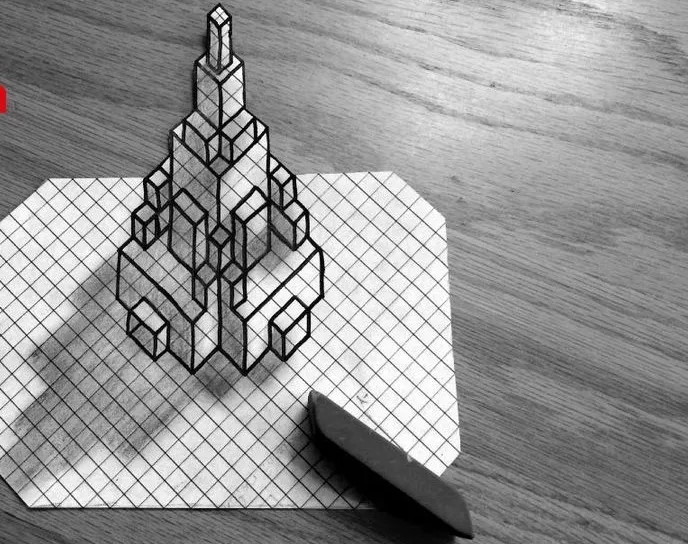
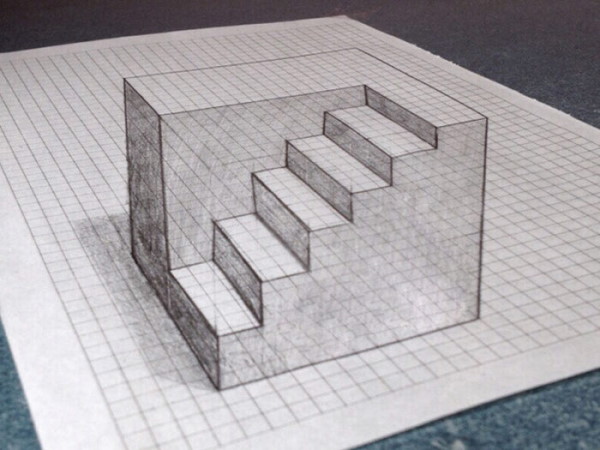
Here is another idea for a staircase. No matter in which direction it is drawn, it always looks interesting, but does not require painstaking work. For images of this type, it is more convenient to use a simple pencil, at least at the stage of drawing the guide lines.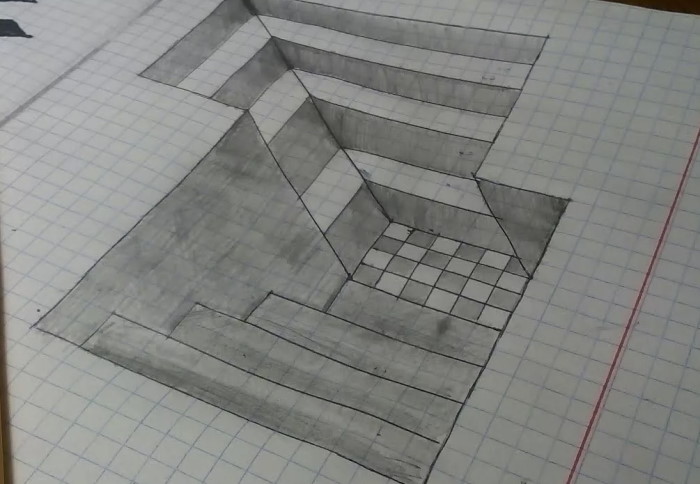
You can also use sheets not with cells, but with straight horizontal lines. If you play with shadows, you get a stunning image. For example, you can depict any letter of the alphabet in this way.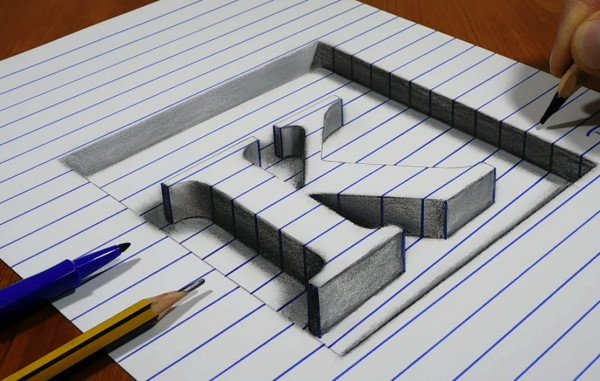
If it is more convenient to work with cells and you want to create an interesting pattern, you can use another example. In this case, you get a kind of braid. This pattern can be used to draw more complex objects, such as a basket with mushrooms, berries or flowers.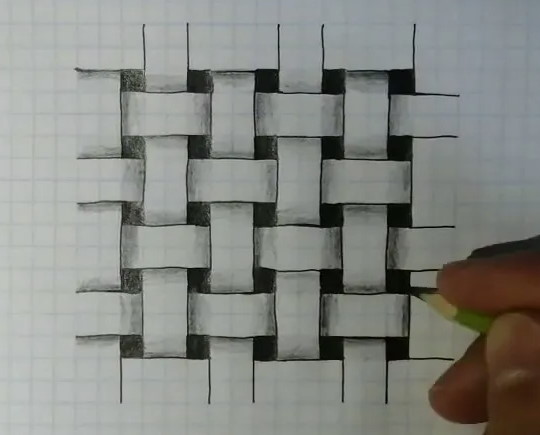
Or you can draw a simple cube with a chess theme. It is worth noting that the dark squares differ in their saturation, although at first glance it is not noticeable. This simple stroke creates the necessary shadow to give volume to the finished picture.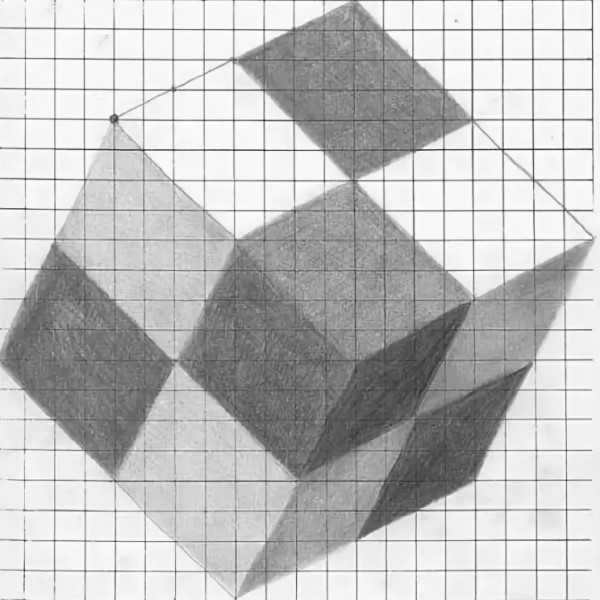
The checkerboard texture always looks good. For example, it can be used to create a tunnel to nowhere. It looks creepy and at the same time very interesting. If you arrange them a little chaotically, you will get a full-fledged composition. And, of course, you can't forget about the shadows. In this case, the darkest part will be the central square. It shows how deep the hole is. You also need to add shadows and highlights on the edges. The squares that go deep should be smaller in size and more elongated in shape.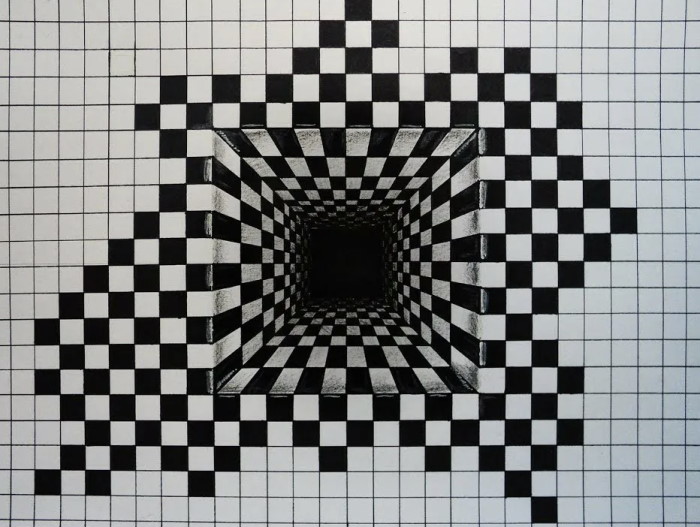
Thus, 3D drawings are very quick and easy to draw on cells. They are more convenient to navigate. After several such images, you can move on to more complex tasks and hone your skills.
Video about 3D drawings by cells
5 volumetric 3D drawings by cells: