An activity like drawing by cells, – interesting, exciting and developing. Older children love to decorate notebooks and albums, personal diaries with such cool drawings. This activity promotes the development of imagination and artistic skills.
Rules of execution and tips
Cool drawings on cells are created using a sheet of paper, a pen or a simple pencil. Preference should be given to a pencil, because if you make a mistake, you will be able to correct it with an eraser.
When choosing paper, you should pay attention to the following:
| Characteristic | Description |
| Notepad or notebook in a cage | The advantages of a notepad over a notebook are that:
|
| Paper quality | The cell size in notebook sheets is usually 5 mm, but you can use a larger or smaller one. Both have advantages, for example:
|
| Paper thickness | If it is too thin, then it is better to refuse to use gel pens, paints and felt-tip pens, especially. The trace of writing instruments will remain on the back side. If you need to create a large-scale image, it is worth purchasing paper with a thickness of 1 mm. |
To color the picture you can use:
- Colored pencils. Suitable for any type of paper.
- Felt-tip pens. They are best used on thick paper.
- Multi-colored pens. Suitable for coloring small areas.
The total number of tools required for the drawing depends on the complexity of the picture. For example, if it is a simple outline, you can get by with 1-2 colors, but to create a complex ornament or landscape, you will need many colors.
You can draw anything on the squares, from the simplest, small objects to huge paintings. Most often, children draw nature, animals, cartoon characters. Girls' drawings usually differ from boys' drawings. For example, girls draw flowers more often, while cars often appear in boys' notebooks and albums.
It is better to start with simple drawings, which are usually made in one color. These can be, for example, emoticons. Their advantage is not only their simplicity, but also the fact that they are familiar to children who use phones and tablets for correspondence.
Cool drawings on cells are created by adhering to the following recommendations:
| Recommendation | Description |
| Drawing evaluation | Having found a suitable drawing for copying, you need to determine its size precisely. During the creation process, the drawing should not rest against the edge of the sheet, otherwise everything will have to be redone. |
| Drawing the outline | The image should start with an outline, especially if you plan to create a complex drawing. Having an outline will make it easier to navigate. |
| Counting cells | When working on a drawing, especially if it is large in size, you need to carefully count the cells. The larger the drawing, the higher the probability of making mistakes. Often, even one such mistake can be enough to have to classify the drawing as unsuccessful and start working on its creation again. |
| Numbering | Before starting work, it is recommended to number all horizontal and vertical rows. Each row can be assigned a number or letter, as is done in the game "Sea Battle". This will make the work much easier. |
| Manifestation of fantasy | It is better to focus on copying the drawing, but you should not limit yourself to this. When drawing, add details that are not in the sample, or color the image in your own way. Additional elements and an individual coloring style will add originality to the picture. |
Easy pictures to get you started
Any drawing on cells begins with their counting and building schemes. First, you need to decide on the starting point, which should not be located in the cell itself, but strictly at the intersection of 2 lines. Then from this point you can draw with a pencil or pen along the notebook lines in the specified direction.
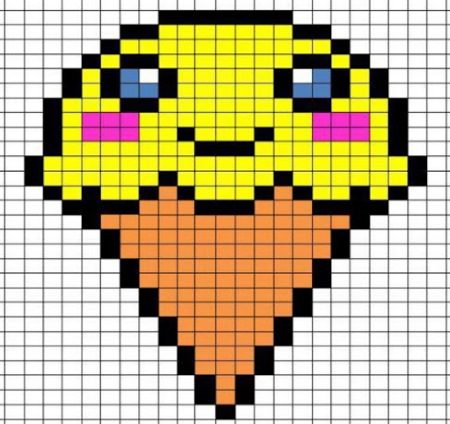
There can be 4 such directions - down, up, left, right, for example, to depict ice cream in a cup, you will need:
- Take a sheet of paper 11 cells wide and 13 cells high.
- As a starting point, choose the intersection of the lowest horizontal notebook line with the 4th vertical line, if counting from the left.
- From the designated point, draw a pencil upward to the next horizontal line.
- Along this horizontal line draw a pencil to the right. The length of the line left by the pencil should be equal to the length of 2 cells: that is, 1 cm.
- Draw a line 2 cells up.
- According to the same principle, act as follows: 1 cell to the left, 1 cell up, 1 to the left, 1 up, 1 to the left, 1 up, 1 to the left, 1 up, 1 to the right, 1 up, 1 to the right, 1 up, 1 to the right, 1 up, 1 to the right, 1 up, 1 to the right, 1 down, 1 to the right, 1 down, 1 to the right, 1 down, 1 to the right, 1 down, 1 to the left, 1 down, 1 to the left, 1 down, 1 to the left, 1 down, 1 to the left, 2 down, 2 to the right, 1 down, 5 down.
- Draw the last line – the longest, final one. The result will be the outline of the drawing.
- Color the outline using colored pencils, felt-tip pens or colored pens. It is also most convenient to color by cells. Here you can use 2 colors. For example, make the lower part of the drawing - the cup - white or blue, and the ice cream - pink.
Having learneddrawing according to this scheme, the child can move on to making drawings in other ways:
- looking at the original drawing, first paint the middle or start with the outlines;
- draw in horizontal or vertical columns.
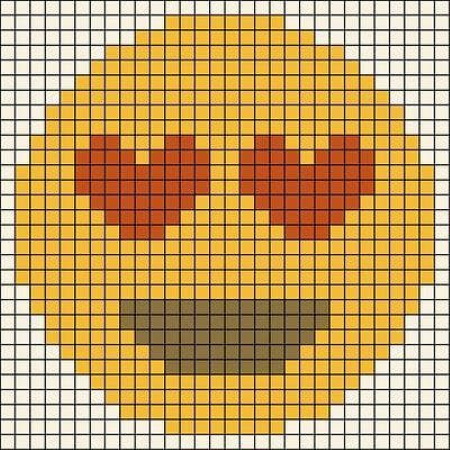
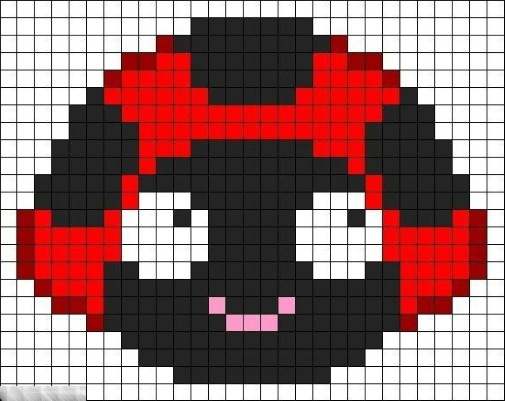
For example, you can draw a simple round smiley face with hearts instead of eyes on the columns, which means delight from what you saw, heard or read.
To depict it on paper, you will need a notebook sheet 10 cm wide and high, as well as pencils or pens of 3 different colors:
- Yellow. The majority of faces will be painted with it.
- Black. It will be needed for coloring the contours. In this case, the contours will be the cells.
- Red. It will be used to color a pair of hearts that are in place of the eyes.
There will also be white in the drawing: since this little man is smiling, his snow-white teeth will be visible. Their shade will be replaced by a white sheet of paper.
Cool pictures by cells
Drawings on cells, regardless of complexity, are suitable for decorating a diary. Both boys and girls can use various cool images.
The uniqueness and brightness of the created drawings will add originality.
For girls
Girls' favorite topics:
- flowers;
- symbols;
- patterns;
- cloth;
- funny animals;
- cartoon and fairy tale characters;
- beautiful inscriptions;
- delicious food.
It is not recommended to place too gloomy pictures and phrases in the diary. After all, one of the main functions of such a diary is to please the owner and give her positive emotions.
Pony
To draw a pony you will need paper 10 cells wide and 9 cells high, as well as black and orange pencils.
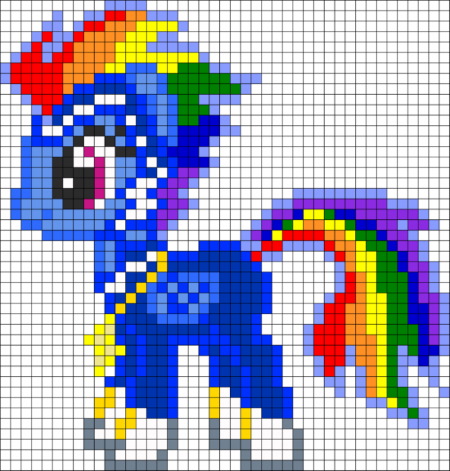
The process of drawing in vertical rows with cell numbering from top to bottom is as follows:
| Row | Actions |
| 1 | Paint the 3rd and 4th cells in orange. |
| 2 | Paint the 2nd, 3rd and 4th cells orange. |
| 3 | Paint the 1st cell black, the 2nd cell orange, and leave the 3rd cell unpainted. This will be the eye. Make the next 5 cells orange, and the bottom cell black. |
| 4 | Paint the 1st cell black, the next 7 cells orange, and the bottom cell black. |
| 5 | Paint the 2nd cell black, the next 5 cells orange. |
| 6 | Paint the 3rd, 4th and 5th cells black, the next 2 – orange. |
| 7 | Paint the 6th, 7th and 8th cells orange, the 9th – black. |
| 8 | Paint the 5th cell black, the next 3 orange, and the bottom one black. |
| 9 | Paint the 5th and 6th cells black. |
| 10 | Paint the 6th and 7th cells black. |
Ladybug
To draw a ladybug you will need a section of paper 7 cells wide and 6 cells high, as well as 2 pencils - black and red.
The stages of creating the image are as follows:
- Paint the 3rd, 4th and 5th cells in the left vertical row red.
- In the 2nd vertical row, paint the 2nd, 4th and 6th cells red, and the 3rd and 5th cells black.
- In the 3rd row, paint the top 2 cells black and the next 4 red.
- In the 4th row, paint the top 2 cells black, the 3rd - red, the 4th - black, the 5th - red, and the 6th - black.
- Make the right part of the drawing symmetrical to the left.
For boys
Cool pictures on cells for boys can be presented:
- machines;
- cartoon and video game characters;
- military equipment.
For example, a tank can be made on a sheet of paper 15 cells wide and 10 cells high.
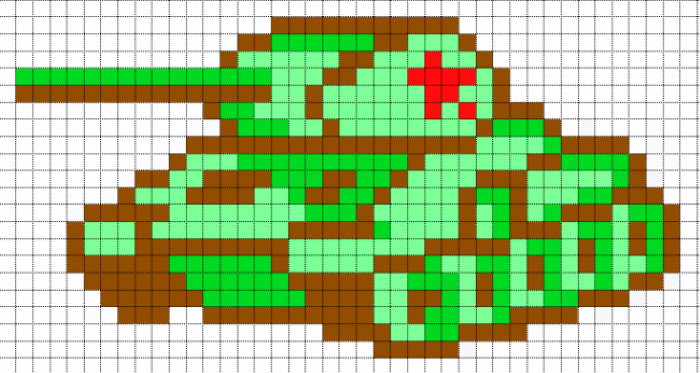
The drawing is done in this way:
- Start at the intersection of the 1st left vertical line with the 3rd top horizontal line. This will be the muzzle of the tank.
- From the designated point draw a line 4 cells long to the left, then 1 up, 3 left, 1 up, 1 left, 1 down, 1 right, 2 down, 1 left, 1 down, 5 right, 2 down, 1 left, 1 down, 1 left, 1 down, 1 left, 1 down, 8 left, 1 up, 1 left, 1 up, 1 left, 1 up, 1 right, 1 up, 2 right, 1 up, 4 left, 1 up.
- Color the resulting tank as desired.
To draw a ship, you will need a sheet of paper 13 cells wide and 12 cells high. The main thing is to draw the outline and then color it. You should start at the intersection of the upper horizontal line with the 7th vertical line.
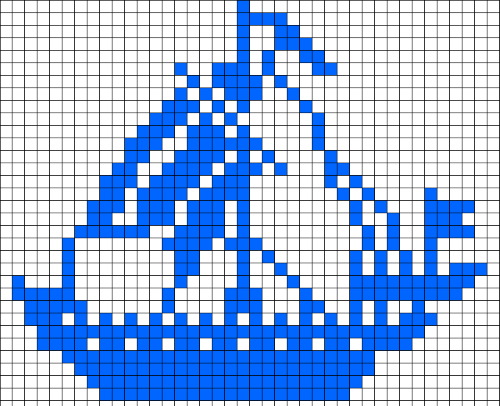
From this point, draw a line 7 cells long. Then - 5 to the right, 1 down, 1 to the left, 1 down, 1 to the left, 1 down, 7 to the left, 1 up, 1 to the left, 1 up, 1 to the left, 1 up, 5 to the right, 1 up, 3 to the left, 3 up, 1 to the right, 1 up, 1 to the right, 1 up, 1 to the right, 1 up, 1 to the right.
Small images
Drawings on cells can be multi-colored, complex or detailed.
There are also small, light, schematic drawings that have the following advantages:
- They don't take much time to create.
- You don't have to be a professional artist to draw them.
Animals
It is not difficult to depict a panda in cells. To do this, you will need 1 black writing instrument and a sheet of 20x20 cells.
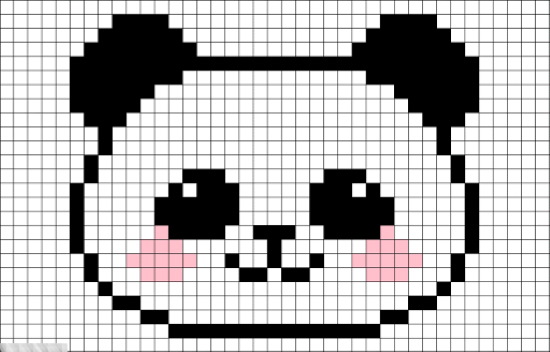
It is better to work on the picture in the following order:
- Create an outline.
- Keeping the symmetry, paint the ears on the top of the head.
- Draw the details of the face – eyes, nose and mouth.
Emoticons
Cool drawings in the form of smileys are good because they are simple and small in size.
Initially, they are created by pixels, so it is convenient to draw them by cells: 1 cell - 1 pixel. You can start with a classic "smiling" smiley, consisting of yellow and black pixels. A sheet of 400 cells (20x20) will be enough.
The stages of the image are as follows:
- Draw the outline with a black pencil or felt-tip pen.
- Paint the eyes and mouth with the same color.
- To color the remaining space inside the black outline, use a yellow pencil or marker.
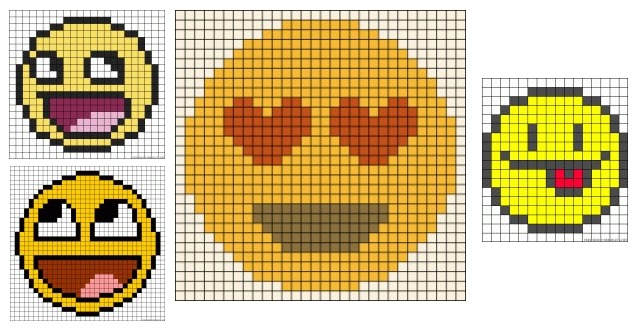
Instead of traditional yellow, you can use another color, if you wish, repaint the details of the face. If you need to turn a "smiling" face into a "sad" one, then it is enough to place the mouth line a few cells higher, and, on the contrary, lower the corners of the mouth.
For personal diary
An image of an angel would be suitable for a diary. To create it, a single-color pencil, for example, blue, and a section of the sheet 19 cells high and 13 cells wide will be enough. You can draw along vertical columns, starting from the left and gradually moving to the right.
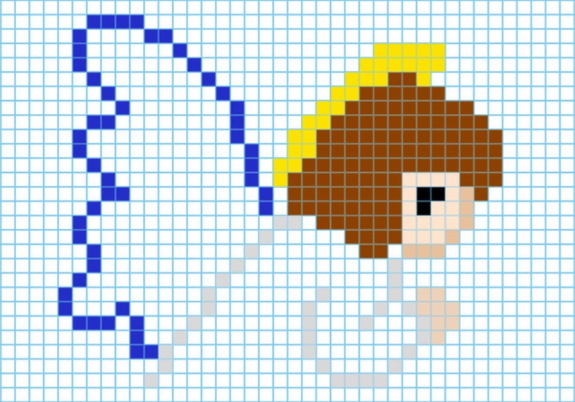
The pattern for coloring cells in vertical rows is as follows:
| Row | Actions |
| 1 | Color the 3rd-7th cells, as well as the 14th-16th. From here on, the cells are counted from top to bottom. |
| 2 | Color the 2nd-8th and 13th-16th cells. |
| 3 | Paint the 1st cell, then the 4th-8th, 12th-13th and 16th. |
| 4 | Paint 5-7, 11-12 and 15-16. |
| 5 | Paint the 6th, 8th, 10-11th and 14-16th. |
| 6 | Color the 1st, 3rd-4th, 6th-7th, 9th-11th and 13th-19th. |
| 7 | Paint 1st and 3rd-16th. |
| 8-13 | These rows are painted symmetrically relative to the 7th vertical row: the 8th row is like the 6th, the 9th is like the 5th, the 10th is like the 4th, and so on up to the 13th.
After the last row you will have a beautiful angel. |
It is not necessary to make the drawing blue, you can use a pencil or marker of a different color or make the angel multi-colored, for example, coloring the halo above the head yellow. If you leave a few cells uncolored inside the wings, it will look like they are made of feathers. Such wings will look more beautiful.
Colored drawings
Drawing multi-colored pictures brings great pleasure to both beginners and experienced artists.
Rainbow
One of the simple and beautiful images. A small rainbow can be placed on a sheet of paper 20 cells wide and 10 cells high. You will need 7 basic rainbow colors. It is more convenient to start with red, because it will cover most of the picture. It is located at the top of the rainbow.
The following should be painted red:
- the bottom 4 cells of the outermost vertical rows;
- 2 cells each - 6th and 7th to be painted in the 2nd and penultimate vertical rows;
- in the 3rd and 18th vertical rows, paint the 5th and 6th cells;
- in the 4th and 17th rows – the 4th and 5th cells;
- in the 5th and 16th rows – 3rd and 4th;
- in the 6th and 15th rows – 2nd and 3rd;
- in the 7th and 14th rows – 1st and 2nd;
- in the remaining vertical rows in the center of the drawing from the 8th to the 13th, paint the top 1 cell red everywhere.
The next color to paint is orange. In each horizontal row, you need to paint 1 cell, located immediately below the red ones. The only exceptions are the first 2 and the last 2 rows.
Thus:
- in the 1st and 20th there is no need to paint anything with orange, since the red color here rests against the bottom edge of the drawing;
- in the 2nd and 19th rows you need to paint the bottom 3 cells orange.
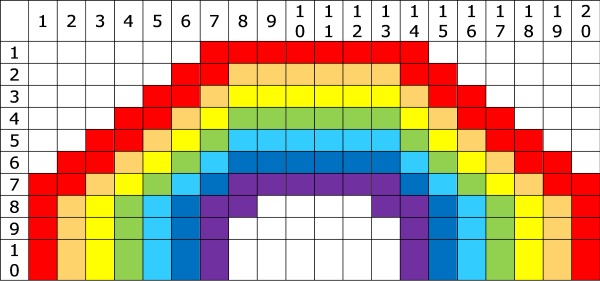
Similarly, under each orange cell there must be 1 yellow cell. The only exception is the outermost vertical rows. In the 1st, 2nd, 19th and 20th there is no yellow at all, and in the 3rd and 18th rows the 3 lower cells are painted yellow. The same is done in green, then in light blue, then in blue. It all ends with a small purple stripe of the rainbow.
You need to paint purple:
- 3 bottom cells in the 7th and 14th vertical rows;
- in the 8th and 13th vertical rows - 2 cells located under the blue ones;
- in the 9th, 10th, 11th and 12th rows, 1 cell should be purple.
If you want the rainbow to be smooth, you can reduce the size of the cells. To do this, you can additionally draw a few more lines in the notebook, passing between the main ones. This will reduce the size of the cells by 2 times. To increase the size of the rainbow, you can add a few cells to its central part. You can also complement the picture by drawing a small cloud to the rainbow.
Colored heart
The drawings in the diary are light and bright. A colored heart drawn on a piece of paper 15 cells wide and 14 cells high will look beautiful.
To draw it, you need to prepare a simple pencil and 7 colored pencils, each of which corresponds to a certain color of the rainbow.
The stages of drawing are as follows:
| Stage | Action | Description |
| 1 | Drawing the outline with a simple pencil |
Color the cells located on the right side symmetrically relative to the 8th vertical row. |
| 2 | Coloring a heart |
|
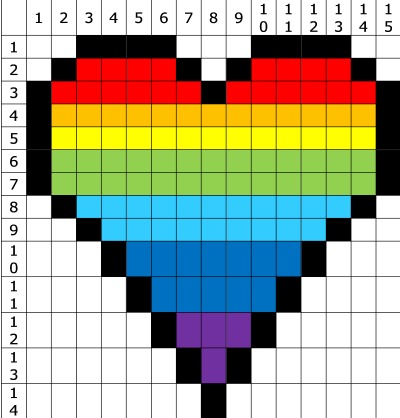
You can leave the multi-colored heart as is or add additional details, such as drawing eyes and a mouth.
Fascinating drawing of cool and simple images on the cells brings aesthetic pleasure, helps to relieve nervous tension after a working or school day. In children, such an activity develops coordination, creative thinking, perseverance, imagination and concentration.
Video about drawing by cells
Cool pictures by cells: