Sports and casual models with long laces can be laced in different ways, with a large number of different patterns being distinguished. These patterns provide a tight fit around the foot and creating the desired image with style. Each technique takes into account the length of the laces, so you can hide the ends that hang down unsightly.
Basic methods for different shoes
Today, fashion is reflected in all details of clothing. At the same time, not only various hair ornaments are influenced, but also braids, which must look beautiful.
Ties are produced:
- in one color or with a pattern;
- with plastic or metal tips;
- with leather, silicone or textile texture;
- shortened or lengthened.
At the same time, the lacing method is influenced by fashion. People of a more mature age will not tie their shoes with neon laces in an unusual technique. However, teenagers take this accessory more seriously, because it allows self-expression, and is also a way to stand out from the crowd and an integral part of the image.
There are many varieties and methods of lacing, thanks to which it is permissible to design a graphic pattern on high boots, sneakers or trainers. In this case, you can make long ties shorter without cutting, hide the bow, and also put on shoes without untying and tying the laces.
Different types of shoes can use different decorative tying methods. In this case, you need to act carefully to get a more graphic and clear pattern. If the technique is performed carelessly, the look will be completely ruined. As a result, you will not be able to create the desired image.
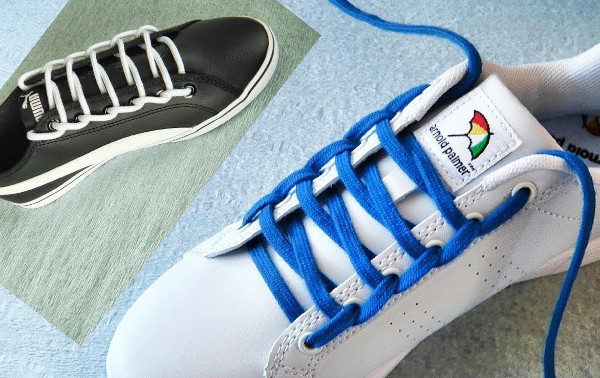
Light-colored sneakers will have an original look with colored laces. For black shoes, reddish, greenish and white laces are suitable.
On sneakers and trainers
For sports style shoes, the decorative lacing methods will be slightly different from the pattern for boots.
There are several ways to tie long laces on sneakers and trainers. so that shoes become a fashionable element of the resulting image:
| Way | Features of tying |
| External lacing | To do this, the laces should be crossed from the inside and passed through 2 holes, passing 2 ends up. After that, you need to cross them again. Next, the ties need to be pulled from top to bottom, repeating the entire pattern to the last row from the top. |
| Double binding | This scheme allows you to reduce the size of the laces. In the process, the laces must be passed through the same holes twice, returning one step back for this. In this case, it is permissible to make different patterns. This type of lacing does not require creating knots, because at the beginning of the process a strong fixation has already been created. The ends of the laces that hang down can be tucked inside the shoe. |
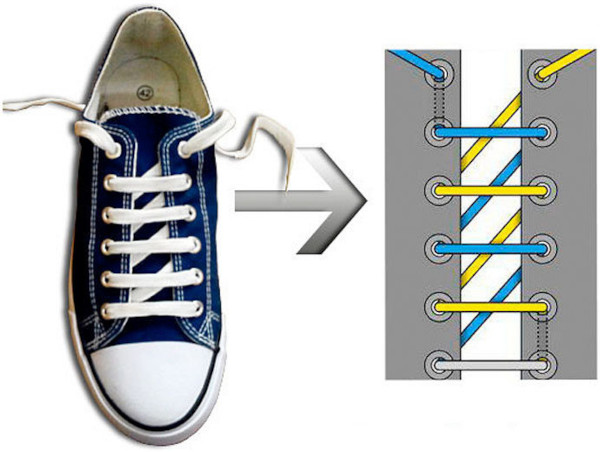
| Zigzag | In this case, the tips need to be inserted into the last row of holes from below, then crossed with each other and inserted into the eyelets of the second row. This pattern needs to be repeated until the last row from above, after which the ribbon needs to be tied into a knot or a bow. |
| Ladder | The laces should be brought in from below and pulled out. Then one edge should be passed through the block from above, and the second one – into the hole above. You need to work with each tip in turn, so that in the end you get straight lacing. |
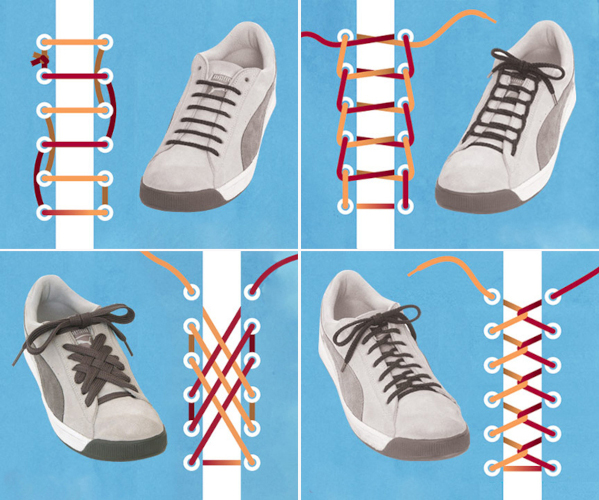
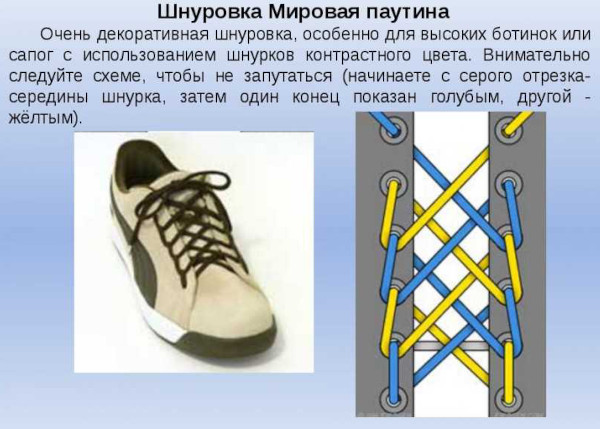
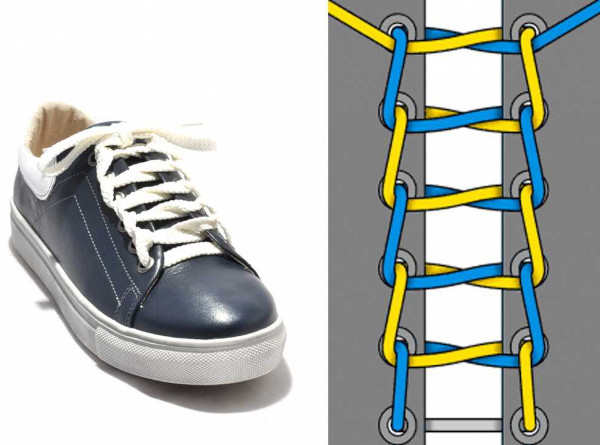
The World Wide Web pattern is especially popular among young people, allowing you to create an unusual pattern using long ties. This method is suitable for sneakers that have at least 6-8 holes.
Lacing option:
- From the bottom side, insert the ties into the 2nd row of eyelets. Then pull the tips through the lower holes.
- Cross the edges of the tape, thread it from below and pull it through the 3rd row of holes.
- Afterwards, pass the tips through the knot formed by rows 1 and 2 from the bottom.
- Cross the edges of the ties again and pull them through the 4th row from above.
- Return the ties, pass the second and third blocks through the knot from below, and then cross them again.
- Pass the tape through the 5th row upwards.
On boots
Long shoe laces can be tied in a zigzag, ladder or double weave to create a beautiful weave. However, if the model is classic, it is recommended to give preference to traditional patterns in the form of straight and cross tying. Experimentation is acceptable on sports-style shoes.
Tying options:
- Crossroads. Like straight lacing, it is ideal for a strict model, which is intended for business meetings and office work. It is permissible to create a clear silhouette of broken and straight lines on the shaft. If the boots are classic, this type of lacing should not have knots with bows. In this regard, the fixation area must be hidden from the inside.
- Diagonally. This pattern allows you to firmly fix the bootleg with the foot, as well as the ties, so that the band does not loosen during long-term wearing of shoes. Additionally, an original pattern will be created. Mirror lacing is suitable for sports-style shoes, symmetrical for classic shoes.
The laces will be greatly affected if the shoe has loops instead of eyelets. In this case, it is recommended to choose a round tape because it is subject to minimal abrasion.
At the same time, cross lacing is more suitable for such models. Unlike straight weaving, the bending angle of the ties will be flat and will have a long service life.
Lacing according to the number of holes
Long laces do not necessarily have to be shortened by cutting. There are several simple techniques for tying the lace on shoes of different styles. The choice will depend on the number of holes in the model.
On 4
It is acceptable to tie long laces on a 4-hole model in a square pattern. This type of lacing has a stylish appearance and also allows you to shorten a long ribbon.

Method of creation:
- Pass the tie through the lower hole on the left. Insert the end of the ribbon not from the inside, but from the outside.
- Pass one end of the ribbon through the other hole, but from the opposite side. Pass the other end of the tie in the same way.
- Then return to the first end again, passing it through the next hole from the top on the same side.
- Using the same principle, pass the other end of the tape.
- Cross the 2 ends and pass them through all 4 holes one by one.
- To tie the ribbon, use a classic knot.
This tying pattern is suitable for a light jog or walk.
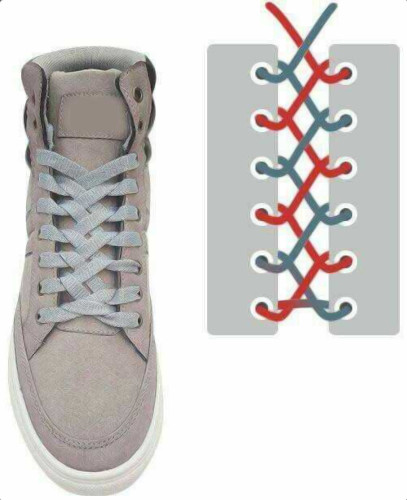
On 5
For shoes with 5 holes, it is better to use a zigzag method of lacing a long ribbon.
Step by step description:
- Pass the tape through the outer rows of holes from below so that the edges come out on the outside.
- Place 2 ends under the created tie and cross them.
- Then bring the tape out from the inside and pass it through the new holes from above. As a result, a new tie should be formed.
- Again, pass the 2 ends of the tie under the tie. Cross them and pull them through the upper holes.
- Perform similar manipulations until the ribbon reaches the top.
This tying option is suitable for business and sports models.
On 6
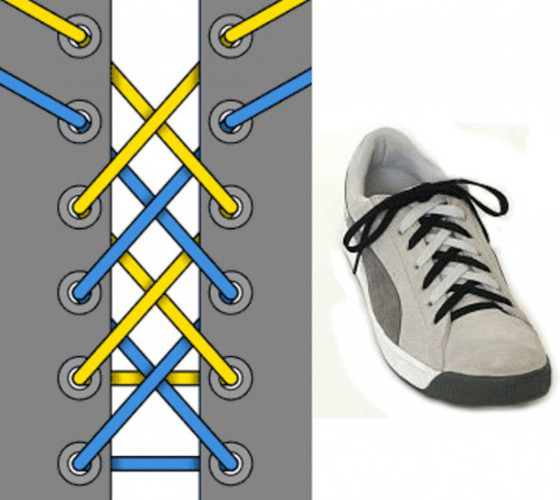
Long laces on shoes with 6 holes can be tied in the form of a cross weave. This type of lacing is considered the most common method used in production.
The only exception is a small segment of the expensive brand model, where a straight weave pattern is used. In other cases, you can see the classic criss-cross pattern.
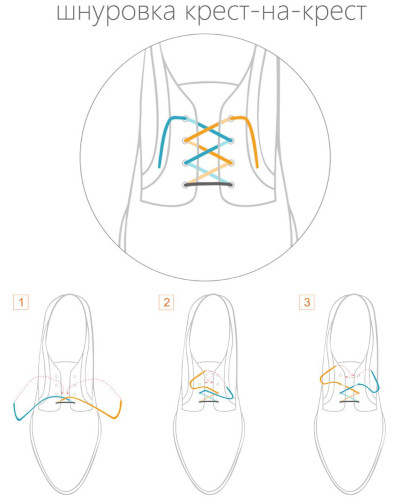
According to this scheme, lacing should start from the outer eyelets at the bottom and finish with a classic bow at the top. This method is suitable not only for 6 holes, but also for a different number of holes.
Step by step process:
- Pass the tips from the inside through the bottom row of holes. Pull the edges of the ties tight and align them so that they are the same size.
- Cross and insert into a new row from below. Check the surface of the ties. If the tie is flat, it should be neat and straight on the front side of the shoe.
- In the 3rd row, insert the tips from the bottom up, as in the previous row.
- Continue lacing in a similar manner to the row of holes at the top.
After finishing the weaving, it is acceptable to insert the tie into the top last row from the bottom up, and tie a bow on the front part. It is also acceptable to insert from the top down, and pull the free edges that are inside towards the toe area, cross them and wrap one end around the other.
At the same time, at the level of the toe, you need to make a not very tight knot. Again, you need to repeat the process, make a new knot and tuck the tape inside, passing it almost to the toe area. The tie should be placed so that it does not interfere with walking.
If the tie is very long, it is acceptable to initially wrap it around the foot, then create a knot. For shoes with 6 holes, the European weaving pattern is suitable, in which the back side will have crossed jumpers, and the front part - straight.
Step by step description:
- Pull the tips from the row below, aligning the edges of the tie. Work with the tips in turn.
- Pull 1 end from below through the opposite hole. Then pull the tip from the opposite side into a similar hole and pass it through the new one.
- On the other side, skip to the 4th row from the bottom. Do the same manipulations with the 2nd end of the tape, but on the other side.
- As a result, the ends of the tie should meet in the 6th row of holes.
- Secure the laces using any method.
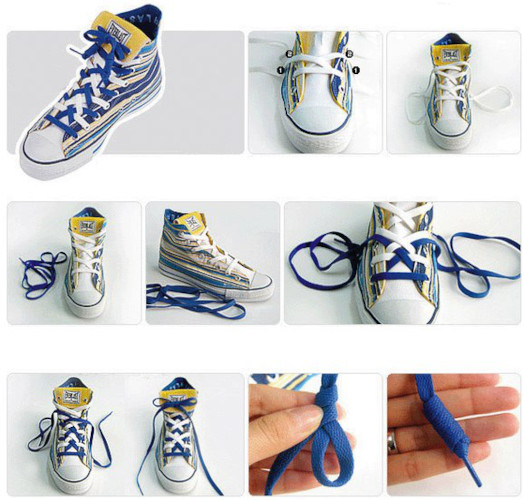
Original lacing techniques
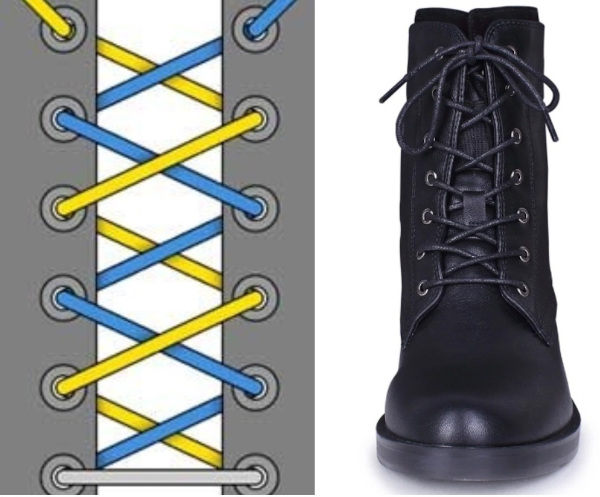
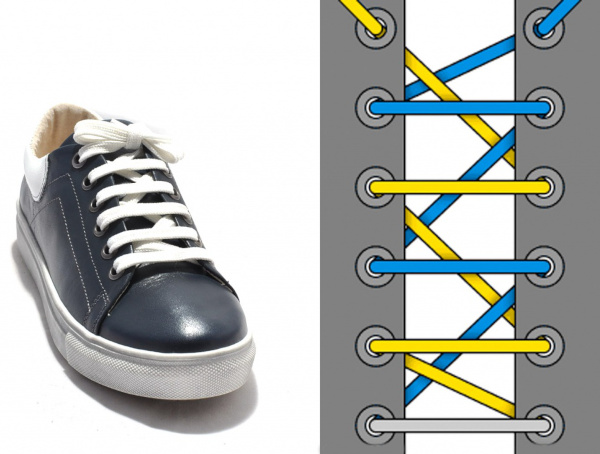
There are original lacing methods that allow you to create a beautiful and stylish image. For example, it is permissible to use 2 ties that differ from each other in shade. Two ribbons can be of a contrasting color or the same tone, but with different intensity. The choice will depend on personal desire and taste preferences.
When using laces of different shades, there should be a few rows of holes on the boots.
Step by step description:
- Pass the first ribbon through the row of holes from below and cross it.
- After that, insert the lace tip into the 3rd row of holes.
- Insert a cord of a different color into the 2nd row of holes from the bottom, performing the same manipulations as with the first. However, insert the tips into the 4th row.
- Continue lacing to the top holes. Then tie 2 bows, which should be located one above the other. The knot can also be hidden inside the boots.
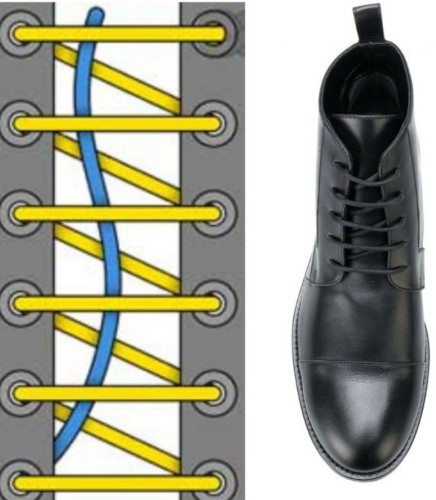
If the instep is high and there are constant problems with choosing shoes, it is necessary to give preference not to a decorative, but to a functional method of lacing in the form of a gap in the middle. This scheme is less popular than other methods, because it is little known. However, it helps to relieve pressure on the instep.
Weaving pattern:
- From the inside, insert the tips into the row of holes from below, then pull them out. Cross them and insert them into the new holes.
- Cross the tie again and continue lacing.
- When the middle row is reached, change the tying pattern. Pass the ribbon through the new holes from top to bottom, without crossing.
- Then repeat the initial algorithm and continue to the row above.
- Before tying the knot, cross the ribbon and pull it inside. Hide the ties under the tongue.
The ends of the tape can be hidden inside the shoe so that they do not hang down and do not interfere with walking. This method is suitable for models with an even number of holes. When creating a knot in the form of a bow, it is permissible to hide it inside the shoes so that it is not present on the front part.
To make the front part of the shoe look respectable, creative and beautiful, it is necessary:
- Divide the tape into 2 unequal parts. The short side should be long enough to create a knot.
- Pass the tip of the extended end through the top hole from the bottom side and insert it into the opposite hole from the top to create a horizontal crossbar.
- Pass the tip of the extended end through 1 hole from below and pull it up. Then pass it through the opposite hole downwards to create a horizontal bridge.
- In a similar way, reach the bottom row with one end of the tie. Then proceed to the reverse algorithm, filling the untouched holes with a similar end, moving upwards.
- When finished, tie a knot and hide inside the shoe.
To create a brutal image you need:
- Pass the end of the ribbon from top to bottom through the 6th hole. Then pull it through the hole on the opposite side from top to bottom.
- Pass the tie through the 5th hole on the opposite side from the inside up.
- Insert the end of the lace diagonally into the 3rd hole, then into the opposite one, then into the first. Each pull-through is performed from the inside of the shoe.
- Perform a step perpendicular to the first hole on the other side. From the top, pull the tie down.
- Then continue working in mirror image so that the ends of the tape are together on the wrong side.
- Tie a knot and hide inside the shoe.
The lacing in the form of a snake looks unusual. This scheme will take no more than 1 minute.
Method of creation:
- Make a tight knot on one end of the tape, the size of which should be larger than the hole intended for threading.
- Pass the knot through the hole. The loop should be inside the shoe.
- 2 Pass the edge of the tape through the upper hole, which is located on the opposite part. Remove through the 2nd hole from above.
- As a result, 2 rows should be created.
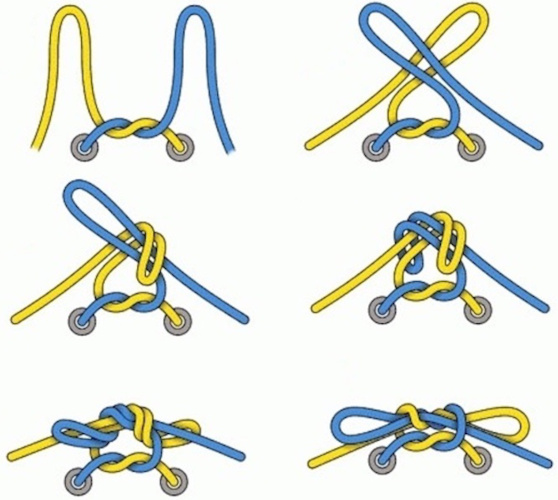
To prevent laces from untying, it is permissible to use a sherpa knot, which is characterized by threading the ends several times. As a result, it is permissible to get a very strong knot. This scheme is suitable for shoes of any model.
Step by step description:
- Tie 2 edges of the tape symmetrically.
- Using the right tie, create a loop without tightening.
- Thread the left part of the lace through the resulting hole twice.
- Tighten the loops with two ties.
The ladder combines cross and straight tying of laces.
This diagram allows you to create an original pattern:
- Thread the ends of the 2 ties through the bottom holes. The straight stitch should remain on the outside.
- Pass the right tape from the inside through the 2nd hole on the left and make a straight stitch that will be parallel to the bottom row.
- Thread the left ribbon through the 3rd hole on the right to create a parallel stitch.
- Then lace the ties one by one until you reach the top.
The type of footwear will mainly depend on the shade, design idea, model and brand. Also in this case, it is necessary to take into account the lacing. If you choose the right length and tie the laces beautifully, everyone will look confident and respectable in such shoes.
Video about tying long shoelaces
3 Cool Lacing Methods: