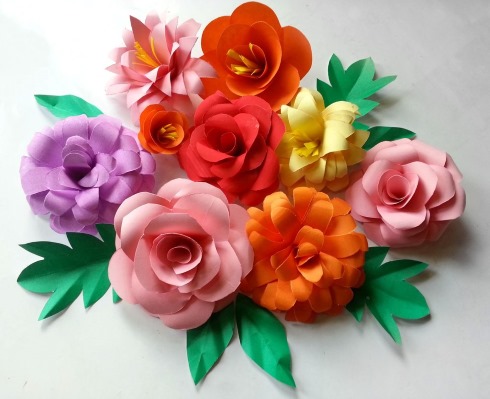
Making paper flowers has become a hobby for many needlewomen since the 50s. These crafts are used to decorate home interiors, decorate tables at weddings, and hold photo sessions with them. To make such flowers yourself, you don’t need any special skills, but you do need a template. Using a pre-cut blank, the process of making flowers will be much easier and faster.
Using templates to cut flowers
A template is a blank made of hard material. To make paper flowers, templates are made thick so that it is convenient to trace them with a pencil on a clean sheet of paper.
Templates are essential when creating paper crafts. They help save time on making a flower. You don't have to draw each detail from scratch, measuring with a ruler. It's enough to do it once, cut out the element, and then use it as a template, simply tracing it on paper.
In addition to saving time, the template has another function - to make the paper decoration symmetrical, even and beautiful. It is impossible to repeat the same outline of any element by drawing it by hand, but thanks to the template, all the details will be identical to each other.
How to make a template with your own hands
It is quite easy to create paper flowers using a template. To make a blank, according to which several elements will be cut out, it is necessary to measure all sides of the part and draw its outline on a suitable material. If you need a template of one petal, then you should measure its height and width. A rectangle with the same sides is drawn on cardboard.
Then the width of the figure is divided in half and marked with a line. This will mark the center, which will result in an even drawing. Inside the rectangle, the petal itself is drawn by hand. The edges of the drawing should touch the edges of the rectangle in the right places. When the petal is drawn, it is carefully cut out and the template is used for further work.
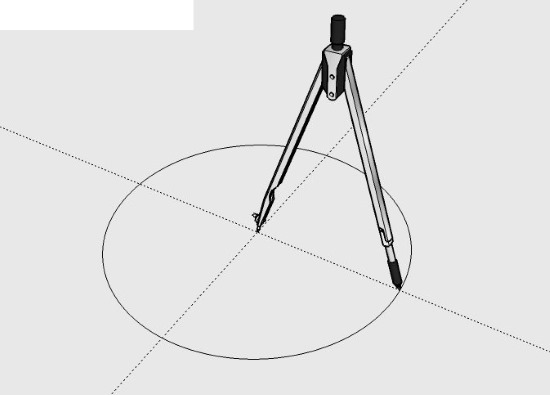
When a round template is needed, its production takes a minimum of time. The compass is applied to the ruler and laid out in accordance with the size of the diameter of the required part. Then simply draw a circle. If you don’t have a compass at hand, you can make do with a glass, shot glass, saucer or any other round object that can be traced. The main thing is that this thing is the right size.
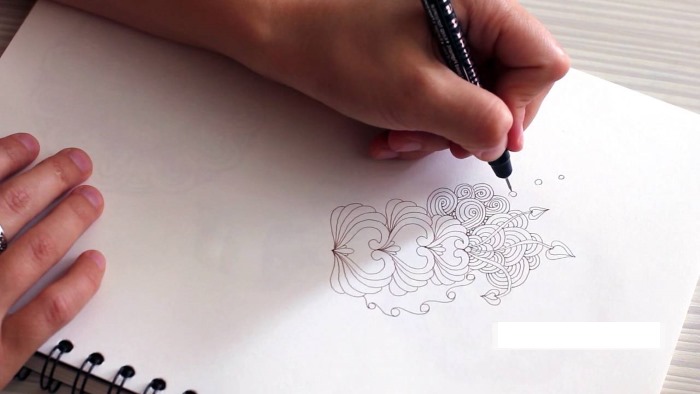
Complex patterns that cannot be copied by hand can be printed on a printer. Afterwards, you need to carefully cut out the paper outline and trace it on a thicker material. Paper templates are not convenient to use. When they are outlined, the edges of the paper bend, crumple, and the outline turns out crooked.
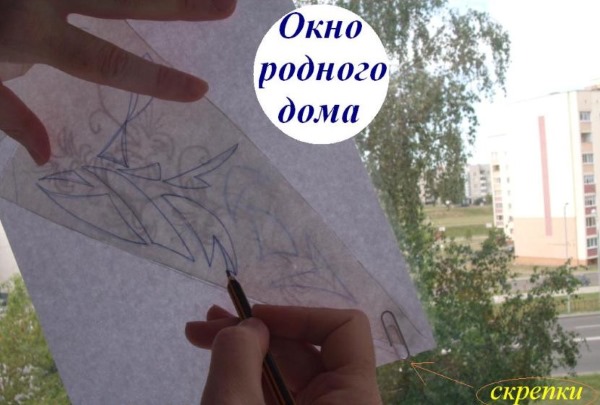
If you don't have a printer at home, you can try another trick - trace the template through the computer screen or even a smartphone. In childhood, many people learned this trick of transferring a drawing through a window. Here, the principle is exactly the same. The main thing is to trace carefully, without pressing with a pencil.
You need to open the image of the kennel on the computer and scale it to the optimal size. It is better to close the curtains in the room and turn off the light, the lines will be visible more clearly. A clean sheet of ordinary office paper is leaned against the screen and all the contours are carefully traced with a pencil. Then the template is cut out and carefully transferred to a hard material and cut out again.
Materials for creating a template
The flower template for cutting out of paper should be dense. Cardboard is suitable for making. It is hard and not as flexible as paper.
You can trace the cardboard blanks a large number of times until the edges of the template are deformed. And to prevent deformation, thin plastic is suitable as a material for the template. Plastic blanks can be cut out of bottles, paint bucket lids, an unnecessary document folder, etc.
In addition to cutting out parts from dense materials, various objects are suitable. Round templates do not need to be prepared specially. If you have a dish in the house that is suitable in diameter, for example, a mug, then you can trace its bottom directly on the paper intended for making elements.
Tools and auxiliary means for manufacturing
In addition to the main material and pencil, you may need other tools to create the template:
- Stationery knife.
- Felt-tip pens.
- Ruler.
- Eraser.
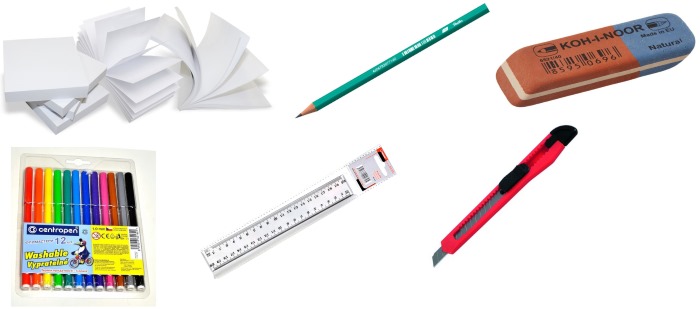
A stationery knife is needed to cut out parts with holes in the middle. You can use felt-tip pens to mark the lines more brightly to make cutting easier. If the workpiece needs to have a fold line, you can take a different color and mark it with a dotted line.
A ruler is needed for precise marking, and an eraser for correcting incorrect lines. The template is gently drawn with a pencil, and only when it has the correct shape, you can outline it with a felt-tip pen.
The table below shows examples of paper types and what paper flower making technique they are suitable for:
| Paper | Technique |
| Office | Origami and children's crafts |
| Corrugated | Bouquets for decoration |
| Photo paper is thin | For giant flowers |
| Newspapers | For non-standard decorative buds |
| Colored | Quilling and origami |
| Scrapbooking paper | Giant flowers |
Many craftsmen can make flowers from any type of paper, the main thing is to show ingenuity and imagination.
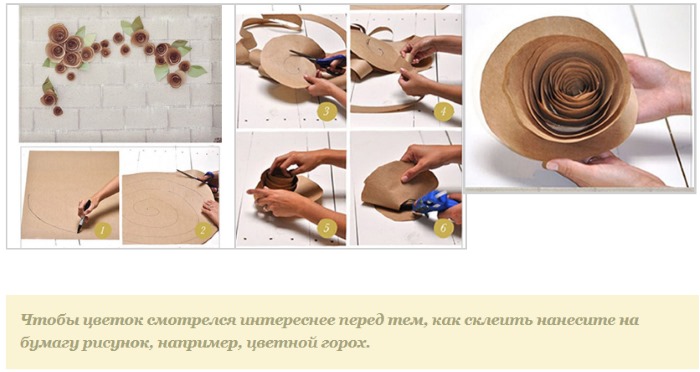
Stages of creating templates and stencils
It is not difficult to make a flower template for cutting out of paper with your own hands, you just need to follow the order of actions.
Finding designs for templates
Sketches can be found on the Internet. In master classes published on handicraft websites, the authors leave the outlines of the blanks for printing. You can use a printer or transfer the image via a monitor.
The last method is also suitable for transferring a sketch from printed publications. If you cannot tear out a page with an outline or cut out a blank directly from a magazine, you can transfer the drawing during the day through a window pane.
A template that you come up with yourself is quite easy to draw on paper. The main thing is to make all the lines straight. To get symmetrical sides of the drawing on cardboard, you can fold the sheet in half and draw only the first half.
For example, a petal requires a heart-shaped detail. The rectangle is folded in half, one half of the figure is drawn and cut out along the contour, without touching the fold line. Then the cardboard is unfolded and you get an even figure with equal sides.
Markup
The next step is proper marking. To make the stencil even, you need to make a sketch using a ruler. These lines will help to draw the outline neatly and clearly. For example, you can take a template of a leaf on a stem. Its shape should be elongated, the edges rounded. At the base, the leaf should be narrower than at the end.
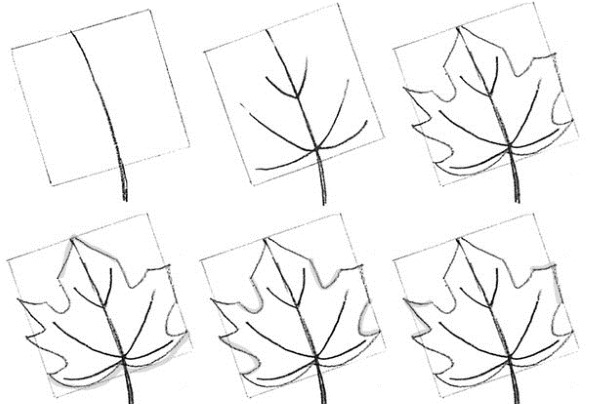
First, you need to draw a rectangle, the height of which should be equal to the length of the sheet, and the width accordingly. The width should be divided in half and marks should be made on the upper and lower sides of the figure. The marks are connected by a thin line, the center is marked.
Now you need to step back a few millimeters from the sides to the middle, thus reducing the width of the rectangle at the bottom. This will be the base of the sheet. From the edge of the base, a smooth line is drawn upwards, gradually it connects with the edge of the figure and again moves away to the center.
At the very top, the line should touch the line indicating the middle. The second half of the sheet is drawn in the same way. The workpiece can be cut out.
Tenderloin
The flower template for cutting out of paper should be smooth, without angularity and burrs. To do this, you need to choose the right cutting tool.
Scissors are suitable for cutting out thin cardboard, such as that sold in children's craft kits. Scissors are not suitable for corrugated cardboard from boxes. A sharp stationery knife is needed here.
Before cutting thick cardboard, it is necessary to protect the table surface from cuts. The knife is carefully moved along the marked lines. All cutting movements should be made away from you.
Thin bottle plastic is easily cut with regular paper scissors. For plastic 5 mm thick or more, you will need a jigsaw. After the workpiece is cut, it is necessary to process the edges with sandpaper.
Examples of template application
Blanks are used for the accuracy and precision of all details. Below are several detailed master classes on how to use templates to create paper flowers.
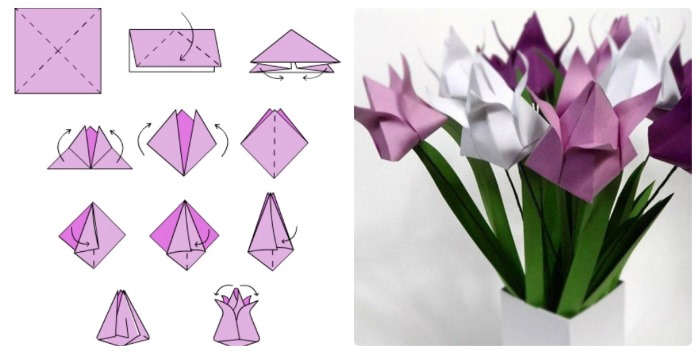
Making origami figures
In order to make paper flowers using origami technique, you will need the simplest template – a square one. It is needed to create several flowers and collect them into a bouquet without using a ruler each time, making a new bud.
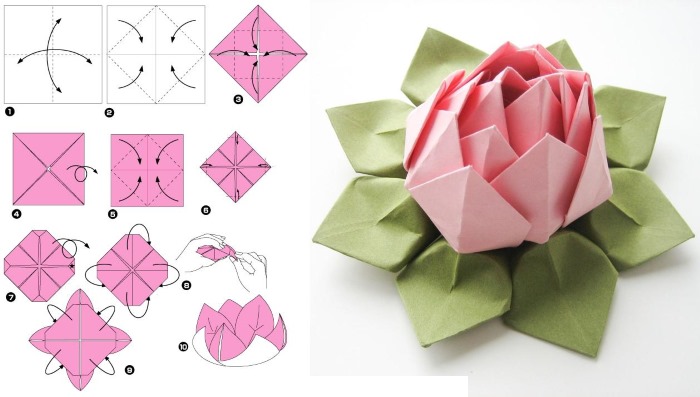
Step by step instructions:
- On thick cardboard you need to draw a square with a side of 15 cm. Cut out the blank and trace it on colored paper of the desired shade and cut it out.
- A 15 x 15 cm colored sheet is folded in half horizontally.
- The resulting rectangle is folded in half again, from right to left.
- The top square needs to be opened like a pocket. As a result, it should turn into a triangle.
- The paper is turned over to the other side. The square that ends up on the front side needs to be unfolded in the same way as the first one, to get a triangle.
- The resulting workpiece is triangular in shape. The corners of the top layer need to be folded, connecting the ends at the top, in the center. The fold line should serve as a reference point.
- You will get 2 small triangles that need to be folded in half and unfolded again. This is necessary to mark the fold line.
- Then they need to be unfolded and made into squares. Unfolding them is easy, you just need to straighten the layers like pockets and fold them in half.
- The free corners at the top of each square need to be folded down.
- The paper is carefully turned over to the other side. Then you need to repeat the last 3 points. Make small triangles, fold each in half, unfold and make squares.
- The resulting top corner needs to be folded downwards.
- The paper blank is carefully opened. It should acquire volume.
- The 2 corners that are in the center need to be turned towards the edges, making the plane even.
- The paper is carefully turned over and the top corner is folded back so that it becomes perpendicular to the square.
- The bottom right square has a top that folds in half diagonally downwards.
- The paper base is turned 180 degrees and the steps from the previous point are repeated.
- Now you need to take the blank and carefully move the walls in the center clockwise with your fingers. You should get a shape resembling a rosebud.
- Now, using a needle or a toothpick, carefully arrange the remaining petals in a random order. You will get a rosebud, which can be glued to a wire stem. You can place a pearl-colored bead in the center of the flower, fixing it with glue.
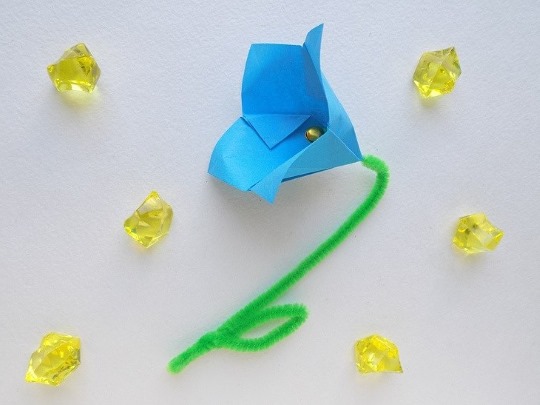
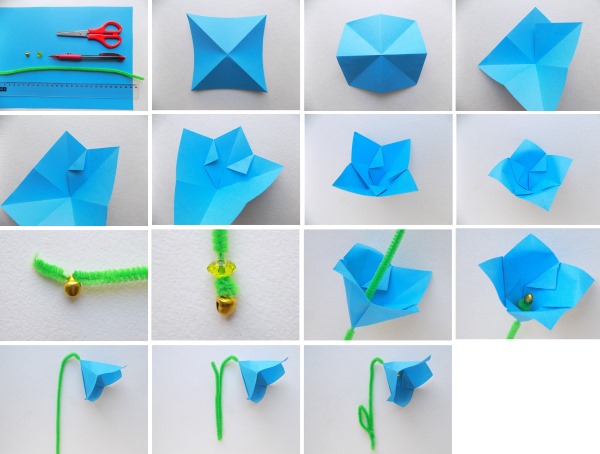
Green chenille wire looks good as a flower stem. Its fluffiness resembles thorns. Such a stem is connected to a paper bud with hot glue. Although it is not necessary to make a stem for these flowers. The buds are quite weighty and strong, so the best design option would be a basket.
You can use green-painted polystyrene foam as a base. Rosebuds are attached to it with glue or wire flower stems are stuck in. A mini-card can be tied to the basket handle with a ribbon.
In this case (when there are several colors), a template saves time. You don't need to measure 15 cm each time on paper. It's enough to trace a ready-made square of cardboard.
Making a gift in the form of paper flowers for a birthday, March 8 and other holidays
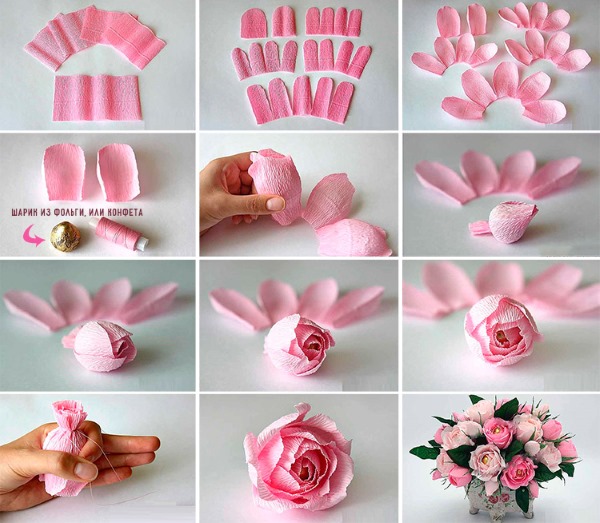
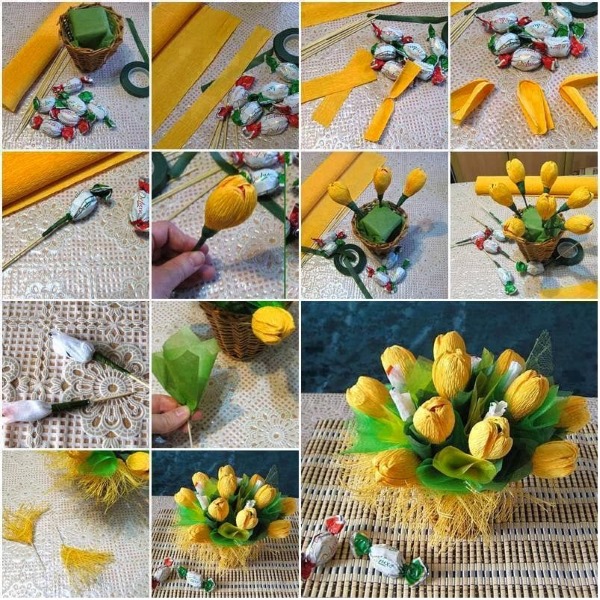
You can please a dear and close woman on a special day with a gift made with your own hands. A bouquet of paper flowers is a good option. Especially if there are small chocolate treats hidden in the middle of the flower.
What you will need to create an original gift:
- thick cardboard;
- corrugated paper in soft pastel colors;
- colored foil to match the paper;
- hot glue;
- scissors;
- round or cone-shaped candies;
- wire and green corrugated paper, or special floral wire;
- threads;
- beautiful wrapping paper for bouquets.
Step-by-step instructions for creating a “sweet” bouquet:
- A flower template for cutting out of paper can be of a very simple shape. On thick cardboard, you need to draw a circle with an approximate diameter of 10 cm. The edges of the circle need to be outlined with semicircles, they will depict petals. The base blank is ready. You need 5 of these templates. Each of them should be 1 cm smaller in diameter than the previous one.
- The blanks are cut out and traced on paper. All 5 templates are components of one bud, so the color should be the same.
- Circles with petals are superimposed on each other, from larger to smaller, and are fastened together with threads. When collecting layers together, they need to be laid overlapping. The void between the petals of the first circle should be covered by the next circle.
- The candies are wrapped in colored foil and attached to the center of the flower with a thread. You need to pierce the layers of paper and wrap the candy with a thread. 4-5 stitches will be enough, which will cover the confectionery on all sides, crosswise.
It is not recommended to attach candies using hot glue. Firstly, it will melt the chocolate and spoil the appearance of the candies. Secondly, there is a risk of damaging the packaging and the glue penetrating into the product.
- The stem is attached to the flower with hot glue. The unsightly joint between them can be covered with floral tape.
- If you chose a regular wire as a stem, you need to decorate it. For this, you will need green corrugated paper. Cut a thin, long strip about 5 mm wide from it. The strip should be carefully wound onto the wire, overlapping the previous layer and coated with PVA glue.
- Having collected the bouquet, it is necessary to pack it beautifully. To do this, cut a square from the wrapping paper, which will fit the flowers. They are placed in the middle diagonally of the square. The corners of the package are connected with tape, and the stems in the middle are tied with a ribbon. The original gift is ready.
For beauty, you can put a small card with wishes and a signature between the buds. The template, in this case, saves a lot of time for making a gift, and the details are even and identical. The buds come out symmetrical and beautiful.
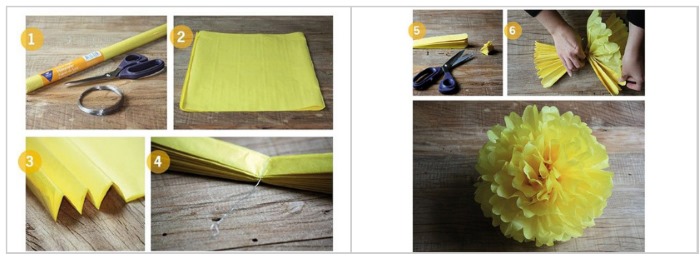
Making large volumetric flowers to decorate a room or hall
Giant flowers can decorate a hall or any other room, and also become a decoration for a photo shoot. To make them, you will need colored paper. It is desirable that it is not too thin, because the petals will not hold their shape.
Colored office paper or white paper on which you can draw colored veins by hand will do. The larger the flower, the thicker the paper should be. To create an unusual decor, you can print out notes or a newspaper in English. Such flowers will look unusual and decorate the festive hall.
Materials needed for work:
- paper;
- scissors;
- thick cardboard;
- pencil;
- hot glue.
On thick cardboard, you need to mark the outlines of the petal templates. You will need different sizes. About 5 large ones, 4 medium ones, 2-3 small ones. The blanks are cut out and traced on colored paper.
The large petals are joined together at the base using hot glue. Medium ones are added to them, and then small ones. All the petals should overlap each other.
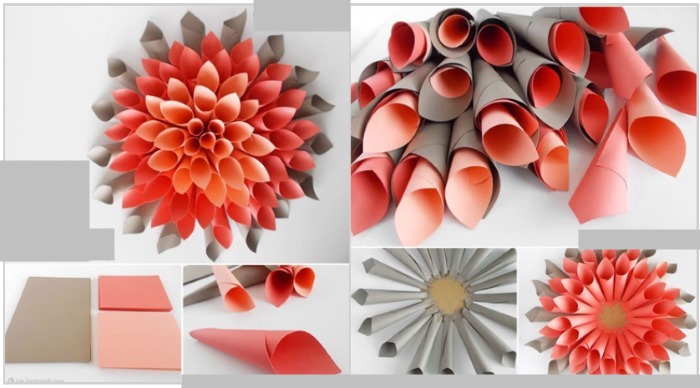
To add realism, you can slightly curl the edges of each petal back. If you can't do this manually, you should try to curl the edges of the petal on a pencil. Give it a slightly wilted shape, which will add naturalness to the flower.
The core of the flower can be done in two ways. The first one is very easy, you need to cut out a rectangle and make vertical cuts along the entire length, then roll the workpiece into a tube and attach it in the middle.
The second way is to use a template for a fluffy pompom. Cut out two donut-shaped pieces from thick cardboard or thin plastic. Put them together, and a skein of yellow threads will pass through the hole. They should be wound around the "donut" until the workpiece is no longer visible.
Next, scissors are inserted between the parts, the threads are cut. Then a thread is pushed between the cardboard templates and the cut threads are pulled together into one bundle. You get a pompom, it is glued to the center of the flower. For children's creativity, where it is not necessary to make the bud natural, you can cut out an ordinary circle from paper and cover the center of the flower with it.
If you plan to make flowers on a stem, thin cardboard tubes glued together and painted green will do. They can be found in rolls of paper towels or wallpaper.
If you can't get hold of tubes, you can use real tree branches. You need to choose a smooth and even one, without knots. Another option is to glue a leg out of cardboard yourself, but this is a long and painstaking process.
The stem and bud are connected with glue. The flowers are ready to decorate any room or become an original decoration for a holiday.
Making paper flowers is not a difficult job. With pre-prepared templates, the time for creating masterpieces will be reduced. The work will have a finished, neat and presentable appearance. The process of cutting out the details will be easy and simple.
Article formatting:Natalie Podolskaya
Video about paper cutting templates
Flower - a template for cutting out a daisy from paper in this video: