Barbie doll is a popular children's toy, 30 cm tall, with movable arms and legs, as well as numerous, bright, fashionable outfits.
Using simple patterns and small pieces of fabric, each girl, together with her parents, can independently make clothes for her favorite doll, which will allow her to show her imagination and significantly expand her gaming possibilities.
Construction of the pattern
Clothes for dolls are made according to special patterns, designs and drawings, and the sewing process itself is practically no different from sewing women's clothes.
Experts advise starting the process of making clothes with a careful examination of the doll and measuring its parameters.
Construction of the pattern
| Height | 30 cm |
| Neck circumference (NC) | 2 cm |
| Chest circumference (OG) | 11 cm |
| Waist circumference (WC) | 8 cm |
| Hip circumference (HC) | 12cm |
The pattern for doll clothes is based on the parameters of the figure and is a reduced copy of the corresponding model of women's clothing taken from the Internet.
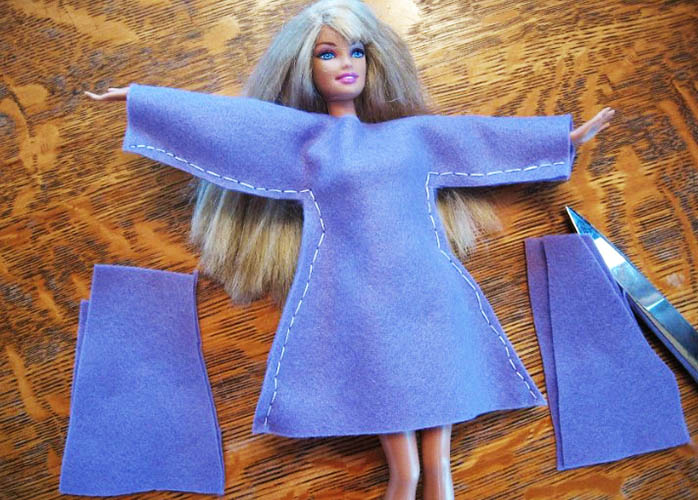
If you don't have sewing skills, you can replace the necessary pattern by placing the doll's silhouette on the material or paper and carefully tracing her figure. In this case, the cut-out sketch should mark the lines of Barbie's chest, waist, and hips.
The finished drawing should be transferred to the selected fabric using tailor's chalk, a simple pencil or a piece of dried soap, and when cutting, add an additional allowance of 0.5-1 cm to each seam.
Materials needed for sewing
The fabric for sewing is selected depending on the type of desired product, and the size of the fabric may not exceed 50 cm. Also, experts advise using a material with non-fraying edges for sewing: felt, knitwear, which will significantly facilitate the process of making the product.
During work it is also recommended to have with you:
- a measuring tape or ruler;
- tailor's chalk, marker or pencil;
- scissors of different sizes;
- sewing accessories (needles, threads, pins);
- sewing soldering iron (used for processing satin ribbons, chiffon);
- any decorative elements for decorating finished products.
When making doll clothes, professional tailors advise girls and their parents to:
- Carry out cutting with sharp scissors. For small parts it is allowed to use manicure scissors.
- Cut paired pieces symmetrically.
- When sewing by hand, stitch with the needle held back and form loop, oblique and blind stitches. When using a sewing machine, stitch at a length of 2 mm.
- After each seam, carefully iron its edges.
- Small elements of the outfits (sleeves and bodice) are sewn by hand, which will allow you to complete the work more accurately.
- Decorate doll clothes with beads, pearls or satin ribbons pre-treated along the edges with a sewing soldering iron.
How to sew a dress for Barbie
Clothes for Barbie dolls can be made with your own hands using patterns taken from the Internet. One of such items is a soft pink doll dress decorated with frills, made from a knitted piece with velvet padding measuring 15*10 cm.
You will also need the following for the job:
- 1.3*4 cm pink nylon ribbon;
- 30*20 cm lining fabric;
- Velcro fastener;
- satin ribbon or braid for a bow.
When working on a skirt, you need:
- Cut the nylon tape into pieces 40 cm long each, and then assemble them manually, shortening them to 14-16 cm.
- On a cambric strip measuring 15*10 cm, previously folded to the wrong side, make 3 cuts 0.5 cm wide. Machine stitch along the resulting piece.
- At the bottom of the product, sew the first frill by hand, and then, stepping back 3 cm each time, attach 2 more flounces.
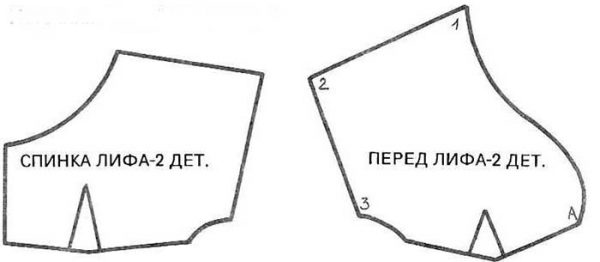
To sew the bodice you will need:
- Cut out the knitted parts of the product and stitch them, covering the shoulder seams and darts.
- Cut the batiste into 0.5 cm wide strips and use them to trim the neckline and sleeves. You can secure the trim to the main piece with a machine stitch along the stitching seam.
- Sew the side seams of the bodice, and then, having marked the “middle points” on it and on the skirt, connect all the parts of the dress.
- Sew on a velcro fastener and decorate the dress with a pink bow.
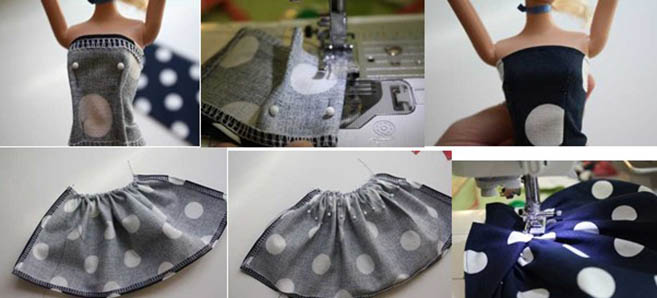
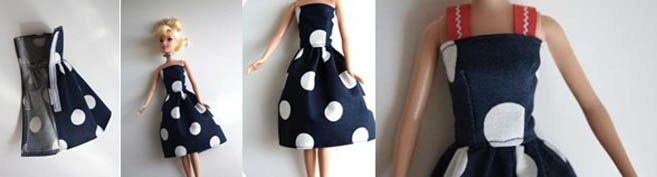
How to sew a dress without a pattern
You can sew a dress for a doll without working with a pattern, for this you need:
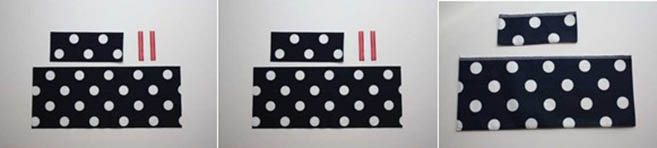
- Cut out two rectangles from the material measuring 10*20 cm and 30*40 cm.
- From the elastic band, make 2 strips measuring 3*10 cm.
- Fold both pieces of fabric along the top and bottom edges and hem them with a zigzag stitch.
- Place the small rectangle on the doll's chest, pin it to form the bodice darts, and stitch along the marks you made.
- On the large rectangle-skirt, make folds with pins and sew them with a machine stitch.
- Connect the parts of the product, put it on the doll and straighten it if necessary.
- Hand sew elastic straps to the bodice.
Jacket with skirt
Clothes for Barbie dolls can be sewn by hand or using a sewing machine, but even in this case, experts recommend connecting all parts of a small-sized product with a hand blind stitch.
To make a jacket with a skirt you will need:
- crepe fabric for a jacket with a cut size of 30*30 cm;
- piece of suede for the skirt - 20*20 cm.
To create a jacket you should:
- Cut out 3 pieces from crepe: the back and 2 front ones, and then overcast them around the perimeter.
- Connect all parts of the jacket along the side and shoulder seams, stitch the darts and hem the neckline and hem.
- Sew the sleeve details along the seams, sew them into the jacket and turn them right side out. If desired, you can stitch a beaded stitch along their edges and hem.
- Decorate the outfit with a belt and decorative buttons (fastener).

When working on a straight skirt, you need:
- Cut the suede to make 3 pieces: 1 solid front piece and 2 back pieces, place them together with the right sides facing inward and join along the side seam.
- Sew a fastener of two buttons to the waistband of the skirt and decorate the product with bead stitching.
Blouse and sundress
You can sew a blouse for a Barbie doll with your own hands from a piece of chiffon measuring 35*35 cm.
You will also need the following for the job:
- thin elastic band 2.5 cm long;
- a piece of felt or other lining fabric;
- Velcro fastener - 0.5*7 cm;
- sewing soldering iron.
Before starting work, cut out all the details of the product from a piece of chiffon according to the drawing (with a mandatory seam allowance of 0.5 cm).
Further during sewing you will need:
- Place the cut piece of felt on the back of each collar piece and attach it by ironing it with a hot iron. Trim off any remaining material.
- Use a sewing iron to treat the edges of all parts of the product to prevent fraying.
- Attach elastic to the sleeves from the inside using a zigzag stitch, and then gather them slightly at the top.
- Sew the blouse along the side and shoulder seams.
- Sew the sleeves into the blouse and gather them by pulling the elastic, then carefully tie the ends and trim them.
- Turn up the bottom of the blouse and hem it.
- Sew the collar to the neckline and process all edges of the product with a sewing iron.
- Sew the Velcro fastener onto the garment along the back edge.
You can complement your outfit with a sundress made of artificial suede, for which you should:
- Cut out all the parts from the prepared material in accordance with the drawing.
- Sew the parts of the sundress along the shoulder seams, fold back the armhole strips and sew a zigzag stitch along them.
- Do the same with the front edges, having first stepped back 0.5 cm from the edge of the product.
- Finish the neckline with knitted strips and secure them with a zigzag stitch.
- Sew the side seams, fold and hem the bottom of the sundress.
- To create the lacing, use an awl to make 7 holes on each side at a distance of 1 cm from each other, and pull the lace through them, having first inserted it into the needle. Lay the lacing moving upwards from the bottom hole.
- Attach the velcro fastener.
Cape coat and boots
Clothes for Barbie dolls can be made by girls together with their mothers, grandmothers or older sisters, and the sewing process itself will allow the child to use their imagination to create a bright and original fashionable outfit for their favorite toy.
To make a coat with a cape and boots, you will need to take the following pieces:
- 55*25 cm of the main dense fabric;
- 35*10 cm lining material;
- 13*13 cm artificial leather;
- 15*7 cm adhesive backing (non-woven fabric);
You will also need:
- small buttons 5 mm - 3 pcs.;
- buttons with a diameter of 0.5 mm - 6 pcs.;
- floss for pom-poms.
To create a coat you will need:
- Cut out all parts of the product from the fabric according to the drawing, after adding 0.5 cm along the seams.
- Sew the darts on the shelves and iron the bottom.
- Connect the side, shoulder and back seams on the wedges and press them apart.
- Glue the interlining to the pocket pieces using a hot iron and attach them to the side gussets of the coat.
- Machine stitch along the middle seam of the back and iron it.
- Sweep the bodice and the bottom of the coat, try the resulting model on the doll and sew the details.
- Treat the collar parts with adhesive interlining and make lapels at their ends.
- Place the collar face down on the coat neck, pin it, trim the edges and sew it carefully. Iron the finished part of the product.
- Turn the seam allowances for the sleeve hem inside out and stitch.
- Sew the sleeves along the seam, turn them right side out and sew them to the coat, inserting them into the armholes.
- Fold the bottom of the product, stitch and iron.
- Try the resulting coat on the doll and align it to the length of the wedges.
- Using blind stitches, sew up the remaining seam allowances at the bottom of the garment and on the collar.
- Attach buttons to both sides of the finished coat to serve as a fastener and decorate with decorative buttons.
To make a cape you will need:
- Connect the pieces cut from the main and lining fabrics along the side seam and smooth it out carefully.
- Place both parts of the cape on top of each other, align the edges and machine stitch, having first stepped back 0.5 cm from the edge to turn the piece inside out.
- Turn the finished product right side out and iron it.
- Make small pom-poms on strings from floss and attach them to the resulting product.
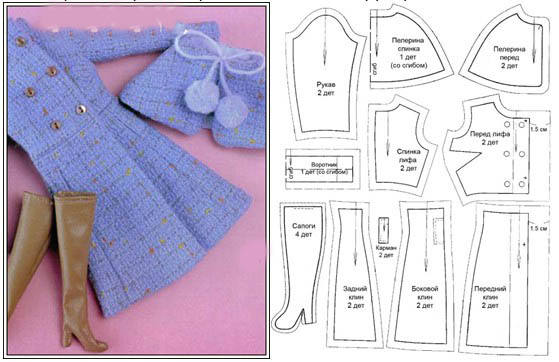
To create boots you need:
- Sew the product along the back and front seams to the bottom of the heel. The heel should remain unsewn.
- Cut the seam allowances and turn the product right side out.
- Cut a piece of 2*3 cm from the remaining artificial leather, roll it into a roll, insert it in place of the heel and sew it on. Cut off the part that is inside the product.
- Sew the turn-up from the top edge of the boot by hand.
Hat
A hat for a Barbie doll can serve as a separate detail, complement a dress or a beach outfit, and its base can be a plastic base from a chocolate egg with a surprise.
It is also recommended to use:
- thick canvas (for embroidery);
- bias tape (for finishing the edges of the fields);
- any decorative fittings (for decoration).
All parts of the product are made separately.
So, to make the brim of the hat you will need:
- Cut a circle out of the canvas that matches the desired size of the headdress, and then make a hole in the middle that matches the diameter of Barbie's head.
- Starch the resulting piece heavily, place it on the walls of the cup and leave until completely dry.
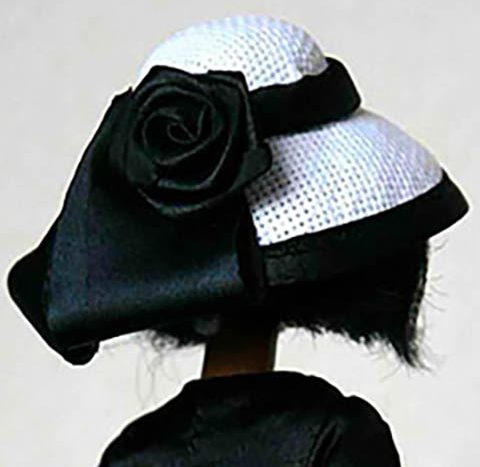
For the top of the hat you will need:
- Wrap half of the plastic part of a chocolate egg with a surprise, pre-starched canvas, and tighten the ends with an elastic band.
- Leave the finished piece to dry for 24 hours, and then connect the two parts of the product together by sewing them together from the inside and cutting off any excess parts.
- Sew the edges of the brim with bias tape and decorate the hat as desired.
Trousers
DIY clothes for Barbie dolls can exactly replicate the models of a woman's wardrobe, an obligatory part of which are considered to be 2- or 4-piece trousers.
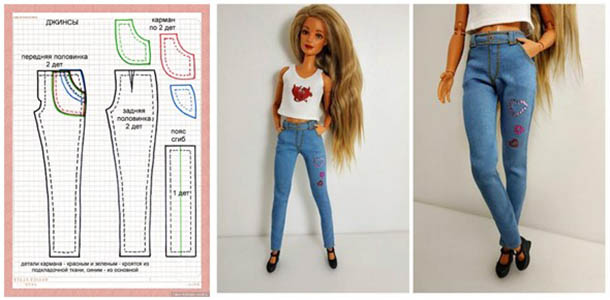
2-piece trousers can have wide legs and be fastened with an elastic band, and to create a 4-piece product you will need:
- Cut out the product parts from a piece of denim fabric measuring 50*50 cm.
- Sew the side seams first on the front and then on the back and iron the seams.
- Glue interlining to the pocket pieces, then place them on the front side of the trousers and machine stitch.
- Attach a belt to the top of the product.
- Turn up the bottom of each leg and machine stitch along it.
- Attach a rivet to the belt.
Shorts
Shorts for dolls are made of knitted or denim fabric.

During the work process you need to:
- Cut out all the parts of the product from the material, pin them together on the wrong side and stitch each piece along the side seam.
- Sew both parts of the product.
- Glue the interlining to the pocket pieces, then place them on the trouser legs and attach them to them using a machine stitch.
- Attach the belt to the top of the shorts, fold it in half and insert the elastic.
Top
A top for a Barbie doll can be sewn using a pattern or by applying a piece of material to the body of the toy. To do this, you should:
- Cut out a square measuring 15*15 cm from any colored knitwear.
- Make a circle in the middle that matches the diameter of the toy's head and put it on its body.
- Using a needle and thread, baste the sleeve openings.
- After removing the blank from the doll, carefully cut out all parts of the product and sew it along the side seams.
- Hem the bottom of the top by folding it under and stitching it on the machine.
- Fold the neck section of the top and machine stitch it.
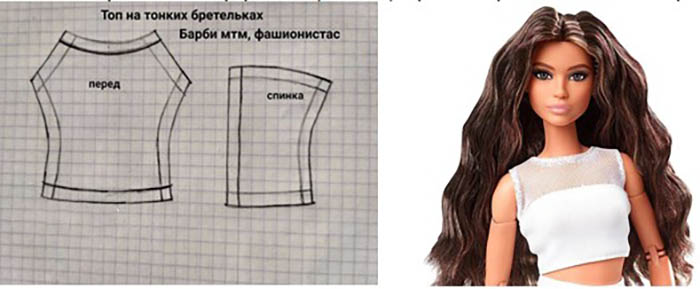
When using a pattern, you should:
- Transfer onto fabric and cut out the material.
- Place the resulting pieces together with the right sides facing each other and sew them together, joining the side and shoulder seams.
- After folding the fabric inward by 0.5-1 cm, you need to process the bottom and neckline.
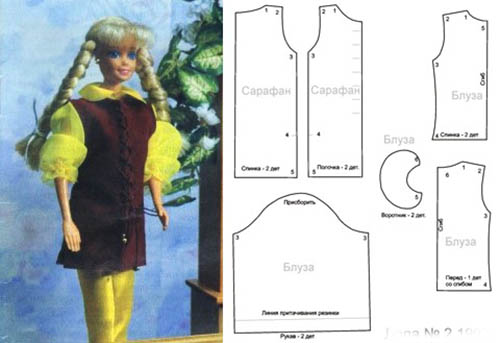
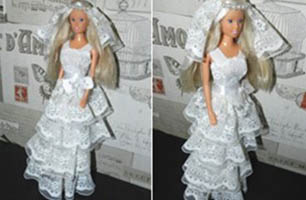
Wedding dress
A wedding dress for a Barbie doll can be sewn from white knitted material and decorated with lace, tulle and artificial pearls. To create the main product, you can use a sewing machine, and the decor should be sewn on manually with a back stitch, starting from the back of the dress.


When working on a dress, you need to:
- Place a piece of white knitwear measuring 70 x 50 m on the table and secure with pins to prevent the material from shifting.
- Place the doll on top of the fabric and use tailor's chalk (pencil) to trace her figure from head to toe, forming a sketch of a trapezoid dress and its auxiliary elements: neckline, sleeves.
- Using scissors, cut out 2 identical pieces from the main material and sew them together, joining the side seams (avoiding the sleeve area).
- Turn the finished outfit right side out, put it on the doll and adjust the length if necessary.
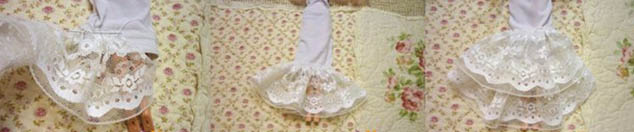
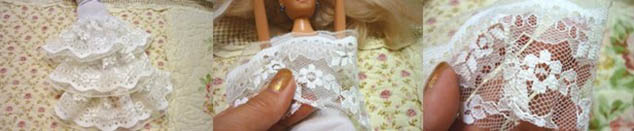
- Sew lace frills to the front side of the product, and to do this, take a thread with a needle, pre-sew the lace and tighten the thread, and then attach it to the bottom of the dress. You can sew lace frills on the doll itself.
- Stepping back 3 cm from the first row of lace, sew the second frill in the same way, and the third one above it.
- When decorating a dress on the chest, attach a small piece of lace to the top of the garment and make a fold (dart) under the chest, fitting the dress to the figure. In a similar way, you need to adjust the garment on the back, and sew the resulting darts.
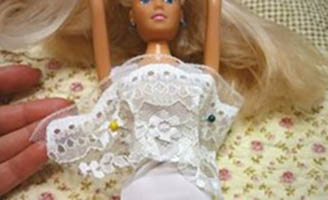
- To form a lace bodice, place a strip of white lace on the dress, pin it in place, and then sew it on, starting from the back.
- Sew the 4th tier of white lace onto the skirt of the outfit, and place a white satin belt cut from ribbon on top of it and decorate it with a bow.
- The doll's veil is made in the same way as the lace frills, and it can be decorated with a headband of artificial pearls strung on a thread. The number of beads should correspond to the diameter of Barbie's head.
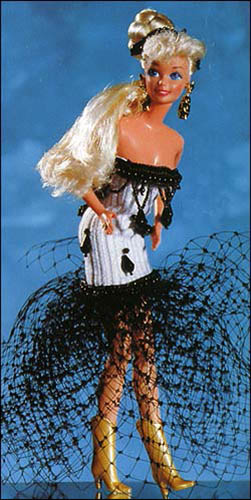
Cocktail dress
DIY Barbie doll clothes can include a variety of elegant dresses of varying lengths.
One of these is a black and white cocktail outfit made from:
- 25*25 cm piece of white jersey;
- 70*15 cm of black, transparent tulle;
- rhinestone for decoration;
- rubber vein.
During the work process you should:
- Cut out the fabric, cutting out the bodice from jersey and the skirt panel from tulle with parameters 65*10 cm.
- Turn the fold of the bodice to the wrong side and sew the product along the back seam.
- Connect the edges of the skirt panel, turning it into a ring, and then gather it along the top edge so that the bottom part of the product is 14 cm, sew it to the bodice, stretching it a little.
- On the seam allowance on the bodice, turned inside out, make a zigzag stitch so that the edge of the garment remains stretchable.
- Attach an elastic band to the top of the bodice, tie knots at the ends, and then hem them.
- Decorate the finished outfit with beads, sewing them on the top so as not to damage the elasticity.
Summer sundress
Summer sarafan for a doll is made of knitted fabric measuring 70*50 cm.
It is recommended to select threads to match the color of the product, and to create it you will need:
- Place the doll on the material and outline the silhouette of the desired model.
- Cut out 2 parts of the sketch (back and front) and sew them along the side seams, first leaving allowances for the sleeves.
- Fold and hem the neckline and bottom edge of the sundress.
- If desired, the finished model can be decorated with beads, complemented with a belt, straps or a halter collar fixed on the neck.
Barbie doll is a popular children's toy with an extensive, varied wardrobe. Knitted dresses, blouses and shirts can be sewn with your own hands on a sewing machine or by hand using patterns downloaded from the Internet, decorated with satin ribbons, beads or seed beads and allow girls to realize their imagination and craving for creativity.
Video about making clothes for dolls