Furniture for dolls made with your own hands has many advantages. You can choose the size, color and even decorate the entire room in one style. Furniture made with your own hands is safe, because it is mainly made from scrap materials. A finished product made of plastic can emit toxins that are dangerous to health.
Basic and additional materials
Materials suitable for creating furniture for dolls can vary.
| Name | Description |
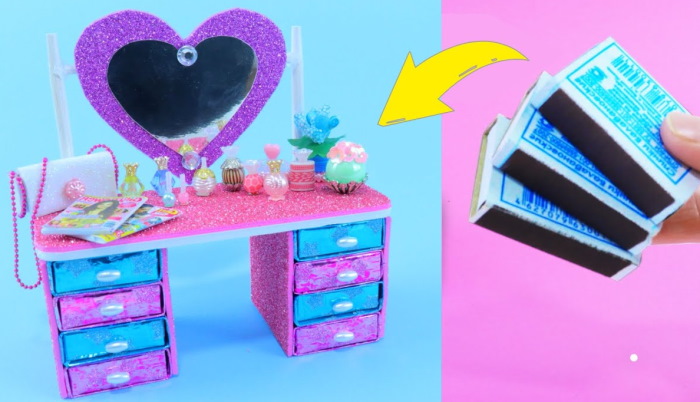
| Matchboxes | A budget option, sold in any store. The advantages of the product are in its design. The pull-out box is similar to a chest of drawers shelf. |
| Cardboard | They mainly use hard cardboard from under boxes from equipment. It has a dense texture and durability. The advantage of the material is the ability to create furniture of any shape and size. |
| Plastic bottle | You can make a hammock chair and many other interesting items out of it. |
| Plywood | The advantage is durability and high wear resistance. A significant disadvantage is that it is difficult to process plywood at home. |
In addition to the basic materials, you will need:
- Glue. They use hot glue, heated in special guns. PVA will not support the structure, because of which the furniture will crawl to the sides
- Scissors. They are used to cut out shapes. If you are working with plywood, they are replaced with a saw.
- Finishing materials. These include: fabric, foam rubber for stuffing, self-adhesive paper, beads. Furniture made with your own hands will have to be given a beautiful appearance. Otherwise, it will look unrealistic. The child will lose interest in it.
The glue can be replaced with scotch tape. Depending on the situation, use double-sided or regular.
Dresser
Furniture for dolls with your own hands It is easy to make if you think about its size and design in advance. People without experience in handicrafts are advised to start making the simplest options. The chest of drawers is just that.
A regular chest of drawers
To create a regular chest of drawers you will need:
- Matchboxes 10 pcs.
- Hot glue, tape.
- Scissors.
- Beads.
- A sheet of plain paper.
- Self-adhesive paper for finishing.
Sequence of actions:
- Matchboxes are emptied of their contents.
- The chest of drawers will consist of 2 sections. Therefore, the boxes are stacked in 2 piles of 5 pieces each.
- Heat up the glue gun.
- The boxes are glued together in one of the stacks. The binding material is applied to the wide part of the product.
- They glue the remaining stack of boxes together.
- Connect 2 stacks into one whole. Glue is applied to the side with sulfur.
- Cut out a shape from a sheet of paper that is suitable for covering the back wall of the chest of drawers.
- The paper is glued with tape so that it goes onto the side walls of the chest of drawers.
- Cover the chest of drawers with paper. Choose any: imitation wood, pink, brown. Cover the back of the chest of drawers with material. Since it is covered with a sheet of paper, the sticky layer will not prevent the shelves from sliding forward.
You should get a rectangle. The boxes are pushed forward, imitating shelves. The final stage is gluing beads. They will act as handles. One piece for each shelf. A total of 10 units will be needed.
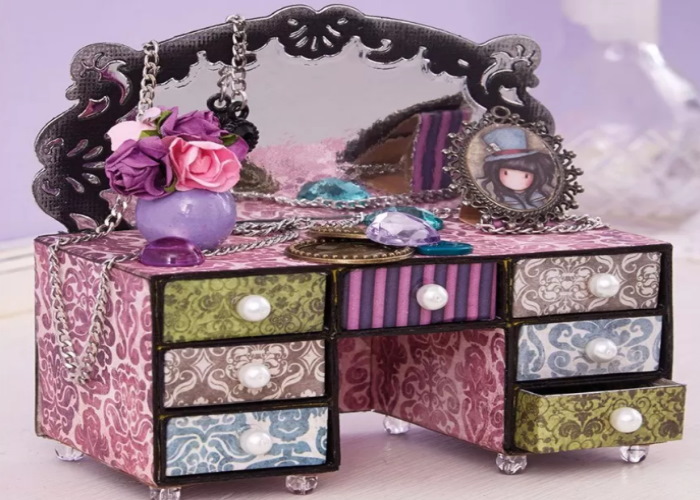
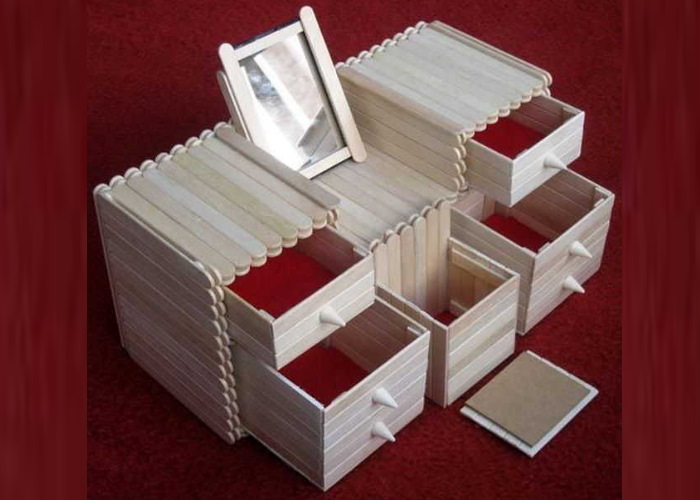
Chest of drawers with mirror
There is a possibility to make the chest of drawers more attractive. To do this, add a mirror. It is easy to do.
In addition to the basic materials (indicated in the master class "Chest of drawers") you will need:
- Small mirror without frame.
- Thick cardboard.
- Tape.
- White beads.
- Pencil.
- Thin wire.
- Foamiran or any other soft material.
- Wire cutters or scissors that can cut wire.
Sequence of actions:
- Repeat steps #1 through #6 described in the “Chest of Drawers” master class.
- Place the mirror on the cardboard and trace around it with a pencil.
- Cut the cardboard so that its length matches this parameter of the chest of drawers.
- Glue the mirror to the top of the cardboard that will protrude above the chest of drawers.
- Glue the bottom of the cardboard to the chest of drawers. The thick paper should cover the back side completely.
- Cut 3 pieces of wire. The size is from the bottom of the chest of drawers to the very top point.
- Glue the wire vertically at equal intervals along the entire back wall of the chest of drawers. It will act as a reinforcement for the structure.
- The back wall is covered with foamiran. You can buy a self-adhesive version of this material. If you don’t have one, use paper. But its thickness is not enough to hide the wire protruding behind the chest of drawers.
- The tape is glued around the circumference of the mirror.
- Cover the chest of drawers with foamiran or paper.
- Glue white beads around the mirror. They will imitate lamps. You will get a modern chest of drawers with imitation lighting.
If there is no mirror, it is replaced with a piece of foil. In this case, the wire is excluded. Strengthening the structure will not be necessary. The legs of the chest of drawers are made using beads. To do this, they are glued to the bottom: 4 units, 1 on each corner.
Closet
It is very exciting to make furniture for dolls with your own hands. This is a real creative process in which you can show your imagination.
There are no restrictions in the choice of materials: they use improvised means or boxes from various materials.
There are 2 ways to make a cabinet for dolls' things:
- From a ready-made box.
- From pieces of cardboard.
Each method has its own advantages.
Do-it-yourself doll cabinet drawings
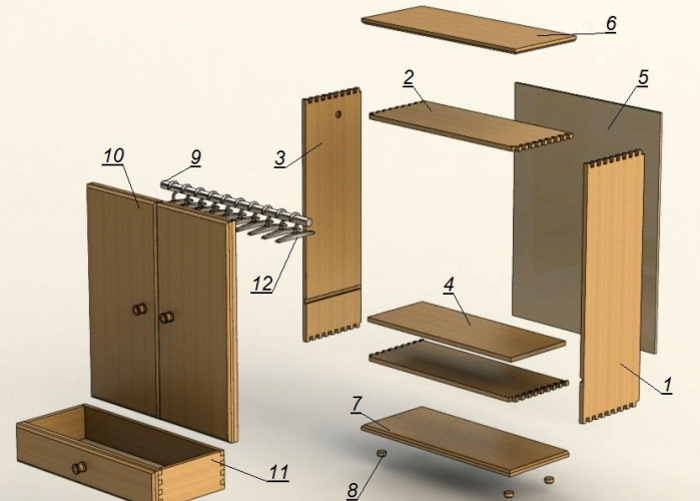
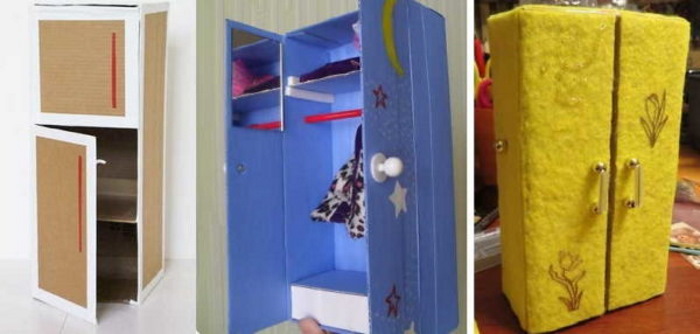
Wardrobe made from a cardboard box
This method is the simplest. You won't have to glue the base of the cabinet. It will be made from ready-made boxes. It is advisable to use products made of dense material.
To create a spacious closet, prepare:
- 2 boxes of Greenfield tea bags.
- Double-sided and regular tape.
- Cabinet finishing paper.
- 10 beads.
- Scissors.
- Tape.
- Cardboard for shelves.
- Long skewer.
- Glue gun.
Sequence of actions:
- Tea boxes are processed. Small sheets of paper need to be cut off so that they do not interfere with the opening and closing of the cabinet doors.
- The boxes are placed in a vertical position. The opening plates should close when closed and move apart when opened.
- Strips of double-sided tape are glued to the side of one of the boxes.
- The boxes are connected so that a single whole is formed. The result is the shape of a rectangular cabinet divided into 2 sections.
One half of the closet will have shelves, and the other half will have a bar for hangers.
Take the following steps:
- Take a skewer.
- They try it on one half of the wardrobe so that it lies freely across the box. They adjust the length with scissors.
- Heat up the glue.
- Beads are put on the ends of the already prepared skewer.
- Glue the skewer inside one section of the cabinet using the beads.
The crossbar is ready. It remains to make shelves in the adjacent section. To do this, cut out wide strips from thick cardboard. Their size is selected as follows: take the width of the cabinet section directly + 5-6 mm for bending on each side.
Then the edges of the strips are folded down. You should get a bench on low legs. It is for them that the shelves are glued inside the 2nd section of the cabinet. The quantity depends on your desire.
Instead of cardboard, you can use ice cream sticks. But you will need at least 10 of them. In addition, you will have to adjust the length with a file. This is a more complicated process, so it is not suitable for everyone.
After the shelves have been made, they begin to decorate the doors. Tape is used to cover their edges.
Next steps:
- The cabinet is covered with finishing paper.
- Beads are glued to the door. They will be the handles of the cabinet.
- Glue 6 legs (beads) to the bottom of the cabinet. 4 at the corners of the cabinet, 2 in the middle, where the seam from gluing the boxes runs. This is necessary to prevent the product from sagging.
The cabinet can be improved. To do this, take 2 matchboxes and glue them together. Decorate with finishing paper in the color of the cabinet. Glue the resulting shelf to the bottom of the section with a crossbar for hangers.
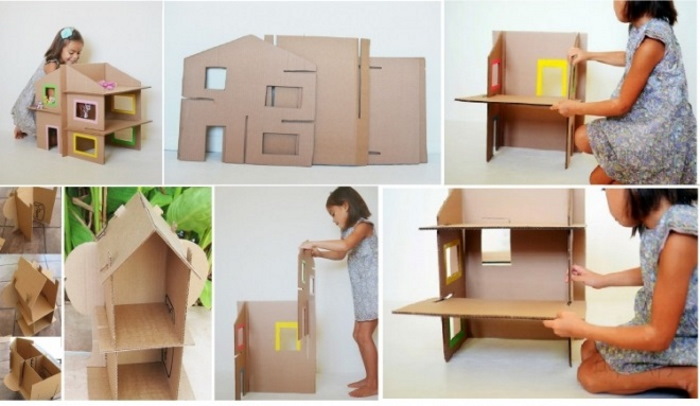
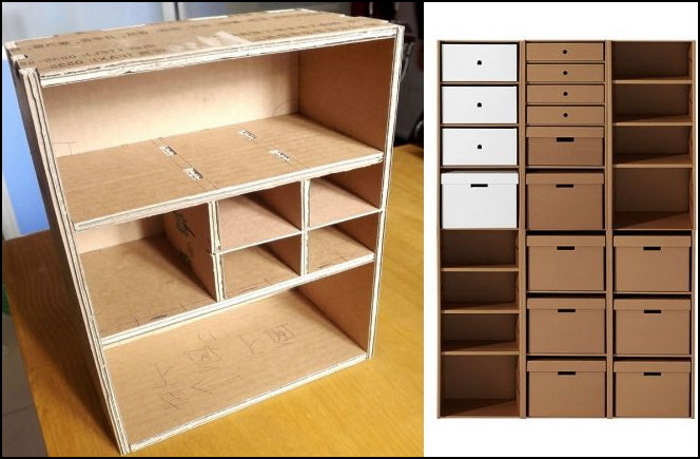
Cardboard Dollhouse
You can make your own doll furniture from cardboard. For example, if you have a large box from some household appliance, you can cut it into layers of paper and start making a cabinet.
Materials:
- Ruler.
- Cardboard.
- Scotch.
- Scissors.
The design is done according to the master class “Cardboard Box Wardrobe”.
Sequence of actions:
- Take a ruler and a pencil.
- A rectangle is drawn on a piece of cardboard. This segment will be the back wall of the cabinet. The size to choose depends on the person's wishes.
- Cut out the shape.
- On the cardboard, draw 2 equal rectangles - the side walls of the cabinet.
- Cut out shapes.
- Draw 2 strips - the top and bottom of the cabinet. Their length is the same as the back wall, and the width is the same as the side ones.
- Cut out the shape.
- Cut out 2 rectangles – cabinet doors.
Let's start assembling:
- They take the side walls of the cabinet and attach the doors to them with tape.
- The side walls are attached to the back plate with tape.
- They glue the top and bottom of the cabinet.
If necessary, glue all seams from the inside with hot glue or thin strips of transparent tape. If the cardboard has pictures, they can be hidden with finishing paper.
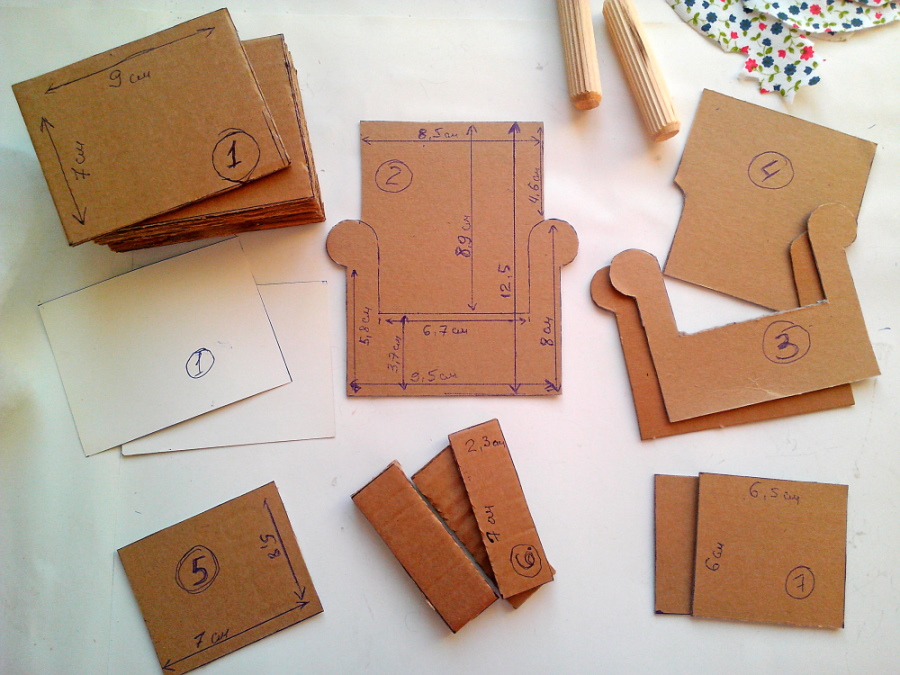
Armchair
You can even make furniture (chair) for dolls with your own hands from wire. A frame is woven from it. A decorative pillow is then placed on the metal. But for beginners, there is an easier option.
To do this, you will need to prepare the following materials:
- Sponges for washing dishes (new).
- Hot glue.
- Upholstery fabric.
- Scissors.
Sequence of actions:
- The frame of the future chair is made from sponges.
- Whole sponges are cut into 2 equal parts to make squares. They are stacked. If you need a high chair, take 3 squares. For a low one, 2 is enough.
- The height of the back and sides is adjusted using the sponges. You can trim it and experiment with the sizes.
- All parts of the chair are glued together using hot glue.
- All that remains is to cover the sponges with fabric so that the furniture acquires an attractive appearance.
The chair can be made from matchboxes.
To do this, proceed as follows:
- The boxes are glued together to form a chair.
- Cut a soft padding for the seat and back from the sponge.
- Soft material is glued to the seat and back of the chair.
- Matchboxes are covered with fabric or paper.
They make 2 chairs at once to create a set.
Sofa
Furniture can be made together with children. They will enjoy this process. The child is instructed to choose the fabric for the sofa upholstery. In addition to advice, children will be able to perform the simplest manipulations with cardboard or other materials at hand.
To create a doll sofa you will need:
- Thick cardboard.
- Scissors.
- Hot glue.
- Pencil.
- Foam rubber. Furniture grade of medium density will do. For example, brand ST 2236 10x1000x2000. It is suitable for handicrafts and furniture upholstery.
- Textile.
- Beads for sofa legs.
Sequence of actions:
- On cardboard draw the figures: back, seat, 2 handles. There should be 4 shapes. Their size is chosen based on the dimensions of the doll. It is important to consider - you should not make a long seat. The optimal option is 15 cm.
- Cut out each shape.
- Glue the foam rubber to the forms so that the cardboard is immersed in the soft material. If there is no glue, you can attach it with a stationery stapler.
- Each detail is wrapped in fabric, imitating upholstery. It is fixed with hot glue. It is not advisable to use a stapler. It will spoil the appearance of the product. If there is no glue, then you can sew on the fabric. A regular needle and thread in the color of the upholstery material will do.
- All parts of the sofa are connected, fastened together with glue.
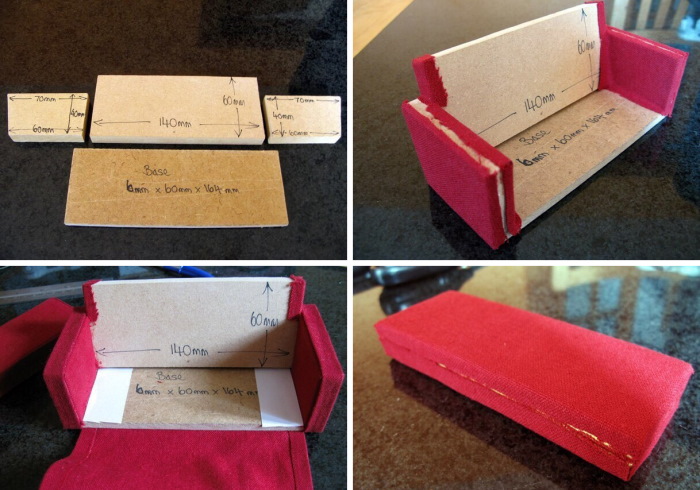
Legs are glued to the bottom of the sofa. Be sure to place 1 or 2 beads in the middle of the product so that it does not sag.
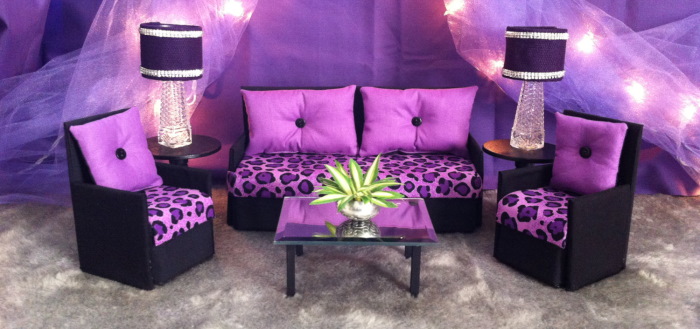
Upholstered furniture
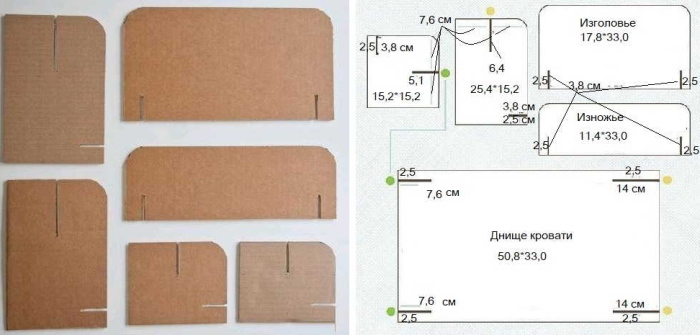
You can make any furniture for dolls with your own hands. The bed is no exception. If you wish, you can create a full-fledged bedroom set.
To assemble the bed you will need:
- Foam sponges.
- Thick cardboard (from boxes).
- The glue is hot.
- Scissors.
- Pencil.
- The wire is strong (you can use gerbera wire).
- Nippers.
- Upholstery paper.
- Textile.
- Beads for feet.
Sequence of actions:
- A rectangle is drawn on the cardboard – the bed of the future bed.
- Cut out 2 rectangles.
- Draw 2 strips on the cardboard, the same length as the bed. Make the width small. These strips will become the sides of the bed. In the furniture industry, they are called tsargi.
- Cut out strips.
- Draw the shape of the headboard and cut it out.
- A strip is cut out of cardboard to decorate the end of the bed at the foot.
- Heat up the hot glue.
- From the wire, cut 2 pieces of length equal to the diagonal of the bed frame form.
- Take 2 rectangles cut to create the bed frame. Glue a wire crosswise diagonally to one form. It will act as a reinforcement to the structure so that the bed does not sag in the middle.
- Connect two rectangles together so that there is a wire between them.
- The bed form is covered with finishing paper.
- Repeat step #11 with the forms for the headboard, footboard, sides and frame.
- Take the sponges and make a mattress out of them. Its size should match the bed frame. The excess is cut off with scissors.
- The sponges are glued together with hot glue.
- Wrap the mattress with fabric so that the seam is under one of its sides.
- The bed frame, headboard and footboard are glued to the bed frame.
- Beads are glued to the bottom of the bed. One must be fixed in the middle of the bed.
All that's left is to put the mattress on the bed and the bed is ready. You can make bedside tables for it. For this, use matchboxes, stacked in a pile. They will have to be glued together and decorated with paper.
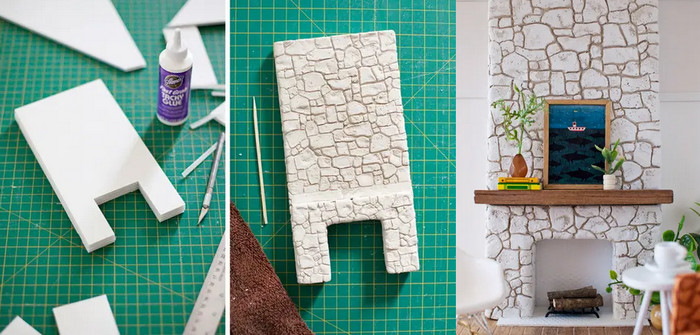
Fireplace
To create a fireplace, prepare the following materials:
- The glue is hot.
- Cardboard.
- Paints and brushes (with thin and thick bristles).
- A glass of water.
- Scotch tape is transparent.
- Scissors.
- The paper is white.
- Matches.
- A stationery knife or manicure scissors.
Sequence of actions:
- The back wall of the fireplace, its sides, bottom and top are drawn on cardboard.
- They cut it out.
- The front wall is cut out to the same size as the back one.
- An arched opening is made in the front wall. This will be the firebox connector.
- All parts of the fireplace are glued together.
- The inside of the fireplace is painted black.
- The outside of the fireplace is covered with white paper.
- They paint it brick-colored.
- Using a fine-bristled brush, paint the outlines of the bricks with dark paint.
- On copper or bronze colored paper, draw a fancy front grille for the fireplace. The image can be based on a picture of a forged product.
- Using a stationery knife or manicure scissors, cut out the lattice.
- The grille is laminated using adhesive tape.
- They glue the grate near the hole in the fireplace.
- Matches are broken and placed inside the fireplace. They will imitate firewood.
Instead of matches, you can draw a flame and stick it to the back of the grate, inside the fireplace.
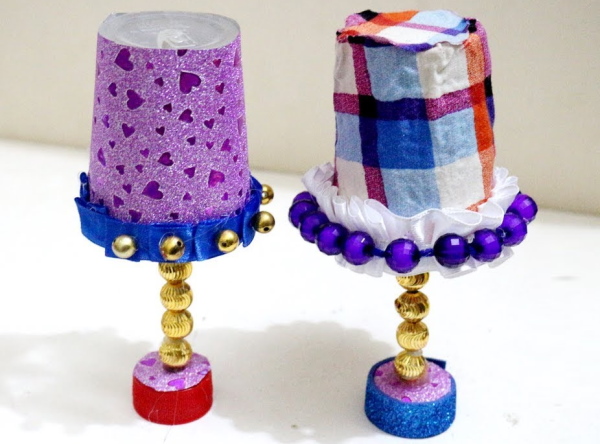
Shade
A lampshade is an interior item that will make a dollhouse more comfortable.
To create it you will need:
- Chupa Chups lollipop stick.
- A plastic cap from any bottle.
- Thick awl.
- Lace.
- Hardening modeling paste.
- Scissors.
- The glue is hot.
- Nippers.
- Lighter.
- A piece of white or any other color for the lampshade.
Sequence of actions:
- A cone is made from cardboard.
- They glue it so that the cone holds its shape well.
- The sharp top is cut off. The resulting lampshade is put aside.
- A hole is made in the middle of the cork for a Chupa Chups stick. To do this, the tip of the awl is heated over a lit lighter. This can also be done over a gas burner.
- Insert the stick into the hole in the cork.
- The modeling paste is used to fill the space inside the cork, packing it tightly.
- The cork and the stick are coated with modeling paste so that everything looks like a single whole.
- Leave to dry.
- The lampshade (a cardboard cone) is covered with lace.
- The hole in the cone is covered with fabric.
- They put a cone on a stick.
You can place the finished lampshade in the dolls' bedroom.
Do-it-yourself bed
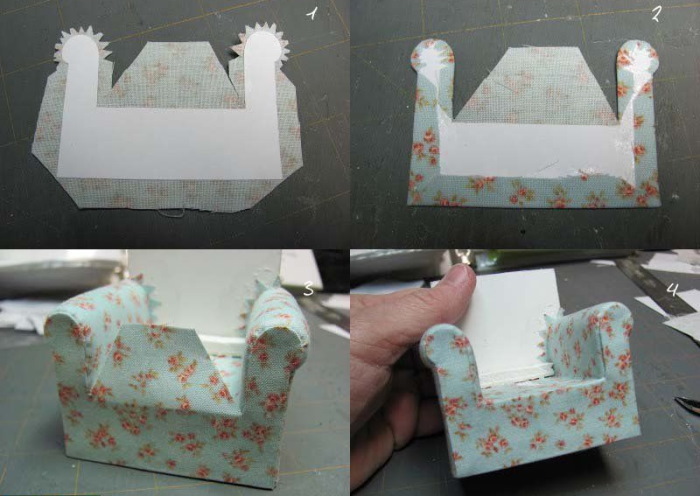
Pouf for Barbie doll
An ordinary toilet paper roll will become the base for the pouf. A few additional details are enough and the new piece of furniture will be ready to decorate the room.
Materials:
- Needle.
- Cardboard.
- White lace.
- Toilet paper or paper towel roll, 6 cm in diameter.
- Decorative braid.
- Pink fabric.
- Ruler.
- Scissors.
- White lace.
- Threads.
Sequence of actions:
- The excess is cut off from the sleeve, leaving a cylinder 6 cm high.
- Cut a circle (6 cm in diameter) out of cardboard.
- A circle with a diameter of 10 cm is cut out of pink fabric.
- The seat for the pouf is made from foam rubber.
- A circle is cut out for the foam rubber, which will cover the hole in the sleeve.
- Connect both parts, fixing them with glue.
- The seat is covered with pink fabric, securing everything with a running stitch.
- The sleeve is covered with pink fabric.
- Lace is secured in a circle at the top of the sleeve.
- The seat is glued to the sleeve.
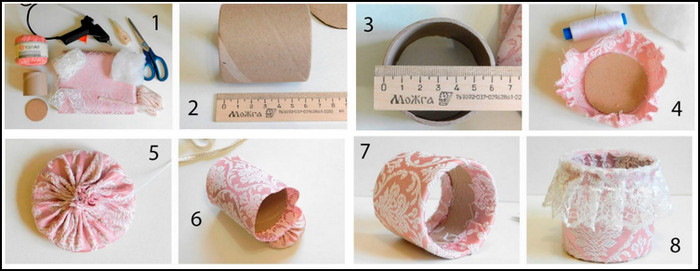
All that remains is to hide the joint between the seat and the bushing with tape.
Useful tips
For those who are going to make doll furniture with their own hands, it is important to consider the following points:
- Stores often have a large number of cardboard boxes left over. You can ask the seller for permission to take 2-3 pieces. This amount is enough to create a full bedroom set and kitchen (the size of furniture for Barbie dolls).
- It is better to use natural fabrics or fabrics with a small percentage of synthetic additives for finishing furniture.
- It is better to replace regular glue with hot glue. It bonds cardboard parts more reliably.
- You can give furniture the appearance of a wooden product using special paper. You can buy it at a hardware store (for example, at OMA).
- You can buy floral wire in the handicraft department. It is easy to work with. For example, a forged fence for a fireplace is made from wire.
- If the product needs to be given a bronze or iron shade, then spray paint is used. To do this, spray the contents of the can onto the finished product in the open air. One layer is enough.
- If you are going to paint a cardboard product with paint, then use thick materials. A liquid base can make the paper soft, and because of this it will lose its shape.
Furniture for dolls made with your own hands will last a long time. The main thing is to use dense materials. Soft cardboard and paper are excluded. If the size of the doll is larger than the standard Barbie, then plywood is used.
Video on how to make furniture for dolls
A detailed video on how to make a pair of soft chairs for dolls from cardboard rolls and scrap materials! Very simple and accessible to everyone.