Crafts made from chenille wire are becoming very popular. Both adults and children enjoy creating small fluffy masterpieces from the fuzzy stick. The colorful multi-colored palette of the material makes it even more attractive.
What is chenille wire
Chenille wire is a fluffy cord twisted from several fibers. Between them there is a row of short thread ends (villi) that stick out in different directions.
It can have different lengths, hardness, pile widths and thicknesses from 4 to 15 mm. In domestic retail outlets, there is mainly a spiral no more than 5 mm. Other sizes can be ordered in an online store, where they offer packages with 20-100 multi-colored pieces.
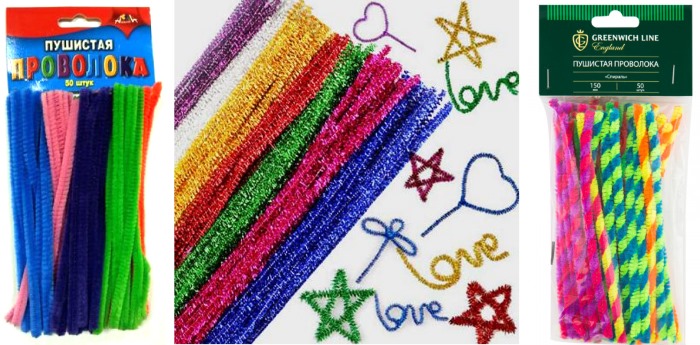
This is a universal material that is widely used in many types of applied art. Chenille has long been used as a pipe cleaner. And only recently it was invented to paint it in different shades and use it for creativity.
Features of working with wire
The wire is fairly easy to work with, it is reusable, and one of its advantages is that the chenille holds its shape well.
Some features of working with a fleecy cord:
- fluffy flexible stick - a fragile material that is not recommended to be bent intensively;
- The ends of the shaggy wire are sharp. If children work with the raw material, the ends should be bent into loops. Before a child takes the chenille, for safety reasons, it is necessary to feel the entire working piece;
- you can connect parts or glue them together using PVA or silicone glue;
- At first, let the child try to form rings from colored material, bend the corners and twist 2 pieces together;
- the fleecy wire is easily cut with scissors;
- The fluffy stick can be used several times.
To give the chenille cord the desired configuration, cylinders and pencils are used.
Craft ideas for kids
Even children can make crafts from chenille wire.
List of the simplest products:
- Making spirals. To do this, a shaggy cord of 1 or 2 shades must be wound in a spiral around a pencil or finger. In this way, you can make various animals, Christmas trees, caterpillars or snakes.
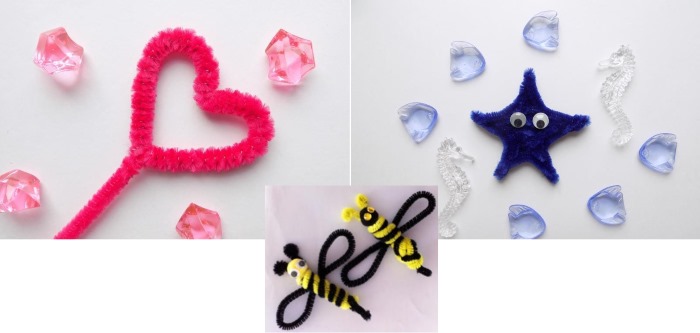
- For starfish You need to take a piece of gimp and form an irregular star shape out of it. Finally, glue on the toy eyes.
- To create a heart you need to bend the red fluffy piece so that one half is longer (for the holder). Then form a heart from 2 lines, fix the short edge at its base. The remaining part of the stick will serve as a handle.
- As a body for a colorful peacock You need to take a pompom, thread the wire paws and neck into it, and stick in colored pieces of chenille for the feathers. Make a crown out of a fuzzy cord and attach toy eyes.
- Bee is created by interweaving shaggy black and yellow thread. The selected shades should be twisted together to form a bee body. Wings and antennae are made from the dark section. Beads can be glued on instead of eyes.
How to make a spider
A cute spider can be used to decorate curtains or a lampshade.
The craft can be made step by step by adults and children:
- Take 4 orange colored shaggy wires and twist them together at the center point to form a ring.
- Straighten the ends of the resulting configuration and form them into long paws.
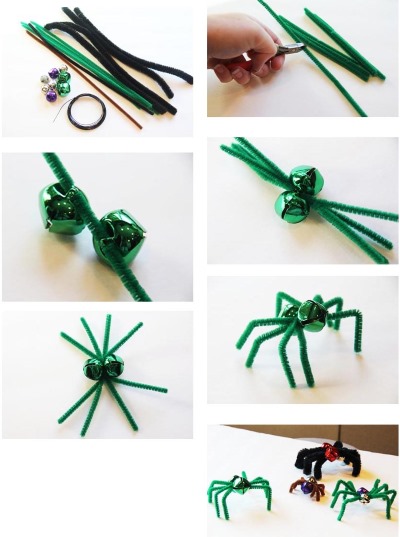
- Twist a piece of black thread into two balls of different sizes. The smaller one will serve as the head, and the larger one will become the body.
- Attach the dark shape on top of the orange piece.
- The ring can be put on your finger and the spider will stay on your hand.
Ladybug
Crafts made from chenille wire are popular for developing creativity in children.
To make a bright ladybug, you should follow the following technology:
- Twist the end of a fluffy piece of black wire into a tight spiral to form the head of the insect.
- To make the insect's legs, you should make 2 folds. This will make 1 half of the body. Then make a large bend and continue making 2 legs on the other side.
- Fix the end of the chenille on the neck under the bug's head. To do this, wrap the remaining piece of material around it.
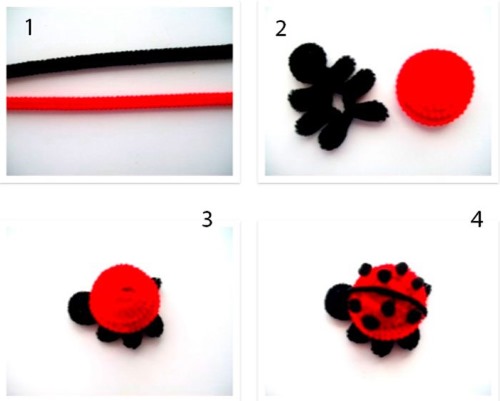
- Make wings from a red shade. To do this, wrap a 30 cm long fleecy cord around completely to form a circle.
- The result should look like ladybug wings.
- Slightly lift the central point of the circle from below to create volume. Fix the tip.
- Apply the resulting configuration to the back of the insect.
- From a small piece of black material, form a vertical line on the wings for demarcation. Fix both ends from the inside to the base of the body.
- Black specks on the red wings can be decorated using bead halves, which need to be glued over their entire surface. Eyes can be made from glossy white beads.
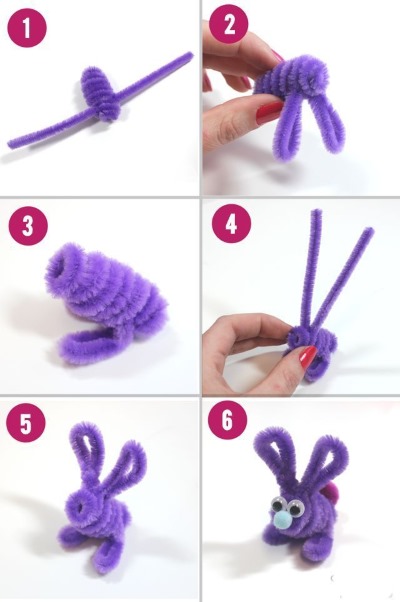
Puppet doll
Step-by-step technology for making a puppet doll:
- Wrap lilac-colored chenille around a pencil, then remove it to create a spring.
- Attach a pink pompom to one end of the spiral, this will be the head. Glue plastic eyes to it.
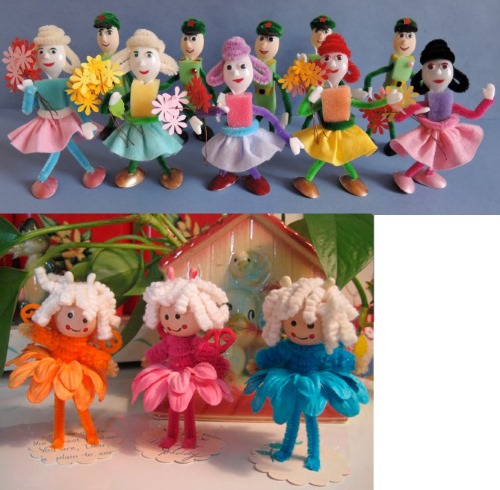
- Roll a small ball from the purple shaggy cord. Pull it out slightly with your hands and glue it as the ostrich's beak.
- Attach another pink pompom to the other end of the spiral.
- Form 2 more lilac springs and attach them to the second fluffy ball on 2 sides so that the blanks are facing down. Attach large shiny beads to their bottom for the legs.
- Attach feathers and a tuft of multi-colored feathers to the sides of the lower pompom and to the back of the upper ball. Also attach a colored tail.
- Take a fishing line (about 40 cm) and cut it into 1 pieces. One piece should be slightly shorter than the other. Then fix them on the ends of a thin long stick.
- Tie a short thread to the ostrich's neck and a long one to the junction of the tail and body.
- To make the puppet move, you need to hold it by the stick and direct it in the desired direction.
Dragonfly
Crafts from chenille wire are easy to make, even if you don’t have any special skills in working with this material.
By following the step-by-step master class, you can easily make a dragonfly:
- For the wings, fold the yellow chenille into a circle and secure the ends.
- From a blue fuzzy stick, make another circle and place it in the yellow blank.
- In a similar way, make another similar configuration. Flatten the resulting figures, and the wings of an insect should come out.
- For the body, take a lilac furry piece and string 2 beads on it; these will be the eyes of the future dragonfly.
- Bend the terry cord in half and twist its ends. This will be the body of the future representative of the fauna.
- Fold the lilac piece in half and insert the previously created pairs of wings inside.
- Pull the wings towards the front part, and additionally twist the back segment of the purple thread.
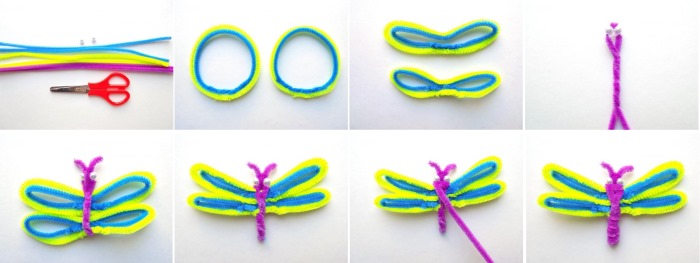
- Take another lilac chenille to create the body of the insect.
- Wrap this fluffy flexible stick around the body, securing the wings at the same time.
Snail
Step-by-step formation of the snail:
- To form the main body of the mollusk, you need to take 1 piece of yellow (or any other color) chenille and bend it in half.
- From the right edge, you need to twist the tip several times into a loop to form a small tail.
- The horns will be located on the opposite edge. Take one end of the shaggy cord and twist it carefully. Make several twists and put the workpiece aside. Design the second horn of the animal.
- Step back a small distance from the horns and twist 2 strips of chenille together twice.
- Then again step back from the intended point a small distance and again twist the original yellow material 2 times.
- Divide 2 strips of fleecy cord in 2 places to create gaps.
- Give the furry craft a shape and make it stable.
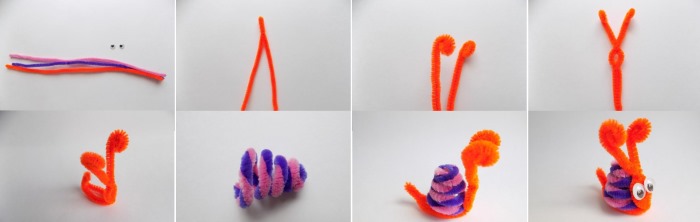
- To form the shell, you need to prepare identical fluffy sticks of 2 shades.
- At the end, twist them together in a spiral. You should get one multi-colored segment.
- After this, wind the workpiece tightly around your finger, and then carefully remove it, pressing the circles of the spiral against each other.
- You should get a shaggy spring that will serve as a house for the snail.
- The shell should acquire a conical shape, and therefore the workpiece should be slightly deformed. To narrow it, the upper section should be tightly wrapped, and the lower part should be unscrewed to expand it.
- Finally, you need to bend the finished piece and press the lower narrow segment to the upper part.
- Take the 2 created elements and insert the lower edge of the shell into the gap of the body. Twist and fix the wire.
- For the animal's muzzle, take a small yellow piece of chenille and 2 black beads, which should be put on the wire ends. The right edge of the fuzzy cord should be bent up to the left side, and the other edge should be bent the other way. Pass through the small hole for the face.
- Bend the ends at the bottom and top to secure the configuration.
Butterfly
To create an attractive butterfly you will need the following amount of fluffy chenille:
| Shade | Quantity |
| pink | 1 |
| blue | 3 |
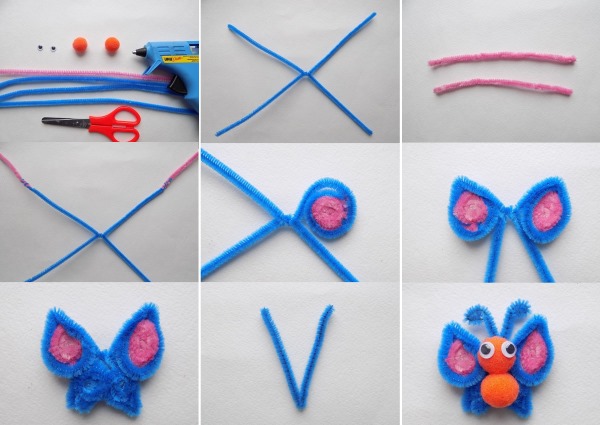
Butterfly manufacturing technology:
- Form symmetrical wings from 2 parts of the same tone.
- The third segment should be folded in half, while braiding the wings with it. This blank will serve as the body.
- Bend the ends of the central part to the sides, these will be the antennae.
- Glue plastic eyes to the top of the body.
You can decorate a pencil with a butterfly-shaped figure. To do this, you need to follow these steps:
- Attach a small pompom to the blunt end of the stationery.
- Cut the green chenille into 2 pieces, place one of them near the ball and the other a little lower. Wrap each piece 1 row around the handle.
- Bend the tips of the upper wings towards the tool and twist them into rings.
- Repeat the same manipulations with the lower stick.
- At the base of the pompom, secure the end of the lilac cord and wrap it around the pencil and the base of the wings.
- Form a mustache from yellow thread. To do this, twist a short piece into the middle on both sides.
- Attach the finished antennae to the top of the head.
- Glue plastic eyes with pupils to the purple balloon.
Caterpillar
A child can create a simple caterpillar with his own hands.
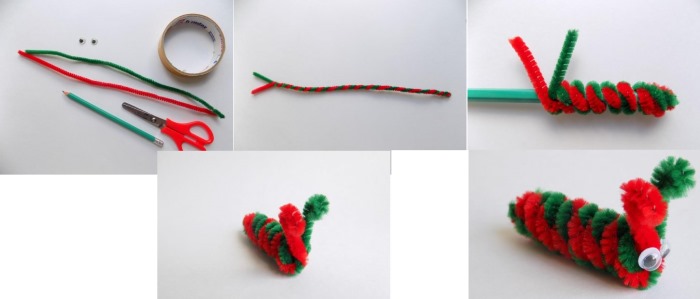
Step-by-step master class on how to design a larva:
- Take 2 coat sticks of different shades and twist them together. Finish twisting, leaving 4-5 cm to the end (they will be needed for weaving the antennae of the insect).
- Place the pencil in your left palm, with the lead facing the right. Then the pre-twisted fuzzy wires should be wound onto the stationery. This will form the body of the larva. It is advisable to narrow it slightly at the end, so the process of weaving the spiral should be completed on the lead.
- Turn the formed mustache slightly to the side, shaping it in the head area.
- The upper part of the antennae needs to be curled slightly.
- For the eyes, you need to glue small pieces of double-sided tape to the side of the pre-prepared plastic eyes and attach the blanks to the head.
Flowers
Crafts made from chenille wire can be presented in the form of flowers.
Master class on making the simplest flower:
- Twist the yellow chenille onto a regular pencil, making sure that each turn is tightly placed next to each other. Small straight pieces should be left along the edges of the fluffy cord, which will be needed to attach the inflorescence to the stem.
- Remove the spiral from the stationery item.
- You need to put a red bead on the green fuzzy thread, placing it in the middle.
- To create a stem, bend the ends of the green wire together.
- Place the formed spring around the scarlet center, holding the free edges with your fingers.
- Using one end of the emerald chenille, you need to secure the yellow inflorescence to the stem.
- From this same green furry stick you should form a leaf.
- Bend the remaining end of the wire upwards, then twist it and form another leaf.
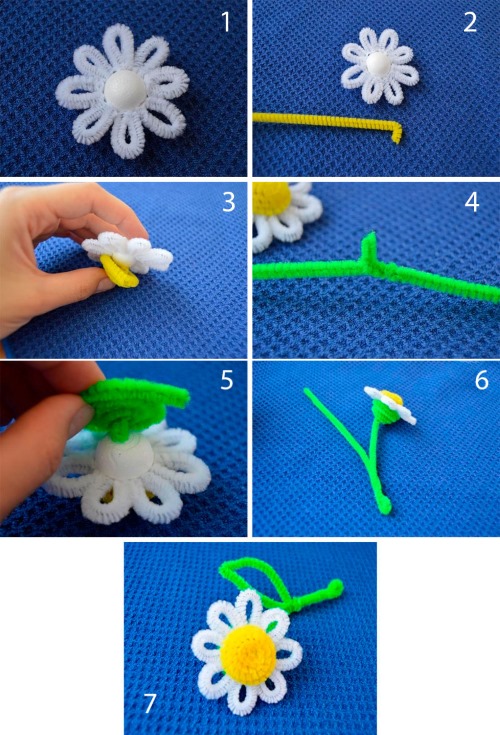
Step-by-step production of chamomile:
- Twist ½ of the yellow thread into a small circle. Make 2 such blanks.
- Cut 2 white fluffy sticks in half, roll each one into petals, and twist the ends.
- For the stem, you need to cover the skewer with green tape.
- Attach the formed petals symmetrically to the yellow core using glue.
- Coat the green stem with glue and insert it between the yellow cores.
Animals
Several master classes on decorating animal figures:
- To make a chick, you need to wind a shaggy cord around your finger or a cone-shaped blank. Attach a yellow pompom as the head. Form wings from another piece of chenille and insert them into the twisted spiral. Bend two small pieces of red thread at a right angle to make a beak and comb. For eyes, attach beads or ready-made parts.
- The base for the hare should be made by winding a fuzzy stick onto a cone. For the head, you need to attach a silver pompom. Form the ears from a single piece of chenille and glue them to the head. It is recommended to make the cheeks from a piece of fluffy cord in the form of a figure eight and glue them. Beads are suitable for the eyes.
- For the main part of the fox, you should wind a shaggy wire around a pencil, leaving a small section. From it you need to form a tail in the form of a drop.
For the paws, bend the pieces of chenille wire on both sides to add volume and bend them a little more at the bottom by 90 degrees to form the feet. Put the paws on the prepared base. Attach the pompom-shaped head to the main part. Glue 2 ears made of chenille, a nose (a bead or a small piece of wire) and plastic eyes to it.
DIY Toys from Chenille Wire and Pom Poms
Crafts are made from chenille wire and pom-poms.
Kids will love the soft cockerel, which is decorated in the following sequence:
- Two yellow pom-poms need to be fastened together with a small piece of fuzzy cord of the same shade, to make the body.
- Before screwing in, coat the ends of the furry stick with glue.
- From a whole piece of gold-colored wire, form the paws.
- Use orange chenille to make the beak and comb.
- Using glue, attach all the parts to the body.
- Finally, attach the plastic eyes.
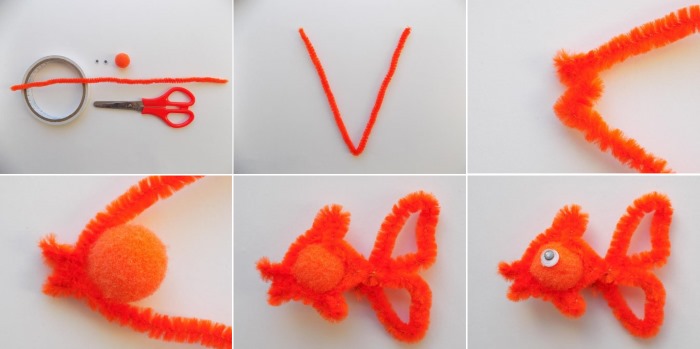
Master class on making a fish from pompoms:
- Take an orange-colored coat stick and bend it in half so that the middle will be visible.
- Next, you need to form the outline of the sea creature.
- At the bend point, you should create a mouth, then insert an orange pompom.
- In the upper half, the dorsal fish fin needs to be made from shaggy wire, and in the lower section, the pectoral swimming organ needs to be made.
- Twist the ends of the chenille together.
- The twisted ends need to be formed into a tail. To do this, bend the wire and give it the required configuration.
- Finally, use double-sided tape to attach the plastic eyes.
Unusual figures and toys made from chenille wire
You can make unusual crafts from chenille wire.
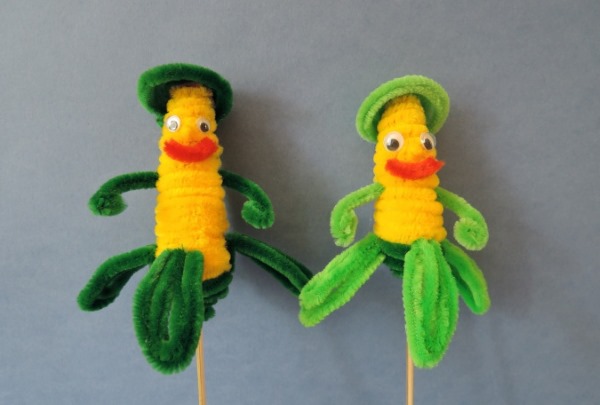
Master class on making corn men:
- From the fluffy yellow cord you should create a spiral, and its top should be narrower than the bottom. This will be the body of the corn.
- To form the headdress, you need to roll a green overcoat stick into a spiral, and for the skirt wedges, roll 3 pieces of the same color several times in a circle, then press the piece with your fingers to lengthen it.
- Attach the skirt blanks to the body with glue and put a cap on the top.
- Finally, you need to glue on plastic eyes and a mouth made of scarlet chenille.
- For the hands, you need to cut the green thread into 2 equal parts and twist the ends into the shape of palms.
- A ball rolled out of wool will serve as the nose.
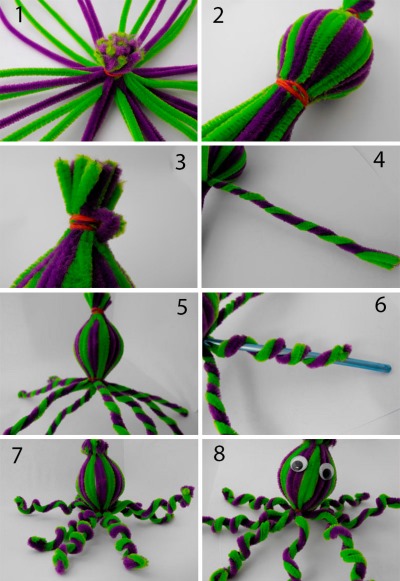
Step-by-step production of an octopus:
- Take a lot (more than 10) of coat wires of any color.
- Connect all the cords into a bundle and twist them in the middle.
- Spread the pieces out in all directions and wrap them around a ball (plastic, paper or wooden). Secure the craft at the base of the ball with an elastic band.
- To form tentacles, you need to twist several pieces together and bend each tentacle upward.
- Finally, glue on plastic eyes and decorate with a ribbon bow.
It is fun and easy to create crafts from bright chenille wire with your own hands. This simple handicraft will help you relax and take your mind off your worries. It is pleasant to work with this material, and if something does not work out, you can disassemble the product and start creating in a new way.
Article formatting:Natalie Podolskaya
Video on making crafts from chenille wire
Crafts from chenille wire: